User Management
Introduction
This book will explain about the permission levels and segregation that senhasegura offers to ensure that users have access only to the operations and data that are pertinent to them.
See also how a workflow of approvals is configured, allowed schedules for performing tasks, use of external authenticators, integration with ITMS systems and use through emergency access.
Understand how to track information usage and operations performed, through audit reports.
Symbols used in this cookbook
This book uses the following symbols to highlight information that should be taken into account for the best use of senhasegura :
Info - useful information that can make the use of the solution more dynamic
Caution - actions and items that cannot be ignored
commands: data that must be entered in the same way as described in this book- URLs : paths to access web pages.
<KEYS>: keyboard paths that will be used to perform actions.
senhasegura Access Control Layer
The senhasegura Access Control Layer is based on permission roles.
senhasegura provides roles that make it easy to grant superpowers to administrators and the technical functions for different user types.
When the user has access to a module or has permission to act, the senhasegura has validated that this user is associated with a role that grants him these powers.
A role can give the user the following powers:
Which modules it can access;
Run procedures related to the module;
Which module features the user can list;
View details of a record related to the module.
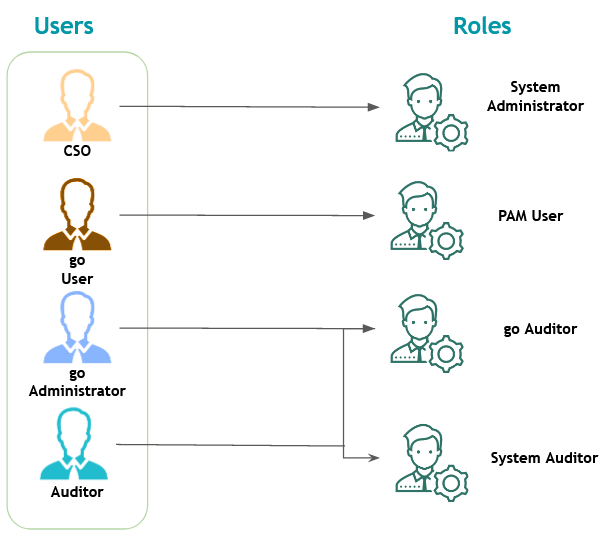
Imagine that a user can query all credentials and devices registered in the senhasegura but cannot register new ones or delete existing ones. You will need to watch and assign the user the correct permissions to avoid abuse of privileges.
Since some operations apply to particular user profiles, which makes direct assignment difficult, the senhasegura provides a list of pre-registered roles with access models that enforce the principle of least privilege.
That is, each role will receive only the permissions that match its responsibility, as in the image usr-sistema-00151

Each Role is named as a position of responsibility that a person has.
By assigning permissions to the Role and later assigning these roles to a user, we can easily manage the operations of the senhasegura using only the 25 Roles that senhasegura provides in its default installation.
The administrator links users to the desired roles so that the user has access to the relevant modules, screens, and operations.
Default Roles
Now that you are aware of how the entities that make up the senhasegura access control layers work and are related, let's introduce the 25 standard senhasegura roles.
Go to the Settings ➔ User Management ➔ Roles menu and click the Details action button to check which permissions each role has.
System Administrator: Administrative access to all modules and Orbit;
System User: Basic user with access to all modules;
System Auditor: Access for auditors to all modules;
Read only: Read-only access to all modules;
DSM Administrator: Manages all the features of the DSM module;
Cloud Administrator: Manages all the resources of the Cloud module;
Information Administrator: Manages all information resources;
Behavior Administrator: Manages all User Behavior parameters;
Domum Administrator: Manages all Domum parameters, groups and suppliers;
Domum Operator: Responsible role for requesting access for employees and third-party users;
Domum Operator - Third: Responsible role for requesting access for third-party users;
Domum Third-party user: Third-party workspace;
Task Manager Administrator: Manage all features of the Task Manager module;
Executions Administrator: Manage all resources of the Execution system;
go Administrator: Manage all senhasegura.go system resources;
go Auditor: Auditor's access to the senhasegura.go system;
Scan Discovery Administrator: Manage all Discovery features;
Certificates Administrator: Manage all features of the Certificate Manager module;
Certificates Approver: Role responsible for approving a request related to the Certificate Manager module;
Certificates Operator: Responsible role for requesting actions related to the Certificate Manager module;
PAM Administrator: Manages all PAM resources;
PAM Operator: Manage PAM resources such as devices, credentials, session and access control parameters;
PAM User: Default PAM user, able to see credentials and start sessions;
PAM Auditor: Auditors' access to PAM;
PAM Approver: Role responsible for credential and session approval;
Creating new roles
Attention! The senhasegura update process will automatically update the roles and permissions set in the default installation. The upgrade will not alter the Roles that the administrator has created! It's up to the administrator to constantly review the user and custom roles to ensure the correct assignment of powers.
Creating new roles can increase the risk surface since a small error, such as one too many permissions, can give a user more power than they might otherwise have. That's why senhasegura provides roles according to the most common user types. If possible, use one of the 25 pre-registered roles and avoid creating new ones.
The roles delivered by senhasegura roles are adequate for the administrator to distribute them to users. But sometimes, it may be necessary that a user receives less access than the registered roles offer.
An appropriate division of responsibilities is reflected in the access privileges granted to users becomes necessary for the proper, efficient, and secure execution of the activities of the senhasegura . For this, we use the concept of Segregation of Duties (SoD).
Let's use as an example a consultant who needs to look only at the operational reports of the module Certificate Manager without being able to perform actions.
In this case, we do not recommend that the roles System Administrator, Certificates Administrator and PAM Auditor be assigned. This would be a great risk for the company, as it would grant you more access than necessary.
We will then create a new Role for this user.
Go to the menu Settings ➔ User Management ➔ Roles to list the registered roles;
Using the report action, go to the registration form and register a new role called Certificate Audit.;
Describe the purpose of this role;
Go to the Permissions tab;
Add the permissions that this role can perform. You can filter permissions by: Type, Module and even description. In the case of this example, the permissions that will be added are:
CertificateManager.Dashboards.View: View Certificate Manager dashboards;
CertificateManager.Reports.List: Lists all reports and events related to certificates;
CertificateManager.Reports.View: View all certificate-related reports and events;
For permissions to be granted correctly, pay attention to the type of each:
List: Permissions to listing in reports;
View: Permissions to displaying operation details;
Write: Permissions for configuring, registering, and changing system records;
Delete: Permissions for inactivating system records;
Action: This type concentrates actions of administrative operations specific to each module.
On the Users tab, add the users that should be associated with this role. If the user you want to associate is not yet created you can skip this step.
Click Save
Cloning existing Roles
You can also create a new Role based on an existing one. At the Roles report, every record has a Clone action. Clicking on it, senhasegura will create a new Role record based on the choosed record. This new Role can be edited by the administrator adding or removing permissions and users.
A cloned role will not inherit users linked to the originating role.
User Registration
To create a user, click on the quick action button User, and on the screen will appear the following steps:
Set a username. This name is the user representation on the other screens;
Set the username;
Into the password field:
Leave password field blank if the email service was defined; or
Manually enter the password while the email service is not defined;
The field Ignore two factor authentication? indicates if this user have no obligation to register and use 2FA OTP token when using the senhasegura . This field is not available if the current user is trying to change their own account.
Confirm that user status is active in the Status field;
Confirm that administrator user has access to Orbit through the Access to Orbit field;
cautionBe careful about accounts in charge to manage the Orbit Portal. Do not grant without concern a user to do this. Orbit Portal has many services control's. See the Orbit documentation for more details.
On the Roles tab, select the roles that should be assigned to this user. As an example, suppose this user should only consult credentials and perform remote sessions, in this screen, the role PAM User should be added.;
cautionIt is possible to add more than one role to a user. However, the administrator must be careful that the roles added do not conflict with the user's activities, giving them higher powers than their responsibilities.
On the Access Groups tab, select the access group the user will be part of, that is, the limit of credentials the user will be able to interact with.
Save user with Save button;
It is now necessary to perform this user validation. Ask the user who owns this account to access senhasegura and log in first. They will be prompted to change the temporary password in compliance with the default security criteria.
Forgetting a user
senhasegura provides a mechanism to guarantee the right to be forgotten, by being notified by a user that he wishes his data to be removed from the application.
Besides if requested by the user senhasegura can provide a complete report of the data that has been collected from him like:
Name
Telephone
E-mail
List of accesses with IP, browser, location and time.
This report can be extracted as an action from the user's screen.
Whenever a report is issued or a user is forgotten alerts are sent to Syslog and e-mail notifications can also be registered.
To forget a user go to Settings ➔ System users ➔ Users in the line of the user you wish to forget, go to the Action column and choose Forget user.

Import Users
To import users to senhasegura , go to the menu: Settings ➔ System users ➔ Batch import.
Click the Choose File button to select the file to import and select the desired file and click the Open button.
Click the Import Users button to complete the import.
Import spreadsheet templates can be obtained by clicking on the With Users buttons, for a template with example users and Empty, for an unfilled template file.
Tokens
Any user can configure his own account to use two steps authentication. You can also force all users to use it at specific actions.
You can see how many users is using two steps authentication, and either cancel tokens, under the report Settings ➔ Authentication ➔ Multi-factor authentication.
Inactivating a user
To inactivate a user, see the following steps:
Go to the user's report on: Settings ➔ System users ➔ Users;
Filter the report with the desired filtered and locate the registry of the user you wish to inactivate;
Click on the action button Change;
In the user's form, change the key State to Inactive;
Save changes by clicking on the Save button
When inactivating a user, he will be disconnected from his Web session, as well as all the other proxy sessions in execution. For the senhasegura.go , it will be necessary to wait for application records update time.
Only the senhasegura user account will be inactivated. In case senhasegura is configured to use a external authenticator provider, the provider will not be informed of the inactivation
Auditing
The permission system audit reports are divided into reports that help identify the permissions that a user has, and reports that help identify changes that have occurred in the permission system.
So the administrator will be able to identify security holes that have occurred or are still vulnerable.
Through the module Reports, you will have access to several audit reports of senhasegura . At this book, we will focus only on the reports pertinent to the The Access Control Layer.
In the Permissions menu you have access to the following reports:
Roles by user:
Check which roles have been assigned to each user;
Even inactive users are considered;
The filter can be user-based, role-based, or both;
Permissions by user
Check which permissions have been granted to each user;
The filter can be based on user, permission or both;
Audit logs
View history of changes made to roles;
You can identify which users made the change when they made it and what was changed;
Filter by period, user, and operation;
Permissions migration
See which roles compared to the permission system of previous versions of the senhasegura were added, kept, or removed.;
The filter can be based on user code, permission or status;
Access Group
Through the senhasegura permission system, we learn how to segregate the actions that a user can perform within the platform. Now we will learn how to limit the data that the user can act on.
In this way, we add another layer of security to ensure the principle of least privilege.
Access Groups act as a filter for entities from their properties. The configuration of groups can be seen in several products of the senhasegura platform:
PAM System
Certificate Manager
A2A
Task Manager
Information Manager
This allows the Administrator to deliver different levels of security to the same user within their assignments in each product.
In this topic, we will talk about the access group of the PAM module, which has access control to credentials and their use.
Segregated entities and their properties
All screens that a user has access to display information from privileged entities are filtered by the Access Group. Actions that can be taken also affect these privileged entities. To avoid misuse, senhasegura queries the rules applied to the user that connects the privileged entity.
If the user has more than one access group that gives them access to privileged information, senhasegura will apply the most restrictive group rule.
Restriction levels are based on the number of steps and people who are aware of the operation:
Allows access to information;
Allow access by requiring justification of the requester;
Allow access within a time range and an approver;
In the PAM module, the segregated entity is the SSH credentials and keys. And these entities have attributes that can be used as a filter:
Devices properties:
Name of the device to which they belong;
Model of the device to which they belong;
Device tags;
Device site;
Device type;
Credential properties;
Credential username;
Additional credential information;
Credential tags;
Credential type;
By using these combinations of attributes you determine what information a group of users will have access to. Some information allows the use of wildcard or masks. We'll talk better about this later.
For some examples, see the following credential list:
| ID | Username | Hostname | Device type | Product | Site | Tag |
|---|---|---|---|---|---|---|
| 1 | root | srvdns | Server | RedHat 7.0 | LAX | |
| 2 | administrator | msad | Server | Windows Server 2019 | LAX | |
| 3 | sa | mssqlprd | Database | Windows Server 2019 | NYC | dba |
| 4 | System | Oraprd | Database | Oracle 19c | NYC | dba |
| 5 | administrator | WS1092 | Workstation | Windows 10 | SEA | |
| 6 | administrator | WS1035 | Workstation | Windows 10 | SEA | |
| 7 | administrator | WS2018 | Workstation | Windows 10 | NYC | |
| 8 | peter.lee | WS1092 | Workstation | Windows 10 | SEA | |
| 9 | peter.lee | mssqlprd | Database | Windows Server 2019 | NYC | |
| 10 | john.ferrer | WS1035 | Workstation | Windows 10 | SEA | |
| 11 | john.ferrer | WS1092 | Workstation | Windows 10 | SEA | |
| 12 | root | vmh-www | Server | RedHat 7.0 | AWS | |
| 13 | root7vmh-cicd | Server | RedHat 7.0 | AWS | ||
| 14 | root | vmh-fw | Server | RedHat 7.0 | AWS |
Let's take a look at some examples of groups that affect this relationship.
Allow the ServiceDesk to have access only to the Administrator user of workstations.
Username:
AdministratorDevice type:
WorkstationAs a result, only credentials5,6, and7will be made available.
Allow DBAs to have access only to privileged Oracle database credentials:
Device type:
DatabaseDevice model:
Oracle*Credential Tags:
DBAAs a result, only credential4will be made available.
Allow users to have access to credentials that take their username, regardless of the device:
- Credential username:
[#USERNAME#]As a result, only credentials whose username is the same as the user logged in to senhasegura will be made available. If the username of senhasegura is john.ferrer only credentials10and11will be made available.
- Credential username:
Allow virtualization administrators to access only virtual machines hosted on AWS. By the rule adopted in this fictitious company, these machines receive the prefix vmh in their hostname:
Device name:
vmh*Website:
AWSAs a result, only credentials12,13, and14will be made available.
These are just a few examples that show how filters can be combined in creating some access groups. Please note that we do not link users at this time and do not set what can be executed. The users can be linked to a diversity of groups, and each group can allow different actions and require different levels of restriction.
The Access Group configuration procedure
Understood how attributes act as information filters, using one of the previous examples, we will create an access group that allows the Service Desk professional to access workstation credentials.
You can access the Access Groups report through the PAM ➔ Settings ➔ Access ➔ Access groups menu.
This report has the option to register new groups or change existing groups.
You can even completely clone a group to a new record through the Clone access group record action. So you can change small variations in criteria by keeping users linked. That could save you a lot of time.
The screen for a new group can also be accessed from the quick actions menu. Came from the quick actions menu you will be asked for the type of access group to register.
Groups once created will be applied immediately to users. But audit and validation reports are updated asynchronously in a process that is triggered with each modification in some group or modifications to some credential or device.
These fields as you may have noticed are determining the rules that must be obeyed by all members of the group if they want to have access to some privileged information reachable by this group.
Allowed actions and access controls
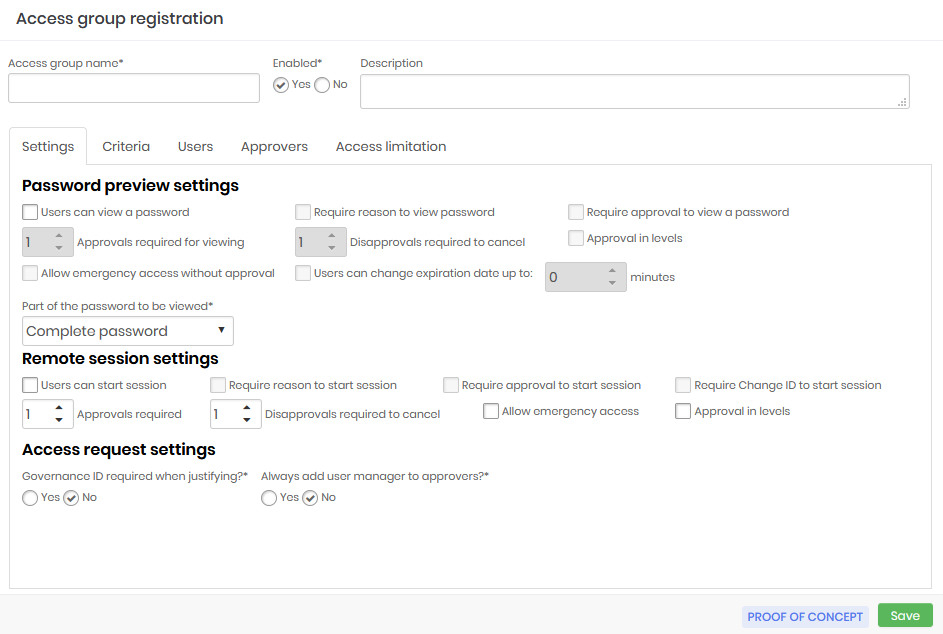
On the very first tab of the access group registration screen, you will see what actions this group allows and what access controls must be respected to make use of the privileged information.
Some of these fields are used to configure the Access Workflow and will be seen in practice in the next chapter.
Access group name: Name of the access group that corresponds to the rules this group applies. This makes it easier to understand and audit;
Enabled:Whether the group is active or not. Disabling a group can reduce the amount of information the user has access to, or reduce the level of security required to access the information;
Password previw settings:
Users can view a password: Determines that the credential password can be seen by the user;
Require reason to view a password: Check if it is necessary to register an excuse to see the password;
Requires approval to view a password: Check whether another user will need to act as an approver in order to see the password. Once active, you also need to define for how long this approval will be valid;
Approvals required to view: Number of approvals required to approve the operation;
Disapprovals required for cancellation: Number of refusals to stop the operation;
Approval in levels: Check whether approvers will be triggered in tiers. This way you can define a hierarchy of approvers;
Allow emergency access without approval: Flag whether the applicant has the power to stop the approval workflow by approving the operation himself;
Users can change the expiration date by up to: Flag whether the applicant has the power to stop the approval workflow by approving the operation himself;
infoIn the credentials display window a button will appear for the user to increase by the time, indicated in this field, their access period.
Part of the password that will be displayed: Allows the requested password to be displayed fractionally. Members of this group will only have access to the fraction defined in this field. This does not prevent the password from being used by the proxy functionality, since the user does not have access to the password in plain text when using any of our proxy solutions;
Remote session settings:
Users can start a session: Check if member users are allowed to start a proxy session using the credentials that this group allows access to;
Requires reason to start a session: Check if it is necessary to register an excuse to start the proxy session;
Requires approval to start a session: Check whether another user will need to act as approver in order to start the proxy session. Once active, you will also need to define how long this approval is valid for;
Approvals required: Number of approvals required to approve the operation;
Disapprovals required for cancellation: Number of refusals to stop the operation;
Approval in levels: Check whether approvers will be triggered in tiers. This way you can define a hierarchy of approvers;
infoWhen using level approval, lower level approvers will initially be notified. Only after approvals have been made by them will higher-level approvers be notified to take their approval actions.
Allow emergency access: Flag whether the requester has the power to stop the approval workflow by approving the transaction on its own;
Approval in levels: Check whether approvers will be triggered in tiers. This way you can define a hierarchy of approvers;
Access request settings: Check the following options
Governance ID required when justifying?: Check whether the applicant must enter an ITMS code at the time of justification;
Always add the user's manager to approvers?: Check if the user responsible for the user's department should be automatically alerted as an additional approver to this group. Therefore, this user will be alerted together with the other approvers in the tab Approvers.;
These fields, as you may have noticed, determine the rules that must be obeyed by all group members if they want to have access to some privileged information accessible by this group.
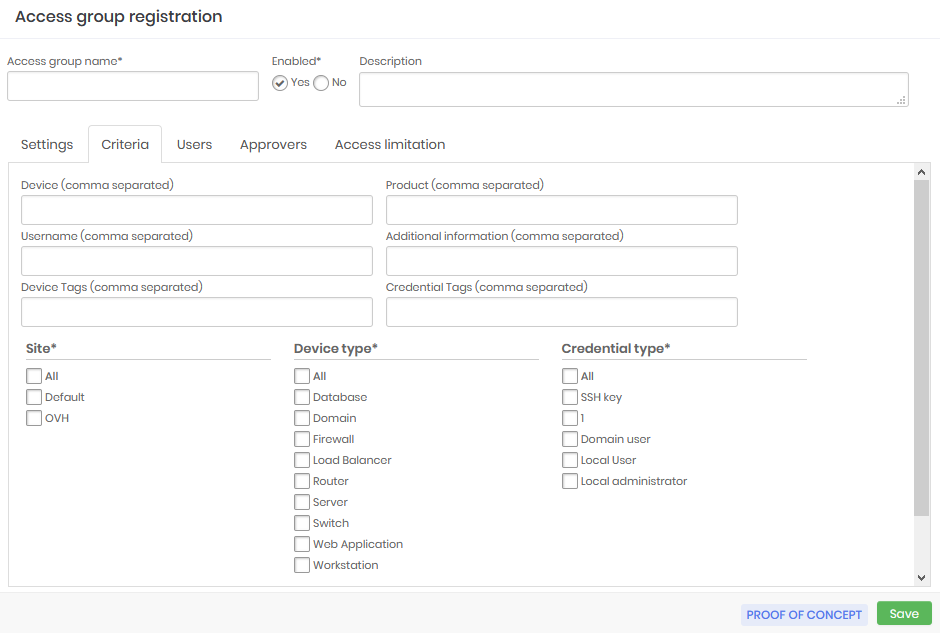
The criteria for determining which data are accessible
Now we can go to the Criteria tab. In this tab, we see the attributes we wrote earlier. Note that some of these attributes are arranged as lists and others as a free text field. Free text fields allow the use of wildcard or masks.
The wildcard character is the asterisk (*) and can be used anywhere in the value. Let's see some examples of wildcard uses in the Device field:
srv*will filter all devices whose hostname starts with srv;*www*will filter all devices that have www in their hostname;vmh*-dbwill filter all devices whose hostname starts with vmh and ends with -db;
Some fields allow multiple values to be separated by a comma. The Device field is one of these. The values will be considered as an OR condition in the rule. So, will be considered a pattern/value or another pattern/value. Example for the Device field:
srv*,vmh*Allow hostnames that start with srv or vmh;
Another special value that can be used is the [#USERNAME#] mask, which will be replaced by the username of the logged senhasegura account requesting the operation. And you can use this mask along with wildchar and fixed texts. Example for the Username field:
[#USERNAME#]Allow only credentials whose username is equal to the requester's username;[#USERNAME#]-admAllow only credentials whose username is a composition of the requesting user's username plus the suffix -adm;[#USERNAME#]-*Allow only credentials whose username is a composition of the requesting user's username plus a suffix that starts with "-" followed by any other value;
Group users and approvers
In previous versions to add users and approvers to an access group it was necessary to save the settings first. However from the version 3.6 it is not necessary to save the data before continuing the configuration of users and approvers, however, different from the versions before the end of the inclusion of users and approvers it is necessary to save the Access Group so that they are admitted by the group created.
Go to the Users tab to add users who are under to this access group.
The interface is intuitive and does not require details.
Perform the same task in the Approvers tab if this is a group that requires approval for operations.
Approvers in level
Note that approver users have a Level setting in their registry. This setting determines the call sequence for operation approval, allowing a hierarchy to be applied.
For example, we can have an access group with three authorization levels. The approvers that are configured as the first level will be the first to receive the access request.
The level two and three approvers will only be notified after the first level approvers grant the access, if they don't then the access will be denied, without the other levels being notified.
Likewise, if the first level approver grants access, but the second level approver rejects the third level approver will not be notified.
It is important to remember that if you register more than one approver for the same level, this way the first approver of that level that grants access will already result in a notification for the next level, thus making the process faster.
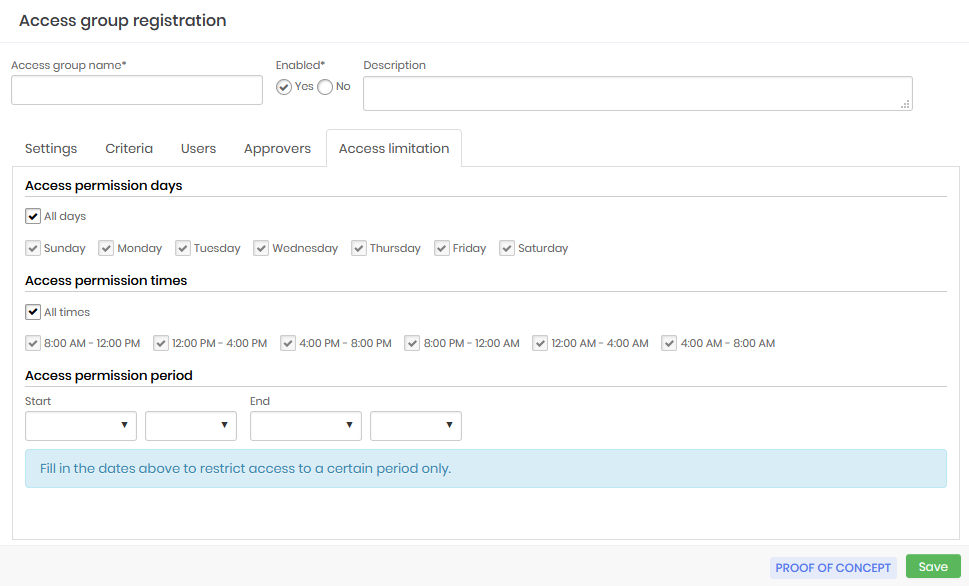
Access limitation
On the Access limitation tab determine the days and times that users who are members of this access group will be able to view passwords or conduct remote sessions. You can also determine dates for a more restricted access period.
Access permission days: Days of the week that users who are members of the group will be able to carry out the activities
Access permission times: Timetables that users members of the group will be able to carry out the activities
Access permission period: Determined period that users who are members of the group will be able to carry out the activities
Auditing the users and groups
As important as ensuring that users have access to the inside information they need to perform their activities, is to ensure that this access respects the company's security policy and is traceable.
Several senhasegura reports are used to ensure that the administrator has the necessary data to validate the access rules and audit these same rules.
Credentials by users
At the Reports ➔ PCI ➔ Credentials by users menu, you have access to the report that shows all credentials that users can see.
Similarly, you can identify whether a particular credential is being improperly made available to a user.
The security levels of the groups are also present in this report.
Access group modification history
Access groups can be completely modified immediately affecting the access level of everyone involved. So you can observe the change history of each group with details of which properties were changed and by whom, through the report Traceability ➔ Access groups.
For each record, you have acess to the detail screen that shows who made the change, what rule was used before, what rule it is used now, and when the change occurred.
Users by access group
The Credentials ➔ Users by group report shows the relationship between users and groups. In addition to presenting who added the user to the group, when and what part of the password this user has access to.
It is important to inform you that all actions to change, create, add, or remove groups and users are notified through messages in SIEM.
Exceptional access
Exceptional access, which is characterized by short duration access, is critical in some daily situations such as problem correction, so granting exceptional access must be quick and easy. senhasegura offers a simple and effective solution to ensure that such accesses are set up quickly and still maintain the security of the devices.
Exceptional access is composed of a credential action button, which is only available to users that have permission to create exceptional accesses. By clicking on the button the administrator is directed to a screen where he must select the user that will receive the access and fill in the start and end date of this permission. Automatically senhasegura will grant access permission only for that credential and only to the selected user and will revoke this right as soon as the validity expires, closing the session if it is still open. senhasegura will use just-in-time credentials to assure the security of this access and will allow auditing just like conventional sessions, through video of the session and the command log.
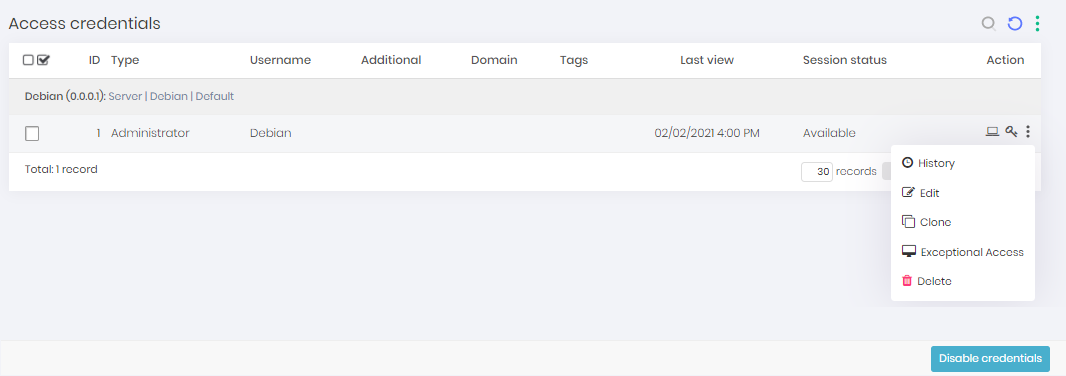
The pop-up screen that will open has the following fields:
User: Field to fill in the user who will receive the exceptional access
Start date: Field to fill in the start date of the access
End date: Field to fill in the end date of the access
Credential username: Informative field of which credential was selected
Device: Informative field with the device that will be the target of this access
Domain: Informative field with the domain of the target device
Save: Button to save the information and finish the action
Access Workflow
We learned previously how to configure access groups with your security criteria and rules to gain access to inside information.
Now we will see in practice how this is presented to the user when he requests access to privileged information.
The PAM access group is used in two moments, and the rules of justification and authorization occur in both situations:
Password withdrawal;
Proxy access;
When a user tries to make use of a credential in any of these situations, senhasegura checks which access group, in which the user is related to the credential, has the most restrictive rule.
As we saw earlier this path can take the following options:
Allow access to information;
Allow access by requiring a justification on the part of the requester;
Allow access within a time range and an approver;
In the first and second case, there is no use of the workflow. The requester will be able to access the information immediately. senhasegura will only record access in all compliant audit reports and forward to SIEM the messages of the actions taken.
Access through justification
If the requesting user needs to record the reason for using the inside information, a registration screen will be presented. And only after sending the justification will be possible to use it.
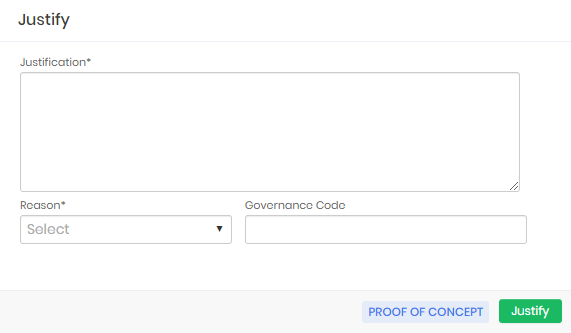
The requesting user can list their requests through the PAM ➔ Access control ➔ My requests menu.
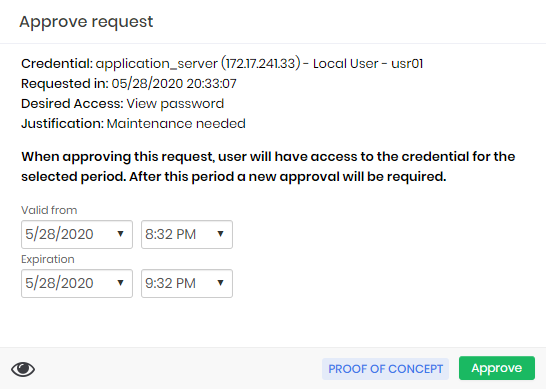
Access through approval
If the requesting user needs approval to perform the same task, the justification screen is presented with the addition of fields for the period. This period is the time interval that the requester needs to use the credential.
After the end of this time, the credential will be available for automatic password change. And if the approval is for a proxy session, the requester will be immediately disconnected.
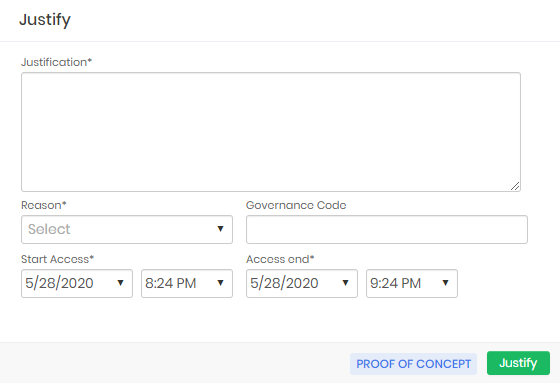
When forwarding the approval request, the user will be presented with the following confirmation screen.
The approver will be notified by email of this request by email.
If the user is a member of an access group with a level approval model, the 1st level approver will receive the email first, after his approval the other approvers will receive the email according to the hierarchy and number of levels defined in the access group configuration.
If the inbox is configured in senhasegura , approvers can reply to the email with the words APPROVE or DISAPPROVE to affect their response. Or he can click on the link described in the email.
Through the system it can be done at the PAM ➔ Access control ➔ My approvals menu. Record actions allow you to approve, disapprove and see the detail of the request.
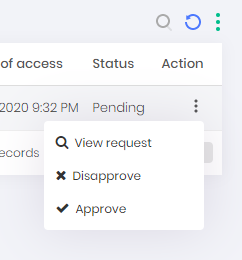
At the time of approval, the approver may change the date and time interval.
All the requests and the justified accesses can be seen in the report Access control ➔ Requests.
The emergency access
There is a special case in which the requester can skip the approval process if there is a need for immediate emergency use of the credential. We call it emergency access.
When the access group allows the requester to make use of this feature, the requester will be presented with the emergency access screen right after sending the access request.
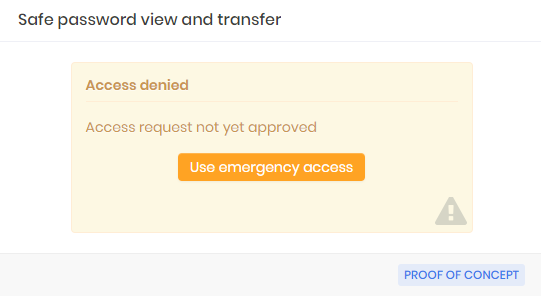
As soon as the requester confirms emergency access, senhasegura will send to all approvers the information that the requester had access to information in advance.
The access request will be marked with emergency use.
ITSM integration
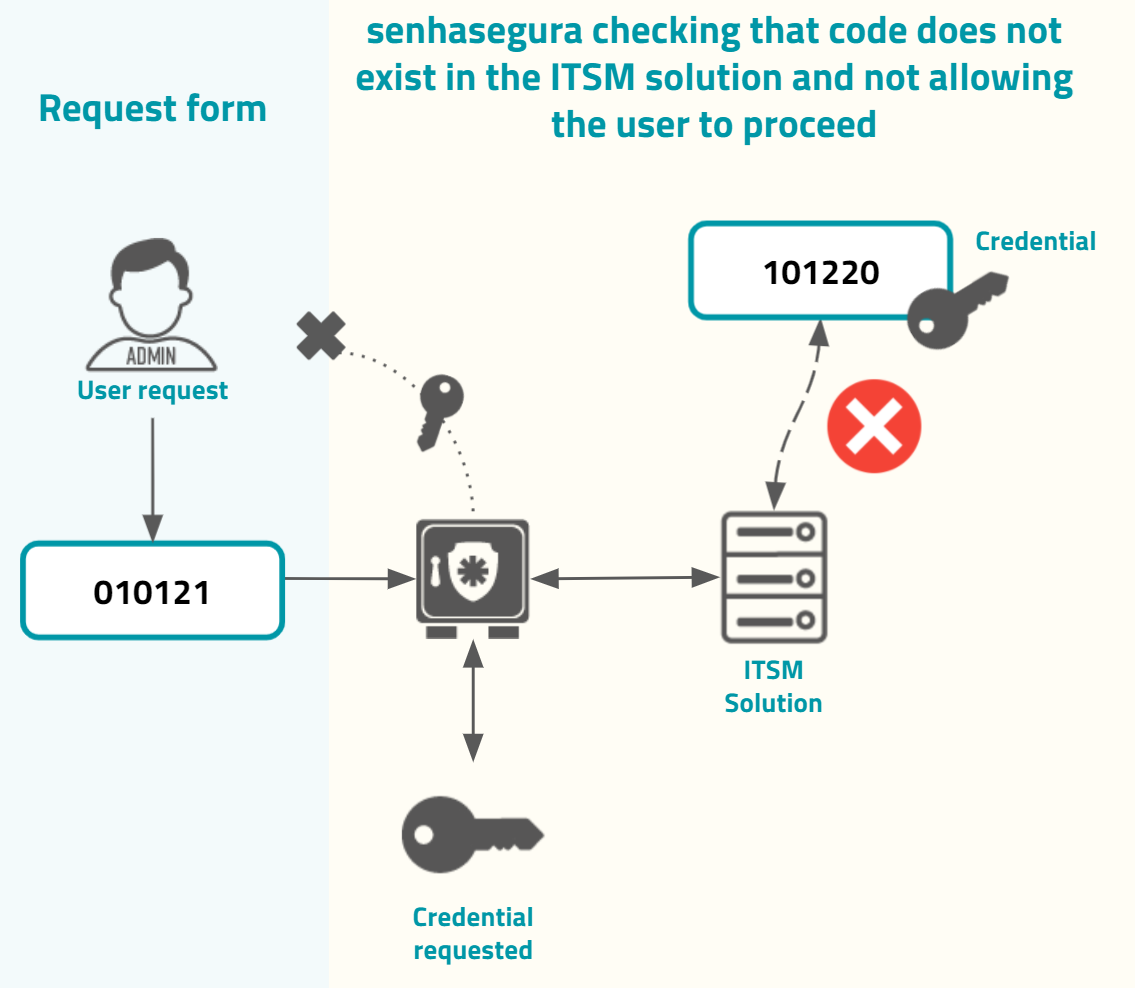
Into the justification and authorization form, the requester user can input the Governance code. This governance code can be used just for evidence or can be integrated into ITSM solutions. If it is integrated with configured ITSM solutions, the senhasegura will first validate with the target ITSM system if the governance code provided grants to the user authorization to execute the operation, if it is the user request is granted, as in the image usr-sistema-0224.

If the code does not exist or is not valid, the senhasegura will not grant the user request, as in the image usr-sistema-0225.
By default, only the following ITSM solutions are provided by senhasegura . You can configure the integration into Settings ➔ System parameters ➔ Integration with ITSM, and then click at the report action button New.
This report also gives the possibility to test every configurations using the Test authentication record action.
If you want a mandatory Governance code to be entered, check the option Governance ID required when justifying? in the users' access group.
Jira Service Desk
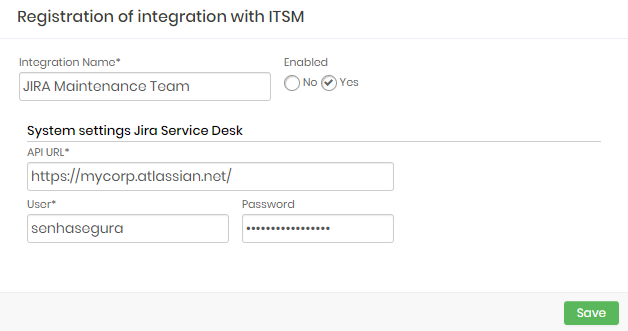
Integration Name: Will be the name of the integration used to identify this configuration inside senhasegura reports;
Enabled: This status flag indicates if this configuration should be used into workflow procedures;
API URL: Should be filled with the main JIRA URL. This URL will be used to access the JIRA REST Endpoint;
User: A valid user with the right permission to query issues tickets inside JIRA;
Password: The JIRA user password;
The JIRA integration will query the given ticket code using the /rest/api/2/issue/ endpoint. The user request will be only accepted if the JIRA issue is under In progress status.
Freshdesk
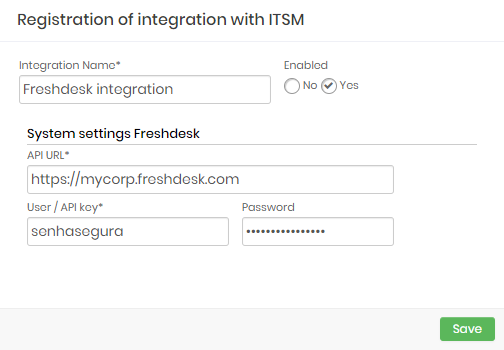
Integration Name: Will be the name of the integration used to identify this configuration inside senhasegura reports;
Enabled: This status flag indicates if this configuration should be used into workflow procedures;
API URL: Should be filled with the main Freshdesk URL. This URL will be used to access the Freshdesk REST Endpoint;
User: A valid user with the right permission to query issues tickets inside Freshdesk;
Password: The Freshdesk user password;
The Freshdesk integration will query the given ticket code using the /api/v2/tickets endpoint. The user request will be only accepted if the Freshdesk issue is under Open or Pending status.
CA Service Desk Manager
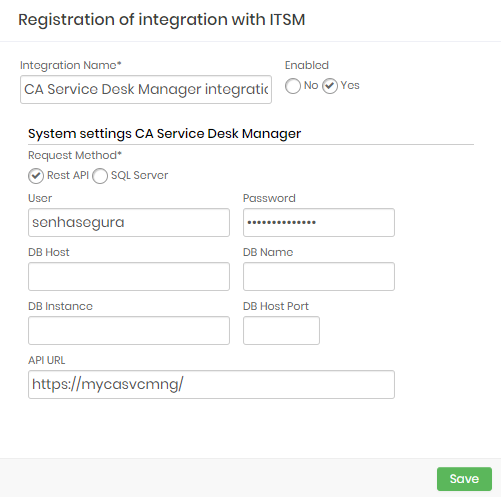
This integration can be configured to runs REST queries or queries directly to CA database.
Integration Name: Will be the name of the integration used to identify this configuration inside senhasegura reports;
Enabled: This status flag indicates if this configuration should be used into workflow procedures;
Request Method: Configure witch kind of communication senhasegura will execute into the CA software;
Rest API: will require HTTPS connection between senhasegura and the CA solution. The following fields should be filled if you choose the REST API method:
API URL: Should be filled with the main CA URL. This URL will be used to access the CA REST Endpoint. Used only if REST API request method was selected;
User: A valid user with the right permission to query issues tickets inside CA;
Password: The CA user password;
SQL Server: Will require a SQL Server connection between senhasegura and the CA solution. The following fields should be filled if you choose the SQL Server method:
User: A valid user to connect into SQL Server;
Password: The database user password;
DB Host: Hostname or IP where the CA database is located;
DB Host Port: The TCP port to connect;
DB Name: The CA database name;
DB Instance: The granted database instance;
Zendesk
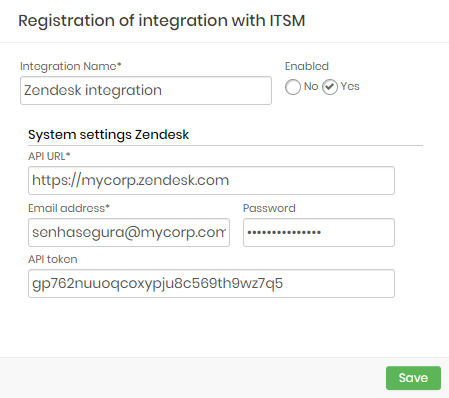
Integration Name: Will be the name of the integration used to identify this configuration inside senhasegura reports;
Enabled: This status flag indicates if this configuration should be used into workflow procedures;
API URL: Should be filled with the main Zendesk URL. This URL will be used to access the Zendesk REST Endpoint;
Email address: A valid user with the right permission to query issues tickets inside Zendesk;
Password: The Zendesk user password;
API Token: A valid OAuth token to identify senhasegura ;
The Zendesk integration will query the given ticket code using the
/api/v2/tickets/[id].json endpoint. The user request will be only accepted if the Zendesk issue is under Open or Pending status.
ServiceNow
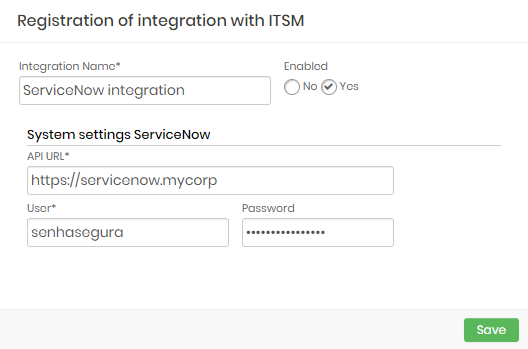
Integration Name: Will be the name of the integration used to identify this configuration inside senhasegura reports;
Enabled: This status flag indicates if this configuration should be used into workflow procedures;
API URL: Should be filled with the main ServiceNow URL. This URL will be used to access the ServiceNow REST Endpoint;
User: A valid user with the right permission to query issues tickets inside ServiceNow;
Password: The ServiceNow user password;
The ServiceNow integration will query the given ticket code using the /api/now/table/ endpoint. The user request will be only accepted if the ServiceNow issue is under In Progress status.
senhasegura multi-Factor authentication
When enabling the two-factor authentication, an extra security layer is added to the account. You can log in with the password, and additionally with the code sent to a device.
For this feature, Google Authenticator and Microsoft Authenticator are some of the applications that can be used to perform the two-factor authentication
To enable the two-factor authentication for the user, follow these steps:
Click on the drop-down menu in the title bar, next to the user name
Select the Token option
Click Yes to proceed with the token setting
Launch the authentication application from your mobile device and read the QR code displayed on the screen by using the camera.
The token is then registered in the application, and an authentication code is displayed.
Click on the click here link to validate the token
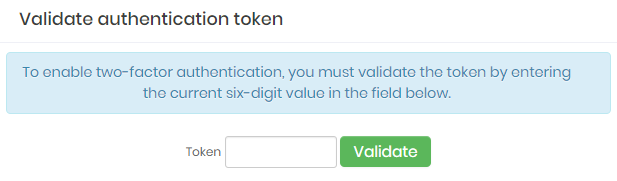
Radius configuration Fill in the Token field with the application-generated code
Click on the Validate button.
From this moment, when logging in, you will need to perform the two-factor authentication, which means using the password and the application-generated code.
Events related to Multi-factor authentication settings are notified through SIEM AND SYSLOG.
Authentication Providers and SSO
In most environments, user authentication providers manage access to IT services such as email and workstation authentication. In addition, these providers control access to a set of applications and systems.
In addition to having its own user base for direct control of the solution, senhasegura can also integrate with authentication providers thus enabling the management of user authentication.
You can configure one or more integration with authentication providers. In a multi-provider scenario, senhasegura allows you to set priority orders for each provider, including using domain authentication.
It is also possible to use physical or virtual X.509 certificates under user custody as long as the user's browser allows integration with the physical token.
Enabling Authentication Providers
To enable an authentication provider, follow these steps:
Access the menu: Settings ➔ Authentication ➔ Providers;
In the field filters, select No in the Enabled field;
Click on the Filter button;
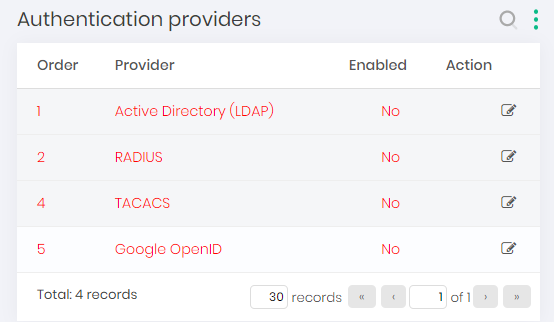
Authentication providers report Click on the Edit button from the provider to be enabled;
Fill in the Order field with the number according to the priority of the Authentication Provider;
In the Enabled field, select whether the device type will be enabled or not;
Click on the Save button to complete the setup;
infoIf there is more than one enabled Authentication Provider, the authentication priority will follow the values indicated in the Order field. Thus, if a user is not found at a higher priority provider (smaller order), then senhasegura will try to authenticate at the provider with the next priority (bigger orders).
Setting authentication via Active Directory
For Active Directory integration, the following integration scenarios are possible:
Synchronization of users and synchronization groups: as users and groups are added or removed from service providers, authentication, the modifications will be reflected on senhasegura . The users and user groups in the authentication providers will be synchronized with access groups;
User Provisioning: When a user is added to an authentication provider, users on senhasegura can be automatically provisioned. When user access is removed from Active Directory, senhasegura user can be automatically disabled;
Single Sign-On (SSO): Users can use their network access credentials for secure senhasegura access without having to enter additional credential data. Thus, the purpose of this section is to assist users with administrator privileges to configure user authentication through authentication providers. By default, authentication providers are registered on senhasegura , but inactive. To use them, you need to activate them;
To set up the authentication in senhasegura via Active Directory, follow these steps:
Access the menu: Settings ➔ Authentication ➔ Servers;
Click on the New Server report button;
Fill in the following fields:
Host: Hostname of the AD or IP server. Example: 192.168.20.20;
Port: Communication port number. The field is filled in with the default protocol port number. Example: 3389 (RDP port number);
Enabled: Indicates whether the server is enabled or not;
Credential for authentication: Credential that will be used to perform the authentication on the server;
DN Base: Distinguished name base of your server. You can find this information in the advanced settings menu of your AD server;
Account form: Items for LDAP support. Example: "Main" for Microsoft;
Account filter format: Account filter format parameters;
Username attribute: The attribute of the username to be searched. Example: "cn";
Account domain: Account domain name;
Account domain (short name): Name of the domain to which the account belongs;
Group: Group name;
Group DN: Distinguished name of the group;
Group attribute (GroupAttr): The attribute of the group to be searched. Example: "cn";
Group scope: Description of group scope, objective;
Group filter: String that will be added to the search filter when searching for a group. Example: ( OR=name_of_or,dc=domain,dc=local);
Member attribute (MemberAttr): Distinguished name of objects in the group that you can find ;
Order: Number according to the LDAP server priority;
Use SSL?: Indicates whether the SSL connection will be used or not;
Member is DN: Indicates whether the member is DN or not;
Bind requires DN?: Indicates whether bind requires DN;
DN Bind (leave blank to use DN Base): DN Bind Parameters;
Click on the Save button to complete the registration;
Setting authentication via RADIUS
To set up the authentication in senhasegura via RADIUS, follow these steps:
Access the menu: Settings ➔ Authentication ➔ Radius ➔ Servers;
Click on the New button;
Fill in the following fields:
Hostname: Server name or IP;
Port: Communication port number. The field is filled in with the default protocol port number;
Shared Secret: RADIUS shared key;
Timeout(s): Lead time;
Max. Attempts: Number of connection attempts;
Enabled: Indicates whether the server is enabled or not;
Click on the Save button to complete the registration;
Setting authentication via TACACS
To set up the authentication in senhasegura via TACACS, follow these steps:
Access the menu: Settings ➔ Authentication ➔ Tacacs ➔ Servers;
Click on the New button;
Fill in the following fields:
Hostname: Server name or IP ;
Port: Communication port number. The field is filled in with the default protocol port number;
Secret Key: TACACS shared key;
Timeout(s): Lead time;
Max. Attempts: How many attempts must be made to connect;
Enabled: Indicates whether the server is enabled or not;
Click on the Save button to complete the registration.
Setting authentication via SAML 2.0
Please take a look to our technical specification manual for a list of approved SAML authentication providers.
senhasegura implements SAML 2.0 authentication. SSO providers that support the protocol can be configured.
senhasegura versions 3.12 and earlier it will be necessary to contact senhasegura support team to perform a manual configuration that allows authentication through the SAML protocol.
For senhasegura to be integrated with an SSO 1 service with SAML 2.0 protocol support, it is necessary that this service is already configured and with embedded users. senhasegura should then receive the following information for configuration:
Entity ID: It is the identification of senhasegura in the SAML provider;
SAML provider metadata URL: It is the URL of the SAML service published by the provider (role descriptor).This XML contains the interface elements, Signing keys or encryption keys, and the SSO protocol endpoints;
Redirect URL: It is the senhasegura URL that will receive the authentication steps. By default it will be as follows https://senhasegura.mycompany/flow/saml/auth/assert/, where the example domain
senhasegura.mycompanymust be replaced with the senhasegura instance access IP or domain;SSO Login URL (Sign-in URL): SAML SSO provider URL where senhasegura should access at the login step;
SSO Logout URL (Sign-out URL): SAML SSO provider URL where senhasegura should access at the logout step;
We recommend that you request a private key in the PEM format and a certificate in the PEM format so that senhasegura communicates encrypted with the SSO SAML provider.
To enable the use of the SAML authentication provider in senhasegura :
Go to the menu Settings ➔ Authentication ➔ Providers;
Change the filter to account for all records. Active and inactive;
Locate the SAML record and change it status to Active;
Go to the menu Settings ➔ Authentication ➔ Providers ➔ System SAML ➔ Providers SAML;
Click on the report action New;
In the form that opens, fill in the information with the data previously mentioned in the premises.
At tab General;
Type: SAML SSO provider type. Use SAML provider if you can't find your provider model;
Entity ID: It is the senhasegura identification in the SAML provider;
SAML provider metadata URL: It is the SAML service URL published by the provider (role descriptor). This XML contains the interface elements, Signing keys or encryption keys, and the SSO protocol endpoints;
Redirect URL: It is the senhasegura URL that will receive the authentication steps. By default it will be as follows https://senhasegura.mycompany/flow/saml/auth/assert/, where the example domain
senhasegura.mycompanymust be replaced with the senhasegura instance access IP or domain;SSO Login URL (Sign-in URL): URL that the SAML SSO provider use to redirect to senhasegura to be accessed at login;
SSO Logout URL (Sign-out URL): URL that the SAML SSO provider use to redirect to senhasegura to be accessed at logout;
Na aba Security SAML;
Should sign SAML request?: If confirmed, senhasegura will communicate with the SSO SAML provider using the provided encryption;
Signature algorithm for request: Encryption algorithm to be used;
Private key (PEM format): Private key in PEM format to be used at communication level;
Certificate (PEM format): Certificate in PEM format to be used at communication level;
From this moment on, senhasegura users can see a login button using SAML on the senhasegura login screen. The authentication validity time rules are the control of the SSO SAML provider.
Setting authentication via OpenID
Checkout our technical specification manual the list of approved OpenID authentication providers.
senhasegura implements standard OpenID protocol authentication. SSO providers that support this protocol can be configured.
At senhasegura version 3.12 and earlier it will be necessary to contact senhasegura support team to perform a manual configuration that allows authentication through the OpenID protocol.
To enable the use of the OpenID authentication provider in senhasegura :
Go to the menu Settings ➔ Authentication ➔ Providers;
Change the filter to account for all records. Active and inactive;
Locate the OpenID record and change it status to Active (not to be mistaken with Google OpenID);
Go to the menu Settings ➔ Authentication ➔ Providers ➔ System OpenID ➔ Providers;
Click on the report action New;
In the form that opens, fill in the information with the data previously mentioned in the premises.
At tab Main informations;
Type: SSO OpenID provider type. Use OpenID Connect option if you don't find your provider's model;
Client ID: It is the senhasegura identification at the SSO provider;
Client secret: It is the authentication password created by the SSO provider;
Redirect URL: It is the senhasegura URL that will receive the authentication steps. By default it will be as follows https://senhasegura.mycompany/flow/opid/auth/oauth/, where the example domain
senhasegura.mycompanymust be replaced with the senhasegura instance access IP or domain;OpenID endpoint configuration: It is the SSO OpendID endpoint URL published by the provider. This URL provides a JSON containing all endpoints used in the other fields bellow;
Authorization endpoint: A URL described at JSON as "authorization_endpoint";
Token endpoint: A URL described at JSON as "token_endpoint";
Userinfo endpoint: A URL described at JSON as "userinfo_endpoint";
JWK endpoint: A URL described at JSON as "jwks_uri";
From this moment on, senhasegura users can see a login button using OpenID on the senhasegura login screen. The authentication validity time rules are the control of the SSO OpenID provider.
Configuring authentication using physical or virtual X.509 certificates
Although they are contained in the same menu structure as other authentication provider technologies, the use of X.509 certificates in senhasegura complements an MFA step. The certificate will be linked to the senhasegura user's account, making it mandatory to use this certificate to login.
The administrator will have the option to make the use of the certificate mandatory in the following scenarios:
Mandatory login on the senhasegura Web platform;
Mandatory senhasegura RDP Proxy sessions;
Mandatory senhasegura Terminal Proxy sessions;
In order for certificate support be enabled, it is necessary that our support team to be contacted so that the CA can be recognized by the senhasegura instance, and the CA chain can be configured to used at the web interface login.
Enabling mandatory settings
Force all users to use digital certificates
Through the menu Settings ➔ System Parameters ➔ Security you will have access to the option Force the use of digital certificate for all users.
This option will require users to log in using an X.509 certificate. At the first login, the certificate used will be linked to the user, and from this point on, all subsequent logins will require the use of this linked certificate.
Through the menu Settings ➔ System parameters ➔ Security, the option "Force secure connection (SSL) in the execution of password change?" is set by default to "Yes" and should be changed to "No" as a standard procedure, not to impact the device password change process.
Force use of digital certificate in proxy sessions
Through the menu Settings ➔ System Parameters ➔ System Parameters you have access to the Security section. In this screen you have access to the fields Force authentication with certificate for RDP Proxy and Force authentication with certificate for SSH/Telnet Proxy.
When activating any of these options, the user must log in to the web interface using a valid X.509 certificate before logging in to a proxy session.
Auditing logins via certificate
Certified Certification Authorities
For a CA to be considered reliable for senhasegura , a senhasegura professional must have manually configured the server to accept the CA. Still, the administrator can decide whether to revoke the use of the CA.
Through the menu Settings ➔ Authentication ➔ Digital Certificate ➔ Authorities you have access to the certificate authorities approved as issuing login certificates.
You can view your details or inactivate an authority. In this case, all certificates from this CA will be prevented from logging on to the platform.
Listing used certificates
Through the menu Settings ➔ Authentication ➔ Digital certificate ➔ Certificates the administrator can view details of the certificate and which user account senhasegura is linked. Through this screen, the administrator can even revoke the use of a certificate. In this case, the user must link a new certificate to login.
It is important to remember that if the administrator wants to block a user's access, he must inactivate the access account. Revoking a certificate will not revoke the access account.
Certificate usage log
Through the menu Settings ➔ Authentication ➔ Digital certificate ➔ Certificates you have access to a detailed report of the events that a user has used an X.509 certificate.
Microsoft Active Directory Authentication and Users Synchronization
Once user authentication is configured to be performed on the costomer's LDAP server, it is now necessary to configure which servers will be asked at the time of authentication.
Also, it is interesting that there is a synchronization of the users of the LDAP server in senhasegura .
Although senhasegura always checks the password and the user's status at the time of login, other user attributes can determine the level of permission within senhasegura . Thus, senhasegura from time to time will perform synchronization to normalize the registration fields and correctly allocate the user in the access groups and access profile of senhasegura .
There are a few premises for the administrator to configure this synchronization:
Be aware of how Access Groups and Access Profiles of senhasegura works;
Know how to register device and credential;
Receive a credential with query access to the destination LDAP that will be used by senhasegura to perform synchronization;
Best practices for authentication availability
senhasegura can be configured to authenticate to more than one LDAP server. But some architectures bring more performance and availability at the time of login. Because senhasegura composes the client's security strategy, it must have less impact at the time of login. Look at the following architectures and understand the risks and benefits of each.
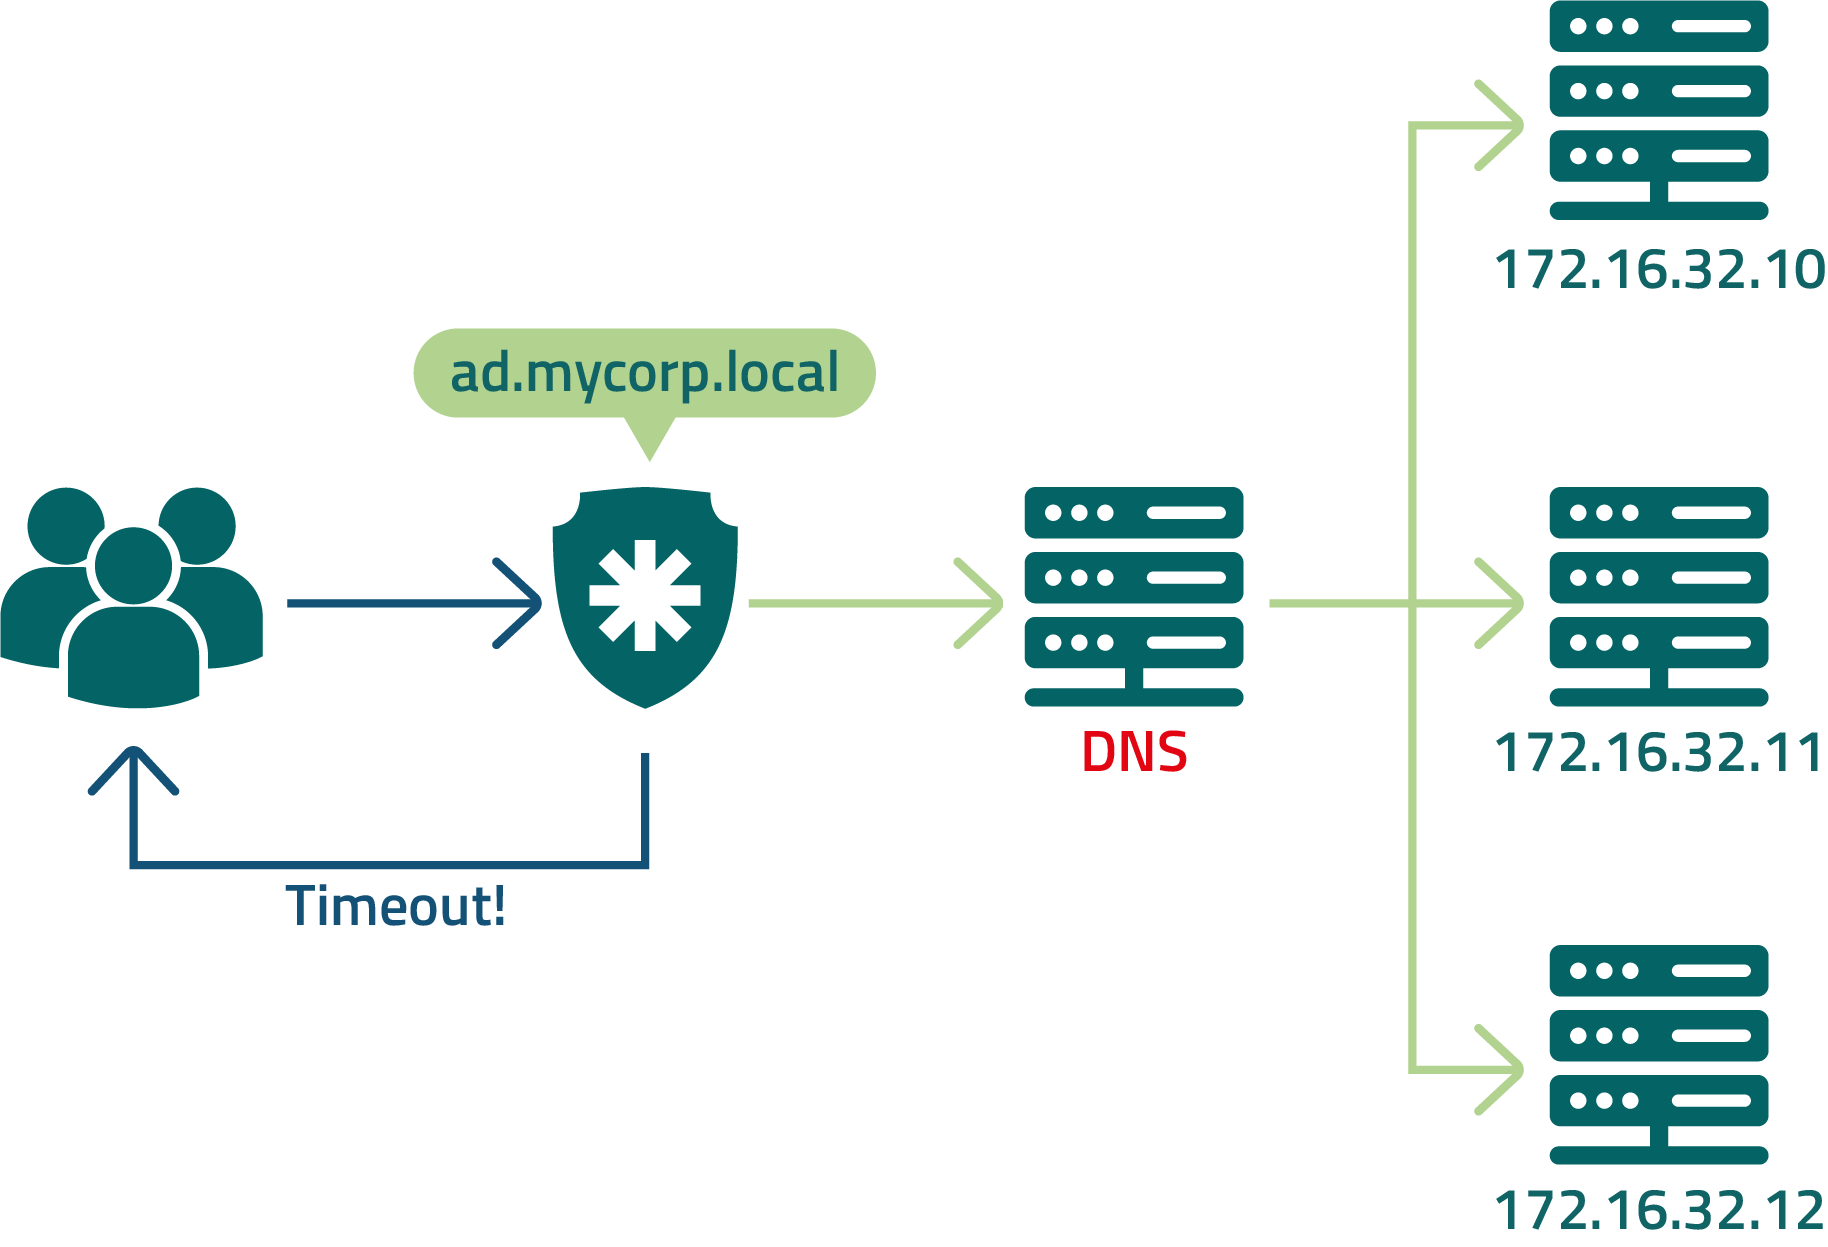
In this example, senhasegura is configured to query DNS to resolve the LDAP address being balanced by the load balancer.
Despite the ease of configuration, users may not be able to log in to senhasegura if the DNS server is unavailable.
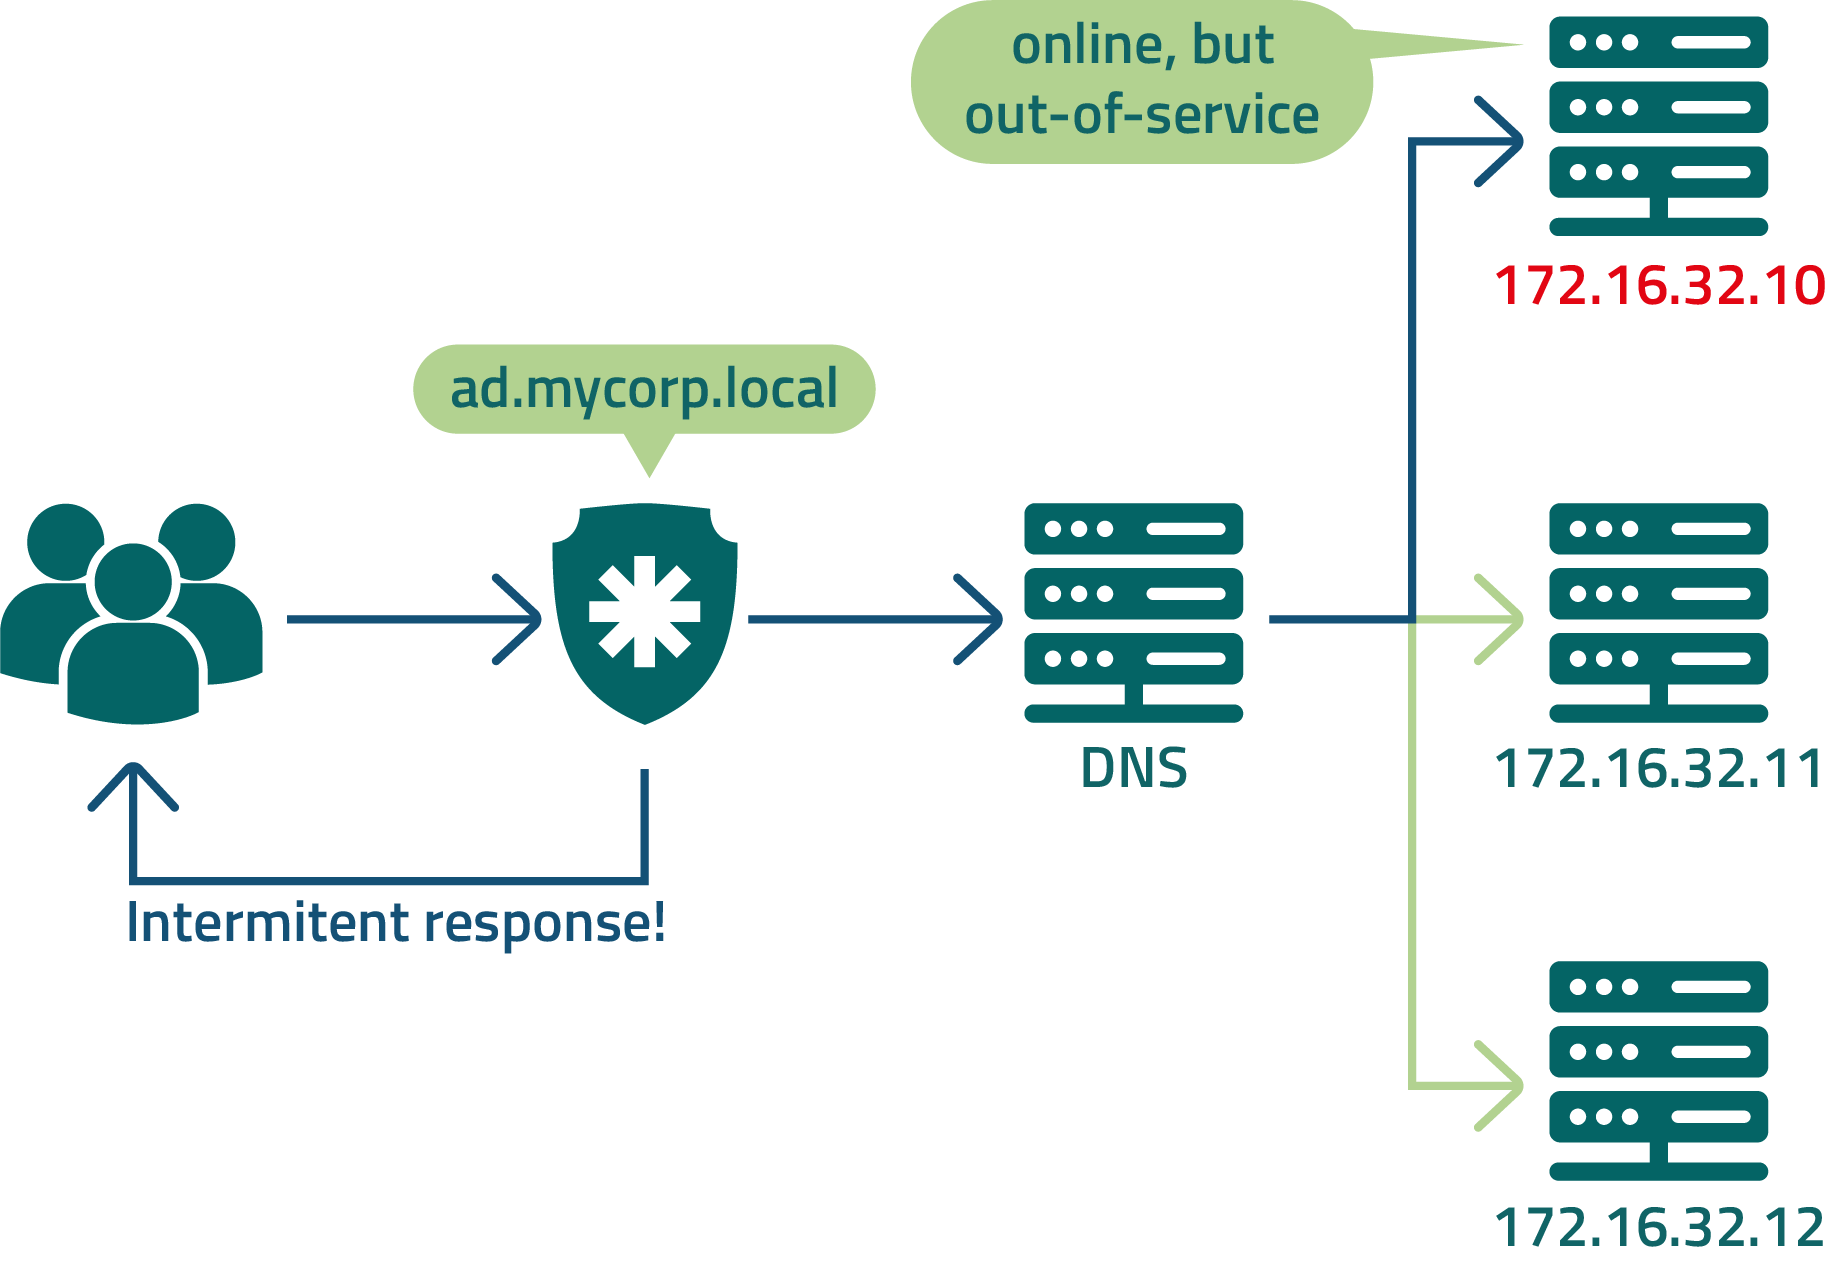
Sometimes the LDAP cluster member is unavailable for query, but the load balancer is not yet aware of this outage. In those cases, the user may receive an intermittent authentication attempt.
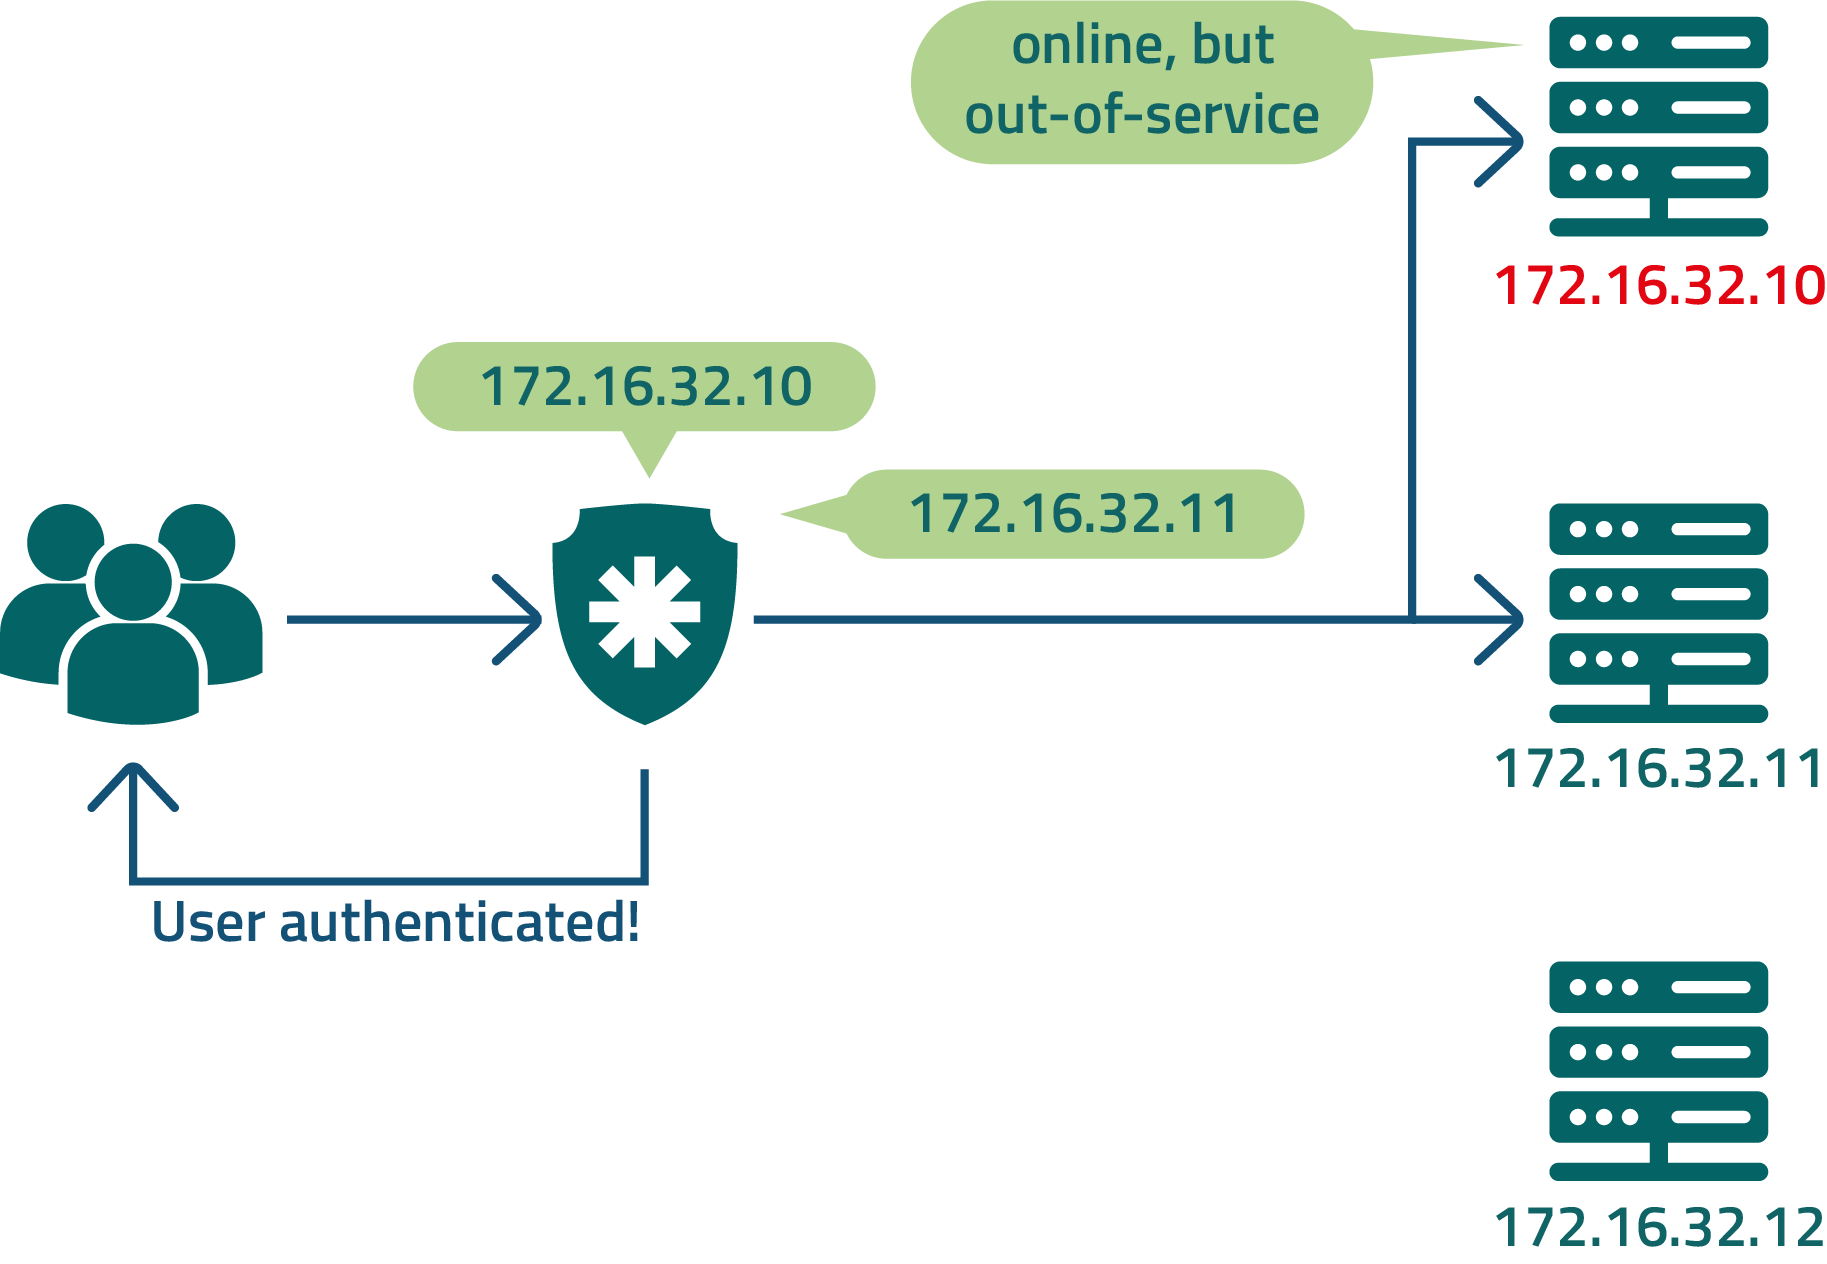
As a suggestion to avoid the cases described above, you can shorten the jumps and mitigate the risks present for DNS usage and a load balancer by registering all LDAP cluster members directly in senhasegura .
senhasegura will manage the sequence of inquiries. And if any member does not respond to the request, the next server will be asked.
Check with the customer about what will be the order of servers so it does not affect usage by other applications.
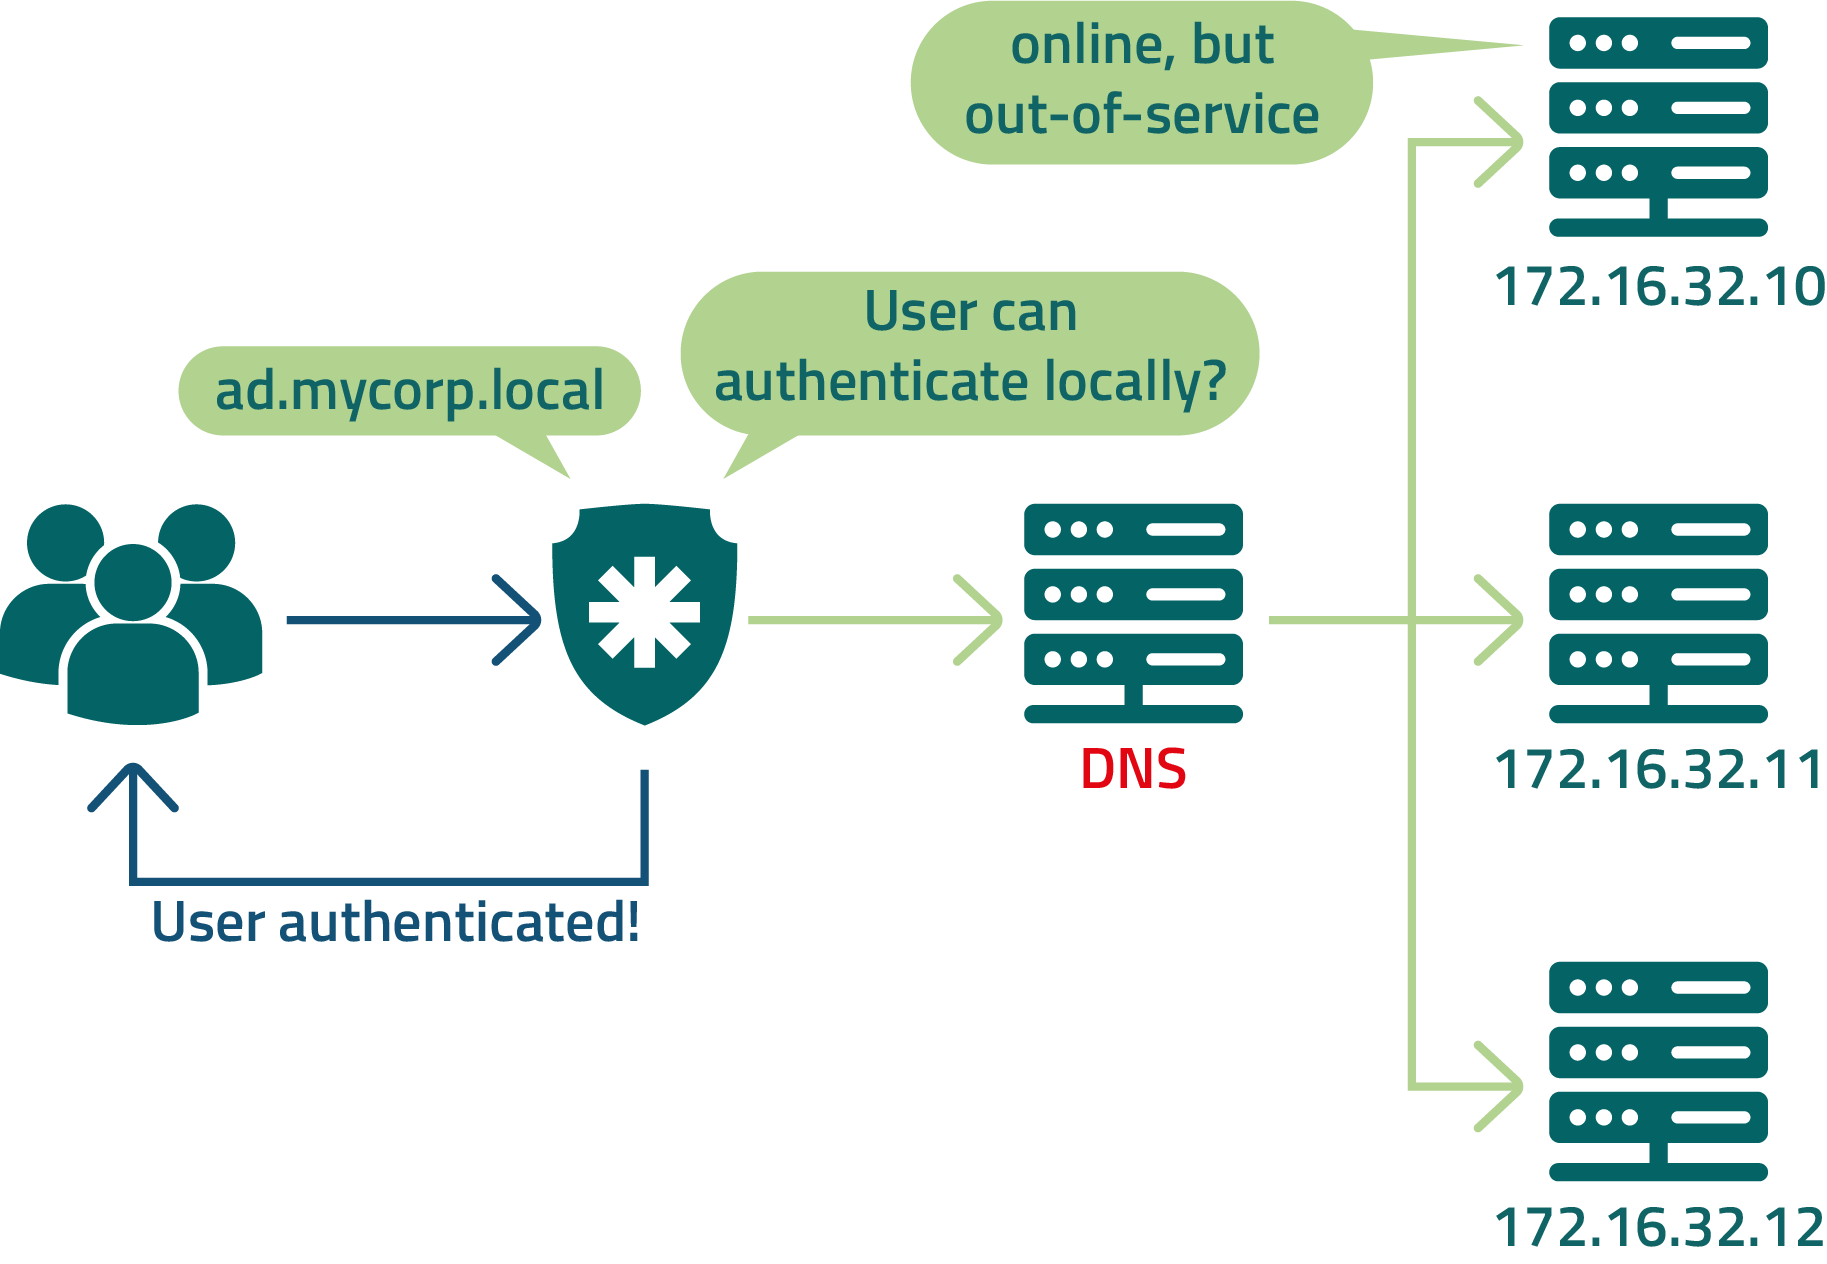
If DNS is offline as described in our first example, you can still configure senhasegura so that some trusted users can authenticate locally. This can be done on each user.
Configuring LDAP authentication servers in senhasegura
Before configuring the LDAP servers, it is necessary that these LDAP servers are already registered as devices in senhasegura , and that there is already a query credential to the LDAP registered. This credential will be used by senhasegura to perform user synchronization.
During the user authentication step, the user-provided credential itself will be used.
Within the Settings ➔ Authentication ➔ Active Directory ➔ Servers menu.
In the presented report you have access to all server records that are being queried by the LDAP authentication process if the Active Directory authentication provider is active.
By default senhasegura already has a template record. You can change or inactivate the default record.
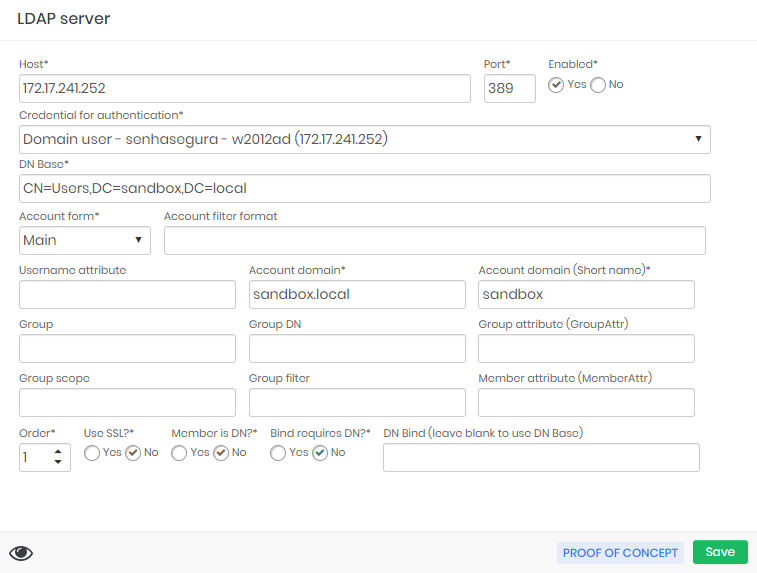
The registration form of an LDAP server contains several fields that serve to identify and filter the users that senhasegura can see. For a more comprehensive configuration you should be aware of the following fields:
Host: IP or hostname of the LDAP server;
Port: Port that the LDAP service is open for interaction;
Enabled: Status of this configuration;
Credential for authentication: The credential that is being used to perform user synchronization. Do not confuse with the credential used by the user for authentication;
DN Base: Address of AD elements that will serve as the basis for querying and synchronizing senhasegura ;
Account form: The users query can be performed using the following formats:
Username: just using username;
Backslash: using domain and username separated by a slash. Eg.
domain\userMain: using username and domain separated by at. Eg.
user@domain.netDN: Use DN filter for account identification;
Account domain: Full domain name;
Account domain (short name): Short domain name;
Order: Server query order under senhasegura authentication chain;
Use SSL: Flag this LDAP server have encryption by becoming an LDAPS;
Once registered and active, senhasegura can use this server to authenticate users.
Setting the authentication order for special users
Let's now configure fallback for local authentication of high-trust users. The rest of the users will respect the default order of the system.
You can refer to the default order of authentication in the Providers report. Exceptions are configured in the Providers by user report.
The admin user who is installed by default in senhasegura already has a record in this report showing that their authentication provider is only the Local and the first one.
For other users that need a secondary authentication provider, it is important to set the company's primary authentication first and keep the local authentication at last in the authentication chain.
Configuring group and user synchronization
With these previous settings, it is already possible for users to authenticate to the system if the user account is manually created inside senhasegura . But all registration management and user maintenance are not centralized. It is preferable that the user registration changes, which are being made on the LDAP server, be reflected in the user configuration and access groups of senhasegura .
senhasegura delivers the synchronization of LDAP users. The process is fully automated and requires a few steps, but you will need to pay attention to it.
Before we start setting up groups, you must be aware of how senhasegura Access Groups and Access Profiles work.
Another important information is that the senhasegura user synchronization service runs every three minutes.
Through the Group Synchronization menu, you have access to the working sync settings.
Each record is a different synchronization rule. And they may be querying the same LDAP server or different servers.
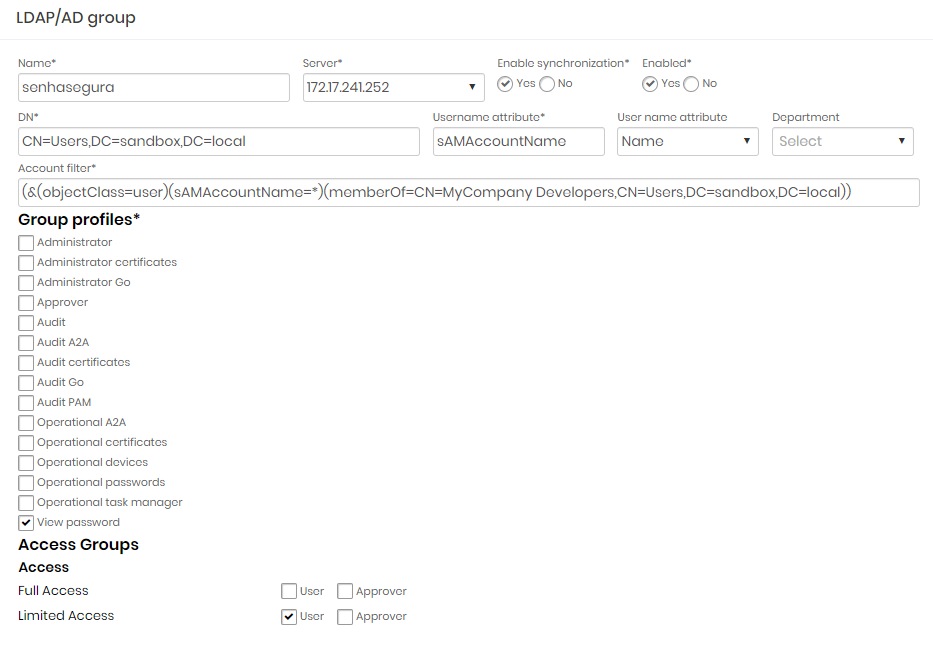
In the configuration form you will set a name to the rule, configure which server should be asked and which DN filter to use. It's interesting to keep sync down while you are setting up to avoid wrong users' creation.
Flag which Access Group and Access Profile each user will receive and save the configuration.
Perform the test to see if the filter used is showing the correct users. To do this, click the Synchronization test record action of the registered configuration.
On the synchronization test screen, validate that the DN and User Filter fields are populated in the same way you previously registered. If ok, click Simulate.
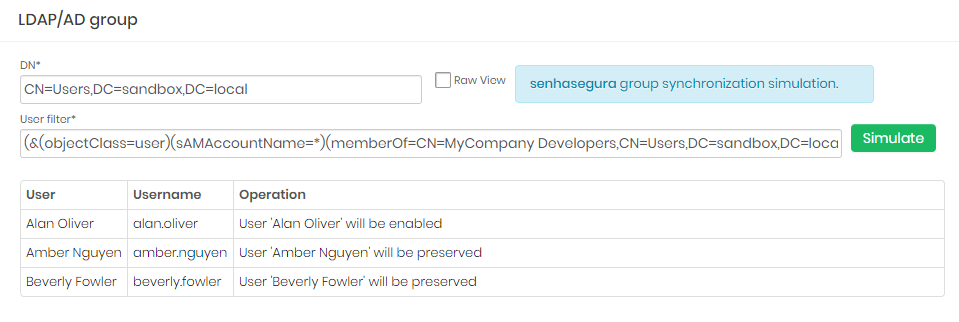
Notice the result. senhasegura will print the accounts that will be created, modified or maintained.
If you agree with the result presented, you can then enable synchronization by editing the configuration. Every three minutes senhasegura will perform synchronization, provisioning users, and recording the operation in the log reports Synchronized Users and Group Synchronization Log.
The Failure log report contains per-user authentication failure records. Use this report for a deeper diagnosis. By default, the user does not receive the detailed message from LDAP at the login failure, but in this report you have access to the original response.
Additional Security Settings
Through the Settings ➔ System parameters ➔ Security menu you have access to additional security settings. In this screen you have access to settings that affect all system users.
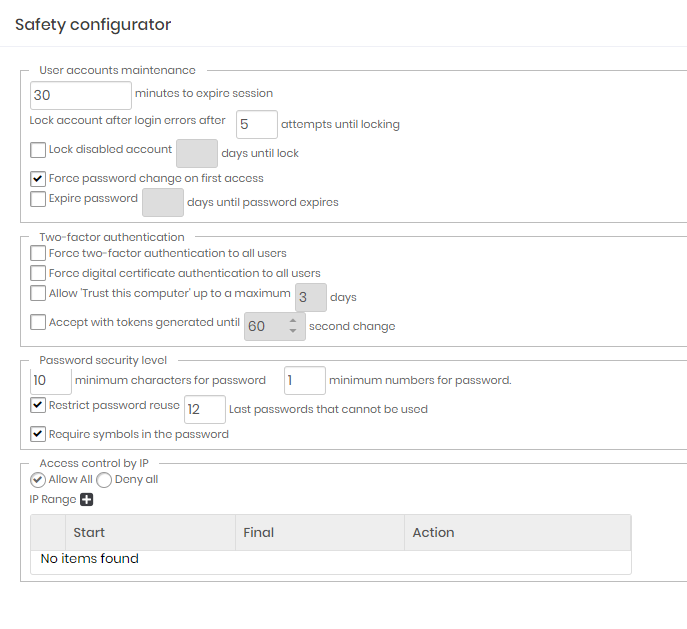
User accounts maintenance
Minutes to expire session: Inactivity time on the web interface so that the user session automatically expires.By default 30 minutes;
Lock disabled account: Flag to automatically block accounts that were not used after a range of days.Inactive by default;
Days until lock: Number of days to consider for an inactive account to be blocked;
Force password change on first access: Flag if the user must change his temporary password in the first access. Active by default;
Expire password: Forces the user's password expiration after a period of time. Inactive by default;
Days until password expires: Number of days for the password to expire automatically;
Warning. The Lock disabled account, Force password change on first access and Expire password configurations can only be used when the standard authentication provider of the senhasegura is in use.
If the user is using an external authentication provider that already has these controls, the authentication provider that must provide the rules.
Two-factor authentication
Force two-factor authentication to all users: By activating this configuration, all users, including the administrator, will have to immediately configure and use the MFA in senhasegura. Use carefully not to affect the current users sessions;
Force digital certificate authentication to all users: By activating this configuration, all users, including the administrator, will have to link a X.509 digital certificate in the login act;
Allow "Trust this computer" up to a maximum X hours: Once active and with hour range set, the MFA token won't be requested every login trial. This allows the tools that execute simultaneous logins in lots of terminals SSH;
Accept with tokens generated until X second change: Some devices are not configured on NTP servers, generating an interval of seconds that can affect authentication using TOTP. In these cases, set the accepted interval in this property;
Enable use of an external multi-factor authentication solution: Allows external providers SSO, hosted in cloud or on-premise, using protocols approved by senhasegura, are used as authenticators;
Password security level
Minimum characters for password: Minimum length for the user password;
Minimum numbers for password: Minimum number of numerical characters in the password composition;
Restrict password reuse: Does not allow password re-use by the user;
N last passwords that cannot be used: Number of passwords that will be considered by senhasegura to identify the re-use by the user;
Require symbols in the password: Indicates whether special characters must be used in the password composition;
Warning. The password security level settings are valid only when the default authentication provider is in use.
If the user is using an external authentication provider that already has these controls, the authentication provider that must provide the rules.
Access control by IP
Allows access or denial of access to IPS and network segments.
This list acts like an Allowlist or Denylist. Be very careful to not restrict administrator access that is creating the rules.
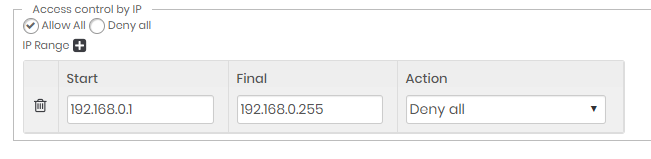
Creating Allowlist rules
In this scenario, senhasegura must be configured for Deny all access and accept only the access configured in the list.
Configure the general rule for Deny all, and in the IP list, configure the ranges with the Allow all rule.
With this setting, only the IPs on the list can authenticate in the senhasegura .
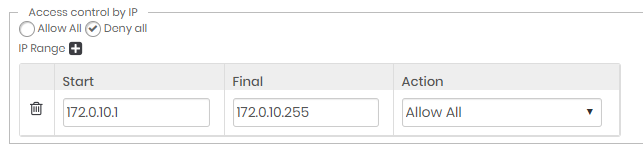
Creating Denylist rules
In this scenario, senhasegura must be configured for Allow all access and will block attempts from the IPs configured in the list.
Configure the general rule for Allow all, and in the IP list, configure the ranges with the Deny all rule.
Review and Certification
Review and Certification have the objective of guaranteeing that all access groups and users of senhasegura have the correct level of access, through periodic reviews. To bring more security to the platform, the review system is responsible for reminding the administrators of the access characteristics of each group, making sure that there is no extra access for any group, as well as checking that the users are correct. Not only the access groups but the users are also reviewed individually so that no old employee or one who has changed area continues with the permissions of the previous position.
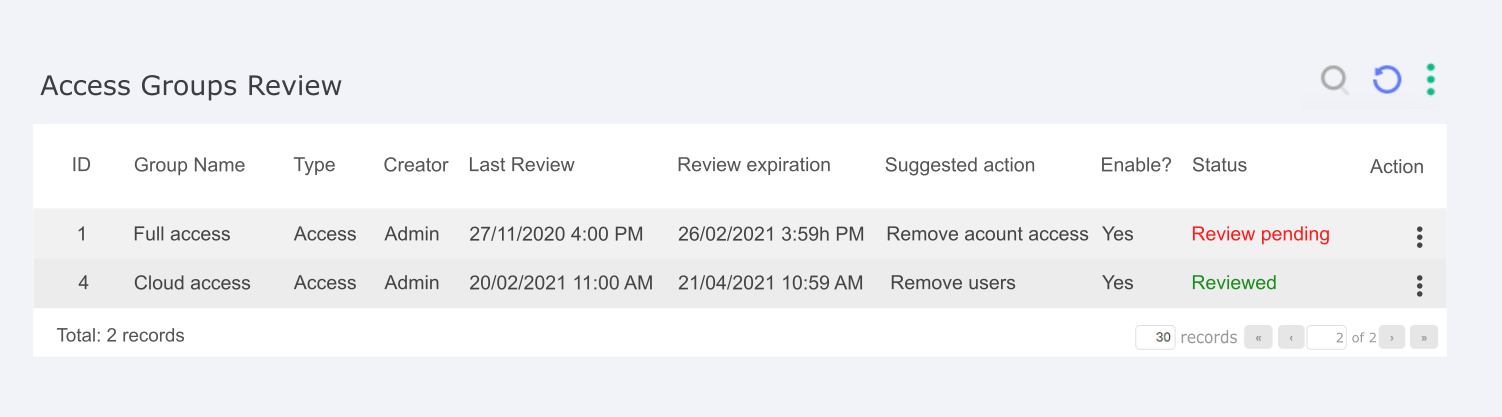
Group Review
The group review is composed of a screen and alerts that allow administrators to always have control over all the group's characteristics. The screen is essentially made up of a report responsible for allowing the identification of the access group to which it refers and its review dates. The columns that constitute this report are:
Date of last review: serve to alert you to the validity of that review and when you will need to review it again;
Review expiration date: serve to alert you to the validity of that review and when you will need to review it again;
ID: ID to identify the group;
Group Name: Group Name to identify the group;
Creator: Creator to identify the group ;
Creation Date: Creation date to identify the group;
Group Type: Group type are responsible for identifying the group;
Enable?: The Enable column lets you see whether the group remains active or not;
Status: The Status column is responsible for giving visibility to the status of that group's review, being "pending review" and "reviewed" the possible options, the first option takes the color red and the second green to help visualization;
Action Button: Action button brings up three options: Approve and Disapprove, to do the review quickly, and Details to access more information about that group.
The Suggested Action column brings an action recommended by the system based on the information in that review, making it easier for the reviewer to judge. The options are based on quick tips such as:
Remove user: The suggestion is to check the users in the group, as there are users who have not logged on for a long time.
Remove account access: The suggestion is to check the accounts registered in the group, because some users have not used them for a long time.
Every group on its creation will have a pre-configured review time, the system default being 90 days, and this is the main trigger for the pop-up alert in the windows tray so that no review is forgotten and the security of the platform is threatened. Not only after the pre-set time, but alerts can also be set for other events such as the addition of new users to the group.
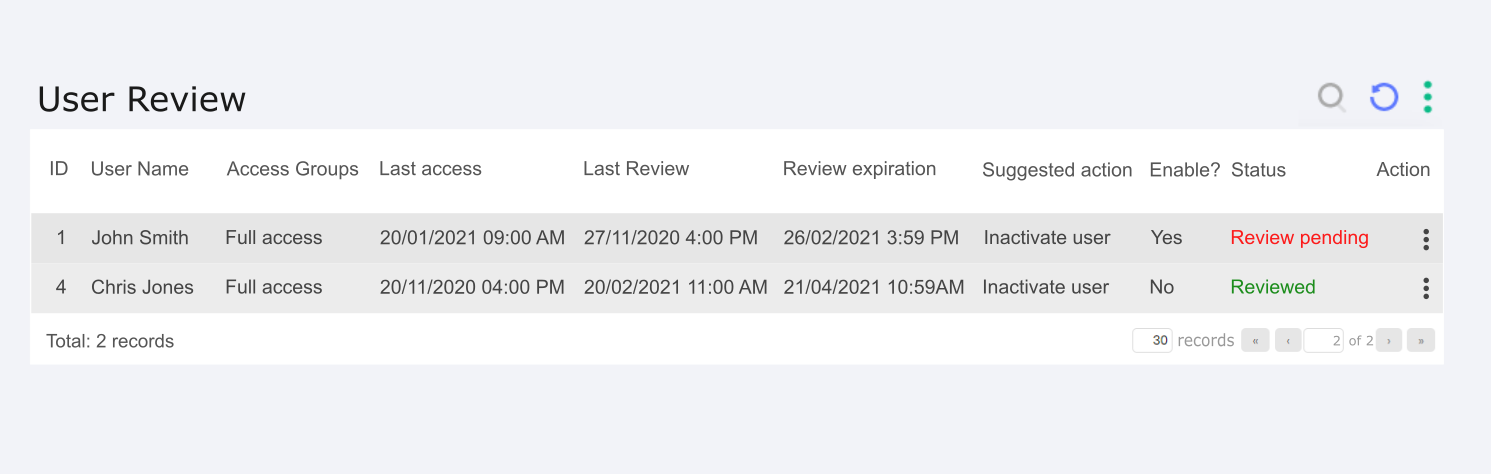
Users Review
The user review is similar to the group review, with a screen and alerts. In the case of users, the report present on the screen has the following columns:
Date of last review: serve to alert you to the validity of that review and when you will need to review it again;
Review expiration date: serve to alert you to the validity of that review and when you will need to review it again;
ID: ID is the user identification;
User's name: User name is the user identification;
Access groups: Access groups is the group the user is a member of;
Last Access: Last access bring useful information for the administrator about the last access perfomed by the user;
Enable?: Enable bring useful information for the administrator, if the user is enabled in the system;
Status: The Status column is responsible for giving visibility to the status of that group's review, being "pending review" and "reviewed" the possible options, the first option takes the color red and the second green to help visualization;
Action Button: Action button are the quick actions Approve and Disapprove, as well as the possibility to see more details.
As with the group review, the Suggested Action column brings an action recommended by the system based on the information in that review, making it easier for the reviewer to judge. The options are hints to guide the reviewer such as:
Disable user: The user has not logged in for a long time and should be disabled
Remove from access groups: The user does not use the credentials of the access group they are in, so we suggest removing them.
Reviewing users will also generate alerts in pop-up form, keeping administrators up to date on which users need to be reviewed. The trigger for the review is mainly the review time that must be configured according to your needs, the system recommends 90 days. Other events can also be configured, such as a user inactivity limit.
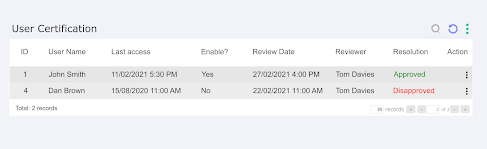
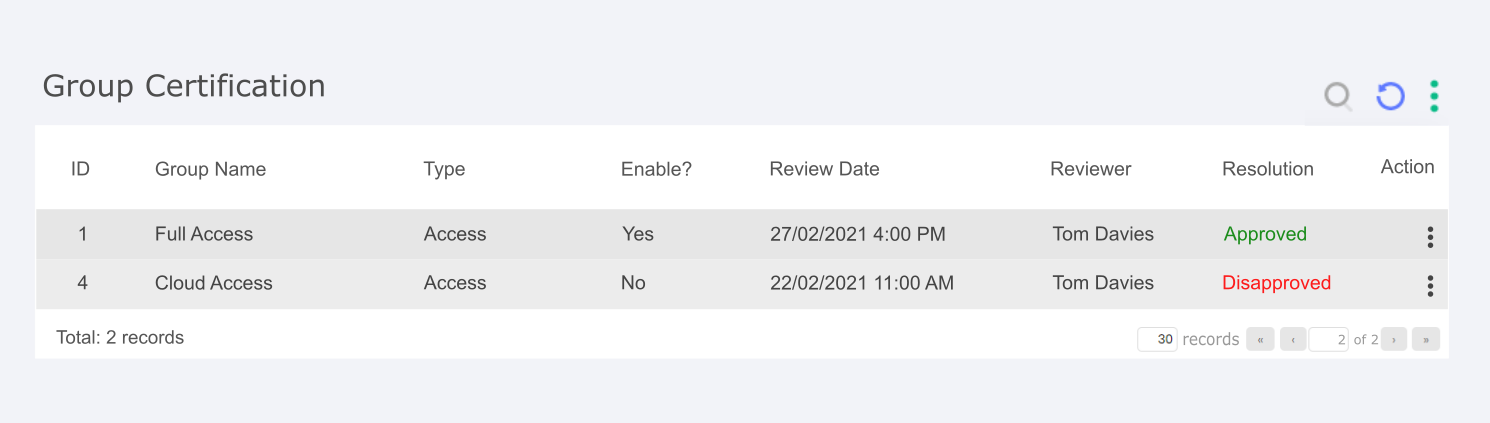
Certification
The goal of Certification is to ensure that the actions taken on reviews are correct, reversing them when necessary. It consists of two screens with reports that register all the actions taken on reviews by groups and users. This way the group in charge of certifying the actions can see information about each review and undo the actions taken, reactivating a user or deactivating an access group, for example.
The columns present in the group certification screens are:
Review Date: The Review date is responsible for identifying the date of that review;
ID : The ID is responsible for identifying the target of that review;
Group Name: The group name is responsible for identifying the target group of that review;
Group Type: The group type is responsible for identifying the group type of that review;
Enable?: Enable bring useful information for the administrator, if that review is enabled in the system;
Reviewer: The Reviewer is responsible for identifying the one who take de action;
Resolution: Resolution help to recognize the action taken by the reviewer;
Action button: In the Action button, we have the options of certifying the action taken or reversing it
For user certification, the columns are repeated except:
User Name: The user name is responsible for identifying the target user of that review;
Last Access: Last access help to recognize the last access perfomed by the user;
The certification actions are then saved in the screens' reports, reports that can still be printed and saved for future audit processes.
Conclusion
By completing this book you will have acquired the knowledge to perform the senhasegura user management related activities.
If you wish to continue learning how to use the senhasegura in the best possible way, please ask our support team for our available documentation according to your profile and needs.
- Single Sign-On↩