Task Manager Cookbook
Introduction
This book will explain the simple way to use the Task Manager module in senhasegura to automate the execution of activities.
Who is this book for?
The Task Manager Manual is written to engage deployers, users and system administrators who need to perform privileged tasks on servers, in an automated manner, without the need to share credentials or grant access to an operator.
What you need to understand first
This book requires the reader to have already had a first experience with senhasegura and have an instance of the solution with at least one device and one credential registered. It is also important to understand how to insert execution templates into the system and how the Executions module work.
Before continuing reading, if you have not yet had this first experience, or executed a password exchange you should consult the following content:
Getting Started Cookbook: This cookbook explains in a simple way the use of senhasegura from its installation to the use of basic functions.
Executions Module Manual: This manual will explain in the simplest way how the senhasegura executors work
Symbols used in this cookbook
This book uses the following symbols to highlight information that should be taken into account for the best use of senhasegura :
Info - useful information that can make the use of the solution more dynamic
Caution - actions and items that cannot be ignored
commands: data that must be entered in the same way as described in this book- URLs : paths to access web pages.
<KEYS>: keyboard paths that will be used to perform actions.
Setting up your Task Manager
Task Manager requires some settings to be made before selecting scripts and scheduling executions. In this chapter we will understand the prerequisites for using the module and the initial settings required.
Prerequisites
To use this module is necessary:
Have a device1 configured with a port for remote access, according to the system. Example:
SSH 22 (Linux or Unix)
RPC 135, RM 5985 or 5986 (Windows)
The device has a credential2 with permission to run the scripts remotely.
To have an environment and a system, registered in the senhasegura
To have a reason for execution, registered.
Possess a registered execution template.
Have an access group for this module.
Registering an environment
An environment in the senhasegura refers to where that task will be executed.
For example, we can say that the task we create will be executed in the environment where the development activities are carried out, that is, our environment will be that of Development.
This setting is only an identification, it will not influence any real configuration of the environment.
Other examples of environments may be: Homologation, Production and others.
If you already have an environment registered in the senhasegura go to the next section.
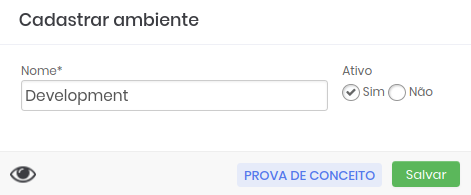
To register an environment follow the instructions:
Access Settings ➔ System parameters ➔ Segmentation ➔ Environments
Click the Show Actions button and select the New option
Set the name of the environment and click Save as in the figure ambiente-enus
Registering a system
Systems in the senhasegura are the platforms where the environments are present.
Using the previous example we can say that our development environment is installed in a cloud system, that is, our system will be Cloud.
This configuration is only an identification, it will not influence any real system configuration.
Other examples of systems can be: Mobile, Web, Intranet and others.
If you already have a system registered in the senhasegura go to the next section.
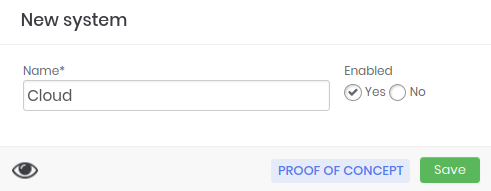
To register a system follow the instructions:
Access Settings ➔ System parameters ➔ Segmentation ➔ System
Click the Show Actions button and select the New option
Set the system name and click on Save as in the figure sistema-enus
Registering a reason
For the execution of a task it is important to define a reason why this activity should be performed.
If the reasons you need are already registered in the senhasegura , go to the next section.
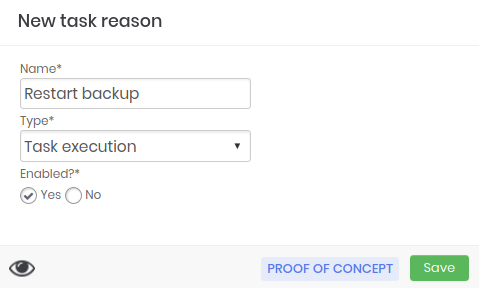
To register a reason follow the instructions:
Access Task Manager ➔ Settings ➔ Reasons
Click the Show Actions button and select the New option
Define the reason in the Name field and select the type of activity as in the figure motivo-enus
Registering a template
Templates are the set of commands to execute an activity through a plugin.
Some activities require a specific order and commands, we can explain this as follows:
A template that has the objective of installing update packages will have different execution steps from a template to stop or restart a service.
It is important to emphasize that although they are different templates can use the same plugin to run or not, since one must take into account the technologies and types of systems involved.
To insert a new template task manager access the template report: Executions ➔ Settings ➔ Templates
Follow the instructions:
Click the Show actions button on the report
Click on the New template option
In the registration form displayed enter the name that this template will have in the field Name.
infoChoose a name that refers to the objective of the template so that it is easy to find it whenever you need it. E.g. Linux - Restart service
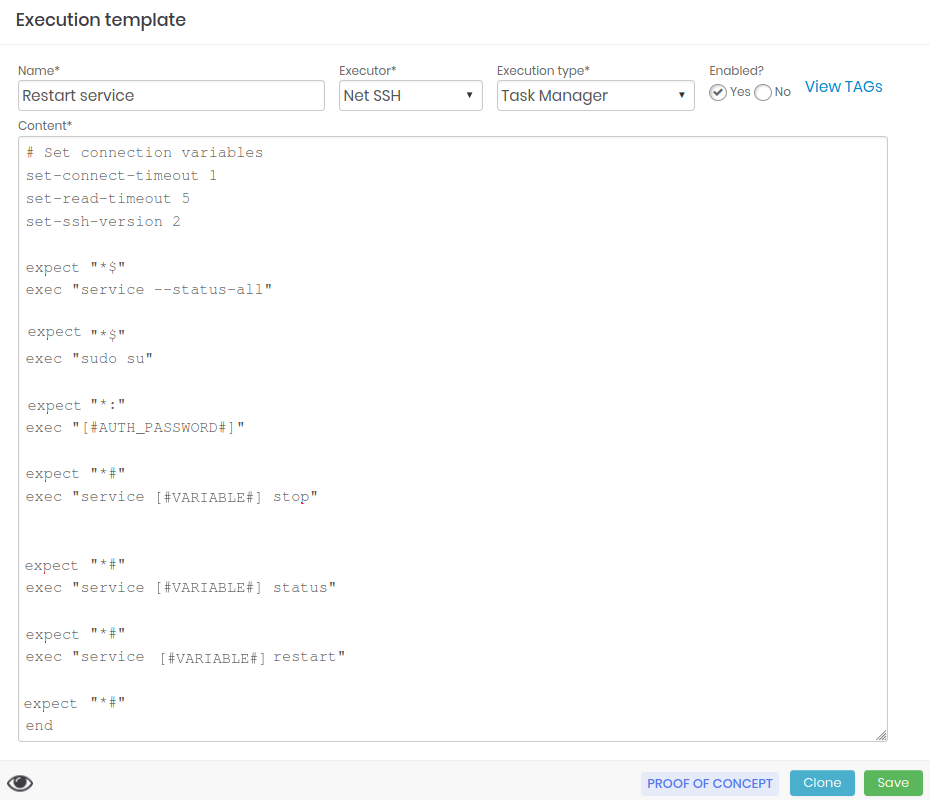
Template registration form Select the plugin that this template will use in the options box of the Executor field.
Select the Task Manager option from the options box3 from the Execution type field.
Select from the options if you want the template to be active or not in the Active? field. So when creating a task this template can be chosen or omitted from the available options.
In the Content field enter the commands that will be executed in the task.
infoThe View TAGs button, as shown in the figure template-enus presents a description for the use of TAGs in templates
To exemplify the syntaxes used in the templates we present below an example template of service restart:
infoFor comments use the sharp character '#' at the beginning of the line.
This is an example of a comment#Checks the status of all services
expect "*$"
exec "service --status-all"
#Root user access
expect "*$"
exec "sudo su"
#Enter the root user password
expect "*:"
exec "[#AUTH_PASSWORD#]"
#Stop the service
expect "*#"
exec "service [#VARIABLE#] stop"
#Displays the status of the service
expect "*#"
exec "service [#VARIABLE#] status"
#Restart the service
    expect "*#"
    exec "service [#VARIABLE#] restart"
#Finalizes the execution of the task
expect "*#"
endNote that the service to be restarted is not mentioned in the template, this is because we are using the tags option here, which we will see in the next chapter. However, in your template, if you wish, insert all the details of the desired execution.
After filling the fields click on Save
Editing an template
To change the content of any template, follow the instructions:
Access the template report: Executions ➔ Settings ➔ Templates
Choose the template you want to edit.
You can use the filter at the top of the report and find the template through its: Execute, Type and other items.
When you find the template click on the respective action button and select the option Edit template
Change the information you want and when you are done click Save.
Viewing the change history
All the modifications in the templates are registered by senhasegura that stores a history that helps in the consultation of what was changed and even the restoration of the template of a certain period.
To view the change history of a template, follow the instructions:
Access the template report: Executions ➔ Settings ➔ Templates
Choose the template you want to view the changes.
You can use the filter at the top of the report and find the template through its: Execute, Type and other items.
When you find the template click on the respective action button and select the option Template changes history
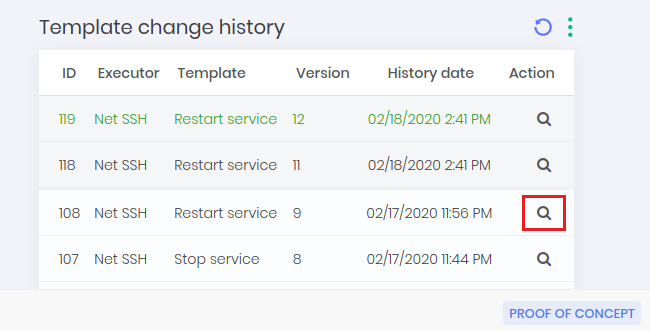
Template change report In the displayed report you can see the change date and its versions.
Click on the action button of the version you want to view the content as shown in the picture templatehis-enus.
When you view an old template a button to restore the template will appear. If you want to restore version click the Clone button and automatically the template will be updated to the previous version you want.
infoWhen restoring a template the senhasegura will register this restoration a new version of the template, allowing you not to lose any version even after some restoration.
Registering an access group
In order for the task created to be viewed, the users who will execute it must be in an access group for the tasks. To create this access group follow the instructions:
Access Task Manager ➔ Settings ➔ Access group
Click the Show actions button on the report
Click on the New group option

Task Manager access group registration form Define the group's permissions and whether group members should justify and/or request approvals to run a task, as shown in the figure grupodeacesso-enus
Go to the guide Criteria and choose the Environments and Systems where the members of this group will be able to perform the tasks
Go to the Users tab and click the Add button and select the users that were part of this group and then click Add Selected as in the figure grupodeacessousu-enus.
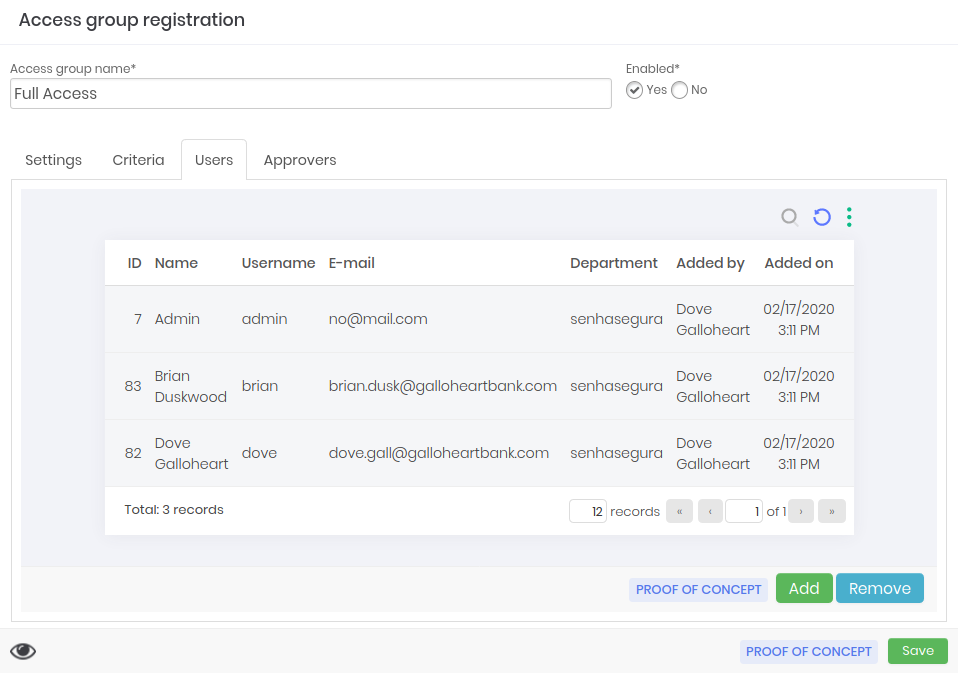
User registration form for the Task Manager access group If you have selected a user by mistake click the Remove button and similarly select the users you wish to remove.
If you have defined in the guide Configurations that group members need approval it is important that the guide Approvals be filled out.
As the users were selected in the previous step, select the approvers.
cautionIf the approval is in levels, you must also define the approval level of each one.
infoYou can check your task execution requests via the menu Task Manager ➔ My requests.
If you are an approver check the requests made to you through the menu Task Manager ➔ My approvals
With these settings you will be able to register and run a task as we will see in the next chapter. % Redefinindo a pasta atual do capitulo
Task Manager and its actions
Now that the necessary settings have been defined, Task Manager can start to be used to manage the privileged tasks on your devices.
To better understand the use of the module we can present the following scenario:
"In an organization there is a hired employee who performs all activities related to the management and monitoring of the system backup. Within a week this employee will go on vacation and stay away from his activities for a month.
The Information Security Manager knows that this employee has a high privilege credential to perform backup activities and understands that even during his absence the backup must continue to be managed and monitored.
But what worries him is that it will be necessary to give the credential with high privileges to another employee or create a new one only for another to perform the backup activities.
This only increases the risk surface since a user will have the power, even temporary, of a credential that is not his own, and by creating a new one the number of privileged credentials to be exploited increases."
In this case the backup activities can be created in Task Manager and executed by another employee who will not have knowledge of the credentials or access to the device where the activities will be executed.
Still with this scenario in mind, the following sections presented how to register and run a task in this context. Access the task report through the menu Task Manager ➔ Tasks to reproduce the instructions of the sections.
Registering a task
Click the Display Actions button on the report
Click the New option
infoYou can also use the Quick Actions button and select the Task option and the registration form will open automatically.
Task registration form Set or name to task no field Task identification name as in figure cadastrotask-enus
infoChoose a name that refers to the purpose of the task so that it is easy to find it whenever you need it. E.g. Restart backup services
Select the Environment and System of this task
In the Template for execution field choose the template created previously.
cautionRemember that the chosen template is a set of commands that will be executed for the task, that is, if your task has the objective to "Restart the backup services", but the chosen template contains commands to change the password the senhasegura will respect the chosen template and will execute the commands described in it.
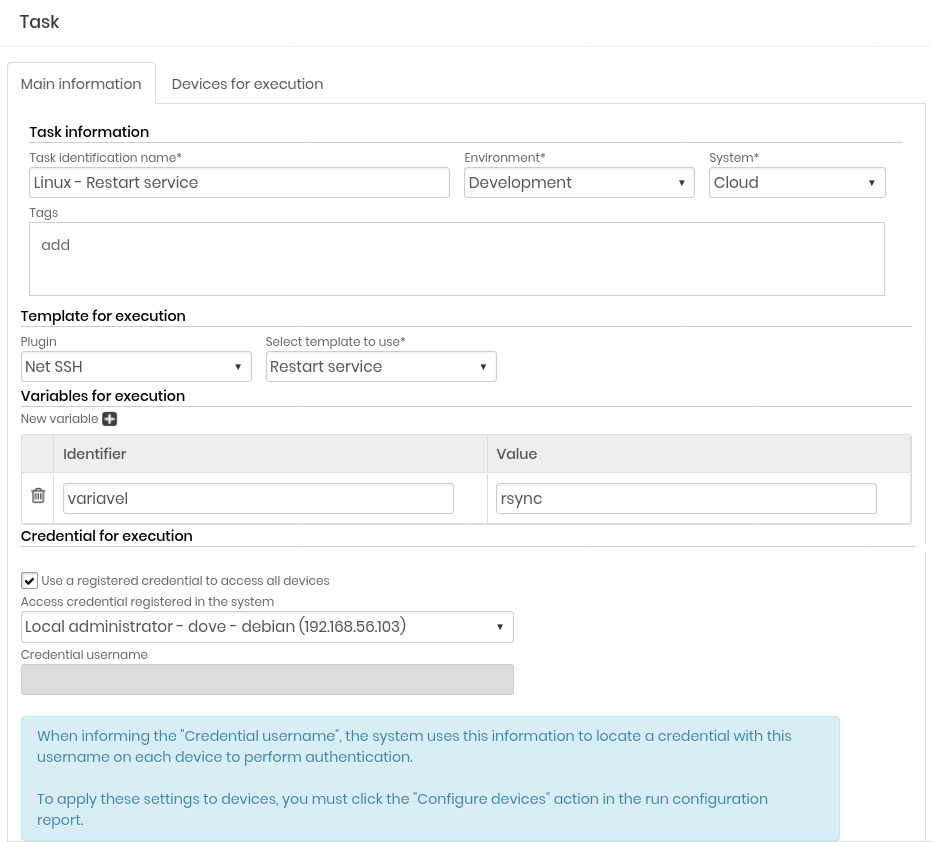
In the following division Variables for execution it will be possible to insert a value for the variable present in the template, as we mentioned in the section Registering a template.
Variables allow us to use the same template in more than one task, for example, observe this excerpt from the template:
#Restart the service
expect "*#"
exec "service [#VARIABLE#] restart"In our current task we need to restart the backup services so we will set the value of the variable [#VARIABLE#] as rsync like in the picture variavel-enus.

Task registration form - variable field In case you need to restart MySQL services I can create another task with the same template just by setting the variable value to mysql.
infoWhen using the variables in the template describe them this way: [#NAME_VARIABLE#]
In brackets ([ ])
Hash (#)
Uppercase
In the task form the variable must be typed without the brackets and the hash and may or may not be capitalized.
If you don't want to use a variable, just enter all the desired commands in the template, always taking into account that the senhasegura respect the commands entered in it.
Select the credential for execution:
Use a registered credential to access all devices: Select this box if you want to use one of the credentials registered in the senhasegura to authenticate yourself on the device where the task will be executed
Credential username: Fill in the username of the credential you want to authenticate yourself on the device where the task will be executed
Go to the next tab Devices for execution and click the Add button and select the devices where the task will run as in the figure cadastrotaskdisp-enus
Then click Add selected.
If you have selected a device by mistake click the Remove button and similarly select the devices you wish to remove.
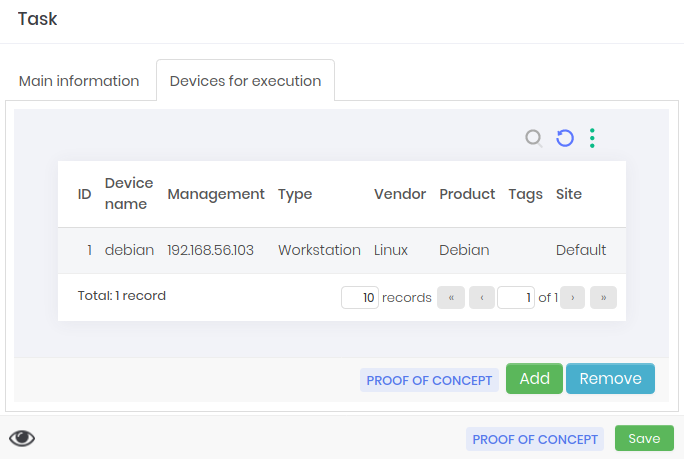
Task registration form - add devices To finish click Save.
Running a Task
After creating the task, update the report so that it is displayed and follow the instructions:
Find the task you want to execute and click the respective action button and select the Execute task option. You can use the filter at the top of the report if you have trouble finding your created task.
Select the reason for execution, already registered before.
If you belong to an access group that requires justificative the text field Reson as shown in the figure executartask-enus, should be filled in with a more detailed description of why you want this task to be executed.

Task execution justification form After filling out the form click on Run task
From this moment on the task is already being executed on the target device.
Scheduling a Task
You can also schedule the execution of the task, to do so follow the instructions:
Still on the task report and find the one you want scheduled.
You can use the filter at the top of the report if you have trouble finding your created task.
Click on the respective action button and select the option Scheduled.
At the bottom of the page click on Schedule running
Select the Reason to run, already registered.
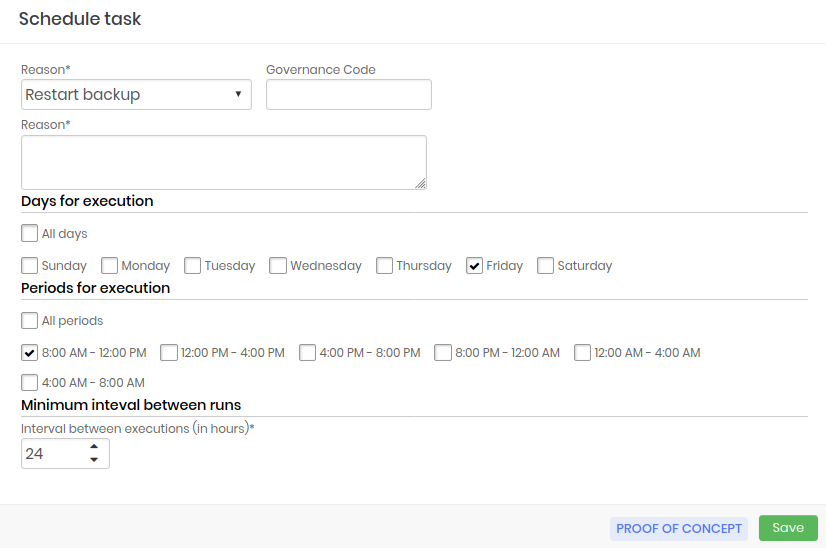
Task scheduling form Describe a detailed justification for why you want this schedule
In the next division Days for execution check the boxes with the days you want the task to run.
Em Periods for execution marque as caixas correspondente ao horário que desejada que a task seja executada.
Then choose the time interval between one run and another in hours
After setting these details click on Save.
With this the task will already be scheduled to be executed on the chosen day and time. If you wish to cancel this scheduling:
- In the schedule report click the action button Cancel schedule.
Checking execution
To check if the execution was successful follow the instructions:
Go to the operations report via the menu Task Manager ➔ Operations
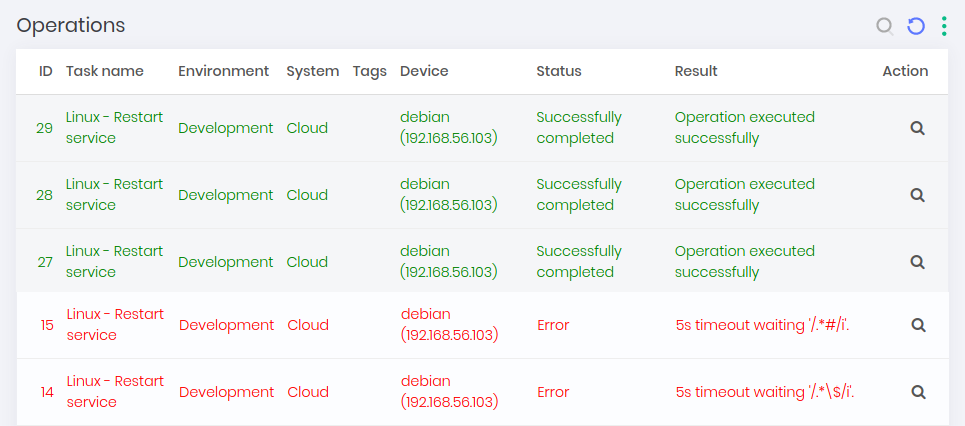
Task operation report The report will display all tasks performed, scheduled or running. The possible statuses are:
Scheduled: The task has not yet been executed and will only be on the day and time scheduled on your schedule.
In execution: At the time of opening this report the task is still being executed on the target device. Wait a few moments and reload the page to view its status after completion.
Successfully completed: The execution was completed without any errors.
Error: There were some errors during the execution of the task and it was not completed.
Cancelled: At some point before or during the execution a user requested the cancellation of the task and it was not completed.
Waiting approval: The user who requested the execution of the task is a member of a group that needs approval for its requests to be executed. The task is in standby mode until an approver of the group allows its execution.
Expired: The approval to execute the task took a long time and therefore the period for operation expired.
Use the filter bar of the form to find the desired task quickly. If your task, as in the picture operacoes-enus, is in color:
Green: was successfully executed.
Red: some error occurred in the execution.
Click the action button to confirm the Logs of execution to understand how the operation was executed and the problems in case of errors.
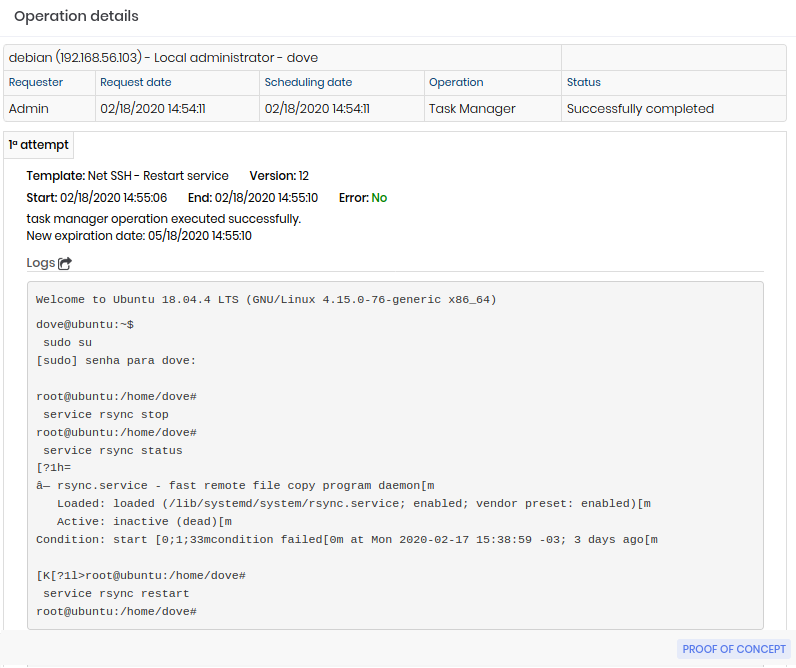
Task operation log
You can also later perform the verification on your own device of the tasks performed. % Redefinindo a pasta atual do capitulo
Conclusion
By the end of this book you will have acquired the knowledge to carry out the execution and scheduling of tasks through the.
If you wish to continue learning how to use the system in the best possible way, please ask our support team for our available documentation according to your profile and needs:
Manuals
Technical Specification
User Manual
Tool Administrator Manual
Operation Administrator Manual
Auditor Manual
Developer Manual
Guides
DevOps Reference Guide
Monitoring Guide
Cookbooks
Getting Started Cookbook
Password Change Cookbook
Task Manager Cookbook
- If you still don't know how to register devices and configure access ports, consult the Getting Started Cookbook.↩
- If you still don't know how to register credentials and configure your access, consult Getting Started Cookbook.↩
- This cookbook aims to deal only with the subject Task Manager the other types of executions in this box will be covered in other documentation, please consult our support team about them.↩