Automated operations
Introduction
This book will explain one of the most important module inside senhasegura environment. The Execution module.
Many senhasegura features needs to perform assyncronous tasks into target systems. And these systems runs with common protocols or interfaces that can be easelly managed by senhasegura over its plugins (as you will understand better reading this manual).
Facing this real deal, senhasegura Execution module will centralize all common operations targeting execute commands or interactions over remote systems. Keeping all clients modules notified, giving a rich audit trail, logs, retrying over failures and rich data dashboards to increase the client secure governance.
Who is this manual for?
Execute Module Manual is written to familiarize deployers, users and system administrators who need to request, execute, monitor and audit the remote assync execution over priviledge information, performed through the senhasegura .
What you need to understand first
This book requires the reader to have already had a first experience with senhasegura and have an instance of the solution with at least one device and one credential registered. Before continuing reading, if you have not yet had this first experience, you should consult the following content:
- Getting Started Cookbook: This cookbook explains in a simple way the use of senhasegura from its installation to the use of basic functions.
Symbols used in this cookbook
This book uses the following symbols to highlight information that should be taken into account for the best use of senhasegura :
Info - useful information that can make the use of the solution more dynamic
Caution - actions and items that cannot be ignored
commands: data that must be entered in the same way as described in this book- URLs : paths to access web pages.
<KEYS>: keyboard paths that will be used to perform actions.
The Execution module
As said before on the introduction, the Execution module has many others senhasegura modules as client. For an example, it can be used to:
Automated password change in senhasegura PAM Proxy;
When its valid period expires;
When its was requested plain-text by some user;
When its was used into a proxy session;
When its was requested by some WebService A2A Application;
When its parent credential started a chained change action;
Credential activation or inactivation by senhasegura PAM Proxy;
When some user needs to start a proxy session using a locked credential;
When some user needs to start a proxy session using a JIT credential;
When some user finished a proxy session;
When a automated task needs to start in the Task Manager Module;
The task execution can be triggered by some user;
The task execution schedule triggered the execution;
When a SSL certificate, managed by Certificate Manager Module, needs some action;
A certificate request should be released;
A certificate need to be signed into a specif CA or a commercial CA;
A certificate need to be revoked;
A certificate need to be published;
We recommend reading your specific manuals for better understanding.
Through the Executions module the user will have control over the following actions:
Request privileged information changing;
Track privileged information operations;
Detail attempts to change privileged informations;
Request a privileged information changing reconciliation;
Configure privileged information operations automation;
Know the privileged information changing parameters;
Create new privileged information changing templates;
Segregate devices and credentials through profiles;
Configure threaded automations;
To accomplish its functions, the Execution module can be divided into three major entities.
Operation
An operation representing a confirmed task to be done. It is registered by the client module which defines its target credential, device and also the starting time. An operation is composed by a target System, a target privileged information, an Executor and a Template.
Executor
Also known as plugin, represents the protocol or engine to be used to connect and interact to a target system. The system can be a SSH server, a Windows over RPC, a website, a Webserver, a Cloud Provider, or any other interactible system!
Templates
are the source-code of the task to be executed. Its have a particular syntax defined by its Executor, but every template can be composed using some masks representing Credentials, SSH Keys, Devices, Certificates, DevOps Secrets or User defined values. These masks will be replaced at the execution time.
We will explain better one-by-one in this manual. But let's take a look at the following chart to understand how they interact.
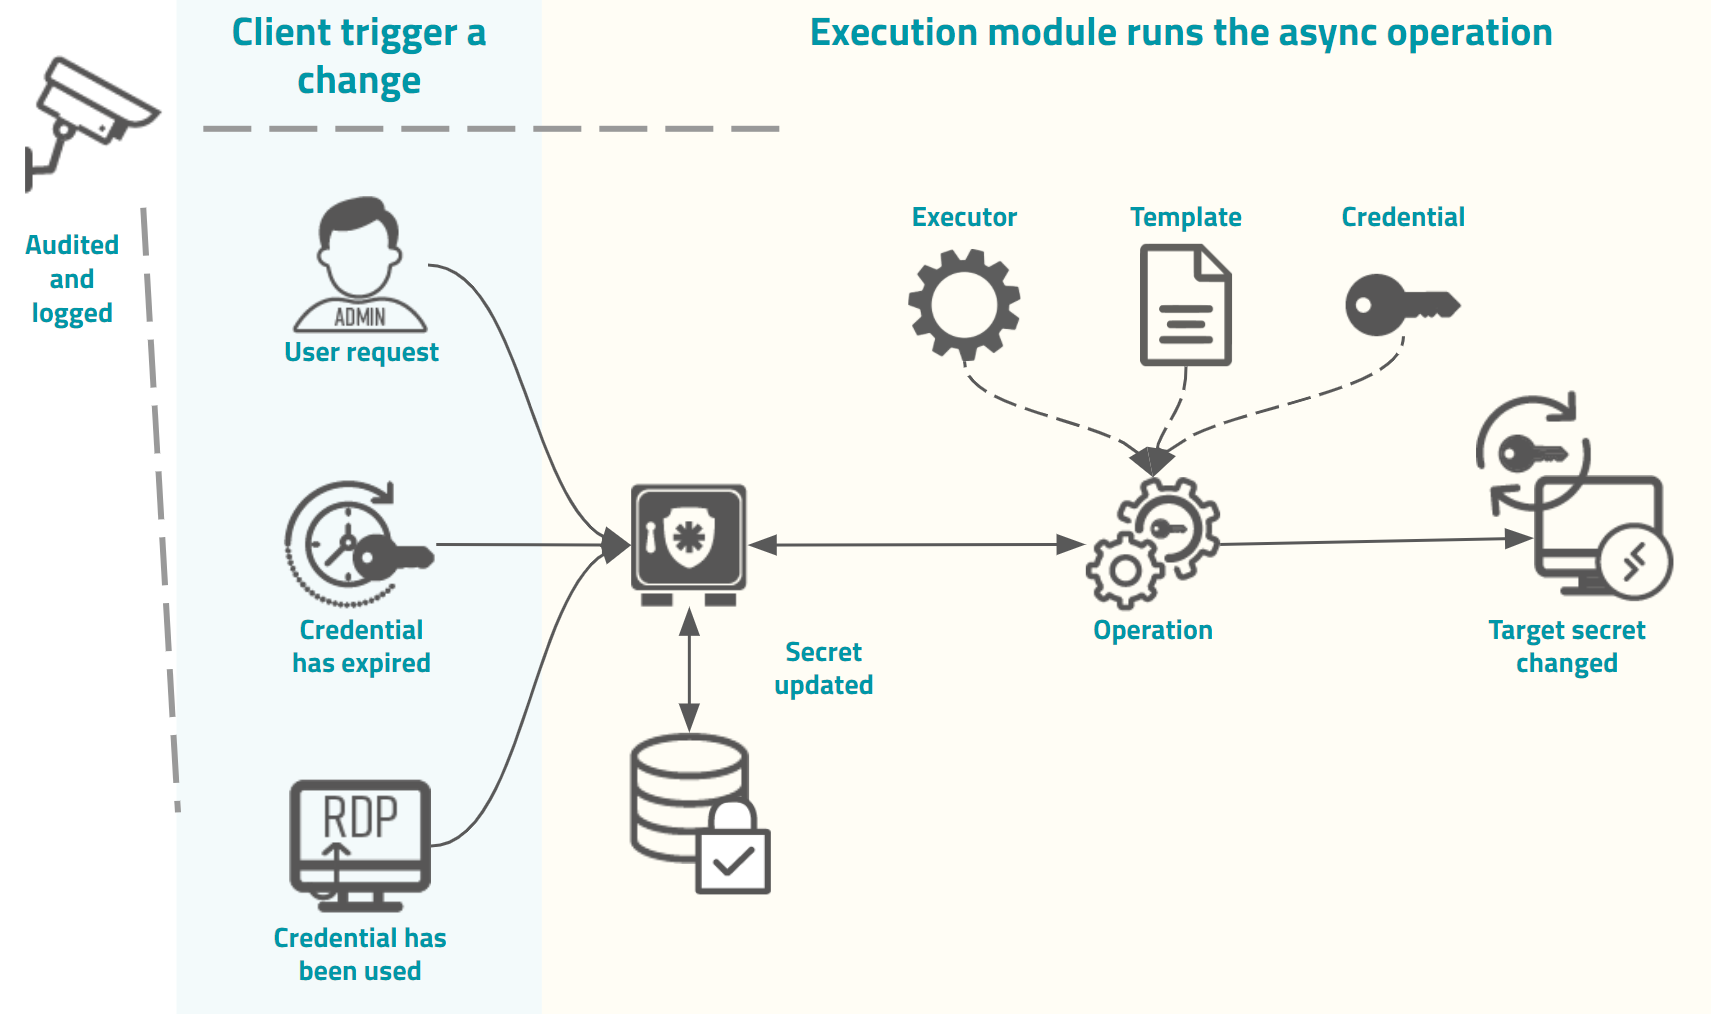
As demonstrated in the image, the trigger origin will request an assinchronous execution to the Execution module. As stated earlier, many modules can request this execution.
A trigger can be the user whom requested a password view, the credential used at a proxy session, a password valid period which expired, the administrator request for change a bulk of credentials, and others modules particular triggers.
This request will then be registered as an operation in the Execution module, and when the time determined by the client is achieved, this operation will be executed.
In this example the operation is composed of an Executor to perform the interface with the target system, a Template containing the interactions that must be performed, and a target Credential that will be affected by the template commands in the target system.
At the end of the operation, the result will be recorded in the senhasegura and the requesting module will be noticed. All operation details, from its start to finish, are recorded in the client module reports and also in the Execution module. SYSLOG/SIEM messages will be echoed and dashboards will be updated to ensure corporation governance.
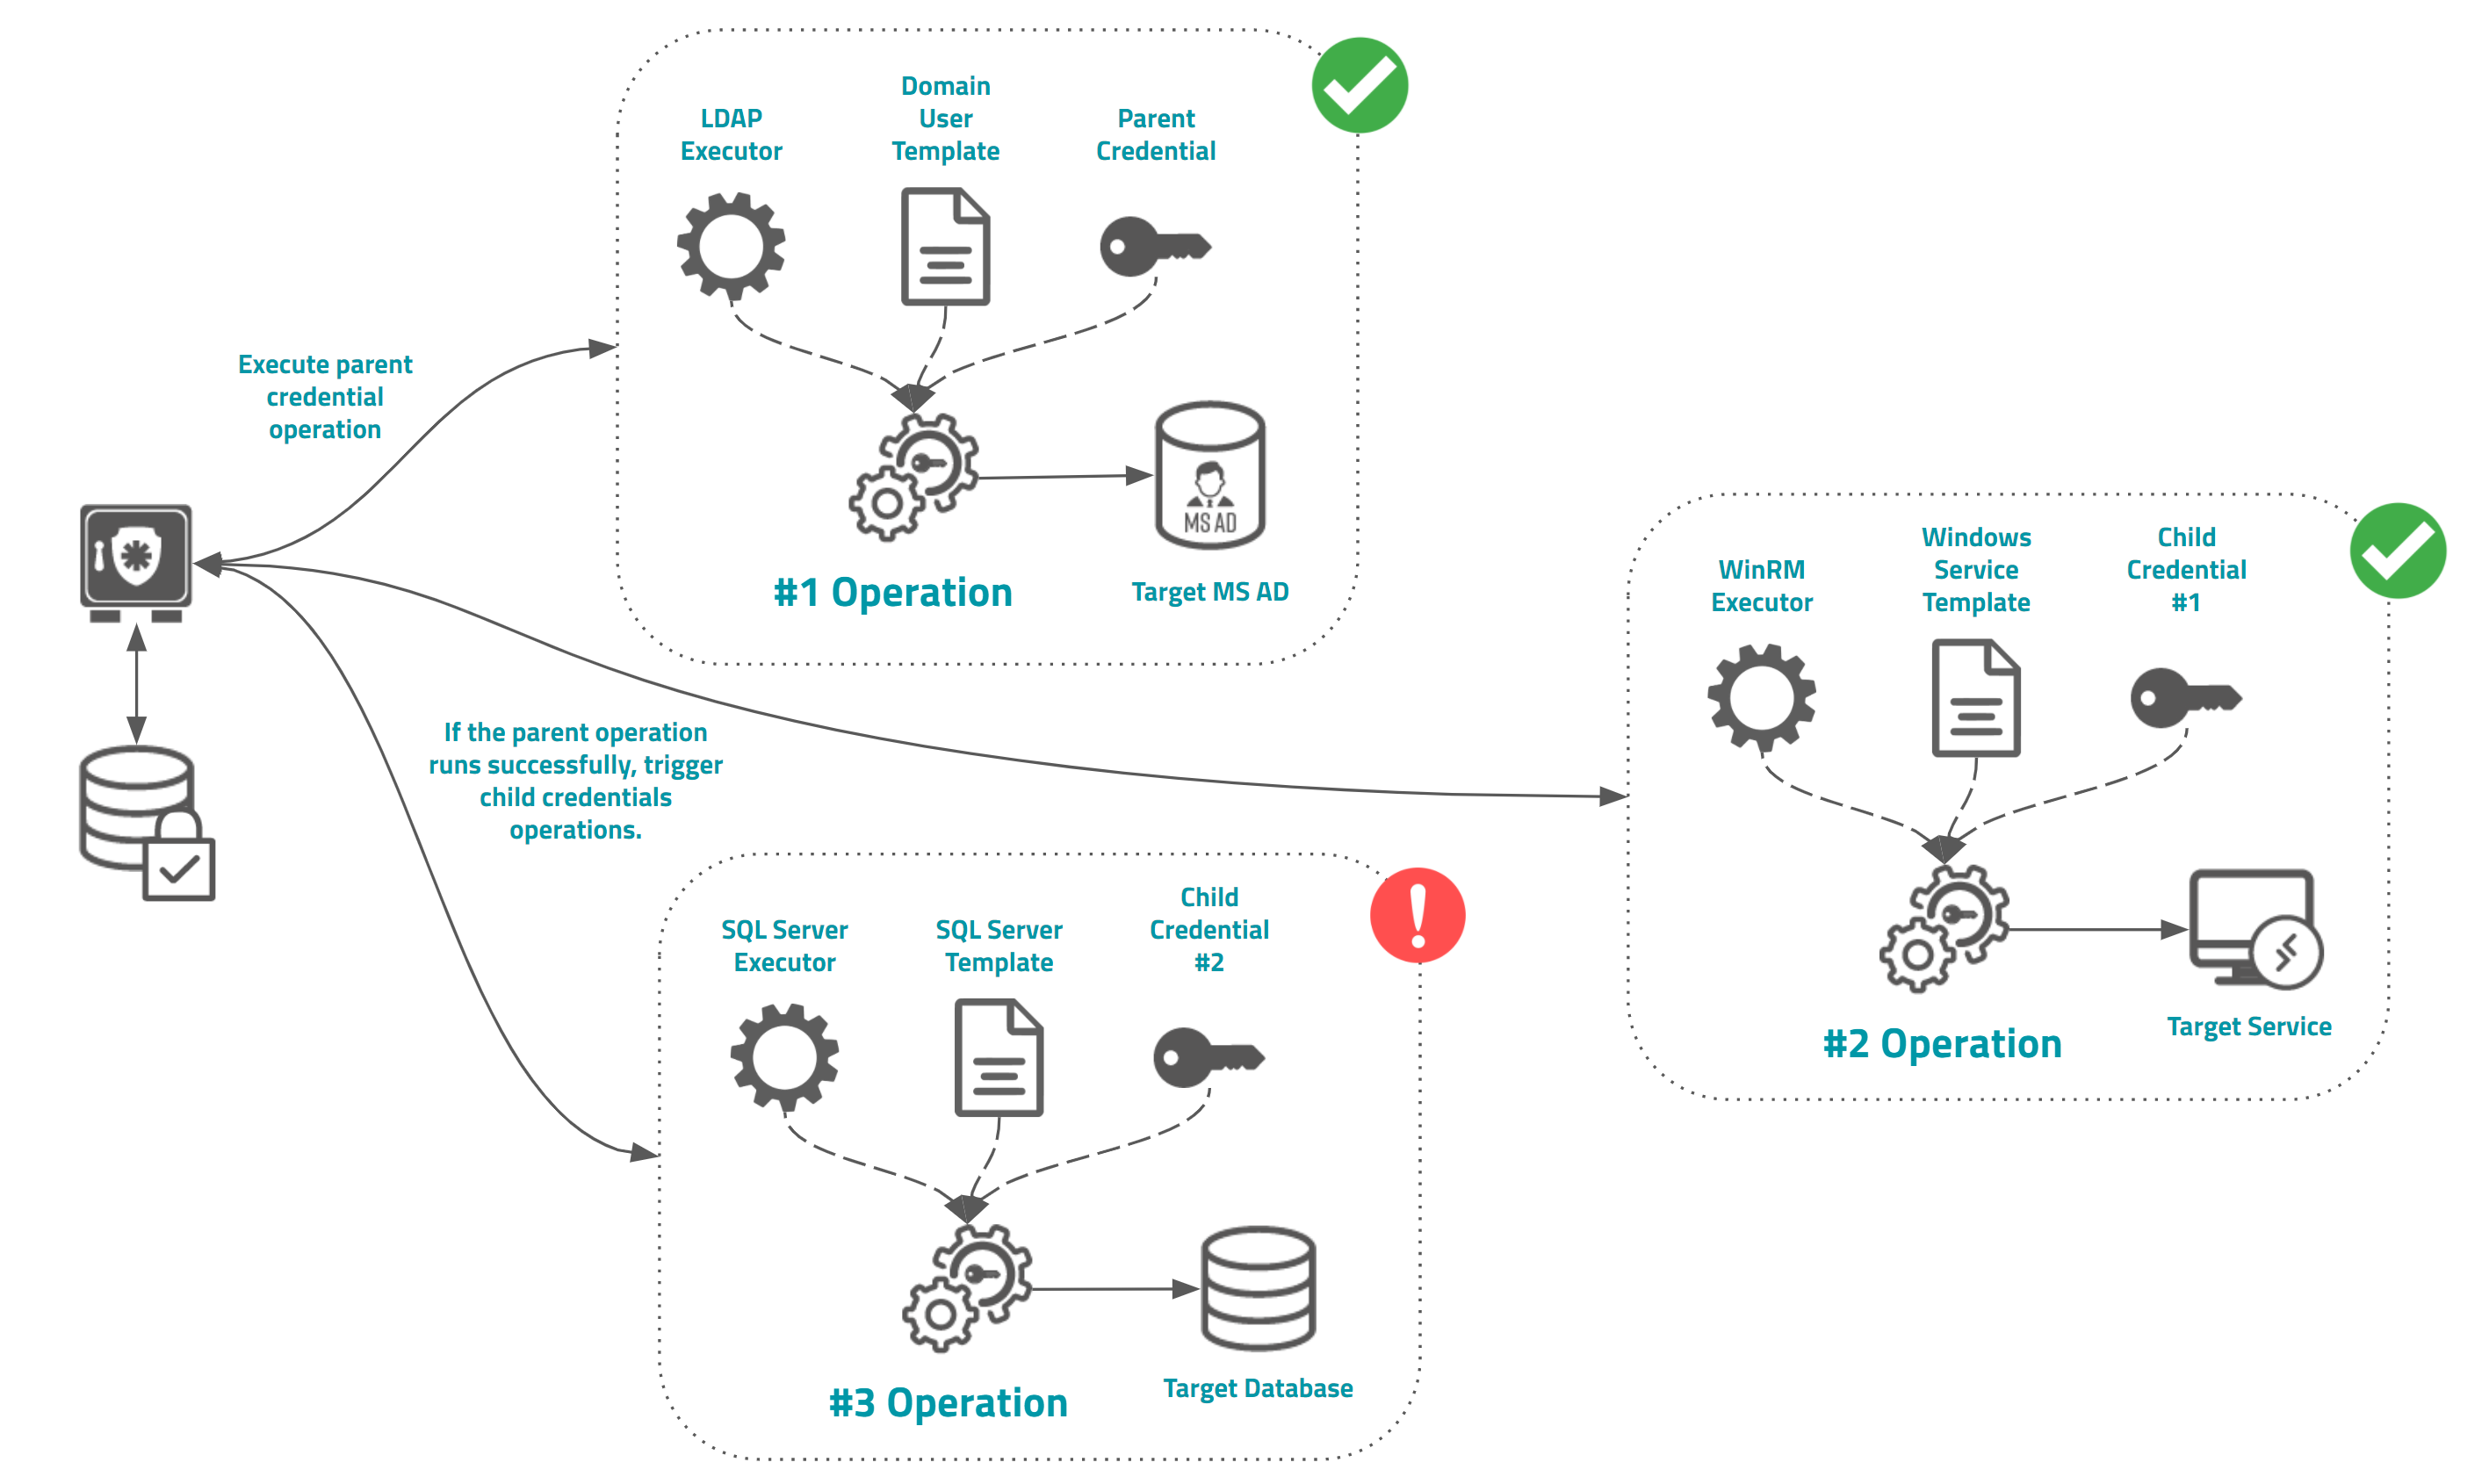
Chained operation using parent-child credential schema
senhasegura allow Administrators to create a simple chained operation using parent and child credential configuration. Into this schema, when the parent credential has its password is changed successfully, the Execution module will register and schedule password change operations to all child's credentials. Each credential can be configured with a particular executor and template.
The child operation result will not affect the parent result and others child's operations.
Templates
Templates are important components of senhasegura . They are the step-by-step instructions to perform system changes.
The system administrator or any other granted user is able to create new templates according to your needs and execute them on devices that have connectivity compatible with senhasegura .
senhasegura is installed with more than 250 templates out-of-the-box. And inside senhasegura PAM Solution our clients and partners can be updated with more templates developed by the senhasegura team and partners community.
To list all the registered templates, go to the menu Executions ➔ Settings ➔ Templates.
Register a template
Click on the New template button and, on the screen that appears, fill in the following fields:
Template name: Name for better identification;
Executor: Communication technology between the senhasegura and the target device. It will be covered below;
Type of execution: Type of change for which the model will be used. Can be any action from triggered by installed execution' client modules;
Active?: Indicates whether the change template is available for use or not;
Template content: A text area to compose the script instruction. We will present every Executor syntax later;
Click the Save button to complete the registration:
Modify a template
To modify a password change execution template, click the Change template button on the template record.
Templates receive an incremental version, identified in their report by the column Version.
You have access to the previous versions, as well as data about the users who modified the template, through the registration action "Template change history".
Composing a template
Every Executor plugin has its own syntax. But you can use some wildcards properties to be replaced by credentials and devices real properties values. The replacement will occurs when the operation will be executed. Which Device and credential available to be used at the operation time, will be defined by the client module even.
These properties will be replaces by the client module rules. Properties that represents password change will be considered only by password change operations. For an example, Task Manager operations will only replace connection wildcards properties.
[#USERNAME#]: Username of the credential that will have your password changed;
[#NEW_PASSWORD#]: The new password you want the credential to use;
[#CURRENT_PASSWORD#]: The password in use for the credential;
[#AUTH_USER#]: Username of the credential that will be authenticated on the station/system/server to perform the change;
[#AUTH_PASSWORD#]: Password of the credential that will authenticate itself to execute the change;
[#AUTH_DOMAIN#]: Domain of the credential that will authenticate itself to execute the change;
[#ADD_INFO#]: Additional credential information;
[#IP#]: The IP of the credential device that will have the password changed;
[#HOSTNAME#]: The hostname of the credential device that will have the password changed;
[#DOMAIN#]: The domain of the credential device that will have the password changed;
[#SERVER_PATH#]: Path of the credential server that will have the password changed;
Executors
The templates will be executed only when the target artifact (eg. credential to be changed) is configured with an executor and with a template to be used. Every template belongs to one and only one executor. Executors of senhasegura represent which protocols and systems connectivity and the ability to interact natively.
This chapter aims to present the plugins provided by senhasegura and how to use them to execute automated tasks and how to create templates for it.
Executor default triggers
A trigger is an action performed into the client module. It can be executed by Executor plugin supported by the client module' technology. This architecture enable our developers to create new plugins and triggers to every target system that support some kind of automated interaction.
By default senhasegura comes with the following triggers to start an execution operation.
PAM triggers;
Credential enable: Enable an locked credential into a target device. Can also be used to perform a JIT credential creation;
Credential disabiling: Disable a target credential after senhasegura Proxy usage. Can also be used to perform a JIT credential destruction;
Password change: Change some credential ou SSH Key secret;
Cloud and DSM;
AWS OpsWorks : Used into senhasegura DSM to provide credentials and secrets management in AWS OpsWorks ;
Secret Management Automation: senhasegura Cloudsecret management tasks;
User provisioning;
New group: Group creation at target system;
New user: User creation at target system;
Group delete: Group deletion at target system;
User delete: User deletion at target system;
User delete in group: Removing a user from a group at target system;
Certificate management;
Certificate disabiling: Revoke a target SSL certificate into target device;
Certificate publishing: Publish a target SSL certificate into target device;
Task Manager;
- Task Manager: Automated tasks into target devices that can be scheduled or executed by user request;
Executors plugins
Every executor can interact over some system. senhasegura abstraction layer enables our development team to create new executors aim to reach protocols, cloud providers APIs, website interfaces, OS commands, etc. Let's take a look into the executors summary.
Web environments
cURL: Executor for requests to simple web pages. Pages without JavaScript environment or HTML events. You can use this executor for legacy systems based on pure HTML4 architecture;
HTTP: Executor for requests to complex web pages where more interactivity using JavaScript elements and event triggers are required;
Miscellaneous protocols
LDAP: Interactivity with navigations and operations on LDAP servers;
SSH: Execution of commands through an SSH connection;
SSH Legacy: Command execution via SSH connection from legacy devices and old SSH versions;
Telnet: Execution of commands through a Telnet connection;
Windows environments
Windows RM: Interactivity with Windows devices through Windows RM;
Windows RPC: Interactivity with Windows devices through Windows RPC. It is even possible to execute commands via PowerShell;
Databases
senhasegura can interact with a great number of databases. Its implementation can be requested to our Sales or Support team if needed. By default, senhasegura is installed with only this four major database vendors.
MySQL: Executing commands in a MySQL database
Oracle: Execution of commands in an Oracle database
PostgreSQL: Execution of commands in PostgreSQL database
SQL Server: Execution of commands in SQL Server database
Specific products and binaries
Tk Expect: Binary interactivity on the remote device via SSH or Telnet connections. Perfect to interact on command line applications where the interface need to be interpreted;
VMWare ESXi: Changing passwords using the VMWare ESXi client;
x3270 IBM Terminal Emulator: Connector for mainframes IBM 3270. You can interact over mainframe application interfaces interpreting its design;
The password change cycle
Registering a credential
The limit of Credentials to be registered in senhasegura depends on the licensing contracted. Contact the senhasegura Support for more information.
The credential can be registered via the shortcut in the quick actions menu, or through the Credentials report.
To register a credential it is mandatory to fill in the fields Username , Password type and Device . Let's understand each tab of the form and its fields.
Credential general settings
At the information tab we have the following fields:
Username: It is the credential username. Must match the credential on the remote system;
Password type: It is the credential type. You can register new types through the Settings ➔ Credentials ➔ Credential types menu; The Domain user type enables proxy use of the credential on other devices. But it is necessary to inform the domain in the field Domain ;
Domain: Credential domain;
Device: Device that holds the credential;
Additional information: Additional information that complements the use of the credential on the target device. This field is available for use in automated password exchange, RemoteApp macros, and database connections; In the case of database connections, the name of the database must be populated in this field;
Status: Flag whether the credential is active for use or not;
Password: Credential password up to 256 characters; If automated password change is configured, this limit will be reduced to 70 characters to prevent character repetition;
Set current password: Indicative that the user wants to change the value of the password that is already registered in senhasegura . For new registrations, allows the editing of the password;
Show password: Display the password plaintext during editing;
Generate password: Will generate a random password respecting the password strength described in the table below the form;
Tags: Identifiers for credential segregation;
Note that there is a frame named Password policy . We will talk about this. For now, understand that senhasegura calculates the strength of the password from device attributes and the credential being registered. And this password policy determines how the random password will be generated in automated exchanges.
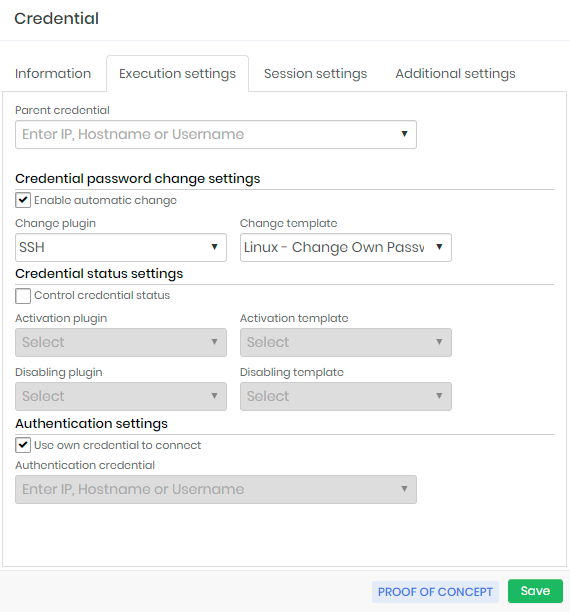
Execution settings
In the Execution settings tab we will configure the credential automated password change procedure. These attributes will be seen in practice ahead when we talk about the automated password change cycle.
Parent credential: Parent credential that initiates the automated password change process of this credential.
It works as a password change chain, where the change of a parent credential initiates the process of all its child credentials.
The existence of a parent credential does not prevent the child credential from being changed manually or automatically;
Credential automatic password change settings
Enable automatic change: Flag to enable automatic credential change;
Change plugin: Plugin connecting and running to the device to perform the change.
This plugin is linked to various connection protocols. There is no validation that the device has its active connectivity;
Change template: Template that will be executed by the executor plugin.
infosenhasegura is installed with more than 250 templates out-of-the-box. And inside senhasegura PAM Solution our clients and partners can be updated with more templates developed by the senhasegura team and partners community.
Credential status settings
Control credential status: Flag if senhasegura should control the status of the credential before and after use by the user;
Activation plugin: Plugin used to connect and perform the credential activation steps on the device;
Activation template: Template that will be used to activate the credential;
Deactivation plugin: Plugin used to connect and perform the credential inactivation steps on the device;
Deactivation template: Template that will be used to inactivate the credential;
Execution authentication settings
Use own credential to connect: Flag whether the credential itself should be used to connect to the device to perform the password change;
Authentication credential: If the credential itself is not used to perform the automated change, you must indicate which credential will be used to connect to the device; You can use a credential to connect to the device and still use your target credential to perform the change. This is possible due to the template system;
As you may have noticed, the Executions module, responsible for automation and template management, was quoted in this tab.
Additional settings
In the Additional settings tab we have the latest credential settings about other features. The most prominent is the Macros/RemoteApp setting.
Identifiers (for web services): Alias to identify the credential when triggered via A2A web services;
User credential owner -: User who owns the credential. When determined, the owner user will always have access to the credential and can make changes to it;
Server path: Path that is used in password exchange templates when the credential is registered into a physical file;
Also in the Additional settings tab, there is the option (not mandatory) to set the criticality of the credential by choosing one of the following options: High, Medium or Low.
Session settings
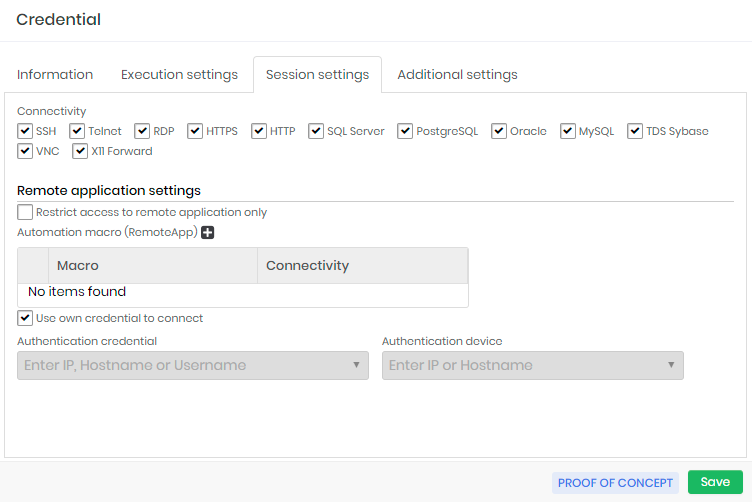
At this tab you can configure the usage of this credential at proxy sessions.
At Connectivity boxes you can select which protocols this credential can be used. The target device also need be configured with one or more selected protocols to enable this credential for proxy usage.
Remote application settings
At the same Session settings you can configure RemoteApp settings for this credential.
Restrict access to remote application only: If active, the credential can only be used for RemoteApp proxy sessions. You cannot use a proxy session that delivers the desktop or terminal of the device. This does not prevent password withdrawal;
Automation macro RemoteApp (grid): You can relate which RemoteApp macros are linked to the credential and available to proxy users;
infoFor a complete list of supported protocols and ports, see: Technical Specification.
Use own credential to connect: Flag the same credential will be used to authenticate to the target device and RemoteApp;
Authentication credential: If the authentication credential on the device is different from the RemoteApp credential, indicate which credential will be used in the authentication step;
Authentication device: The device where the credential will be authenticated and the macro will run. If filled, the original credential device we are registering will be ignored;
Additional fields for multi-factor authentication (grid): Additional fields for authentication on websites. Some sites require a lot of additional information to complete the login steps. You can give an alias to the values to complement the web authentication script;
Remarks: General credential remarks;
You can complete the registration of the credential through the Save button.
Now senhasegura will process the access groups that allow the viewing of the credential and make available to users. Every stage of registration is reported by SIEM. If a manual password change occurs, the child credentials won't be notified.
Requesting change
We will initially request a password change for a credential. To do this, go to the menu Executions ➔ Request password change.
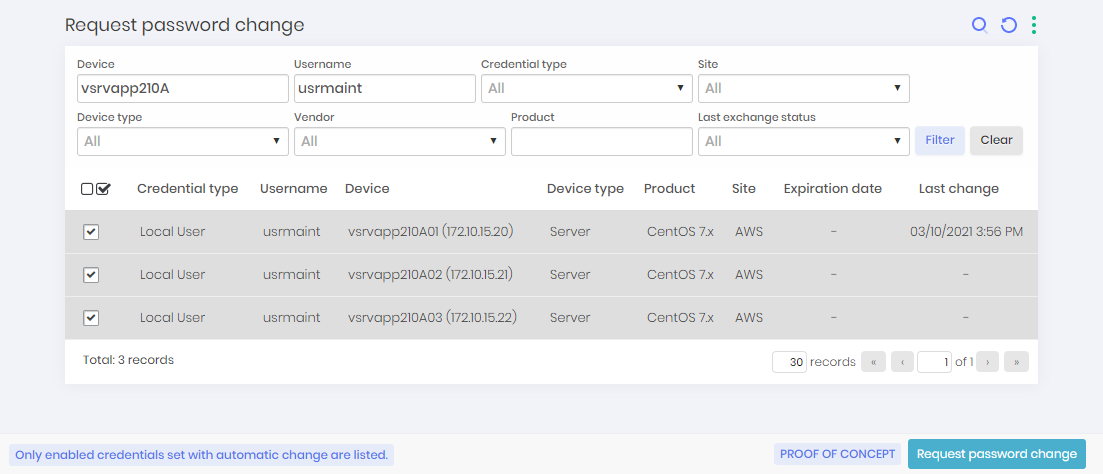
This report will only show credentials that are active and have automated change configured. Select the desired credentials and click on the footer action Request password change. When requesting the change, an asynchronous task will be scheduled. We will now teach you how to monitor the execution.
To perform a bulk change:
Filter the change report with the credentials you want to change;
Select all credentials with the checkbox column action;
Click the Request password change button at the footer bar;
All the selected credentials will be registered to immediately change. When the administrator request manually a password change, all triggers counters will be reseted by the password change.
Following the execution
Go to the menu Executions ➔ List operations to view all registered operations on senhasegura . These operations are performed asynchronously and vary in the following states:
Scheduled: This is the first state. As soon as execution is requested, the asynchronous task waits for the execution time or waits in the queue if it is full. The task in this state is available to cancellation.
Awaiting approval: Some modules require an approval flow in order to run or fail. Only the Certificates and Task Manager modules use this function. The task in this state is subject to cancellation.
Canceled: If it is in the Scheduled or Waiting for approval states, it is possible that the administrator will cancel the operation before it is executed. This operation is then marked in the state Canceled.
Running: These are the operations that are already running at this very moment. No preventive action can be taken.
Successfully performed: These are the operations that have successful in their execution. You will have access to the details of that run.
Error: These are tasks that have not been correctly performed by an impediment. Check through the action Details to understand the reason of the failure. In these cases, we provide an action to restart the process.
Expired: These are the tasks that were in the state Awaiting approval, whose approval period has expired.
Within the actions available for operations you have the following options:
View attempts: For finished operations, through this action you will have access to the logs and details of the operation;
Restart execution: If the operation has finished with an error state, through this action you restart the operation. Use if failure motivators have been mitigated;
Request immediate execution: When many operations are scheduled to run, through this action you will prioritize the selected operation;
Cancel operation: Allows you to cancel running while it is not executed or completed;
The menu Executions ➔ List attempted operations will centralize the result of each attempt of each operation. This report serves as a guide to support the identification of active errors in your park.
Ensuring password validity - Password reconciliation
To ensure that a managed credential is valid on the target system and synchronized with senhasegura , there is a password reconciliation feature to check and reset the credential when an inconsistency is detected.
Once the password change has been configured and the change has been successfully executed, senhasegura will carry out the validation from time to time if this credential is accessible and valid.
This process will identify the credentials that need attention and provide the possibility to reset them automatically or manually.
To enable the reconciliation process, access the menu Settings ➔ Execution processes ➔ Processes.
Find the Password Reconciliation option and in the field Action switch to ON which means that the executing service will be turned on, or active to perform this operation.
Manual reconciliation
For manual reconciliation, the credentials that fail the validity check performed by senhasegura are listed on the Password reconciliation report, where the admin can evaluate the problem and take measures to reset the passwords.
The report can be accessed at Executions ➔ Password reconciliation menu.
Automatic reconciliation
The reconciliation process will attempt to execute a credential rotation for the passwords that fail the validation test in order to reset the credential both on the target device and on senhasegura to keep the synchronized.
At this situation, the target credential should be configured with another credential to connect and execute the password change. You can configure the authentication credential in the Authentication credential under the Execution settings tab. You can see it in details at section execution-auth-settings at page execution-auth-settings.
The reset attempts will be executed as long as the reconciliation service is enabled.
SSH keys change
For SSH Keys, senhasegura can use the same operation workflow described for passwords change. The difference is just the screens and menus used to manage SSH Keys.
As credentials using usernames and passwords, SSH Keys should be related to devices. Access the menu PAM ➔ SSH Keys ➔ SSH Keys to get access to all SSH Keys registered.
To create a new SSH Keys registry, click at the report action button New and fill the following fields:
At the Information tab:
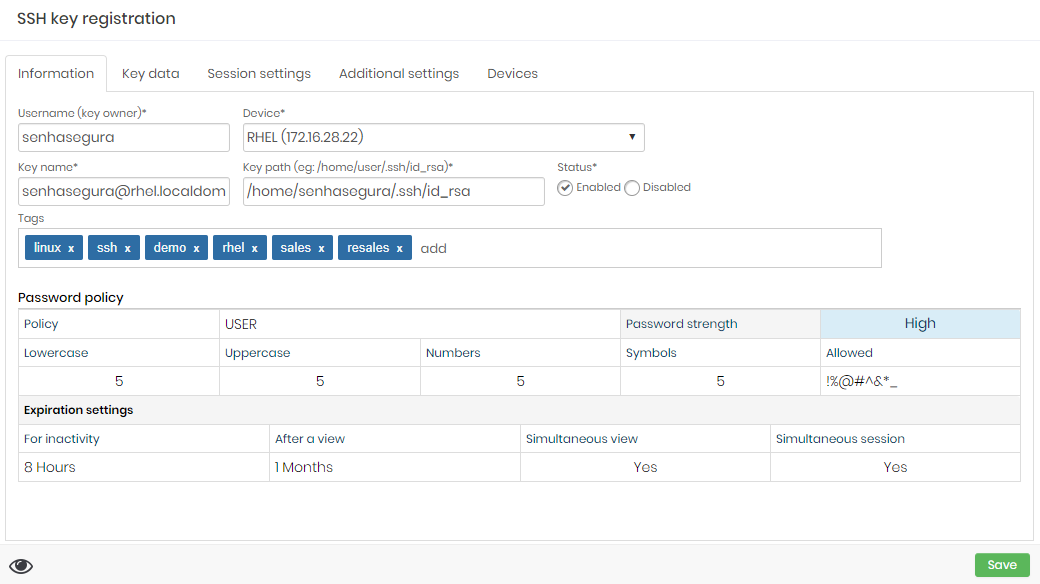
The SSH Key creation form Username (key owner): Operation system user owner of the key;
Device: Device where the SSH Key is installed;
Key name: A alias for internal senhasegura identification;
Key path: The physical location of the key inside the device file system;
Status: Flag if the key is able for use inside senhasegura ;
Tags: User defined tags for data segregation and filters inside senhasegura ;
At the Key data tab:
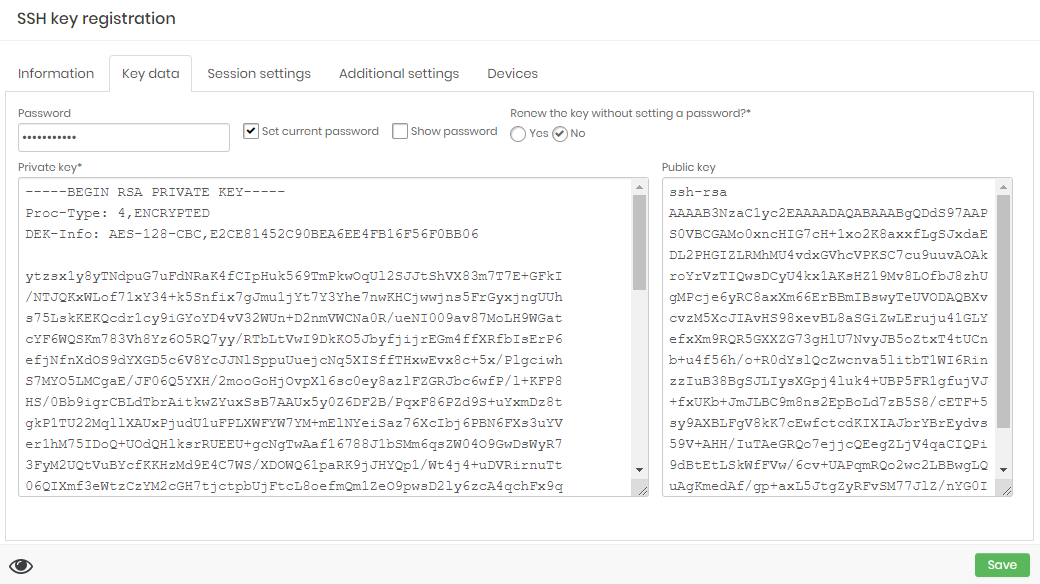
The SSH Key creation form Set current password: Checkbox to define manually the current key password;
Show password: Checkbox to define if the password field will display the plain-text password without mask;
Password: Input the current password;
Private key: Input the plain-text private key value as PEM format;
Public key: Input the plain-text public key value;
At the Addition settings tab:
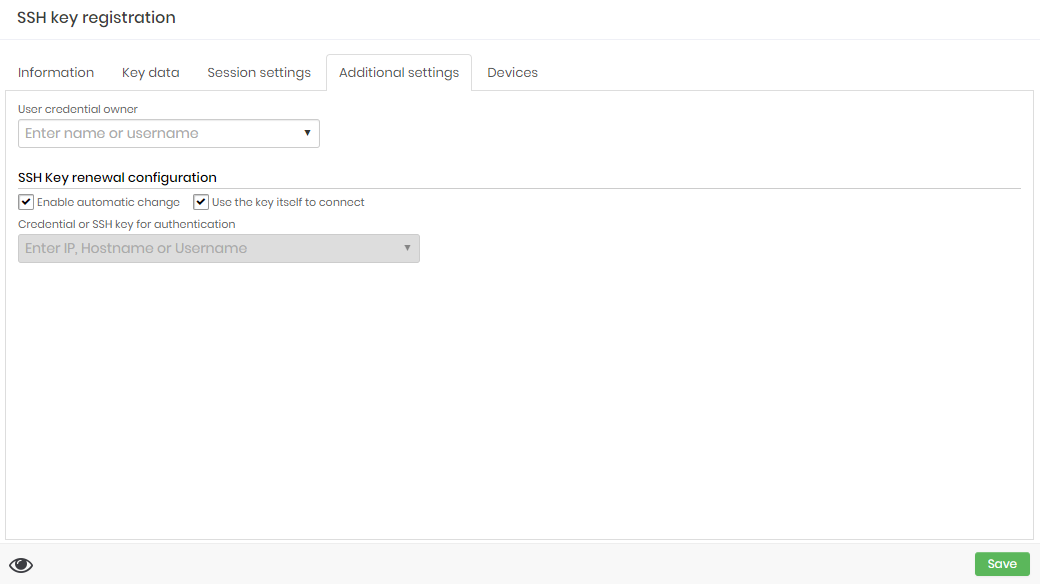
The SSH Key creation form Enable automatic change: Check if you want to senhasegura enable this key to be automatically changed;
Use the key itself to connect: Check if you want to use the key itself to authenticate the target SSH session;
Credential or SSH key for authentication: If you choose to not use the key itself for authenticate, you can choose another credential to execute the change process;
At the Devices tab you can link all devices which this key is published. So senhasegura will replace the key at the owner device and echo the public key into the related devices;
Finished the SSH Key registering, you can execute a change operation request as explained earlier.
Chained operation automation and SQL Server Linked Servers
Automating password change operations allows users with administrator privileges to perform operations, such as password change linked, automatically or manually.
Linked execution is understood as an operation where the password of a target credential must be replicated to several different destinations. Sometimes containing different systems that require different executors and templates. For example: Ensuring that the database password is replicated for services hosted on Linux and Windows servers.
Using the automation script elaboration syntax, you can determine whether the operation will be performed when all credentials have been successfully changed, or even when only part of them have been successfully executed.
In the configuration of an execution script, it is possible to select the operation to be performed, as well as the strength of the changed passwords.
The run can also be configured to automatically on predetermined days and periods. You can also select a minimum interval between linked password change runs.
To exemplify its use in this document we will use the automation to run password change scripts, however this functionality can be used for any script.
SQL Linked Server
Using the senhasegura Operation Automation you can easelly change Microsoft®SQL Server Linked Servers passwords replicating accounts using senhasegura out-of-the-box templates for SQL Server instances.
senhasegura offers two different templates to deal with dynamic port configuration, or static port configuration.
When the SQL Server works with dynamic port configuration, you should configure the senhasegura device with the UDP port where SQL Server will publish which TCP port SQL Server is running in.
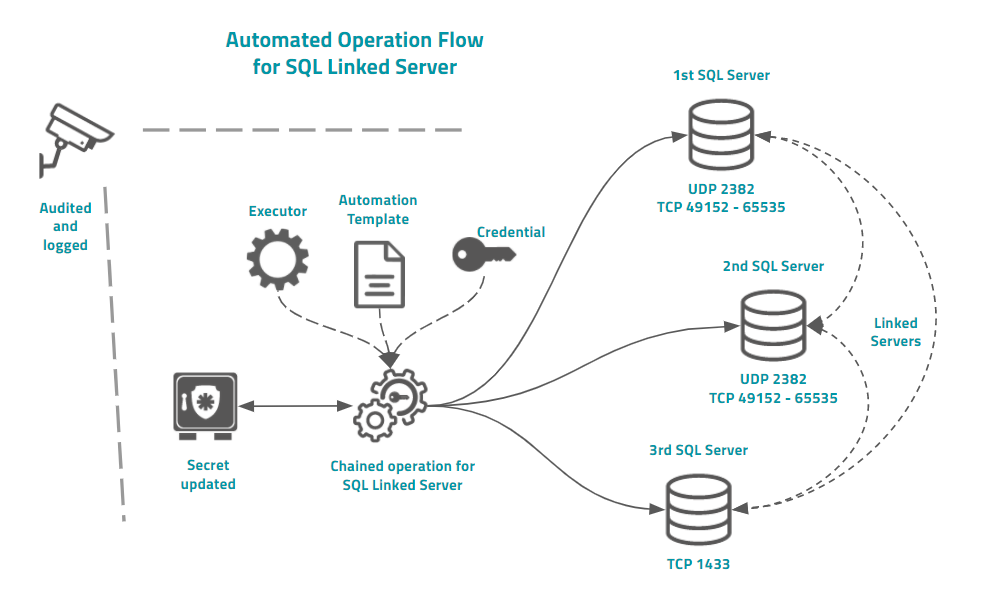
Into the example image you can see that this architecture are composed by two Microsoft®SQL Server instances running with Linked Server dynamic ports. So the device registered into senhasegura should have the UDP port configured.
senhasegura then will first query the UDP port for the right TCP port where the SQL Server is accepting database connections. So senhasegura will connect to this port to perform the template tasks.
Finished this first instance, and doesn't matter if it was successfully executed or not, senhasegura will then connect to the next server and go on.
The main difference between the use of chained operation and parent credentials is the fact that in chained operation you can use special syntax to determine which template should be replaced for Linked Server environments.
Register an automation
To register an automation, go to the menu Executions ➔ Operations automation ➔ Automations
Click on the actions button and select the option New
On the Settings tab, complete the following fields:
Automation Name: Name. For internal control only;
Operation: type of automation. In this version, only the Chained exchange option will be available;
Password strength: Password strength used for automation. We recommend using the weakest device password policy so that you can be sure that all members of the chain receive the same password.;
Execution script 1: Script that makes up the chain of execution between devices;
Active?: Indicates whether automation is active for use or not;
In the Execution tab, fill in the following fields:
Enable automatic execution?: Indicates whether automatic automation execution is active or not. If activated, the senhasegura will perform its execution from time to time;
Days to run: Automation will run on selected days of the week;
Execution periods: Automation will be performed within the selected periods;
Minimum interval between runs: Minimum interval between runs in hours;
Click the Save button to complete the settings.
The syntax of an automation script
The script will give the sequence by which each device will be reached. Therefore, it is important that you already have this information properly mapped before you start writing the script.
check_conn
Requires validating connectivity of target devices before starting the process. If the target device is not accessible, abort the operation. It contains no additional arguments and it is preferable that this command is at the beginning of the script.
rollback
Roll back the automation if any changes are not made. The rollback itself will be performed only at the end of the entire execution. That is, in an change of 10 credentials, if an error occurs in the fourth credential, it will still continue executing the others until the end and so it will rollback the entire operation.
This guarantees visibility to the administrator of which credentials are having problems.
In case the rollback command is not added, senhasegura will perform the change for all desired credentials but will not perform the rollback if an error occurs in one, some or all credentials.
linked_tpl uint: id
Determines which template will be used to change passwords when dealing with a Linked Server.
This causes the change template configured in the credential to be ignored and replaced by the template designated in the script.
The parameter id is a positive integer referring to the Id of the desired template.
change string: type uint: id string: is_linked
Changes the Credential or Pool of credentials, determined by the parameters type and id.
If the parameter is_linked is filled with linked, the template determined by the command linked_tpl will be used for the change.
The parameter type can vary between cred for when the value of id is the Id of a credential, or pool when the value of id is the Id of a credential pool.
The id parameter will always be a positive integer.
Look at the example below for better understanding.
## Lines started with sharp are comment

## Force connectivity validation before usage
check_conn

## Sets the linked server template.
## Its will use the template id 87
linked_tpl 87

## Sets the rollback flag
rollback

##### Sets the credential's or pool's change chain

## Change credentials 120 to 122.
## But credential 122 must use linked server template
change cred 120
change cred 121
change cred 122 linked

## Change credential pool 42 and 45
change pool 42
change pool 45
Perform an automation
To perform automation, go to the menu Executions ➔ Operations Automation ➔ Automation.
Click on the Run button. The automation of operations will be scheduled and the user will be able to follow the result in the menu View executions, described below.
View runs
To view the automation execution history, go to the menu Executions ➔ Operations Automation ➔ Executions.
On this screen, you can view various information on automation executions, such as number of operations performed, the result of the execution, if processed, ended in error, as well as the requesting user and the execution date of the request.
Click on the View operations button to get more details on the result of your operation. Each record on this screen corresponds to the execution of each target credential.
When the script is configured to run a Credential Pool, each credential in the pool will be shown record by record.
Attempt Parameters and triggers
The triggers can be configured into the Password policies. And the attempts at the Execution Parameters.
Credential Policies
Credential policies are the point of union between password strength and credential. Plus settings about when the credential will have its password recycled and the intervals of these triggers.
You can find the credential policies through the PAM ➔ Settings ➔ Credentials ➔ Policy credentials menu.
The form for registering new policies resembles setting up Access Groups because its logic is similar. We will segregate some devices and credentials from their attributes. And then senhasegura will use the highest value of the Priority field if there is a policy tie.
Let's look at the Settings tab to identify how the use of the credential will be affected by the password policy.
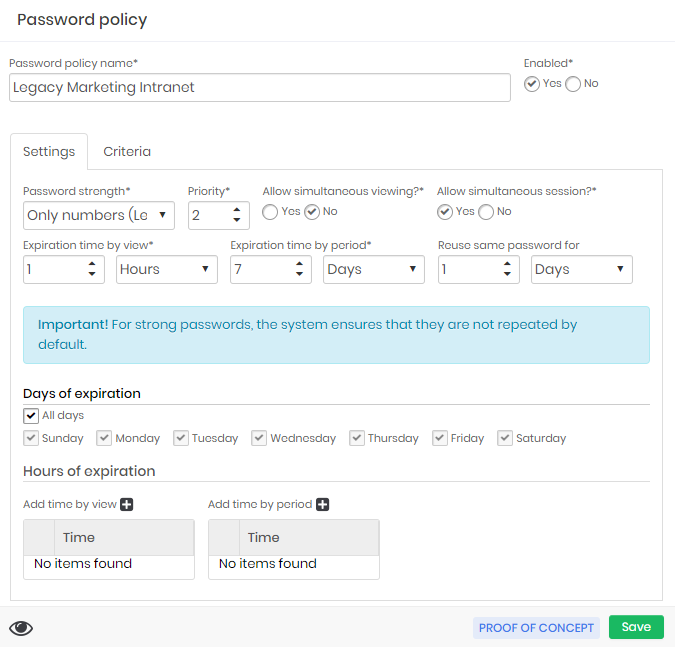
Note in the example that the policy created is to handle an old intranet system in the Marketing department. This system is using the password force Only numbers that was created especially for systems that accept only 5-digit numeric passwords.
Being a weak password, the administrator then decides to isolate the Marketing system in a security rule with the following configuration:
Simultaneous Allow viewing?: The password withdrawal may not occur simultaneously. If a user performs the password withdrawal he will be in custody, and another user can only make the withdrawal if the user who holds custody releases the use;
Simultaneous Allow session?: The users who want to perform proxy sessions with the credential will be able to perform simultaneous accesses since in these cases the password will not be exposed;
Priority: Define the policy application priority if senhasegura finds more than one policy that applies to the credential. The higher the priority, the higher the number of this field;
Expiration time by view: The time interval in which senhasegura will automatically change the password after viewing by a user. In this example, the password will be automatically changed after 1 hour of withdrawal;
Expiration time by period: The time interval in which the password expires after a long period of no use. That is, no one used the password either via withdrawal or via proxy session. But the password must be recycled still;
Reuse same password for: The time when the password will be reused after use by a proxy session. Unlike password withdrawal, when the password is used via proxy there is no direct exposure to the user. But it is recommended that the password be recycled after the proxy session. This interval then determines how long senhasegura should allow password reuse in other sessions until the automatic exchange is performed;
Days of expiration: Some credentials cannot be recycled daily. Whether it's the security policies of the target device or the impacts it might have on the business. Then, in these fields you can configure which days the password exchange may occur;
Hours of expiration: In the same way as the previous field, some deals only allow trading at certain times;
Note that all these fields determine actions that influence the customer's business rule, or target device security rules. Configuration mistakes of these fields can lead to the unavailability of the credential.
That's why it's very important to know and segregate target systems into dedicated password policies. Use the Criteria tab to perform segregation as you've already learned in the Access Group chapters.
See then that senhasegura immediately identifies the correct password policy to the credential at the time we link a device that matches the type and determine a credential with the tag configured.
If you change the password policy in a way that no longer applies to the credential, the credential will use a new policy that meets your device and credential characteristics.
To define the password change parameters in the vault, go to the menu Executions ➔ Settings ➔ Parameters. The following fields are available for adjustments:
Number of change attempts: Number of times senhasegura will attempt to perform the operation in case of failure;
Connection timeout (s): Maximum connection timeout, in seconds;
Readout timeout (s): Maximum target output wait time, in seconds;
Total records per cycle: Number of credentials to be considered for each cycle of automated execution;
Interval between attempts (min): Interval, in minutes, between attempts to change a password that has given an error. Make this range suitable for devices that already have a history of high latency or intermittent outage. This interval refers to the attempts determined in the Number of change attempts field;
Interval between attempts with error (min): If senhasegura runs out of attempts to change passwords, this execution will be marked as a failure and a new automated execution will only be performed within the interval determined by this field;
Click the Save button to complete the settings.
Configure Credentials and Devices profiles
So far we have shown you how to set up a credential so that it has an automated password change process. But in a scenario where you have multiple credentials that use the same password change template, and that share a common feature between Manufacturer, Device type or Credential type, it is preferable that they receive the password change configuration immediately upon registration. Thus avoiding the risk of forgetfulness or a wrong configuration on the part of those who register the credential.
With this in mind, senhasegura offers the possibility to create password change configuration profiles for both Credentials and Devices.
Credential Profiles
You have access to all credential profiles through the menu Executions ➔ Settings ➔ Credential profiles.
For example, we will use a scenario where all devices of the type Server from manufacturers CentOS and Debian that contain credentials of type Local User receive the template Linux - Change Own Password at the time of registration of the credential.
The credential and device profiles serve as a template for new credentials on devices that fit one of these types of profile. But once you have registered the Credential, you have complete freedom to change the settings for executing the credential. Changing profiles also does not change the credential settings already registered.
Click the New change profile button
In the Information tab, fill in the following fields:
Name: Name of the credential execution profile. For identification only;
Priority: Priority of using the profile. The higher the number, the higher the priority. It can vary from 1 to 255. For our example, fill in with 10;
Active?: If this option is selected, the template is active for use;
Immediate password change?: If this option is selected, as soon as the credential that fits this profile is registered, a password change task will be scheduled. For our example, select Yes;
First change interval (in minutes): This field will be active only when the Immediate password change? Field is checked. Indicates the interval in minutes at which the first automated change will take place. For our example, fill in with 1 minute;
In the Execution Settings tab, you will have the same fields as in the Credential register. This is the template itself. Fill in the fields:
Enable automatic change: Indicates whether credentials should be configured with automatic password change. For our example, enter Yes;
Plugin: Executor to be used for the change. For our Linux example select Net SSH;
Automatic password change template: Template used to change the password. For our example select Linux - Change Own Password;
Manage account status: If selected, the credential activation and deactivation process on the target device will be used. For our example, keep the field unchecked;
Account activation plugin: Plugin used to activate the credential on the target device;
Account activation template: Template used to activate the credential on the target device;
Use your own password to connect: If this option is selected, the credential itself will be used to change your own password. For our example, keep this field checked;
Authentication credential: If the credential is not used for authentication on the remote device, you can select which credential will be used;
Credential username: It may happen that the credential indicated in the Authentication credential field does not have access to all devices that fit this profile. But all devices will have a credential with the same username - and a different password - registered and managed by senhasegura . In these cases, fill in this field with the username corresponding to the credential that has access to the device;
infoFor example in the Credential Username field, imagine that all Linux servers contain a local user with username usrpwdchg whose responsibility is to change the other passwords hosted on the same server. And that this user has different passwords from server to server.
However, as this credential is managed by senhasegura , you can fill in the Credential Username with username usrpwdchg so that senhasegura uses the correct device-to-device credential.
In the Criteria tab, fill in the following fields:
Model (comma-separated): Device model on which the profile will be applied. Leave it blank in our example;
Manufacturer: List of manufacturers to which the profile will be applied. Select CentOS and Debian for our example;
Device type: Select which device types this profile will be applied to. Select Server for our example;
Credential type: Select which types of credentials this profile will apply to. Select Local user in our example;
Click the Save button to complete the registration.
Following these steps of our example, the next device Debian or CentOS that is registered as type Server, will have its credentials of type Local user configured with the change of passwords as the Credential Profile that we just configured.
Device Profiles
Still in the previous example, imagine a scenario where all servers CentOS respect the credential profile. But there is only 1 CentOS device that needs a different access credential and a different execution template. This can occur on legacy systems or on servers where management is shared.
In these cases, we recommend that you directly configure the password change on the target credential or create a profile per device. In this second case, each credential that is registered on the device holding the profile, will receive the indicated password change configuration. To access the registered device profiles, go to the menu Executions ➔ Settings ➔ Device profiles.
Find the desired device in the report and click on the registration action Configure profile:
Target Equipment: Device;
Password change plugin: Execution plugin that will be used in the new credentials of this device;
Password change template and Plugin: Execution template to be used.
In case the new credentials of this device require an activation process before use, indicate which plugin will be used;
Activation Template and Plugin: Template that will be executed by the activation plugin.
In case the new credentials of this device require an inactivation process before use, indicate which plugin will be used;
Inactivation Template: Template that will be executed by the inactivation plugin;
Access credential: Credential to be used to carry out the change process. As we are dealing directly with the device managed by senhasegura , you must select a valid credential. There is no possibility to indicate a wildcard username as in the case of Credential Profiles;
Click the Save button to complete the configuration.
At this time, all new device credentials will be automatically configured with that change profile.
Executors plugins syntax
This chapter will cover every plugin syntax and particularities. A small example will be used to make easy to understand its functionality. Remember that senhasegura is installed with more than 250 out-of-the-box templates. And you can also access the senhasegura PAM Solution to have access to the partner community templates.
cURL
Executor for requests to simple web pages. Pages without JavaScript environment or HTML events. You can use this executor for legacy systems based on pure HTML4 architecture.
If you need to perform an automation using web interfaces elements simulating a real user actions, take a look at the HTTP executor.
By default this plugin does not validate the SSL connection and its default timeout is setted to 10 seconds.
Syntax
This plugin accept commentary. For comments use the sharp character '#' at the beginning of the line.
| Command | Description |
|---|---|
| set-disable-auth | Do not consider user and password in request to supply HTTP Authset-disable-auth |
| set-request-header ”param” ”value” | Sets a header parameter for HTTP request to be performed.set-request-header ”mytoken”``”FF32C5E9AC1800A2” |
| set-request-param ”param” ”value” | Configures any cURL1 parameter for the request to be madeset-request-param``”CURLOPT_ENCODING” ”ISO-8859-1” |
| set-request-content ”content” | Determines the data content of the request. From this value is calculated the header Content-lengthset-request-content``”name=Peter&surname=McAlister” |
| set-content-type ”type” | Determines the content definition header of the requisition. This value will be assigned to the header Content-type: text/TYPE;charset=”utf-8” e Accept: text/TYPE.set-content-type ”text” |
| set-request-method ”method” | Determines the type of requisition that will be performed. Can be post, put and delete methods. Check RFC 7231 for more details.set-request-method ”GET” |
| request ”URL” | Realizes the request at the given URLrequest ”https://www.google.com/” |
| expect ”string” | Search for a text within the answer to the request. Fails if not found. Continue if found.expect ”password changed!” |
| no-expect ”string” | Search for a text within the answer to the request. Continue if not found. Fails if found.no-expect ”password change failed!” |
Example of a simple HTTP password change with token header
set-request-header "X-INTRANET-TOKEN" "FF32C5E9AC1800A2"
set-request-param "username" "[#AUTH_USER#]"
set-request-param "password" "[#AUTH_PASSWORD#]"
set-request-param "tgt_user" "[#USERNAME#]"
set-request-param "tgt_npassword" "[#NEW_PASSWORD#]"

set-request-method "POST"

## If 7 bytes string 1200-OK returns, the password change was accepted
expect "1200-OK"

## If 7 bytes string 9999-NOK returns, the password change has failure
no-expect "9999-NOK"
HTTP
Executor for requests to complex web pages where more interactivity using JavaScript elements and event triggers are required;
Syntax
| Command | Description |
|---|---|
| start-at url | Indicates the initial url of the desired page. This command should be at the template begin.start-at https://www.senhasegura.com/ |
| timeout milliseconds | Milliseconds total duration of the process as a whole. This command should be at the template begin.timeout 3000 |
| useragent string | Specifies which useragent will be used during password change. By default it will use Mozilla/5.0 (Windows NT 10.0; Win64; x64) AppleWebKit/537.36 (KHTML, like Gecko) Chrome/85.0.4183.102 Safari/537.36. This command should be at the template begin.useragent senhasegura-executor |
| new-action | Indicates that a new group of actions will begin.A group of actions is composed of all actions performed for a page submit.new-action |
| set-location url | Redirects the executor to the indicated URL.set-location https://mysystem.local/admin/login.php |
| test-location string | Validate the current URL against the provided string. The given string can be just a piece of the entire URL. Stops the process if false.test-location /admin/login.php |
| log string | Register a log message. Use for identifying the steps into the execution log.log Starting authentication steps |
| test-selector selector | Perform a test on a selector similar to jQuery selectors. If it does not find the element, it interrupts the process as failed.test-selector input#username |
| fill selectordata | Fills the element returned by the selector with the indicated value.fill input#username #USERNAME# |
| click selector | Fire the event by clicking on the DOM element returned by the selector.click inputtype=button#login |
| jclick selector | Fire the event click on the element returned by the selector.jclick inputtype=button#login |
| offset xy | Creates a positioning offset to adjust the really-click and really-fill commands. |
| really-click selector | Fire one external click on the page. Just like a user does. Use the offset command to adjust the element coordinate.really-click inputtype=button#login |
| really-fill selectordata | Fills the element returned by the selector with the indicated value through user input simulation. The element will be clicked using really-click command before being filled. Use the offset command to adjust the element coordinate.really-fill input#username #USERNAME# |
| prop selectorpropertyvalue | Change an element property. Normally used when some CSS class or DOM element made a really-fill or really-click action hard to be performed.prop input#agreement enabled true |
| test-visible selector | Test if element is visible for the user. Interrupt the operation if it is not visible.test-visible div#alert.success |
| test-not-visible selector | Test if element is invisible. Interrupt the operation if it is visible.test-not-visible div#alert.failure |
| sleep milliseconds | Wait for the milliseconds specified between one action and another.sleep 1000 |
| jscript jscode | JavaScript script code to execute into the current rendered page. Use with caution.jscript $(’inputtype=checkbox’).prop(’checked’, true); |
The sleep command inserts a wait action so the current action is resumed and a new action is generated with the next command (after the wait period).
Example for Amazon AWS Console
start-at https://console.aws.amazon.com/console/home
timeout 30000
user-agent "Mozilla/5.0 (X11; Linux x86_64) AppleWebKit/537.36 (KHTML, like Gecko) Chrome/60.0.3112.113 Safari/537.36"

new-action
sleep 4000
test-location /signin?redirect_uri
fill #resolving_input [#USERNAME#]
jclick #next_button
sleep 2000

new-action
fill #ap_password [#CURRENT_PASSWORD#]
click #signInSubmit-input

new-action
test-location /console/home
set-location https://signin.aws.amazon.com/updateaccount?redirect_uri=https%3A%2F%2Fconsole.aws.amazon.com%2Fbilling%2Fhome%23%2Faccount
sleep 2000

new-action
test-location /ap/cnep
jclick #cnep_1A_change_password_button-input

new-action
fill #ap_password [#CURRENT_PASSWORD#]
fill #ap_password_new [#NEW_PASSWORD#]
fill #ap_password_new_check [#NEW_PASSWORD#]
click #cnep_1D_submit_button-input

new-action
test-selector #message_success
LDAP
This plugin can be used to interact even to Microsoft®Active Directory or OpenLDAP servers.
Syntax
| Command | Description |
|---|---|
| connect null ”target” | It connects to the requested destination. If not informed, connects to the device linked to the credential.connect |
| find ”dn” ”filter” | Locates the single entry to be manipulatedfind ”o=MyCompany,c=BR” ”(username=user01)” |
| mod-add ”param” ”value” | Add an attribute to the entry. Depends on whether the command find has already been successfully executed.mod-add ”memberuid” ”username” |
| mod-del ”param” ”value” | Remove an attribute from the entry. Depends on whether the command find has already been successfully executed.mod-del ”memberuid” ”username” |
| mod-replace ”param” ”value” | Replaces an attribute with the entry. Depends on whether the command find has already been successfully executed.mod-replace ”memberuid” ”username” |
| bind ”dn” | Performs server authenticationbind ”uname” |
| set-option ”param” ”value” | Determines the value of a property in the LDAP connection. See PHP LDAP1 to the pick list.set-option ”LDAP_OPT_PROTOCOL_VERSION” ”3” |
Example for domain user password change at Microsoft Active Directory
## LDAP protocol version
set-option LDAP_OPT_PROTOCOL_VERSION 3

## DistinguishedName of the user who will connect to the server
bind "cn=[#AUTH_USER#],CN=Users,DC=senhasegura,DC=local"

## Search the user in which the procedure will be done.

## The system will search in general scope for a user object that has
the name of the user
find "DC=senhasegura,DC=local" "(&(objectClass=user)
(sAMAccountName=[#USERNAME#]))"

## Update user password
mod-replace unicodePwd "u([#NEW_PASSWORD#])"
Example for user account activation
## LDAP protocol version
set-option LDAP_OPT_PROTOCOL_VERSION 3
set-option LDAP_OPT_REFERRALS 3

## DistinguishedName of the user who will connect to the server
bind "CN=[#AUTH_USER#],CN=Users,DC=senhasegura,DC=local"

## Search the user in which the procedure will be done.
find "DC=senhasegura,DC=local" "(&(objectClass=user) (sAMAccountName=[#USERNAME#]))"

## Update account status
mod-replace userAccountControl 512
To find the DistinguishedName of your server access the area of Advanced Features and follow the steps:
Click on View and then on Advanced Features.
With the complete view of user attributes, click on User Properties.
Go to the attribute editor tab and find the
DistinguishedNameamong the information.
SSH
Syntax
This plugin accept commentary. For comments use the sharp character '#' at the beginning of the line.
| Command | Description |
|---|---|
| set-ssh-version [1] | Determines the version of SSH to be used. By default it will use the 2.set-ssh-version 2 |
| set-new-line-mode [unixwindowsmac] | Send command character. By default it will use unix.set-new-line-mode unix |
| set-read-timeout [seconds] | Time in seconds for command reading read timeout. By default will use 5 seconds.set-read-timeout 5 |
| set-connect-timeout [seconds] | Time in seconds for connectivity timeout. By default it will use 5 seconds.set-connect-timeout 5 |
| exec ”string” | Executes the command on the remote deviceexec ”passwd myuser” |
| write ”string” | Write the string to the remote device. The end of line character will not be sent. |
| read ”string” | Locates the text provided in the connection output. Does not accept regular expressions.read ”New password:” |
| expect ”string” | Locates the text provided in the connection output, allowing the use of the wildcard character ’*’ for expansive searches. |
| expect-regex | Locates the text through a regular expression.read ”[nN]ew password:” |
| sleep ”seconds” | Waits for the script to run within the given secondssleep 10 |
| no-expect | Search for an expression to irrigate within the response to the request. Continue if you can’t find it. Fails if found.no-expect ”password change failed!” |
| end | Closes the connection to the target serverend |
Example for a Linux user password change
## Put the language in English
expect "*#"
exec "export LC_ALL=C"

## Execute the password change for the user
expect "*#"
exec "passwd [#USERNAME#]"

## Fill in the new password
expect "*password:"
exec "[#NEW_PASSWORD#]"

## Confirm the new password
expect "*password:"
exec "[#NEW_PASSWORD#]"

## Validates if successfully changed
expect "*updated successfully"
Example for Apache htpasswd password change
expect "*#"
exec "htpasswd -bm /etc/htpasswd/.htpasswd [#USERNAME#] [#NEW_PASSWORD#]"

expect "*Updating"
expect "*#"
exec "exit"

end
Example for Apache Tomcat password change
## Changing tomcat-users.xml user entry
expect "*#"
exec "sed -i 's/<user username="[#USERNAME#]" password="[#CURRENT_PASSWORD#]"/<user username="[#USERNAME#]" password="[#NEW_PASSWORD#]"/' /etc/tomcat/tomcat-users.xml"

## Validating changing step
expect "*#"
exec "cat /etc/tomcat/tomcat-users.xml | grep 'username="[#USERNAME#]" password'"
expect "*[#NEW_PASSWORD#]*"

## Restarting tomcat
expect "*#"
exec "service tomcat restart"

## Finish the procedure
expect "*#"
exec "exit"
end
Example for Red Hat JBoss Application Vault
expect "*#"
exec "/opt/wildfly/bin/vault.sh --enc-dir /opt/vault --keystore /opt/vault.keystore --keystore-password VaultK --salt $(shuf -i 10000000-99999999 -n 1) --iteration $(shuf -i 10-99 -n 1) --alias vault --vault-block [#ADD_INFO#] --attribute [#USERNAME#] --sec-attr [#NEW_PASSWORD#]"

expect "Please make note of the following:"
expect "*#"
exec "exit"

end
SSH Legacy
Syntax
This plugin accept commentary. For comments use the sharp character '#' at the beginning of the line.
| Command | Description |
|---|---|
| write "command" | Forwards the command execution to the target serverwrite ”passwd myuser” |
| exec ”command” | Same as the write |
| read ”string” | Search for a text within the answer to the request. Fails if not found. Continue if found.read ”password updated successfully” |
| expect ”string” | Same as the read |
| expect-regex | Same as the read |
| not-expect ”string” | Search for a text within the answer to the request. Continue if not found. Fails if found.password unchanged |
Example for a legacy Linux password change
## Request password change
expect "*$"
exec "sudo passwd [#USERNAME#]"

## Fill in the sudo password
expect "*:"
exec "[#AUTH_PASSWORD#]"

## Fill in the new password
expect "*password:"
exec "[#NEW_PASSWORD#]"

## Confirm the new password
expect "*password:"
exec "[#NEW_PASSWORD#]"

## Validates if successfully changed
expect "*successfully"
Telnet
Syntax
| Command | Description |
|---|---|
| set-username-prompt ”string” | Determines which user prompt pattern to locate. The search value is a simple text. It is not a regular expression.set-username-prompt ”Username:” |
| set-password-prompt ”string” | Determines which password prompt pattern to locate. The search value is a simple text. It is not a regular expression.set-password-prompt ”Password:” |
| set-new-line-mode [unixwindowsmac] | Determines which breakline system must use.set-new-line-mode ”unix” |
| set-no-authenticate | Configures the executor to skip authentication stepset-no-authenticate |
| send ”command” | Sends the command to the target server without inserting the line break character automatically at the end.send ”passwd” |
| exec ”command” | Sends the command to the target server by entering the line break character at the end. |
| expect ”pattern” | Wait for the desired text to appear.expect ”changed!” |
| end | Closes the connection to the target server.end |
Example for an 3com Switch 5500 Family
## Waiting username
expect "*:"
exec "[#USERNAME#]"

## Waiting password
expect "*:"
exec "[#CURRENT_PASSWORD#]"

## Enter system-view
expect "*>"
exec "system-view"

## Enter local user view
expect "*]"
exec "local-user [#USERNAME#]"

expect "*]"
exec "password cipher [#NEW_PASSWORD#]"

## Exit to user.
expect "*]"
exec "quit"

## Exit to system view.
expect "*]"
exec "quit"

expect "*>"
exec "quit"
Windows RM
The target device needs Microsoft®Windows®Remote Management connectivity enabled and authorized.
Syntax
| Command | Description |
|---|---|
| !unsecure | Determines the use of unsafe prototype for change.!unsecure |
| !reload-password | Forces the replacement of the current password with the new password value.!reload-password |
| !sleep seconds | Wait for the determined number of seconds to execute the next command.!sleep 30 |
| !change-password | Requests the execution of password change of the target user of this automation.!change-password |
| powershell cmd | Executes the powersheel command on the remote server.powershell Set-ADAccountPassword -Identity``[#username#] -Reset -NewPassword (ConvertTo-SecureString``-AsPlainText ”[#NEW_PASSWORD#]” -Force) |
Example for devices that have Windows RM over HTTPS
## change user password
!change-password
Example for devices that have Windows RM over HTTP
!unsecure

## change user password
!change-password
Example for password change in configuration file via PowerShell
powershell (Get-Content .Desktop\Web.config) | Foreach-Object {$_
-replace 'password=([^;"]+)','password=[#NEW_PASSWORD#]'} |
Set-Content .Desktop\Web.config
Example for COM+ Application password change using PowerShell
## Change user password
!change-password

## Replicate the new password into COM+ application
powershell $comAdmin = New-Object -com ("COMAdmin.COMAdminCatalog.1")[nl]$applications = $comAdmin.GetCollection("Applications")[nl]$applications.Populate()[nl]foreach ($application in $applications)[nl]{[nl]$appName = $application.Value("Name")[nl]$appIdentity = $application.Value("Identity")[nl]if ($appIdentity -eq "[#ADD_INFO#]\[#USERNAME#]") {[nl]$application.Value("Password") = "[#NEW_PASSWORD#]"[nl]$comAdmin.ShutdownApplication($appName)[nl]$applications.SaveChanges()[nl]$comAdmin.StartApplication($appName)[nl]}[nl]}
Example for Windows Autologon password change using PowerShell
## Change user password
!change-password

## Replicate the new password into Windows registry
powershell $RegPath = "HKLM:\SOFTWARE\Microsoft\Windows NT\CurrentVersion\Winlogon"[nl]
Set-ItemProperty $RegPath "AutoAdminLogon" -Value "1" -type String[nl]
Set-ItemProperty $RegPath "DefaultDomain" -Value "[#DOMAIN#]" -type String[nl]
Set-ItemProperty $RegPath "DefaultUsername" -Value "[#USERNAME#]" -type String[nl]
Set-ItemProperty $RegPath "DefaultPassword" -Value "[#PASSWORD#]" -type String
Example for IIS Website Application Pool
## Change user password
!change-password

## Replicate the new password into IIS application pool
C:\Windows\System32\inetsrv\appcmd.exe set config /section:applicationPools /"[name='[#ADD_INFO#]']".processModel.identityType:SpecificUser /"[name='[#ADD_INFO#]']".processModel.userName:[#USERNAME#] /"[name='[#ADD_INFO#]']".processModel.password:[#NEW_PASSWORD#]
Windows RPC
The target device needs Microsoft®Windows®RPC connectivity enabled and authorized.
Syntax
This executor accept any Microsoft®Windows®RPC command, plus some senhasegura Microsoft®Windows®RPC Executor commands starting with exclamation.
| Command | Description |
|---|---|
| !netsmb-password | Requests the execution of password change of the target user of this automation.!netsmb-password |
| !reload-password | Forces the replacement of the current password with the new password value.!reload-password |
| !sleep seconds | Wait for the determined number of seconds to execute the next command.!sleep 30 |
Changing a domain user password
## Changing account using executor command alias
!netsmb-password

## You can also execute a native RPC command
## net user [#USERNAME#] [#NEW_PASSWORD#] /domain
Changing a local user password and update a local user Windows Task account password
## Change password
net user [#USERNAME#] [#NEW_PASSWORD#]

## Waiting three seconds
!sleep 3

## Update password for "Defrag"
schtasks /Change /RU [#USERNAME#] /RP [#NEW_PASSWORD#] /TN Defrag
Changing a local user password and update a Windows Service account password
## Change password
net user [#USERNAME#] [#NEW_PASSWORD#]

## Waiting three seconds
!sleep 3

sc config [#ADD_INFO#] obj= [#USERNAME#] password= [#NEW_PASSWORD#]
MySQL
Syntax
You can execute any MySQL administration query, or even queries targeting databases.
You can also call MySQL functions or specific databases functions. The only limitation is to call or create stored procedures.
User password change example
ALTER USER '[#USERNAME#]'@'[#ADD_INFO#]' IDENTIFIED BY '[#NEW_PASSWORD#]';
FLUSH PRIVILEGES;
Oracle
Syntax
You can execute any Oracle administration query, or even queries targeting databases.
You can also call Oracle functions or specific databases functions. The only limitation is to call or create stored procedures.
User password change example
CONN [#USERNAME#]@[#ADD_INFO#]
ALTER USER [#USERNAME#] IDENTIFIED BY [#NEW_PASSWORD#]
PostgreSQL
Syntax
You can execute any PostgreSQL administration query, or even queries targeting databases.
You can also call PostgreSQL functions or specific databases functions. The only limitation is to call or create stored procedures.
User password change example
ALTER USER [#USERNAME#] WITH PASSWORD '[#NEW_PASSWORD#]';
SQL Server
Syntax
You can execute any SQL Server administration query, or even queries targeting databases.
You can also call SQL Server functions or specific databases functions. The only limitation is to call or create stored procedures.
User password change example
ALTER LOGIN [#USERNAME#] WITH PASSWORD = '[#NEW_PASSWORD#]' OLD_PASSWORD = '[#CURRENT_PASSWORD#]' UNLOCK;
Tk Expect
This plugin use the TK Expect binary to interact using a powerful stdout interpreter.
Syntax
You can use the native TK Expect2 manual to create your script.
IBM AS400 password change example
use telnet script
expect {
    "User  . ." {
        send "[#USERNAME#]\t"
        exp_continue
    } "Password  . ." {
        send "[#CURRENT_PASSWORD#]\r\n"
        exp_continue
    } "Selection or command" {
        send "chgpwd\r\n"
        exp_continue
    } "Current password  . ." {
        send "[#CURRENT_PASSWORD#]\r\n"
        exp_continue
    } "New password  . ." {
        send "[#NEW_PASSWORD#]\r"
        exp_continue
    } "New password (to verify)" {
        send "[#NEW_PASSWORD#]\r"
        exp_continue
    } "Password changed successfully." {
        send "\r"
        exit 0
    } incorrect {
        send_user "FAILURE INCORRECT"
        exit 1
    } timeout {
        send_user "FAILURE TIMEOUT"
        exit 1
    } eof {
        send_user "FAILURE EOF"
        exit 1
    }
}
VMWare ESXi
This plugin will interact over the VMWare ESXi administrative console binary esxcli.
Syntax
The original esxcli command syntax should be used.
Setting a user password using esxcli "system account set" command example
system account set -i '[#USERNAME#]' -p '[#NEW_PASSWORD#]' -c '[#NEW_PASSWORD#]'
x3270 IBM Terminal Emulator
Executor for mainframes IBM 3270. You can interact over mainframe application interfaces interpreting its design.
Syntax
Some of the linux x32703 commands was replaced by executor aliases to make the senhasegura integration secure and easy.
| Command | Description |
|---|---|
| timeout [seconds] | Some mainframes connections, or some actions, can get stuck. To avoid this situation you can configure the timeout seconds. This timeout is the maximum elapsed time the entire operation can take. By default its configured to 5 seconds.This command should be used before connect command. timeout 300 |
| sleep [seconds] | Sleep by the given seconds. Use this command if you need to wait the mainframe perform some action. This sleep will not be sent to the mainframe.sleep 3 |
| echo [string] | Echo a string into the executor operation logs. This echoed message will not be sent to the mainframe.echo Starting authentication step |
| connect | Will perform the mainframe connection to start the interaction step, resulting into a Connect action.connect |
| search [data][x,y,r,c] | Will lookup the rendered mainframe application for the given coordinate and compare with the give data string. If will stop the execution with failure status if it’s not equal.The coordinate should be composed by 4 position variables.The command will be translated to Ascii action.* x: Starting row number starting by 0; |
- y: Starting char column starting by 0;
- r: Number of rows to be returned starting by 1;
- c: Number of columns to be returned starting by 1;
search SUCCESSFUL 10,17,1,10| | search_not [data][x,y,r,c] | Similar tosearch. But will failure if the give string have been found.search_not FAILURE 10,17,1,7| | send [data] | Input some data to target application. This command can accept string escapes sequences.The command will be translated toString()action.send T01281\t2918\r| | screenshot | Will log into the executor operation log the entire rendered ASCII screen (24x80 terminal only).screenshot| | disconnect | Will perform a mainframe connection shutdown.The command will be translated toDisconnect()action.disconnect|
Changing user password into mainframe application example
timeout 350

## AUTHENTICATION STEP ##################

echo Starting connection

connect

sleep 3

echo Performing login
search USER: 20,2,1,5

send [#USERNAME#]\t[#CURRENT_PASSWORD#]\r

echo Result screen
screenshot

## PASSWORD CHANGE STEP ##################

search USER: [C] CHANGE PASSWORD 10,5,1,19

send C\r[#NEW_PASSWORD#]\t[#NEW_PASSWORD#]\r

search_not FAILURE 12,70,1,7
search SUCCESS 12,70,1,7

echo Result screen
screenshot

disconnect
See how to prepare this script in the section subsec: execautoscript↩
- http://x3270.bgp.nu/