Privileged Information
Introduction
This book will explain how we can register Devices, Credentials, Personal Information, and SSH Keys. Through registration screens or batch registration of devices and credentials.
Symbols used in this cookbook
This book uses the following symbols to highlight information that should be taken into account for the best use of senhasegura :
Info - useful information that can make the use of the solution more dynamic
Caution - actions and items that cannot be ignored
commands: data that must be entered in the same way as described in this book- URLs : paths to access web pages.
<KEYS>: keyboard paths that will be used to perform actions.
Registering Devices and Credentials
Before we learn how to register the inside information, it is important to be aware that in senhasegura every credential belongs to a device. But a credential can be used on multiple devices and products on the platform.
This means that the device must be registered before the credential. But this device does not need to be exactly hardware. It can be a service that is reachable under network address and it may have connectivity within the protocols supported in senhasegura .
In this way, you can segregate the accesses as previously seen using the attributes of the device creating easy segregation of users who perform maintenance on the operating system, from those who perform maintenance on the services of this device.
Some important entities
Before registering the devices it is important to know about some device attributes usage, and where we can set them.
Domain: In senhasegura , domains are used on Microsoft Windows devices. They are part of the authentication process in the connection protocols. They can be seen in use the proxy, password exchange, certificates, scan & discovery sessions and other features involving Microsoft credentials. Domain registration is performed at the PAM ➔ Credentials ➔ Domains menu. On the parameter screen, the LDAP/Active Directory section contains a list of available domains in the Domain settings field;
Site: The site is used as a division of devices. Physical sites such as geographic locations, business area separations, or virtual separations can be used. Use the customer's business rule to generate this division. The sites can be registered at the time of device registration, or through your report at the Devices ➔ Settings ➔ Sites menu.
Registering the Device
Proper registration of devices is critical to the proper functioning of the solution. Any discrepancy between the registered registration and the actual access data affects the software experience.
You can register the device through the quick actions menu or the Devices ➔ Devices menu.
In this report you have access to key device data. The Connectivity column has the record of the last asynchronous test of connectivity to the devices.
On the new record screen, you have three tabs with information pertinent to the device to perform the segregation of access and perform connectivity for other functionalities. Such as Proxy or Password Exchange.
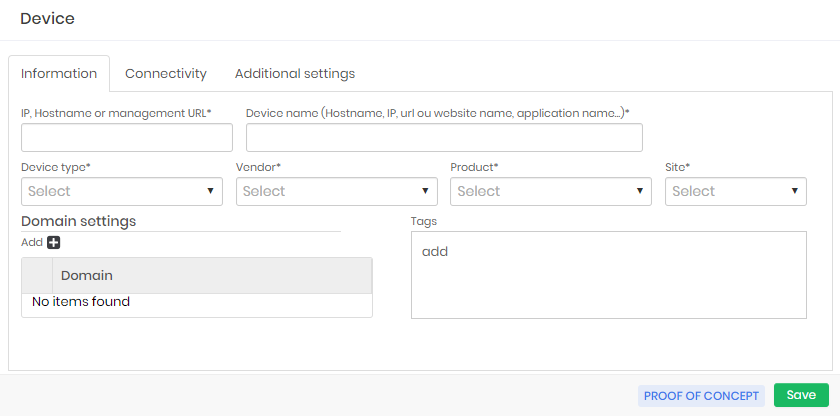
The minimum required fields are all in the main tab Information.
The entities Type, Site, and Template are segregators in the senhasegura permission system.
Changing and inactivating may affect access to Devices and Credentials.
Changing your name may affect the user experience in reports and dashboards.
All registration, modification and inactivation operations of Devices and their attributes are sent via Syslog.
IP, hostname or management URL: Network address, hostname, or IP through which the device is registered and that is reachable by the platform;
Device name: Device name for internal use of senhasegura . There is no need to be the same hostname as the device. This name will be used for segregation;
Device type: Device type;
Vendor: Device manufacturer;
Product: Device model;
Site: Division to which the device belongs;
Domain: List of domains to which the device belongs;
Tags: Tags for distinction of use. Used for filters and segregation;
The fields Device type , Vendor , Product and Site can be registered directly on the device sign-up screen if the value entered does not exist.
In the Connectivity tab, you can configure which protocols and ports the device accepts. When you add a record to the grid, you can change the port number and perform the connectivity test.
Connectivity tests are performed via TCP socket.
It is possible to configure senhasegura two applications with the same protocol, but on different ports
The protocol list is fixed. The user is not allowed to inactivate or create new records.
When modifying the default port of a connectivity, the change will only be reflected when registering new devices, not being applied to Devices already registered.
Except for the encryption type, which will apply to all Devices that contain connectivity to the configured protocol.
Through the ports, you allow or not the use of the device for Proxy connections or use by other modules.
In the Additional settings tab, you can register private information to work in other modules. By default you will see the expressions grid for Proxy connectivity. There is also the option (not mandatory) to set the criticality of the device with High, Medium or Low.
In this grid, you can register regular expressions to handle custom authentications on devices that use command-line protocols such as Telnet.
We recommend that whenever possible use protocols with encryption support, but sometimes the client has an old device with a custom Telnet interface that must be protected and managed by senhasegura .
End device registration with the Save button. The device will be available in the device report and ready to receive new credentials.
When activating a previously inactivated devices, the credentials associated with it will not be activated.
The credentials report
Only Credentials the current User has permission to see will be listed on this screen.
The Credentials report is accessed in the PAM ➔ Credentials ➔ All menu.
This report shows credentials subdivided by the devices to which it belongs.
Each record has actions for maintaining or using the credential. Let's explore the special actions of the credential.
View password: Have access to the credential password. This action uses the access workflow;
History: Have access to the password history of the credential, and you will be able to access all old values of this password. This action uses the access workflow;
Clone: Allows you to clone the credential completely. Use as a facilitator when similar credentials in their characteristics are to be created. You will save time by changing only the username and password values;
Start session: Present only when the device has some protocol that allows proxy sessions. Delivers a Web Proxy session to the requester. This action uses the access workflow;
Start session on another device: Allows proxy access to another device from the same domain. The credential must be a domain user and have a domain configured;
By inactivating a credential, all users lose access cannot use the credential through the proxy. Automatic password change will also be inactivated. Even password withdrawal and history access will be prohibited.
When you deactivate a device, all credentials linked to the device will be inactivated.
When you activate a device, only the device will be activated. Credentials must be activated one by one manually. This allows the review and assurance that credentials are not improperly activated.
Registering a credential
The limit of Credentials to be registered in senhasegura depends on the licensing contracted. Contact the senhasegura Support for more information.
The credential can be registered via the shortcut in the quick actions menu, or through the Credentials report.
To register a credential it is mandatory to fill in the fields Username , Password type and Device . Let's understand each tab of the form and its fields.
Credential general settings
At the information tab we have the following fields:
Username: It is the credential username. Must match the credential on the remote system;
Password type: It is the credential type. You can register new types through the Settings ➔ Credentials ➔ Credential types menu; The Domain user type enables proxy use of the credential on other devices. But it is necessary to inform the domain in the field Domain ;
Domain: Credential domain;
Device: Device that holds the credential;
Additional information: Additional information that complements the use of the credential on the target device. This field is available for use in automated password exchange, RemoteApp macros, and database connections; In the case of database connections, the name of the database must be populated in this field;
Status: Flag whether the credential is active for use or not;
Password: Credential password up to 256 characters; If automated password change is configured, this limit will be reduced to 70 characters to prevent character repetition;
Set current password: Indicative that the user wants to change the value of the password that is already registered in senhasegura . For new registrations, allows the editing of the password;
Show password: Display the password plaintext during editing;
Generate password: Will generate a random password respecting the password strength described in the table below the form;
Tags: Identifiers for credential segregation;
Note that there is a frame named Password policy . We will talk about this. For now, understand that senhasegura calculates the strength of the password from device attributes and the credential being registered. And this password policy determines how the random password will be generated in automated exchanges.
Execution settings
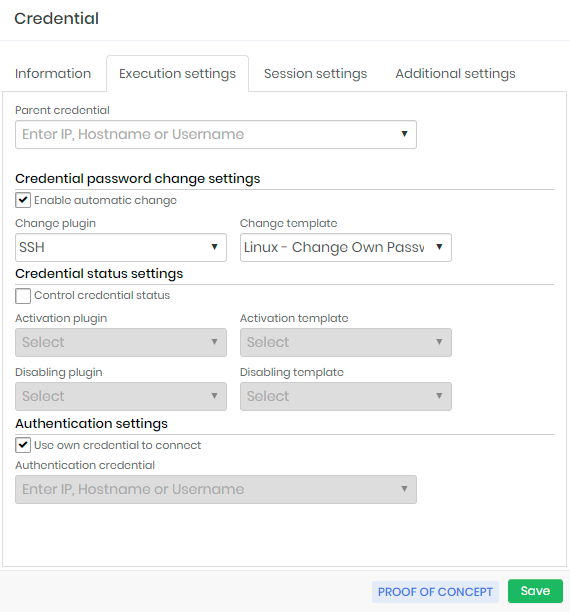
In the Execution settings tab we will configure the credential automated password change procedure. These attributes will be seen in practice ahead when we talk about the automated password change cycle.
Parent credential: Parent credential that initiates the automated password change process of this credential.
It works as a password change chain, where the change of a parent credential initiates the process of all its child credentials.
The existence of a parent credential does not prevent the child credential from being changed manually or automatically;
Credential automatic password change settings
Enable automatic change: Flag to enable automatic credential change;
Change plugin: Plugin connecting and running to the device to perform the change.
This plugin is linked to various connection protocols. There is no validation that the device has its active connectivity;
Change template: Template that will be executed by the executor plugin.
infosenhasegura is installed with more than 250 templates out-of-the-box. And inside senhasegura PAM Solution our clients and partners can be updated with more templates developed by the senhasegura team and partners community.
Credential status settings
Control credential status: Flag if senhasegura should control the status of the credential before and after use by the user;
Activation plugin: Plugin used to connect and perform the credential activation steps on the device;
Activation template: Template that will be used to activate the credential;
Deactivation plugin: Plugin used to connect and perform the credential inactivation steps on the device;
Deactivation template: Template that will be used to inactivate the credential;
Execution authentication settings
Use own credential to connect: Flag whether the credential itself should be used to connect to the device to perform the password change;
Authentication credential: If the credential itself is not used to perform the automated change, you must indicate which credential will be used to connect to the device; You can use a credential to connect to the device and still use your target credential to perform the change. This is possible due to the template system;
As you may have noticed, the Executions module, responsible for automation and template management, was quoted in this tab.
Additional settings
In the Additional settings tab we have the latest credential settings about other features. The most prominent is the Macros/RemoteApp setting.
Identifiers (for web services): Alias to identify the credential when triggered via A2A web services;
User credential owner -: User who owns the credential. When determined, the owner user will always have access to the credential and can make changes to it;
Server path: Path that is used in password exchange templates when the credential is registered into a physical file;
Also in the Additional settings tab, there is the option (not mandatory) to set the criticality of the credential by choosing one of the following options: High, Medium or Low.
Session settings
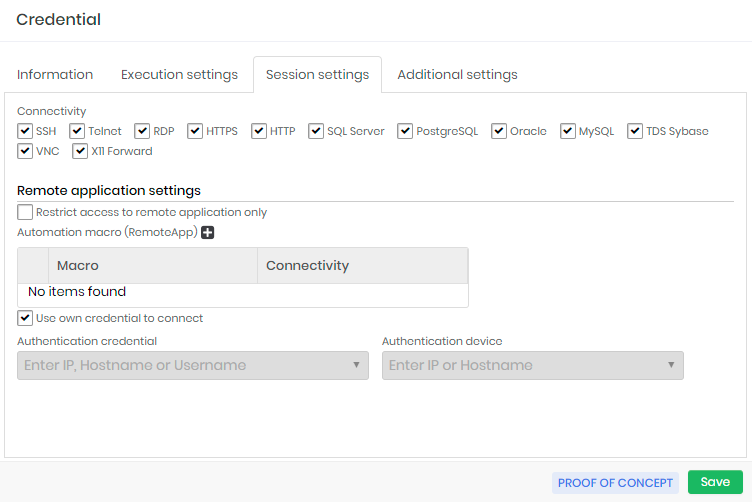
At this tab you can configure the usage of this credential at proxy sessions.
At Connectivity boxes you can select which protocols this credential can be used. The target device also need be configured with one or more selected protocols to enable this credential for proxy usage.
Remote application settings
At the same Session settings you can configure RemoteApp settings for this credential.
Restrict access to remote application only: If active, the credential can only be used for RemoteApp proxy sessions. You cannot use a proxy session that delivers the desktop or terminal of the device. This does not prevent password withdrawal;
Automation macro RemoteApp (grid): You can relate which RemoteApp macros are linked to the credential and available to proxy users;
infoFor a complete list of supported protocols and ports, see: Technical Specification.
Use own credential to connect: Flag the same credential will be used to authenticate to the target device and RemoteApp;
Authentication credential: If the authentication credential on the device is different from the RemoteApp credential, indicate which credential will be used in the authentication step;
Authentication device: The device where the credential will be authenticated and the macro will run. If filled, the original credential device we are registering will be ignored;
Additional fields for multi-factor authentication (grid): Additional fields for authentication on websites. Some sites require a lot of additional information to complete the login steps. You can give an alias to the values to complement the web authentication script;
Remarks: General credential remarks;
You can complete the registration of the credential through the Save button.
Now senhasegura will process the access groups that allow the viewing of the credential and make available to users. Every stage of registration is reported by SIEM. If a manual password change occurs, the child credentials won't be notified.
Access Group
Through the senhasegura permission system, we learn how to segregate the actions that a user can perform within the platform. Now we will learn how to limit the data that the user can act on.
In this way, we add another layer of security to ensure the principle of least privilege.
Access Groups act as a filter for entities from their properties. The configuration of groups can be seen in several products of the senhasegura platform:
PAM System
Certificate Manager
A2A
Task Manager
Information Manager
This allows the Administrator to deliver different levels of security to the same user within their assignments in each product.
In this topic, we will talk about the access group of the PAM module, which has access control to credentials and their use.
Segregated entities and their properties
All screens that a user has access to display information from privileged entities are filtered by the Access Group. Actions that can be taken also affect these privileged entities. To avoid misuse, senhasegura queries the rules applied to the user that connects the privileged entity.
If the user has more than one access group that gives them access to privileged information, senhasegura will apply the most restrictive group rule.
Restriction levels are based on the number of steps and people who are aware of the operation:
Allows access to information;
Allow access by requiring justification of the requester;
Allow access within a time range and an approver;
In the PAM module, the segregated entity is the SSH credentials and keys. And these entities have attributes that can be used as a filter:
Devices properties:
Name of the device to which they belong;
Model of the device to which they belong;
Device tags;
Device site;
Device type;
Credential properties;
Credential username;
Additional credential information;
Credential tags;
Credential type;
By using these combinations of attributes you determine what information a group of users will have access to. Some information allows the use of wildcard or masks. We'll talk better about this later.
For some examples, see the following credential list:
| ID | Username | Hostname | Device type | Product | Site | Tag |
|---|---|---|---|---|---|---|
| 1 | root | srvdns | Server | RedHat 7.0 | LAX | |
| 2 | administrator | msad | Server | Windows Server 2019 | LAX | |
| 3 | sa | mssqlprd | Database | Windows Server 2019 | NYC | dba |
| 4 | System | Oraprd | Database | Oracle 19c | NYC | dba |
| 5 | administrator | WS1092 | Workstation | Windows 10 | SEA | |
| 6 | administrator | WS1035 | Workstation | Windows 10 | SEA | |
| 7 | administrator | WS2018 | Workstation | Windows 10 | NYC | |
| 8 | peter.lee | WS1092 | Workstation | Windows 10 | SEA | |
| 9 | peter.lee | mssqlprd | Database | Windows Server 2019 | NYC | |
| 10 | john.ferrer | WS1035 | Workstation | Windows 10 | SEA | |
| 11 | john.ferrer | WS1092 | Workstation | Windows 10 | SEA | |
| 12 | root | vmh-www | Server | RedHat 7.0 | AWS | |
| 13 | root7vmh-cicd | Server | RedHat 7.0 | AWS | ||
| 14 | root | vmh-fw | Server | RedHat 7.0 | AWS |
Let's take a look at some examples of groups that affect this relationship.
Allow the ServiceDesk to have access only to the Administrator user of workstations.
Username:
AdministratorDevice type:
WorkstationAs a result, only credentials5,6, and7will be made available.
Allow DBAs to have access only to privileged Oracle database credentials:
Device type:
DatabaseDevice model:
Oracle*Credential Tags:
DBAAs a result, only credential4will be made available.
Allow users to have access to credentials that take their username, regardless of the device:
- Credential username:
[#USERNAME#]As a result, only credentials whose username is the same as the user logged in to senhasegura will be made available. If the username of senhasegura is john.ferrer only credentials10and11will be made available.
- Credential username:
Allow virtualization administrators to access only virtual machines hosted on AWS. By the rule adopted in this fictitious company, these machines receive the prefix vmh in their hostname:
Device name:
vmh*Website:
AWSAs a result, only credentials12,13, and14will be made available.
These are just a few examples that show how filters can be combined in creating some access groups. Please note that we do not link users at this time and do not set what can be executed. The users can be linked to a diversity of groups, and each group can allow different actions and require different levels of restriction.
The Access Group configuration procedure
Understood how attributes act as information filters, using one of the previous examples, we will create an access group that allows the Service Desk professional to access workstation credentials.
You can access the Access Groups report through the PAM ➔ Settings ➔ Access ➔ Access groups menu.
This report has the option to register new groups or change existing groups.
You can even completely clone a group to a new record through the Clone access group record action. So you can change small variations in criteria by keeping users linked. That could save you a lot of time.
The screen for a new group can also be accessed from the quick actions menu. Came from the quick actions menu you will be asked for the type of access group to register.
Groups once created will be applied immediately to users. But audit and validation reports are updated asynchronously in a process that is triggered with each modification in some group or modifications to some credential or device.
These fields as you may have noticed are determining the rules that must be obeyed by all members of the group if they want to have access to some privileged information reachable by this group.
Allowed actions and access controls
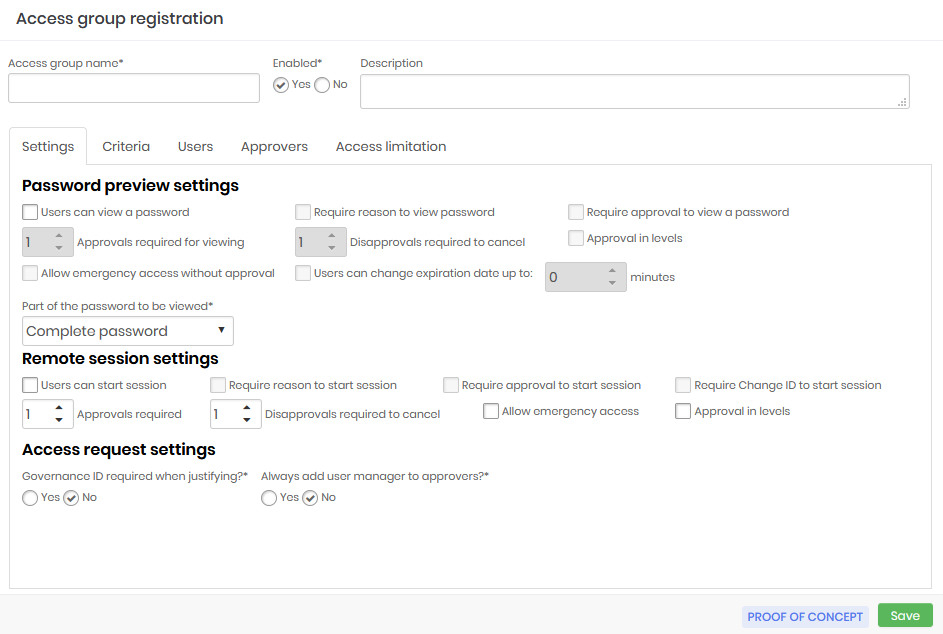
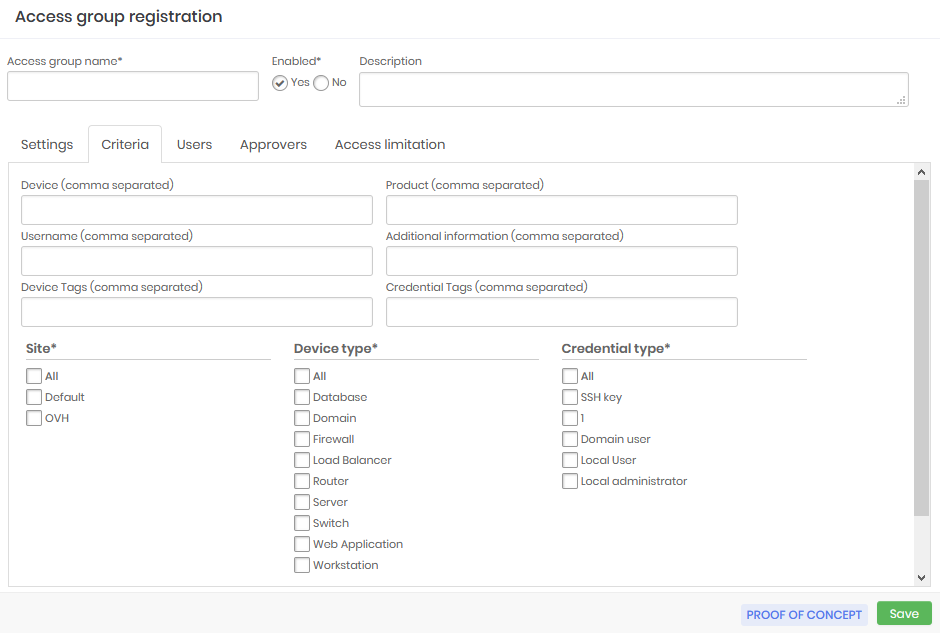
On the very first tab of the access group registration screen, you will see what actions this group allows and what access controls must be respected to make use of the privileged information.
Some of these fields are used to configure the Access Workflow and will be seen in practice in the next chapter.
Access group name: Name of the access group that corresponds to the rules this group applies. This makes it easier to understand and audit;
Enabled:Whether the group is active or not. Disabling a group can reduce the amount of information the user has access to, or reduce the level of security required to access the information;
Password previw settings:
Users can view a password: Determines that the credential password can be seen by the user;
Require reason to view a password: Check if it is necessary to register an excuse to see the password;
Requires approval to view a password: Check whether another user will need to act as an approver in order to see the password. Once active, you also need to define for how long this approval will be valid;
Approvals required to view: Number of approvals required to approve the operation;
Disapprovals required for cancellation: Number of refusals to stop the operation;
Approval in levels: Check whether approvers will be triggered in tiers. This way you can define a hierarchy of approvers;
Allow emergency access without approval: Flag whether the applicant has the power to stop the approval workflow by approving the operation himself;
Users can change the expiration date by up to: Flag whether the applicant has the power to stop the approval workflow by approving the operation himself;
infoIn the credentials display window a button will appear for the user to increase by the time, indicated in this field, their access period.
Part of the password that will be displayed: Allows the requested password to be displayed fractionally. Members of this group will only have access to the fraction defined in this field. This does not prevent the password from being used by the proxy functionality, since the user does not have access to the password in plain text when using any of our proxy solutions;
Remote session settings:
Users can start a session: Check if member users are allowed to start a proxy session using the credentials that this group allows access to;
Requires reason to start a session: Check if it is necessary to register an excuse to start the proxy session;
Requires approval to start a session: Check whether another user will need to act as approver in order to start the proxy session. Once active, you will also need to define how long this approval is valid for;
Approvals required: Number of approvals required to approve the operation;
Disapprovals required for cancellation: Number of refusals to stop the operation;
Approval in levels: Check whether approvers will be triggered in tiers. This way you can define a hierarchy of approvers;
infoWhen using level approval, lower level approvers will initially be notified. Only after approvals have been made by them will higher-level approvers be notified to take their approval actions.
Allow emergency access: Flag whether the requester has the power to stop the approval workflow by approving the transaction on its own;
Approval in levels: Check whether approvers will be triggered in tiers. This way you can define a hierarchy of approvers;
Access request settings: Check the following options
Governance ID required when justifying?: Check whether the applicant must enter an ITMS code at the time of justification;
Always add the user's manager to approvers?: Check if the user responsible for the user's department should be automatically alerted as an additional approver to this group. Therefore, this user will be alerted together with the other approvers in the tab Approvers.;
These fields, as you may have noticed, determine the rules that must be obeyed by all group members if they want to have access to some privileged information accessible by this group.
The criteria for determining which data are accessible
Now we can go to the Criteria tab. In this tab, we see the attributes we wrote earlier. Note that some of these attributes are arranged as lists and others as a free text field. Free text fields allow the use of wildcard or masks.
The wildcard character is the asterisk (*) and can be used anywhere in the value. Let's see some examples of wildcard uses in the Device field:
srv*will filter all devices whose hostname starts with srv;*www*will filter all devices that have www in their hostname;vmh*-dbwill filter all devices whose hostname starts with vmh and ends with -db;
Some fields allow multiple values to be separated by a comma. The Device field is one of these. The values will be considered as an OR condition in the rule. So, will be considered a pattern/value or another pattern/value. Example for the Device field:
srv*,vmh*Allow hostnames that start with srv or vmh;
Another special value that can be used is the [#USERNAME#] mask, which will be replaced by the username of the logged senhasegura account requesting the operation. And you can use this mask along with wildchar and fixed texts. Example for the Username field:
[#USERNAME#]Allow only credentials whose username is equal to the requester's username;[#USERNAME#]-admAllow only credentials whose username is a composition of the requesting user's username plus the suffix -adm;[#USERNAME#]-*Allow only credentials whose username is a composition of the requesting user's username plus a suffix that starts with "-" followed by any other value;
Group users and approvers
In previous versions to add users and approvers to an access group it was necessary to save the settings first. However from the version 3.6 it is not necessary to save the data before continuing the configuration of users and approvers, however, different from the versions before the end of the inclusion of users and approvers it is necessary to save the Access Group so that they are admitted by the group created.
Go to the Users tab to add users who are under to this access group.
The interface is intuitive and does not require details.
Perform the same task in the Approvers tab if this is a group that requires approval for operations.
Approvers in level
Note that approver users have a Level setting in their registry. This setting determines the call sequence for operation approval, allowing a hierarchy to be applied.
For example, we can have an access group with three authorization levels. The approvers that are configured as the first level will be the first to receive the access request.
The level two and three approvers will only be notified after the first level approvers grant the access, if they don't then the access will be denied, without the other levels being notified.
Likewise, if the first level approver grants access, but the second level approver rejects the third level approver will not be notified.
It is important to remember that if you register more than one approver for the same level, this way the first approver of that level that grants access will already result in a notification for the next level, thus making the process faster.
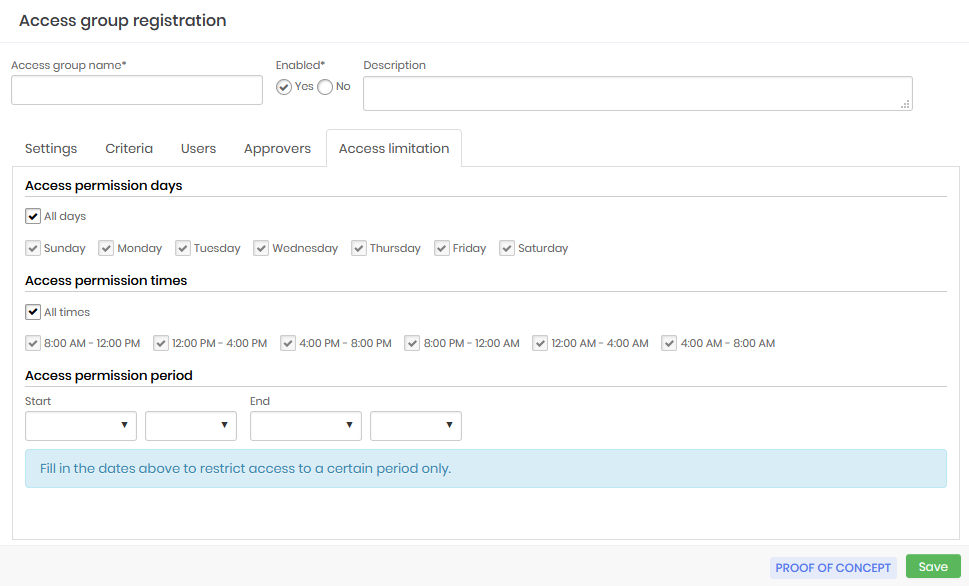
Access limitation
On the Access limitation tab determine the days and times that users who are members of this access group will be able to view passwords or conduct remote sessions. You can also determine dates for a more restricted access period.
Access permission days: Days of the week that users who are members of the group will be able to carry out the activities
Access permission times: Timetables that users members of the group will be able to carry out the activities
Access permission period: Determined period that users who are members of the group will be able to carry out the activities
Auditing the users and groups
As important as ensuring that users have access to the inside information they need to perform their activities, is to ensure that this access respects the company's security policy and is traceable.
Several senhasegura reports are used to ensure that the administrator has the necessary data to validate the access rules and audit these same rules.
Credentials by users
At the Reports ➔ PCI ➔ Credentials by users menu, you have access to the report that shows all credentials that users can see.
Similarly, you can identify whether a particular credential is being improperly made available to a user.
The security levels of the groups are also present in this report.
Access group modification history
Access groups can be completely modified immediately affecting the access level of everyone involved. So you can observe the change history of each group with details of which properties were changed and by whom, through the report Traceability ➔ Access groups.
For each record, you have acess to the detail screen that shows who made the change, what rule was used before, what rule it is used now, and when the change occurred.
Users by access group
The Credentials ➔ Users by group report shows the relationship between users and groups. In addition to presenting who added the user to the group, when and what part of the password this user has access to.
It is important to inform you that all actions to change, create, add, or remove groups and users are notified through messages in SIEM.
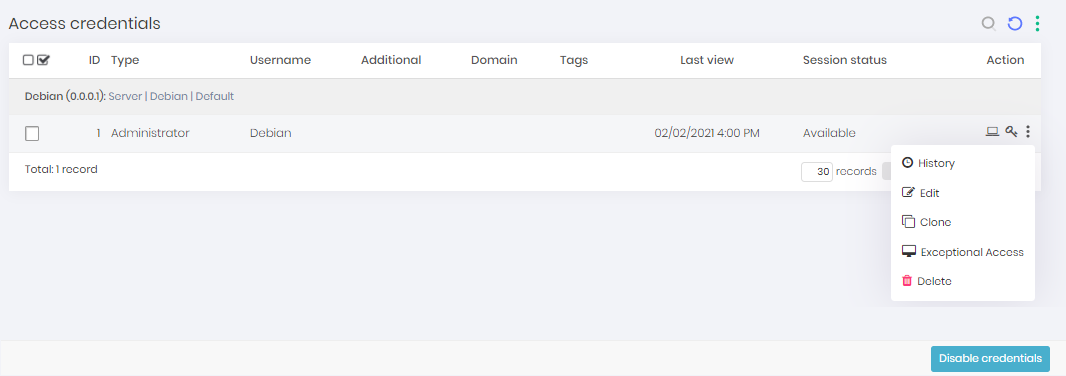
Exceptional access
Exceptional access, which is characterized by short duration access, is critical in some daily situations such as problem correction, so granting exceptional access must be quick and easy. senhasegura offers a simple and effective solution to ensure that such accesses are set up quickly and still maintain the security of the devices.
Exceptional access is composed of a credential action button, which is only available to users that have permission to create exceptional accesses. By clicking on the button the administrator is directed to a screen where he must select the user that will receive the access and fill in the start and end date of this permission. Automatically senhasegura will grant access permission only for that credential and only to the selected user and will revoke this right as soon as the validity expires, closing the session if it is still open. senhasegura will use just-in-time credentials to assure the security of this access and will allow auditing just like conventional sessions, through video of the session and the command log.
The pop-up screen that will open has the following fields:
User: Field to fill in the user who will receive the exceptional access
Start date: Field to fill in the start date of the access
End date: Field to fill in the end date of the access
Credential username: Informative field of which credential was selected
Device: Informative field with the device that will be the target of this access
Domain: Informative field with the domain of the target device
Save: Button to save the information and finish the action
Access Workflow
We learned previously how to configure access groups with your security criteria and rules to gain access to inside information.
Now we will see in practice how this is presented to the user when he requests access to privileged information.
The PAM access group is used in two moments, and the rules of justification and authorization occur in both situations:
Password withdrawal;
Proxy access;
When a user tries to make use of a credential in any of these situations, senhasegura checks which access group, in which the user is related to the credential, has the most restrictive rule.
As we saw earlier this path can take the following options:
Allow access to information;
Allow access by requiring a justification on the part of the requester;
Allow access within a time range and an approver;
In the first and second case, there is no use of the workflow. The requester will be able to access the information immediately. senhasegura will only record access in all compliant audit reports and forward to SIEM the messages of the actions taken.
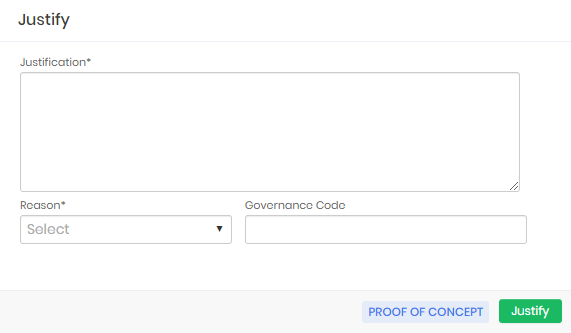
Access through justification
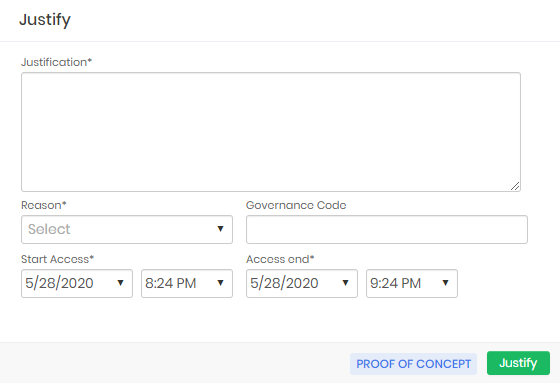
If the requesting user needs to record the reason for using the inside information, a registration screen will be presented. And only after sending the justification will be possible to use it.
The requesting user can list their requests through the PAM ➔ Access control ➔ My requests menu.
Access through approval
If the requesting user needs approval to perform the same task, the justification screen is presented with the addition of fields for the period. This period is the time interval that the requester needs to use the credential.
After the end of this time, the credential will be available for automatic password change. And if the approval is for a proxy session, the requester will be immediately disconnected.
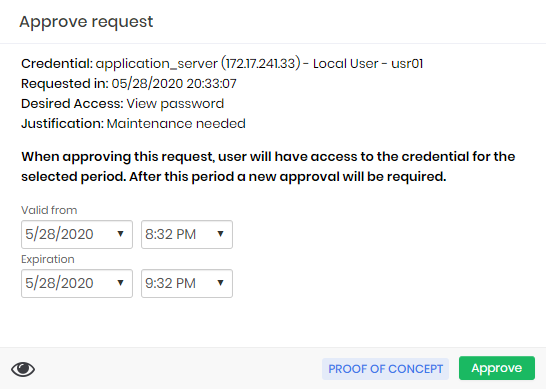
When forwarding the approval request, the user will be presented with the following confirmation screen.
The approver will be notified by email of this request by email.
If the user is a member of an access group with a level approval model, the 1st level approver will receive the email first, after his approval the other approvers will receive the email according to the hierarchy and number of levels defined in the access group configuration.
If the inbox is configured in senhasegura , approvers can reply to the email with the words APPROVE or DISAPPROVE to affect their response. Or he can click on the link described in the email.
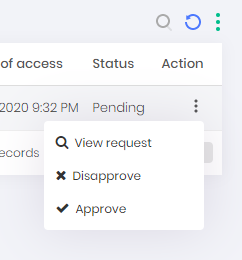
Through the system it can be done at the PAM ➔ Access control ➔ My approvals menu. Record actions allow you to approve, disapprove and see the detail of the request.
At the time of approval, the approver may change the date and time interval.
All the requests and the justified accesses can be seen in the report Access control ➔ Requests.
The emergency access
There is a special case in which the requester can skip the approval process if there is a need for immediate emergency use of the credential. We call it emergency access.
When the access group allows the requester to make use of this feature, the requester will be presented with the emergency access screen right after sending the access request.
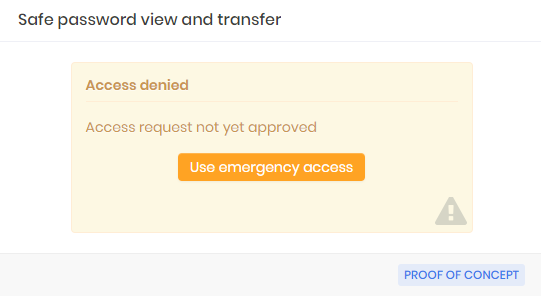
As soon as the requester confirms emergency access, senhasegura will send to all approvers the information that the requester had access to information in advance.
The access request will be marked with emergency use.
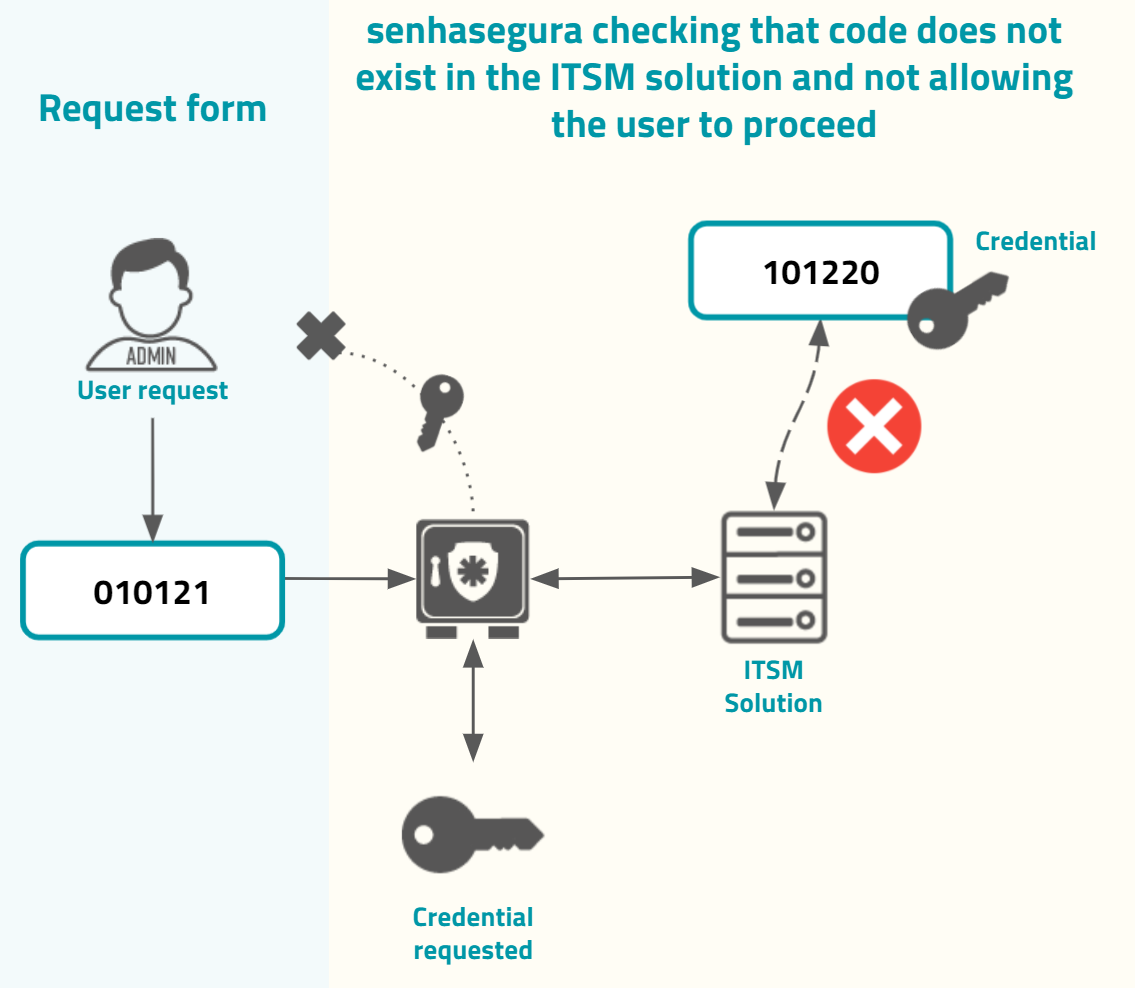
ITSM integration
Into the justification and authorization form, the requester user can input the Governance code. This governance code can be used just for evidence or can be integrated into ITSM solutions. If it is integrated with configured ITSM solutions, the senhasegura will first validate with the target ITSM system if the governance code provided grants to the user authorization to execute the operation, if it is the user request is granted, as in the image usr-sistema-0224.

If the code does not exist or is not valid, the senhasegura will not grant the user request, as in the image usr-sistema-0225.
By default, only the following ITSM solutions are provided by senhasegura . You can configure the integration into Settings ➔ System parameters ➔ Integration with ITSM, and then click at the report action button New.
This report also gives the possibility to test every configurations using the Test authentication record action.
If you want a mandatory Governance code to be entered, check the option Governance ID required when justifying? in the users' access group.
Jira Service Desk
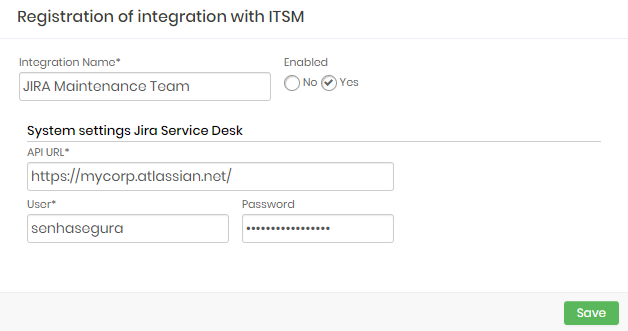
Integration Name: Will be the name of the integration used to identify this configuration inside senhasegura reports;
Enabled: This status flag indicates if this configuration should be used into workflow procedures;
API URL: Should be filled with the main JIRA URL. This URL will be used to access the JIRA REST Endpoint;
User: A valid user with the right permission to query issues tickets inside JIRA;
Password: The JIRA user password;
The JIRA integration will query the given ticket code using the /rest/api/2/issue/ endpoint. The user request will be only accepted if the JIRA issue is under In progress status.
Freshdesk
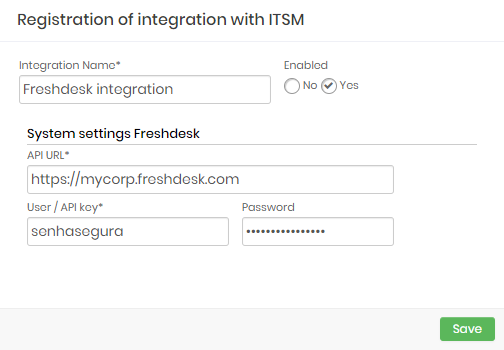
Integration Name: Will be the name of the integration used to identify this configuration inside senhasegura reports;
Enabled: This status flag indicates if this configuration should be used into workflow procedures;
API URL: Should be filled with the main Freshdesk URL. This URL will be used to access the Freshdesk REST Endpoint;
User: A valid user with the right permission to query issues tickets inside Freshdesk;
Password: The Freshdesk user password;
The Freshdesk integration will query the given ticket code using the /api/v2/tickets endpoint. The user request will be only accepted if the Freshdesk issue is under Open or Pending status.
CA Service Desk Manager
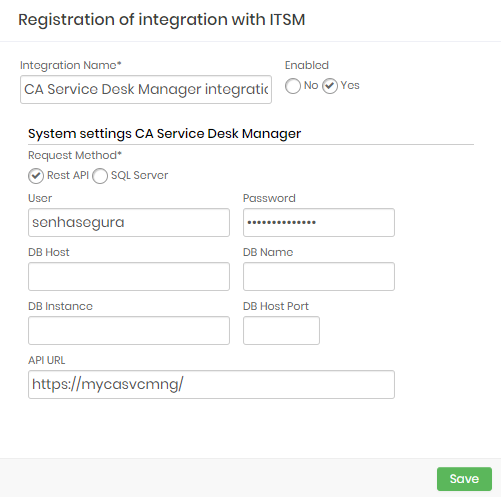
This integration can be configured to runs REST queries or queries directly to CA database.
Integration Name: Will be the name of the integration used to identify this configuration inside senhasegura reports;
Enabled: This status flag indicates if this configuration should be used into workflow procedures;
Request Method: Configure witch kind of communication senhasegura will execute into the CA software;
Rest API: will require HTTPS connection between senhasegura and the CA solution. The following fields should be filled if you choose the REST API method:
API URL: Should be filled with the main CA URL. This URL will be used to access the CA REST Endpoint. Used only if REST API request method was selected;
User: A valid user with the right permission to query issues tickets inside CA;
Password: The CA user password;
SQL Server: Will require a SQL Server connection between senhasegura and the CA solution. The following fields should be filled if you choose the SQL Server method:
User: A valid user to connect into SQL Server;
Password: The database user password;
DB Host: Hostname or IP where the CA database is located;
DB Host Port: The TCP port to connect;
DB Name: The CA database name;
DB Instance: The granted database instance;
Zendesk
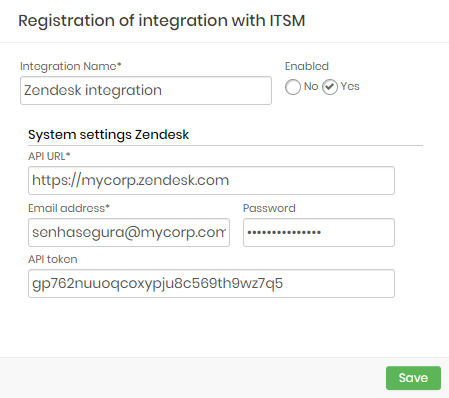
Integration Name: Will be the name of the integration used to identify this configuration inside senhasegura reports;
Enabled: This status flag indicates if this configuration should be used into workflow procedures;
API URL: Should be filled with the main Zendesk URL. This URL will be used to access the Zendesk REST Endpoint;
Email address: A valid user with the right permission to query issues tickets inside Zendesk;
Password: The Zendesk user password;
API Token: A valid OAuth token to identify senhasegura ;
The Zendesk integration will query the given ticket code using the
/api/v2/tickets/[id].json endpoint. The user request will be only accepted if the Zendesk issue is under Open or Pending status.
ServiceNow
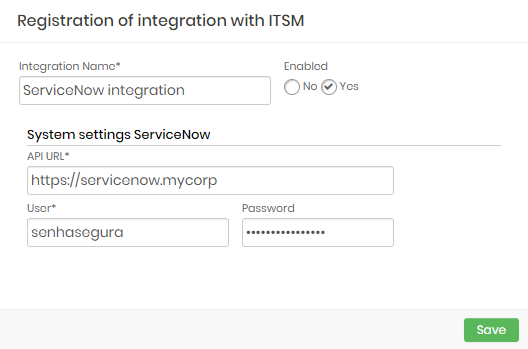
Integration Name: Will be the name of the integration used to identify this configuration inside senhasegura reports;
Enabled: This status flag indicates if this configuration should be used into workflow procedures;
API URL: Should be filled with the main ServiceNow URL. This URL will be used to access the ServiceNow REST Endpoint;
User: A valid user with the right permission to query issues tickets inside ServiceNow;
Password: The ServiceNow user password;
The ServiceNow integration will query the given ticket code using the /api/now/table/ endpoint. The user request will be only accepted if the ServiceNow issue is under In Progress status.
Personal information
Like credentials, personal information can be stored in senhasegura and rely on the benefits of Access Groups and Access Workflow.
This information is not changed automatically and is not used by any automated processes. They are at the disposal of the user who holds the information and will be considered in the process of backup and export by Master Key. Ensuring the availability of information.
Through the Information module you have access to the screens of the Personal Information module.
Personal Information Access Group
In the Settings ➔ Access groups menu you have access to the access groups configured report for personal information. You can even create new access groups.
On the Access limitation tab is possible to restrict the information access by dates, days of the week and hours. In case an user that belongs to one of the access groups tries to access the information in date, day or time out of the restrictions configured, it will get an error message indicating restriction issue.
Unlike credential access groups, personal information access groups do not have a criteria tab. This means that only security policies and member users are configured.
The maintainer of the registered information has the power to decide on who that information will be shared for, not the access group administrator.
Note that by not having the criterion as an attribute of an access group, the name of the access group should reflect the security policies.
Registering a new Access Group
When clicking on the option to create a new access group, the Access group registration screen will open and there firstly, it's necessary to fill up the following fields and options:
Access group name: Name of the access group that matches the rules that this group applies. This makes easier understanding and auditing;
Description: a brief description of the access group;
Enabled: Whether the group is active or not. Disabling a group can reduce the amount of information the user has access to, or reduce the level of security required to access the information;
After filling up the initial fields and options, all other configuration options are separated by tabs:
Settings: Protected information settings
User can view the protected information: Flag if the protected information can be seen by the user;
It requires justification to view the protected information: Flag whether it is necessary to register a justification to see the protected information;
It requires an approval to view the protected information: Flag whether another user will need to act as an approver in order to see the protected information. Once active, you also need to set for how long this approval will be valid;
Approvals required for viewing: Number of approvals required to approve the operation;
Disapprovals required to cancel: Number of refusals to prevent operation;
Approval in levels: Flag if approvers will be triggered in levels. So you can set a hierarchy of approvers;
Users: Associate users to the access group that will have the role of operators.
ID: ID of the user to be added or removed;
Name: Name of the user to be added or removed;
Username: The username of the user to be added or removed;
E-mail: The e-mail of the user to be added or removed;
Approvers: Associate users that will have the role of approvers of the operations regarding the use of the information.
ID: ID of approver to be added or removed;
Name: Name of the approver to be added or removed;
Username: The username of the approver to be added or removed;
E-mail: The e-mail of the approver to be added or removed;
Access limitation: You can restrict the access group's acesss to the protected information by days of the week, time of the day and period (start and end date).
Registering Personal Information
In the Information menu, you have access to the personal information report. You will only see your registered information or other users' information that you have access to permission with a direct grant or through an access group.
Through reporting actions or through the quick action shortcut, you can register the new information.
There are four main features that make up protected information:
The information can be composed of file, text and password. All this information will be protected;
The information has a name, a type, an identifier for web services, and may receive a compulsory expiration date;
The information may be linked to a URL and a service, without the use of senhasegura to these attributes. This will be used only for maintainer organization purpose;
The information can be accessed even if inactive. The information status concerns only its use in the business plan;
Let us look at these attributes presented in a completed example.
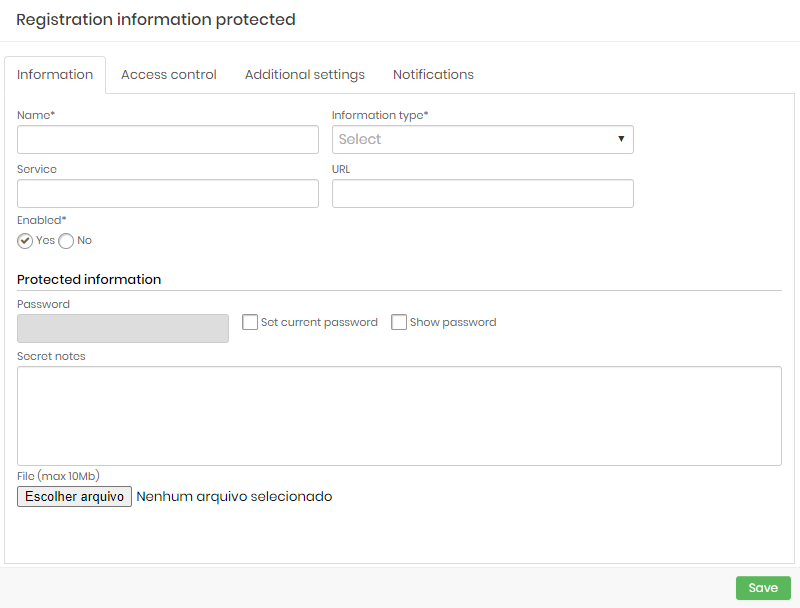
Note that in the Information tab you can fill in the data that will be protected, such as a file, notes and password, and you can also fill in the open attributes of this information, such as name, type, service and URL.
In the Additional settings tab, you can fill out the observations of this custody.
Do not confuse the Note field of this tab with the Secret notes field of the Information tab. The Note field will not be protected!
You can also determine validity for information, an identifier for retrieving information through web service methods and manually indicate the status of this information.
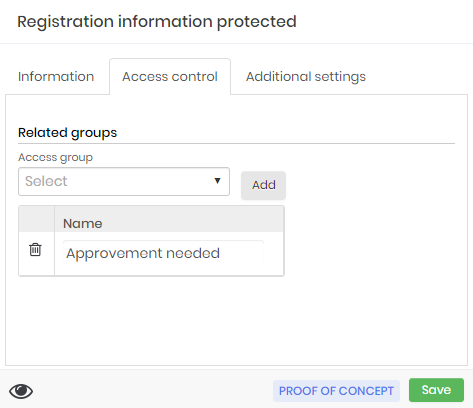
In the Access control tab, you can determine which users will have access to information, for how long and in which context.
When you grant access to an user, the information owner can set up the expiration date and time by filling the Expiration date field. If the access should be permanent, just keep the Expiration date field empty.
Note that in this case, the information owner will have full knowledge of which users will be able to use the secret, instead of information that is shared with access groups, where the group composition is not responsibility of the secret holder.
You can select a predefined Information type if it exists, or if doesn't exist, type a new one to be persisted with the new Personal Information.
You can configure a compulsory expiration date on the Expiration date field at Additional settings tab.
When the information reach the expiration date, all users lose it's access and only the owner can edit ou access the information.
In the Notifications tab you can configure which users should be notified before the protected information expires. You can set up a single rule for all users listed in Access Control, or create special notification rules for users outside of access control.
Viewing the information
The information viewing screen centralizes all the details that had been previously registered. Note that protected data is available on the View password, View the information and Download the file action buttons.
The event of viewing the information will be reported through SIEM and can be accessed in the report Information ➔ Access log.
Registering Shared Information
Like personal information, shared information has the same protected attributes, and expiration information.
Its difference lies in the fact that the information holder configures which access groups will have access to information, without knowing who are the participants of these groups. In shared information, you cannot determine other users with edit power. All users with access will only be allowed to view the secret.
Once the information is registered, the secret holder can view the information and observe which users have access to the secret.
Batch importing Protected information
To make easy the deployment of senhasegura , in scenarios where multiple information was already managed by other solutions, the administrator can import through worksheets.
On the menu Information ➔ Batch import;
Click the report action menu Import;
On the import screen presented, click the footer button Template file to download the template Excel file;
Fill out the file by obeying the instructions from each field:
Name: Required field. It is the name of information that will be used for identification within senhasegura;
Information Type: Required field. It is the category within the business rule. If the type typed does not exist, a new type with the value typed will be registered;
Owner: Required field. Fill with the username of the user of the senhasgura that will be responsible for information;
Service: A description of the service to which information belongs;
URL: If the information is of a service hosted on a website, fill in with the access URL;
Password: A password that complements the information. This password will be protected and will only be visible for users with permission to access to information;
Secret notes: It is a free text field that will be protected by Senhasgura, getting visible only for users with permission to access to information;
Expiration date: The date the information will expire. This information will be used to alert users linked so that an action is taken;
Notificar users with: Number of days with which users will be notified in advance;
Identifier: Information identifier for use in WebService A2A ;
Note: General observations;
Allowed users: Relationship of usernames, separated by commas, which will have read permission in information. To also assign writing permission, complement the desired username with the suffix
:edit;
At the end of the fill, perform the upload the file on the same screen where the template file has been obtained;
Processing will generate a record in the import report so you can track the result of the operation;
Registering a personal credential
With the high level of complexity in the standard passwords that some systems have, it is common for users to leave their passwords noted in unsecured places.
The Personal Credentials function aims to provide a "personal vault" for system users to store their personal access credentials to, for example:
Email accounts;
Applications;
File storage services;
And others;
This way users store these credentials where access to them will be exclusively yours, being able to consult them as many times as they think necessary.
In addition, they can generate passwords and share their credentials with other users, without having to send them by email or messaging applications that may not be as secure. Managers can also benefit from this feature when they need to share passwords and generic usernames for their team members.
These personal credentials are unrelated to the credentials associated with devices registered in the vault for password withdrawal and remote sessions.
To insert a personal credential in the senhasegura follow the instructions:
Go to the menu: Information ➔ Personal credentials ➔ Personal credentials;
Click the action button on the report and choose the option New personal credential;
Enter the username of your credential;
If you wish to insert the URL of this credential;
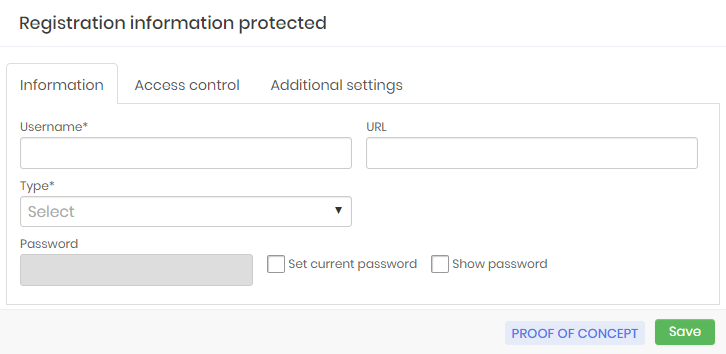
Personal credentials registration form Select in the Type field what the type of this credential is, as shown in the image protec-info-0010-enus;
You can also store the password for this credential.
To do this click on the Set current password option.
Enter the password or click on the Generate password option where the system will create a password for your credential.
Go to the Access Control tab to add users to whom you wish to share this credential. If the credential should not be shared go to the next step.
In the User field select from the options the user with whom you want to share the information of this credential then click the Add button as shown protec-info-0011-enus.
In the table below a check box will appear in the Write column, select this box if you want the user to make changes in the credential information.
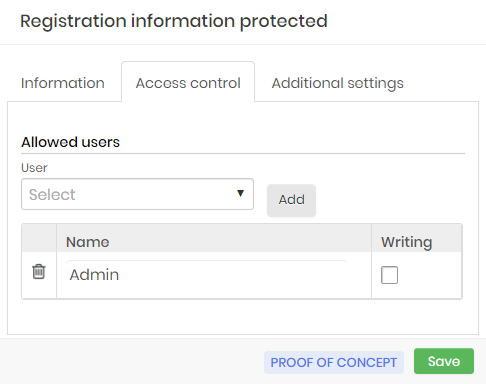
Personal credentials registration form - Access control Go to the Additional settings guide as in the picture protec-info-0012-enus;
If this credential has an Expiration Date, type in the field or click to have the calendar displayed;
Click the checkbox in the Notify users with field to receive a notification when the expiration date is near, then select how many days in advance the system should notify the users;
In the Identifier field you can enter a code or name to identify this credential;
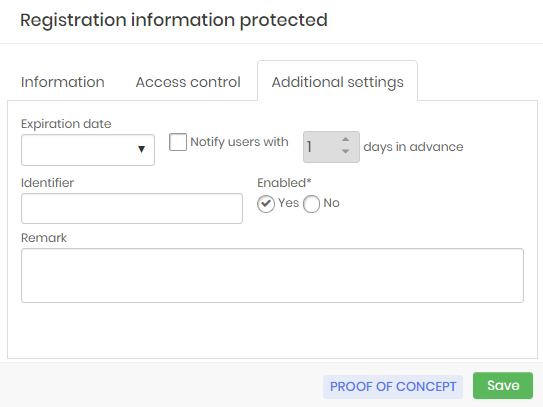
Personal credentials registration form - Additional settings If you wish to enter a Remark with details and other information about the credential;
Finally click on Save;
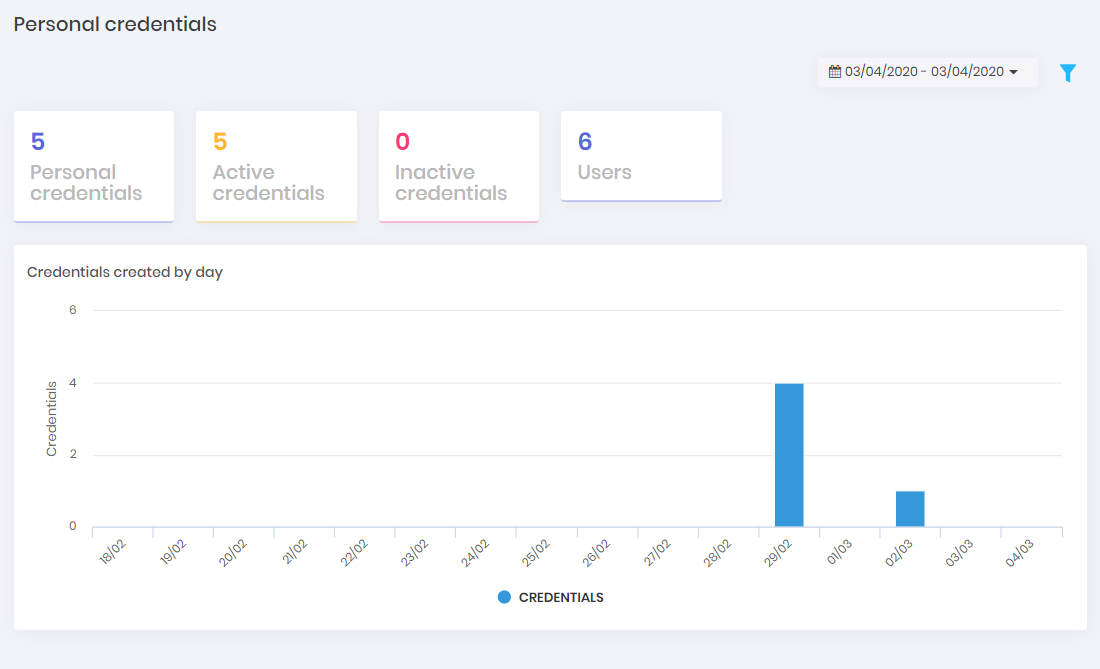
Dashboard
This dashboard displays an overview of personal credentials stored in the senhasegura
Even without having their own credentials the user can have an idea of how many personal credentials have already been stored in the system, as well as how many users have credentials, without knowing who they are and what their credentials are.
To access the personal credentials dashboard, go to: Information ➔ Personal credentials ➔ Dashboard
Registering SSH Keys
SSH keys receive particular use in senhasegura . Its use however is similar to common credentials composed of user and password. But because they are replicated to many devices, and have specific characteristics governed by judicious technical specifications, they need to be managed separately from other information.
The access groups are the same as the credentials.
Registering keys
You have access to SSH keys through PAM ➔ Credentials ➔ SSH keys ➔ SSH keys menu.
To add new keys, use the quick action or the New key report action.
The key registration form is similar to the credential registration form. The password policy presented is for issuing the key password.
The interface does not provide a means of creating the key but allows the key to be configured to be recreated with or without a random password.
The Username and Device fields must be populated with the device and user who originally holds the key.
The Key name field is just a name that will track details, visualizations, and other appearances within the platform. Making it easier to identify the key.
The Key path field is the physical path of the private key file on the device that hosts it. It will be used for renewal.
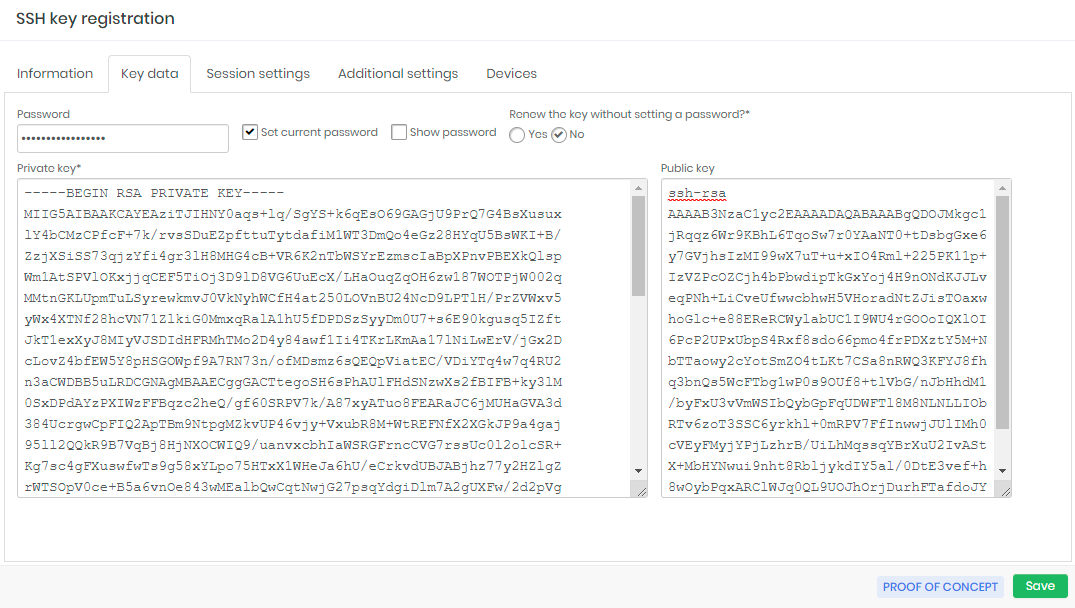
In the Key data tab you will enter the key composition data. If the key has a password for manipulation, checkbox Set current password and enter its value in the Password field.
If you want that senhasegura to recycle the key indicating a new password, check No in the Renew the key without setting a password field. Otherwise, the key will be recreated with a new random password.
In the Session settings tab, you can configure which macro/RemoteApp is related to this key. And also block the key usage only for RemoteApp sessions. Check the Use own credential to connect to use this same key to authenticate into target device. If you need to authenticate using another key or credential, keep this box unchecked and select another credential at Authentication credential and Authentication device field.
In the Additional settings tab, you can configure the user who owns the credential. The owner user will be the only one who can withdraw the certificate, see it password and use it in proxy sessions.
Other users will only be able to recycle through the Executions module without having access to the previous value and the new value.
In the Devices tab, you can configure devices that allow the use of the key to start a proxy session. These same devices will receive the new public key at the time of automated recycling.
View the key and password
In the key report, you have access to the Show key action. This action displays the values of the public and private keys. And if there is a usage password, this password can be accessed from the View password button.
To view the previous key values, the record action Key passwords history will list all previous values. And each record will have a preview action.
Proxy access with SSH keys
Also in the SSH key report you will find the record action Start session with key . This action will redirect to the SSH Keys: Remote access report, also accessible from PAM ➔ Credentials ➔ SSH Keys ➔ SSH keys menu.
In this report you will see the key in the highlighted record and its devices in subsequent records. Each device will have a Start session action, where the Web proxy will start.
The use of the SSH key can also be performed by senhasegura Terminal Proxy.
Just-in-Time (JIT) credentials for Proxy sessions
Using the Templates mechanism of the Executions module1, it is possible to configure credentials to use Just-in-Time for Proxy sessions.
There are two modes that can be used:
Create and Delete: The JIT credential will be created when requesting the Proxy session startup, and will be destroyed at the end of the session;
Activation and Inactivation: The JIT credential will be activated when requesting the initialization of the Proxy session, and will be inactivated at the end of the session;
Both JIT modalities are available for use only for senhasegura Web Proxy . It is recommended that a Password Policy be applied that prevents the simultaneous use of credentials.
Creation of templates
You must configure the creation/deletion and activation/inactivation templates of the target systems that the credentials will use. See the Automated Operations manual for more details.
These templates will be configured in the credentials and will be used when starting the proxy session.
Setting up a JIT credential
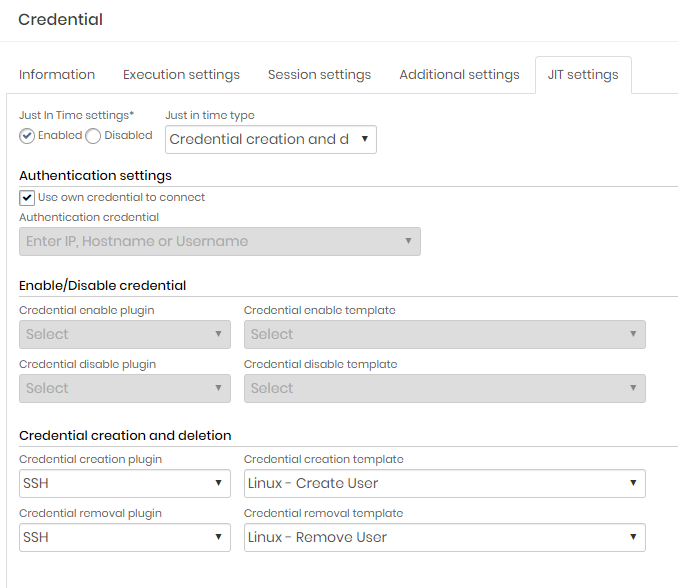
In the credential registration form, go to JIT Settings tab;
Select the option Active in Just in Time Configuration;
Select the modality of in the field Type of Just in time;
In the Authentication configuration section, configure whether the credential itself will be used to connect, or if another credential will be used. This credential will be used to run the JIT template in the initial and final stages of the session;
If you chose the Enable/Disable credential option, configure the plugin and template for activation and deactivation;
If you chose the Creation and deletion of credential option, configure the plugin and template for creation and deletion;
Special features
JIT configuration is performed in a credential managed by senhasegura . But usage will be different for each modality.
When using the modality Enable/Disable credential, the credential to which the configuration is being performed will be the target of the enabling and disabling template. In this case, use another credential to authenticate in the JIT step.
When using the modality Creation and deletion of credential, the credential where the JIT is being configured will not be the target of the template. A new dynamic credential will be created on the target device using the pattern senseg9999999 (senseg prefix followed by 7 digits). In this case, the credential itself can be used to authenticate itself to the target device.
Exceptional access
Sometimes, in exception or emergency scenarios, it will be necessary to grant access to a credential to a certain user for a short period of time.
In these cases, to avoid modifying the PAM Access Groups, you can use the Exceptional Access functionality. Modification of PAM access groups can create access conflicts with other users, limiting or granting improper access.
To set up exceptional access to a credential, follow these steps:
Go to the Credentials report and click on the Exceptional access registration action for the desired credential;
In the presented form, configure the access validity period in the fields Access restriction;
Configure the users who will benefit from access;
Click Save to finish the configuration;
Users will not be notified that they have received exceptional access.
To view the configured exceptional access list, go to the menu PAM ➔ Access Control ➔ Exceptional Access. In this report you can see which credentials each user has access to. Through the details magnifying glass, you can see more details of the release operation and what actions can be performed.
Credential batch import
Under the deploy step is very important the agility of importing the devices and credentials to senhasegura .
You can achieve this agility through the Scan & Discovery module if the customer has contracted this product, or through batch import.
Some important points regarding batch import:
The import is based on an Excel spreadsheet;
Imported worksheets are recorded in the system and can be retrieved;
Devices and credentials that do not exist will be created on import;
The devices and credentials that are already registered in senhasegura and that are re-imported, will be updated!
The quickest way to undo a wrong import is to fix the worksheet and import it again;
Filling in the template file
The Excel template file is available on the same screen where you can import the filled file. Access Devices ➔ Batch import menu to gain access to the imported files report.
Through the Import report action, you will have access to the import form.
In this form, click the Template file footer button to download the template file.
Note that the columns are self-explanatory.
Row 5: Row 5 of the worksheet contain the fields and has colors to identify the entity to which it belongs. Fields in yellow are for Devices, blue for Credentials, and purple for additional credential information, such as automatic change and macro settings.
Line 4: Line 4 are explanations and examples of how to populate the values of these fields described in line 5.
Line 6: Values can be entered in line 6.
Some entities must be filled exactly with the values that are already registered in senhasegura . This means that misfiling will prevent device or credential registration.
The fields below must be filled with the same value registered at senhasegura .
Device Fields (Yellow)
Type: the device type. It will be registered automatically in case it hasn't been registered before
Connectivity: You must respect the standard of this field as described in your line 4
Hostname: the device's hostname, IP, URL, website name or application name. It will be the identifier for the queries. (i.e; Facebook or apl001s10)
Manufacturer: It will be registered automatically in case it hasn't been registered before (i.e; Microsoft)
Model: the device's model. It will be registered automatically in case it hasn't been registered before (i.e; Windows Server 2012)
IP Management: the IP or URL device management
Site: place where the device is located. It will be registered automatically in case it hasn't been registered before (i.e; Data Center NYC)
Connectivity: equipment and port connectivity, separated by a comma and with the port number after ":". (i.e; RDP:3389,SSH:22)
Domain: the device domain (i.e; domain.com)
Additional 1: additional information (i.e; platform)
Additional 2: additional information (i.e; system)
Device Criticality: fill in with "High", "Medium" or "Low"
Credential (Blue)
User: credential's username
Password type: credential's type. Insert a value already registered (i.e; Local user)
Domain: credential's domain
Password: password's value. In not filled in, the password will not be updated
Additional information: additional information about the current credential. Used for database instances, password changes or general connections (i.e; ORAC19)
Tags: Password tags, separated by comma. Used to group or filter certain credentials (i.e; mobile, dev)
Credential Criticality: fill in with "High", "Medium" or "Low"
Credential - additional information (Purple)
Activate automatic change: Indicate of the password will be automatically changed
Change Plugin: plugin used by the change template (i.e; SSH)
Change Template: template used to change password (i.e; Linux - Change Password As Root)
Activation Plugin: plugin used by the activation template (i.e; LDAP)
Activation Template: template used to activate credential (i.e; AD- Activate User)
Inactivation Plugin: plugin used by the credential inactivation template (i.e; LDAP)
Inactivation Template: template used to inactivate credential (i.e; AD- Deactivate User)
Credential Owner: user who own the credential. Only the credential owner user can log in and retrieve the password of the respective credential.
User father credential: Username used to identify the parent credential
Hostname father credential: Hostname where the parent credential is managed
Macro: remote app automation macro
Control status: indicate if the password status will be automatically controlled
User for connection: user used to connect to the equipment and carry out the exchange and status control operations. The same credential can be used (i.e; root or password)
Hostname for connection: hostname used to connect to the device and perform status change and control operations. The same one as the password can be used
Restrict access: Restrict access for the remote app only ("Yes" or "No")
User for macro connection: user used to connect to the Operating System. The same one as the registered credential can be used
Hostname for macro connection: hostname used to connect to the Operating System. The same one used for the hostname of the registered credential can be used
Action for Registration: indicates the action to be taken in relation to the spreadsheet row records (i.e; "I" for Insert, "U" for Update and "D" for Deleting records). If blank, the default action of Insert or Update the record will be taken (if the Device or Credential is already registered).
Points of attention during filling
Another important rule is how to record repetitions. A device filled in the spreadsheet will be compared to devices already registered in senhasegura through the Device name field.
This means that if the spreadsheet device matches an existing device in senhasegura , the device will be updated with the spreadsheet information.
If you want to register more than one user to a device, repeat at least the required fields of the device. So the device will be kept untouched and the credential will be considered.
If a credential has been improperly added and needs to be deleted, the last column of the worksheet can be filled with include, change, or delete actions. By default senhasegura will always try to enter or update the data. If you force with the delete argument, the credential is inactivated on the platform.
When importing the file, the following scenarios will be considered:
Devices and credentials are not registered in senhasegura : The records will be registered with the information filled in the spreadsheet
cautionWhen entering an unregistered credential always include the Hostname or IP of the device with which it will be associated.
Registered devices and unregistered credentials: The records associated with the device will be updated, and the credentials will be registered with the information filled in the spreadsheet
Devices and credentials are registered in senhasegura : The records will be updated with the information filled in the spreadsheet
infoThe spreadsheet can be used to update the devices and credentials already registered in the environment, to do this enter the IP of the device in the field IP Management or the Username of the credential and enter the data you want to update in the corresponding fields.
Once completed, return to the spreadsheet retrieval screen and upload the filled file.
Tracking file processing
Returning to the report accessible from the menu Devices ➔ Batch import , you will have access to the processing of your load. Files that are still being processed will be in Waiting status. Once processing is finished, the status will change to Finished.
If the load has been invalidated by an error, the record will turn red and the Error column marked yes . Check the processing details using the Process details record action.
On the import details screen you have access to the Download log file button. This excel spreadsheet file will have the line in which the detail occurred, the type of alert, and the description of the action taken by senhasegura .
It is important to mention that even if a file was finished with an error, it does not mean that devices and credentials were not created or changed during the process. Therefore, correct the information indicated by senhasegura and continue importing the worksheet until the desired result has been achieved.
You can use this functionality to make adjustments to credentials and devices even after you deploy senhasegura . But be careful to not import old spreadsheets that no longer reflect the system reality.
Credential Policies and Password Force
This chapter will explain how to set different password patterns and how to segregate credentials from different devices by respecting the manufacturers' standard without offending corporate security policies.
Also the layers of security policies that can be configured to affect the use of credentials, and the automated actions that will be taken to change passwords in many scenarios.
Password force
The strength of the password concerns the composition of the password that will be generated randomly and automatically by senhasegura in the process of recycling passwords.
The system administrator can create several password strength settings based primarily on the password policies of the target devices. It is particularly important to know the different password rules of each manufacturer that make up the architecture to isolate devices that have a weak password policy.
This isolation ensures that other devices that allow the use of larger, more complex passwords do not take the risks of legacy devices that accept, for example, only numeric passwords up to 5 digits.
Passwords can compose a maximum number of 256 characters. If the password strength setting is set to not allow duplicate characters, the maximum limit will be 70.
Creating new password strengths
Through the PAM ➔ Settings ➔ Credentials ➔ Password strength menu, you have access to the configured forces and the action to create new ones.
By default, the system already has 3 registered force's setup, but only the High force setup will be used. We will see the Credential Policy setting in use.
You can register new forces through the form accessible by the New password strength report action.
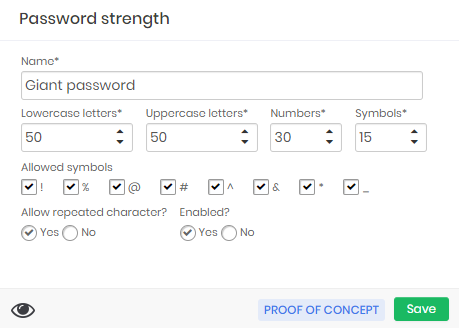
The form allows you to configure the composition on the following aspects. How many lowercase and uppercase characters will be used as well as how many special numbers and symbols will be used.
The special characters available are in checkboxes for selection.
You can still determine whether character repetition is allowed. Remember that if your password uses more than 26 characters, more than ten numbers or more than 8 special characters, repetition is inevitable.
As additional security, senhasegura always validates that the username is not present in the generated password. Let's see some examples:
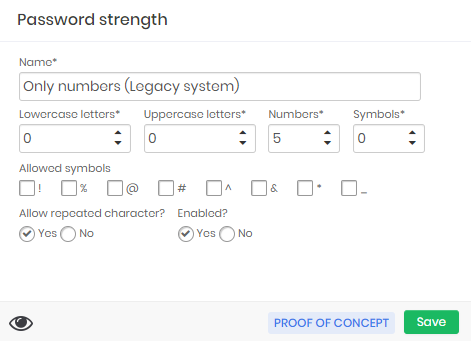
A weak password of a legacy system that uses only 5 numeric characters in its passwords
A password from a system that allows 40 characters in your password, varying between numbers, letters and symbols
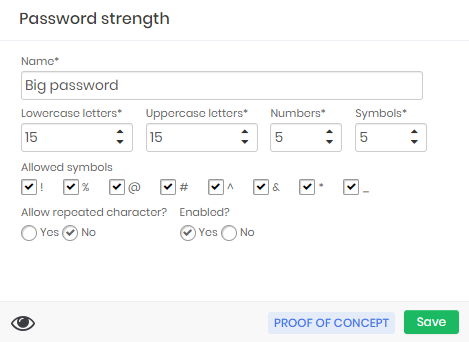
A password from a system that allows a password of 145 characters. In this case, repetition is inevitable
Remember to always give a name that makes sense of password strength. Use names that lead to understanding the types of systems that should use this force. Legacy systems will generally be exceptions that force the administrator to create new password policies and forces.
If you inactivate a password force that is already in use by some credential policy, that policy continues to use the same force even if it is inactive. This force setting will only not be available for new policies.
Credential Policies
Credential policies are the point of union between password strength and credential. Plus settings about when the credential will have its password recycled and the intervals of these triggers.
You can find the credential policies through the PAM ➔ Settings ➔ Credentials ➔ Policy credentials menu.
The form for registering new policies resembles setting up Access Groups because its logic is similar. We will segregate some devices and credentials from their attributes. And then senhasegura will use the highest value of the Priority field if there is a policy tie.
Let's look at the Settings tab to identify how the use of the credential will be affected by the password policy.
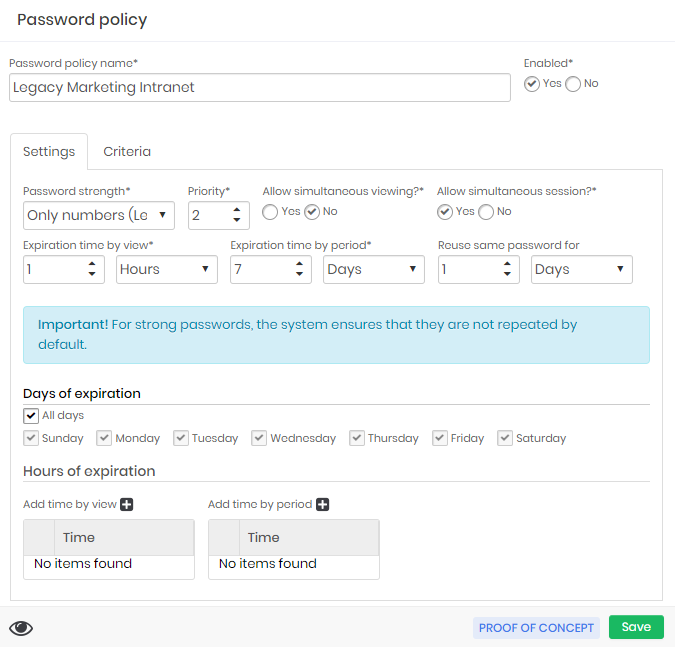
Note in the example that the policy created is to handle an old intranet system in the Marketing department. This system is using the password force Only numbers that was created especially for systems that accept only 5-digit numeric passwords.
Being a weak password, the administrator then decides to isolate the Marketing system in a security rule with the following configuration:
Simultaneous Allow viewing?: The password withdrawal may not occur simultaneously. If a user performs the password withdrawal he will be in custody, and another user can only make the withdrawal if the user who holds custody releases the use;
Simultaneous Allow session?: The users who want to perform proxy sessions with the credential will be able to perform simultaneous accesses since in these cases the password will not be exposed;
Priority: Define the policy application priority if senhasegura finds more than one policy that applies to the credential. The higher the priority, the higher the number of this field;
Expiration time by view: The time interval in which senhasegura will automatically change the password after viewing by a user. In this example, the password will be automatically changed after 1 hour of withdrawal;
Expiration time by period: The time interval in which the password expires after a long period of no use. That is, no one used the password either via withdrawal or via proxy session. But the password must be recycled still;
Reuse same password for: The time when the password will be reused after use by a proxy session. Unlike password withdrawal, when the password is used via proxy there is no direct exposure to the user. But it is recommended that the password be recycled after the proxy session. This interval then determines how long senhasegura should allow password reuse in other sessions until the automatic exchange is performed;
Days of expiration: Some credentials cannot be recycled daily. Whether it's the security policies of the target device or the impacts it might have on the business. Then, in these fields you can configure which days the password exchange may occur;
Hours of expiration: In the same way as the previous field, some deals only allow trading at certain times;
Note that all these fields determine actions that influence the customer's business rule, or target device security rules. Configuration mistakes of these fields can lead to the unavailability of the credential.
That's why it's very important to know and segregate target systems into dedicated password policies. Use the Criteria tab to perform segregation as you've already learned in the Access Group chapters.
See then that senhasegura immediately identifies the correct password policy to the credential at the time we link a device that matches the type and determine a credential with the tag configured.
If you change the password policy in a way that no longer applies to the credential, the credential will use a new policy that meets your device and credential characteristics.
Audit
It's important to have your experience setting up Devices, Credentials, Password Strengths, and Password Policies. And then check the audit information that the system provides.
Password expiration
Reports ➔ PCI ➔ Password expiration menu. This report shows the expiration dates of all credentials passwords that are registered in senhasegura . This report is important for the comparison between the company's password policy and the real application of the password expiration date.
It is also possible to have a general view on the number of expired passwords on the dashboard menu, to view this board access: Dashboard ➔ PAM ➔ Password changes
Child credentials will only be considered on this dashboard if their respective parent credentials have the automatic change active. In some cases the system does not schedule a specific change for the child credential, creating and executing the change at the time of executing the parent credential change. The "Waiting" and "Error" dashs will not necessarily display the sum of "Updated" and "Expired", as they depend on the behavior of each change.
The Password expiration report will print the following information:
The following counts managed/non-managed credentials:
Updated: which are -
 : Over 25% managed credentials
 : 5% to 25% managed credentials
 : Under 5% managed credentials
Expired: which are -
- : None expired
- : At least one expired
Not managed: which are -
 : Credentials without automatic password change enabled
Execution status: which are -
- : No problems
- : Any problem with up to 2 robots simultaneously (all active)
- : Any problem on the 3 robots simultaneously.
The following counts expired credentials that have the "password change" flag activated:
Waiting: which are -
 : More than 75% of managed credentials
- : Less than 75% of managed credentials
Error: which are -
- : Without errors
- : With at least one error
Credentials by users
Reports ➔ PCI ➔ Credentials by users menu. This report shows all credentials that every user registered in senhasegura system can have access. This report is relevant for the comparison between the user's access privileges set by the company's policy and current conceded privileges.
Password custody
Reports ➔ PCI ➔ Password custody menu. This report shows all the passwords that are under custody of any user registered in senhasegura system. This report is relevant for the comparison between the users access privileges set by the company's policy and the current privileges and access conceded.
It is also possible to have a general view on the users and the number of custody conceded on the dashboard menu, to view this board access: Dashboard ➔ PAM ➔ Custody.
Password policy change history
Reports ➔ Traceability ➔ Password policies menu. This report shows the history of the changes made on the password policies registered in senhasegura system. This report is important to know what changes were made and by which user to understand if the passwords expiration and viewing periods still in compliance with the company's policy and security expectations.
It's also possible to view what exactly was changed through a comparison between the original data to the recent alteration clicking on the action icon of the register.
Password strength change history
Reports ➔ Traceability ➔ Password strength menu. This report shows the history of the changes made on the password strength registered in senhasegura system. This report is important to know what changes were made and by which user to understand if the passwords has the level of complexity and strength in compliance with the company's policy and security expectations.
It's also possible to view what exactly was changed through a comparison between the original data to the recent alteration clicking on the action icon of the register.
Credential change history
Reports ➔ Traceability ➔ Credentials menu. This report shows the history of the changes made on the credentials registered in senhasegura system. This report is important to know what changes were made and by which user to understand if the new and current credentials still have the access permissions and settings in compliance with the company's policy and security expectations.
It's also possible to view what exactly was changed through a comparison between the original data to the recent alteration clicking on the action icon of the register.
Device changes history
Reports ➔ Traceability ➔ Devices menu. This report shows the history of the changes made on the devices registered in senhasegura system. This report is important to know what changes were made and by which user to understand if the new and current devices still active and have the access permissions, credentials and settings in compliance with the company's policy and security expectations.
It's also possible to view what exactly was changed through a comparison between the original data to the recent alteration clicking on the action icon of the register.
Protected information change history
Reports ➔ Traceability ➔ Protected information menu. This report shows the history of the changes made on the protected information in senhasegura system. This report is important to know what changes were made and by which user to understand if the new and current information stills integer, available and with access restrictions to the correct users in compliance with the company's policy and security expectations.
It's also possible to view what exactly was changed through a comparison between the original data to the recent alteration clicking on the action icon of the register.
Access control history
Reports ➔ Events ➔ Password view menu. This report shows all the password view senhasegura intercede for users requests. This report is important to present all the access flow the system supports and the access type configured by the administrator, this can be useful to compare the access flow and system access settings with the company's access policy and security expectations.
Password policy changes
Reports ➔ Credentials ➔ Policy definition menu. This report shows the history of the changes made on the password policies registered in senhasegura system. This report is important to know when was changed, the usernames and devices that admitted the changes to understand if the passwords expiration and viewing periods still in compliance with the company's policy and security expectations.
Conclusion
By completing this book you will have acquired the knowledge to perform the related activities of Devices, Credentials, Personal Information, SSH Keys and their actions.
If you wish to continue learning how to use the senhasegura in the best possible way, please ask our support team for our available documentation according to your profile and needs.
- More details in the manual "Automated operations"↩