Tool Administrator Manual
Robots and Tasks
In senhasegura , tasks that require the processing of large amounts of information are performed asynchronously.
The triggers that can initiate processing vary according to the information being worked on. They are usually divided into two types. Tasks that are performed through scheduling and tasks that are performed through a system event. Robots can be understand as services.
Robots
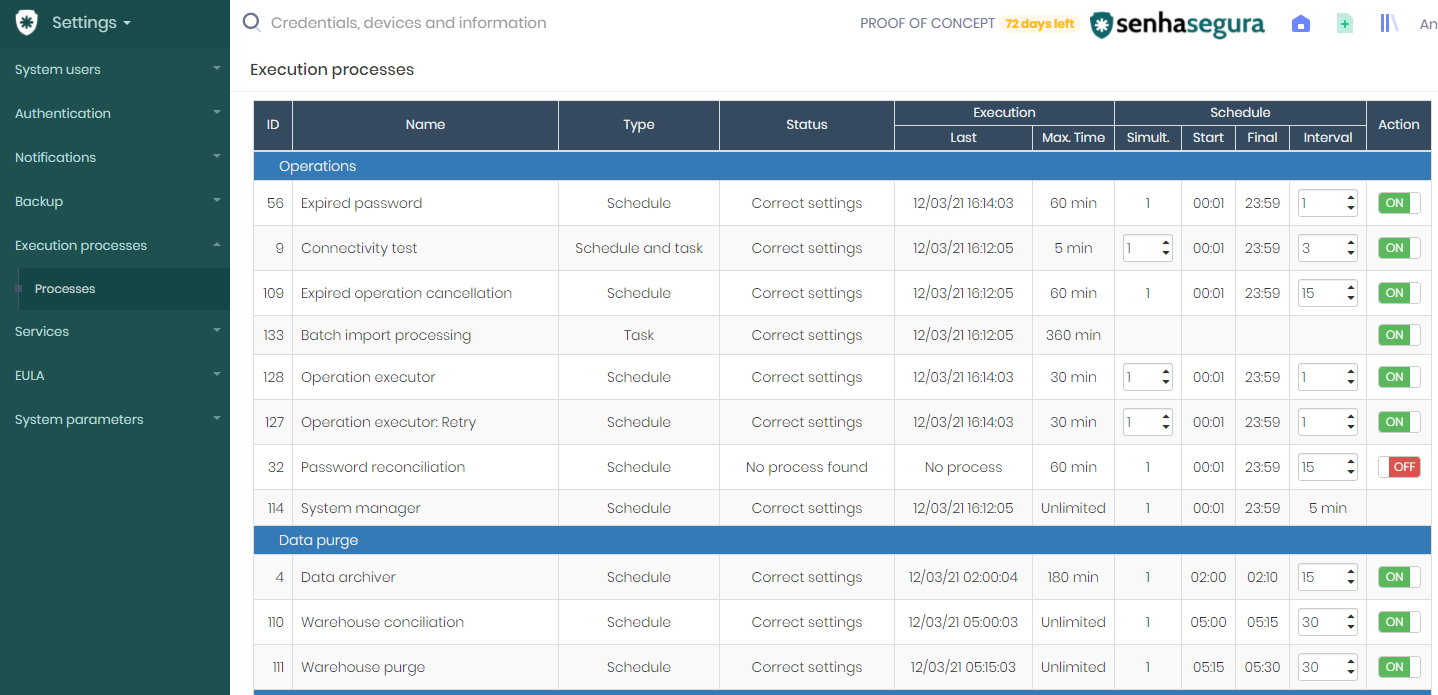
Accessing the menu Settings ➔ Execution Processes ➔ Processes you will have access to the main panel of all robots.
You can change the number of instances of a robot at the field Simult..
Robots are kept on hold until the next execution configured through the execution interval and the start and end time of execution. You can configure the execution range of some robots.
Changing any interval of execution, number of instances or switch its status can cause unavailability of data.
Any changes will be notice by syslog.
Operations
Batch import processing: Process the uploaded spreadsheet for devices and credentials import;
Connectivity test: Test all devices registered connections;
Password reconciliation: Check if the recorded password is the same password applied on the target. Valid only with Windows RPC and SSH.;
Operation executor: Batch operator executor. Execute tasks ordered by Change Password, Certificate and Discovery modules.;
Operation executor: Retry Retry failures registered by the Operation Executor;
Expired operation cancellation: Looks for queued operations that expired the execution time and cancel it;
Expired password: Request password change task's to the Operation Executor when the password has expired;
Notifications
Password change report: Notify configured users about occurred password changes;
CPU and Memory Monitor: Notify configured users about system monitor warning's;
Disk space monitors: Notify configured users about disk usage warning's;
Expiration notification: Information Notify configured users about passwords and certificates close to expire;
Session gateway
Session finalizer: Register the end time of proxy sessions that finished out of normal circumstances;
Failed session finalizer: Register the end time of proxy sessions that not even occurried. Network, password or firewall issues denied the connection;
Session gateway: log converter Convert all user events into a readable format at the session log's;
Session gateway: video generator Needs user request. Convert the entire session video into a MP4 file;
Session texts indexer: Dumps all texts exposed into the session into the database. Users can filter desired information looking into all recorded sessions;
SocketServer Monitor: Keeps the proxy server socket's alive;
Session gateway: log processing Convert all user events into a readable format at the session log's;
Session gateway: input log Convert user inputs into a readable format at the session log's;
Session gateway: connection status Update the proxy sessions dashboard;
NSS settings synchronizer: Update the senhasegura NSS (Name Service Switch);
Discovery and scan
Credential discovery: Run configured discoveries looking for credentials;
Access logs synchronizer: Identify suspects logins into registered devices;
Discovery consolidator: Update all discoveries status and reports;
Device discovery: Run configured discoveries looking for devices;
Access control
Reply of email request: Process the configured inbox looking for authorization responses;
Access groups processing: Process all access groups compiling granted user access;
LDAP/AD Synchronization: Syncs users accounts with the configured LDAP/AD server;
Data purge
Data archiver: Archive expired database data. Control date can be configured;
Warehouse conciliation: Checks if virtual data and physical data is compliance;
Warehouse purge: Delete expired database data. Control date can be configured;
In cases where the purge should not be performed in a session see the Proxy Manual in the sections "Actions at the end of a session" and "Logs for a session".
User provisioning
- Account discovery: Update senhasegura account's with configured AD account's changes;
Mail
E-mail collector: Process all configured email inbox;
E-mail sender: Send all queued emails;
System monitors
Primary key monitor: Monitors the database primary key and warning if it's value is close to reach;
Backup monitor: Monitors if the database is configured, running and if the backup files is updated;
Schedule monitor: Monitors if all scheduled tasks is running and if there is no late task;
User Behavior
User Behavior: View: Consolidate all recent password request's made by users;
User Behavior: History View: Consolidate all password request's made by users;
User Behavior: Session: Consolidate all recent proxy session's made by users;
User Behavior: History Session: Consolidate all proxy session's made by users;
Risk analysis
- Command audit: Score all configured audited commands that occur into a proxy session;
Certificates
- Certificate expiration: Notify and act under certificates next to expire;
Backup jobs
Backup Export: Exports the last backup to configured remote directory;
Credentials backup: Run backup tasks for credentials;
Secrets backup: Run backup tasks for protected information;
Task Manager
Daily Data: Update reports and dashboard data;
Executor: Execute scheduled tasks;
Reports
The menu Settings ➔ Services ➔ Robots and tasks have auxiliary reports to see the execution statues.
Tasks: Shows the registered tasks triggered by others modules, and its status;
Process: Shows started processes. A process can be a schedule one or a task based;
In execution: Shows started robots instances;
Deployment of senhasegura Image File to HYPER-V Format
Purpose
Import virtual machine files with a .OVA senhasegura application on Microsoft Windows Server servers that use the Hyper-V role.
To perform a senhasegura virtual machine import, the following steps must be performed:
senhasegura Virtual Machine Importation
Import senhasegura OVA on Virtualbox or Vmware;
Export a virtual machine on OVF format;
In this process, a virtual hard hard disc file will be extracted. This file has a VMDK format. However, to a virtual machine be created on Hyper-V, should be used the VHD or VHDx format.;
Virtual Machine Image File Conversion
Download the Microsoft Virtual Machine Convert;
Import the converter in PowerShell;
Execute the following commands on PowerShell to load the Windows conversion module;
PS C:\WINDOWS\system32> Import-Module 'C:\Program Files\Microsoft Virtual Machine Converter\MvmcCmdlet.psd1'Convert the file from .vmdk format to .vhdx through the following command;
PS C:\WINDOWS\system32> ConvertTo-MvmcVirtualHardDisk -SourceLiteralPath d:\ss-andrew-v3-24042017 \ss-andrew-v3-24042017-disk1.vmdk -VhdType DynamicHardDisk -VhdFormat vhdx -destination d:\ss-andrew-v3-24042017The following message will be displayed:
Destination
-----------
d:\ss-andrew-v3-24042017\ss-andrew-v3-24042017-disk1.vhdx
Source
------
d:\ss-andrew-v3-24042017\ss-andrew-v3-24042017-disk1.vmdk
senhasegura Virtual Machine Creation and Initialization
On Hyper-V, create a virtual machine and indicate the disc on .vhdx format.
Start the senhasegura virtual machine on the Hyper-V environment.
Dell iDRAC Configuration
Introduction
The purpose of this section is to assist users with administrator privileges to perform the iDRAC interface settings and to enable the PAM Crypto Appliance monitoring service.
What is iDRAC?
The Integrated Dell Remote Access Controller (iDRAC) is a tool for hardware management and software solution that provides capabilities of remote access, system recovery, and power control functions for Dell PowerEdge systems.
The devices that offer this feature have an embedded microprocessor for control and independent remote monitoring of the operating system.
Once configured on the network, the interface can be accessed in the IP address through a Web, Telnet, or SSH browser.
Access
To access the iDRAC web interface, follow these steps: In the web browser, enter the configured IP or FQDN address.
Authentication
The following screen will be displayed:
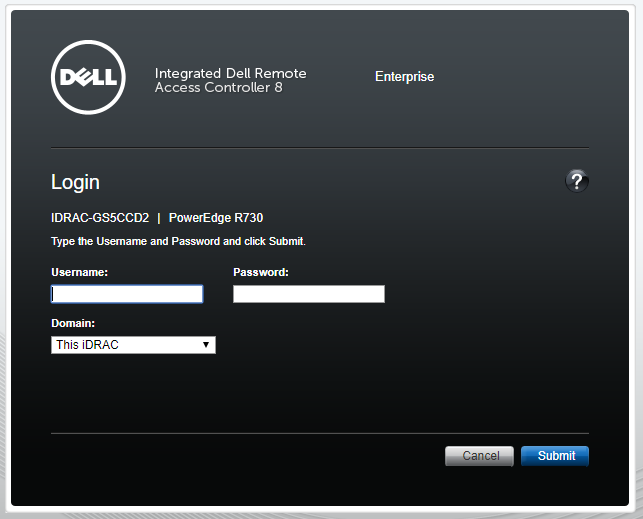
Fill in the Username field with the user root;
Fill in the Password field with the password;
Click on the Submit button;
iDRAC Settings
Addressing setting
To perform the addressing setting, follow these steps:

Access the menu: Overview ➔ iDRAC Settings ➔ Network ;
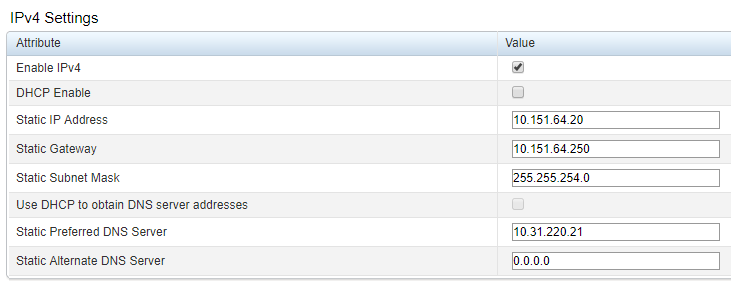
IPv4 Settings Fill in the following fields:
Enable IPv4:If this option is selected, the IPv4 protocol will be enabled. By default, it must always be selected.
DHCP Enable:If this option is selected, the DHCP protocol will be enabled to assign the server IP
Use DHCP to obtain DNS server addresses:If this option is selected, the DHCP protocol will be enabled to obtain DNS server addresses
If the DHCP Enable field is not selected, fill in the following fields:
Static IP Address:Server IP;
Static Gateway:Server gateway;
Static Subnet Mask:Server Subnet Mask;
In the Services tab, fill in the following fields:
SNMP Community Name:SNMP community name;
SNMP Protocol:Indicates which SNMP protocol will be used;
SNMP Discovery Port Number:Discovery communication port number;
Click on the Apply button to apply the settings.;
SNMP Service Settings
SNMP, or Simple Networks Management Protocol, is a standard protocol for network monitoring and management supported by a series of network assets, such as routers, switches, and servers.
For properly setting up the service, you must identify the format of the version supported by the environment and the tool that will monitor the PAM Crypto Appliance. To use SNMP v3, you must create a user with privileges for the authentication process between the monitoring tool and the PAM Crypto Appliance.
To set up the SNMP service with the monitoring tool information:
Access the menu: Overview ➔ Server ➔ Alerts ;

Alert Options Fill in the following fields:
Alerts:Indicates whether the alert service is enabled or not;
Category:Select the categories of the alerts that will be sent;
Severity:Select the criticality of the alerts that will be sent;
On the SNMP and Email Settings tab, fill in the following fields:
;

IP Destination List Settings State:Indicates whether the alert target is enabled or not;
Destination Address:Alert target server IP;
SNMP v3 Users:Select the SNMP user;

SNMP Settings Community String:Community string name;
SNMP Alert Port Number:Communication port number for sending alerts;

SNMP Trap Format Settings In the SNMP Trap Format field, select the format of the SNMP traps;
Click on the Apply button to apply the settings;
SNMP v3 User Creation
To use SNMP version 3, you need to create a user with privileges through the iDRAC interface so that the monitoring tool performs the authentication on iDRAC, and thus gather the information defined in the metrics.
To create an SNMP v3 user, follow these steps:
Access the menu: Overview ➔ iDRAC Settings ➔ User Authentication ;
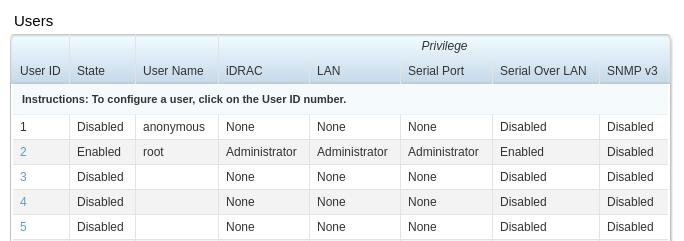
Users report On this screen, the users configured in the iDRAC will be displayed, along with their status and their respective privileges.
Select a user that has the Disabled value in the State field;
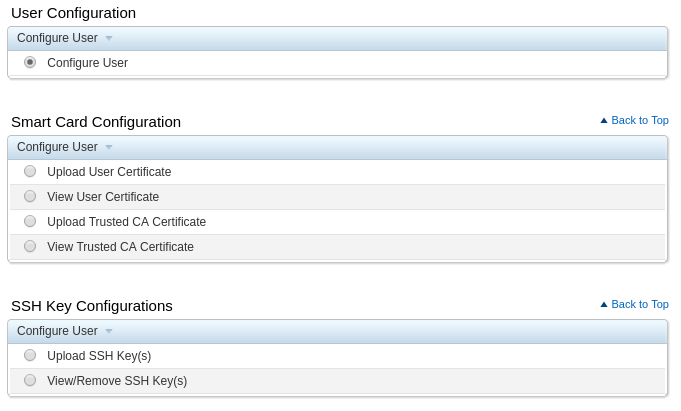
Users Configuration screen Select the Configure User option in the User Configuration section.;
Click on the Next button;

Users Configuration screen In the General section, fill in the following fields:
Enable User:If this option is selected, the user will be enabled;
User Name:User login;
Change Password:If this option is selected, the user must change the password on the first access;
New Password:User password;
Confirm New Password:User password confirmation;
In the SNMP v3 section, fill in the following fields:

SNMP v3 Configuration screen Enable SNMP v3:If this option is selected, the SNMP v3 protocol will be enabled;
Authentication type:Select the authentication type of the SNMP v3 protocol;
Privacy type:Select the privacy type;
In the iDRAC User Privileges section, enable the System Control field:
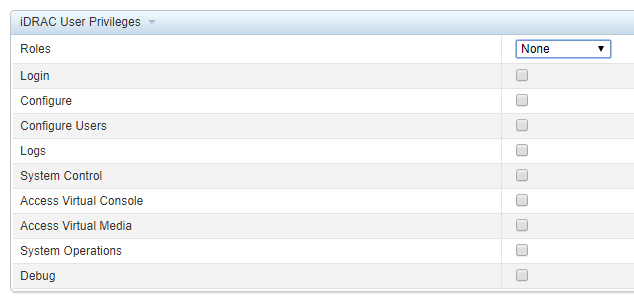
SNMP v3 Configuration screen Click on the Apply button to apply the settings;
Shutting down the PAM Crypto Appliance
Via iDRAC
The PAM Crypto Appliance shutdown command via the iDRAC interface performs the physical shutdown of the device. It will only be possible to turn it on again through the same interface.
Access the interface through the specific IP in the web browser.
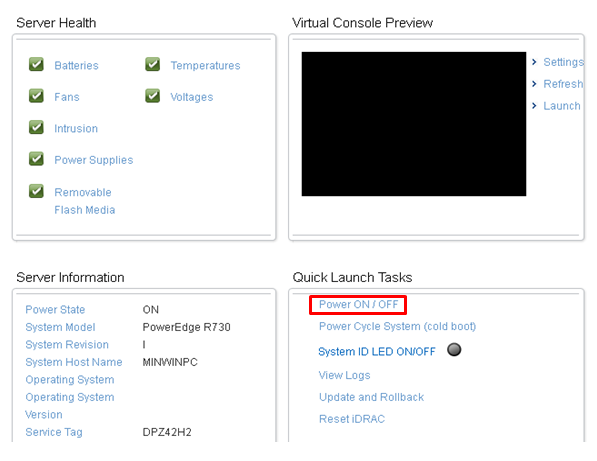
Click on the Power ON / OFF button.
Via SSH client
To shut down the PAM Crypto Appliance through the SSH client management interface, follow these steps:
Start the SSH client;
Connect via SSH using the management IP;
Run the
xl listcommand to list the virtual machines being executed on the server.;Execute the
xl shutdown <hostname>command wherehostnameis the virtual machine responsible by the application;
senhasegura log rotate and data purge
senhasegura log rotates and data purge senhasegura has by default some particular database tables that are rotated by period. Many of these tables are used by the senhasegura Support Team for diagnostic and troubleshooting steps and do not affect the client operation at all. The only table witch interacts with client operation is the Email sent and Email received records. But all those data can be indexed by the client SMTP and POP3 provider. See below the rotated entities and their period.
Asynchronous tasks requests
All operational and log tables used by Orbini Asynchronous Tasks are rotated. The module which requested the operation will keep all operation records. These purged data does not have any client operation detail or sensitive data.
Orbini Assync PIDs: Records rotated on the 7th day. Has the execution timestamp and its internal used PID;
Orbini Assync Logger: Records rotated on the 15th day. Has process info and error messages;
Orbini Assync Tasks: Records rotated on the 30th day. Has the execution requests provided by clients modules;
Orbini User Notification: Records rotated on the 30th day. Has system messages sent to users;
Device Connectivity Tests: Records rotated on the 30th day. Registered devices connection test based on registered connections protocol;
LDAP Sync Logs: Records rotated on the 30th day. Used by Orbini LDAP Synchronizer for diagnosing and troubleshooting;
Orbini Screens Viewed: Records rotated on the 30th day. Has when a user accessed a senhasegura screen;
Orbini WebService A2A Requests: Records rotated on the 30th day. Has all clients requests to WebService A2A ;
Orbini Events: Records rotated on the 30th day. Has user data interaction timestamp log. Do not confuse with data events from each module. This table is used only for framework purpose;
Orbini Changed Data: Records rotated on the 30th day. Has user data interaction timestamp log. Do not confuse with data auditing from each module. This table is used only for framework purposes;
Orbini SMTP Emails: Records rotated on the 180th day. Have all emails sent by senhasegura . These emails can have sensitive information or module-specific information. The same data can be retrieved by the client SMTP server;
Orbini POP3 Emails: Records rotated on the 180th day. Have all emails received by senhasegura configured account. These emails can have sensitive information or module-specific information. The same data can be retrieved by the client SMTP server;
Orbini User Actions: Records rotated on the 300th day. Has all user data interaction and login/logout logs;
Session dump data purge
All proxy sessions are recorded into its raw protocol format, and stored inside senhasegura data storage. This data can be also copied to the client backup repository at the backup procedure.
These data will consume something next to the network traffic during a proxy session. There is no magic number to determine the size of a session raw replay file.
At time, the client will decide if the session should be keep or can be purged by senhasegura automatic purge process.
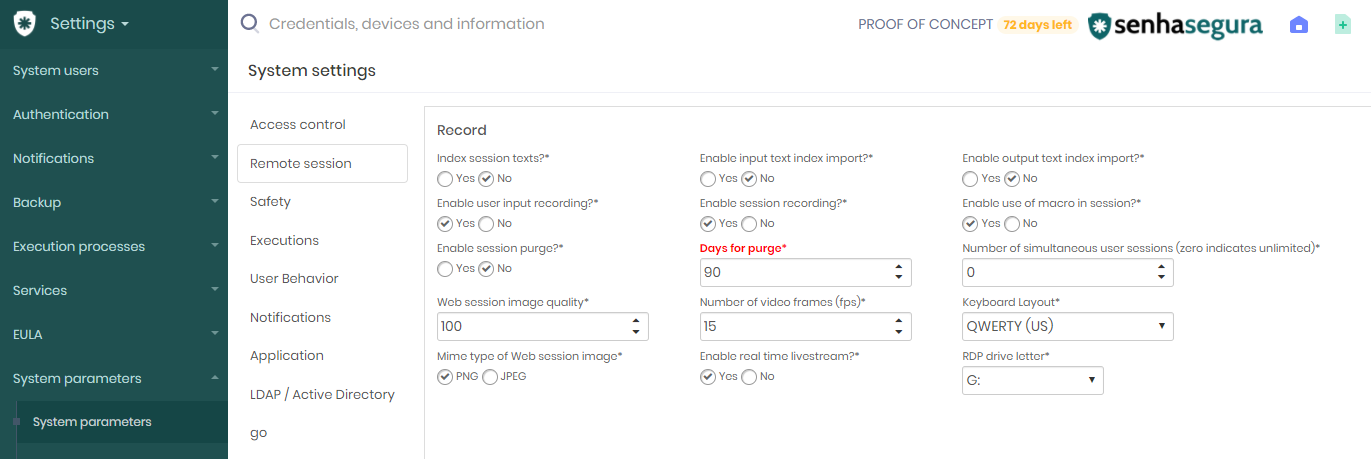
By default, senhasegura is configured with 90 days of session storage. So if a session has occurred more than 90 days ago, it will be automatically purged.
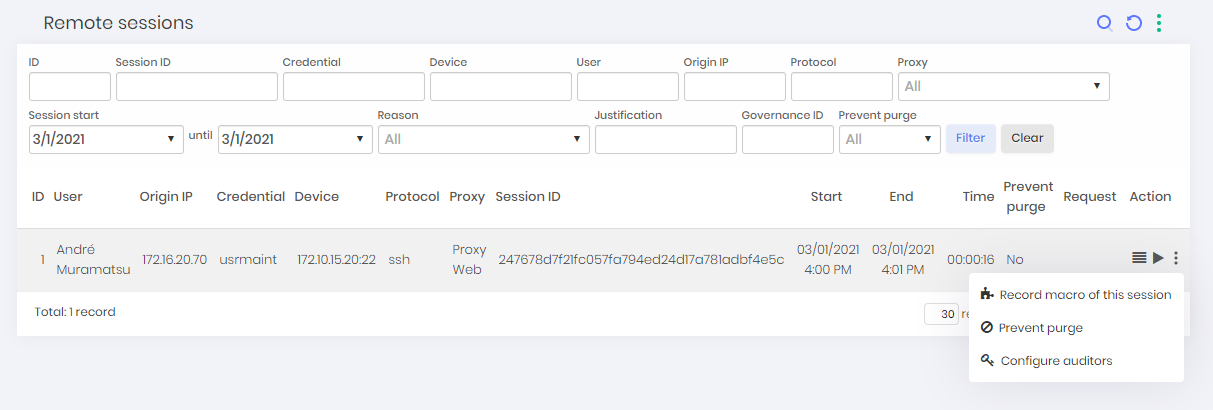
Prevent session purge
At the Remote sessions report, accessed by PAM ➔ Credentials ➔ Access control ➔ Remote sessions menu, the administrator can prevent the session purge clicking at Prevent purge action on the desired session record;
Change purge interval
At the Settings ➔ System parameters ➔ System parameters menu, go to the Remote session section and change the Days for purge field. You can change this field defining a new purge period from 1 day to 1000 days;
Disable purge service
The administrator can also inactivate all purge services at Settings ➔ Execution process ➔ Process menu, and disabling Data archiver and Warehouse purge services;
Advanced system recovery and maintenance
In this chapter, you will understand some advanced troubleshooting methods. Many of these procedures will be executed into a senhasegura instance at the operational system layer. You can have access to all technology manuals explained here. But remember that senhasegura development team had changed the default configuration of all these software for a better a secure experience. Do not change any parameter by yourself. Call our Support team if needed.
senhasegura Cluster reconciliation
senhasegura uses the MariaDB Galera Cluster as database high-availability cluster technology. This section will explain the unavailable scenarios and the steps to recovery safely.
First, we will explain a little bit about how the MariaDB Galera Cluster syncs data.
A briefly explain about SST and IST differences
Data reconciliation with SST1 is made by transferring a complete dataset from a node member to other.
Therefore, data reconciliation using IST2 is made comparing missing transactions between nodes, syncing only missing data between nodes, instead of sync the entire database.
Into a under control scenario, is better use IST instead SST, for a better performance.
Data reconciliation inside senhasegura
Usually, in scenarios of temporary interruption of data replication between cluster nodes with standard configurations, there is a tolerance of approximately 3 hours of interruption in which the cluster only needs an IST to resolve the reconciliation, that is, just sending the incremental data. In this case, no intervention is necessary since the cluster solves the problem of reconciliation automatically.
Longer outages usually require a complete data transfer (SST).
In most cases, the senhasegura cluster is resilient and intelligent enough to resolve the reconciliation by performing an SST automatically. Only in some cases is the intervention of the support team necessary to ensure the integrity of the data by performing an SST manually.
Manual intervention to perform an SST in the cluster
First step. Check the syncronization status login the database and verifying the following variables control:
SHOW GLOBAL STATUS LIKE 'wsrep_connected';
SHOW GLOBAL STATUS LIKE 'wsrep_cluster_status';
SHOW GLOBAL STATUS LIKE 'wsrep_local_state_comment';
Looking at the official Galera Cluster documentation:
wsrep_connected: shows whether the node has network connectivity with any other nodes;
wsrep_cluster_status: shows the primary status of the cluster component that the node is in, which you can use in determining whether your cluster is experiencing a partition;
wsrep_local_state_comment: shows the node state in a human readable format;
First steps at primary node (data donor)
Stop the MariaDB process;
sudo systemctl stop mariadb.serviceDisable the replication changing the
galera.cnfconfiguration file;Edit the
/etc/mysql/conf.d/galera.cnfconfiguration file;Locate the
wsrep_onparameter and change it value toOFFSave the file and exit the editor;
Delete the old cluster control files;
sudo rm /var/lib/mysql/galera.cache;sudo rm /var/lib/mysql/grastate.dat;sudo rm /var/lib/mysql/multimaster.info;Start the MariaDB process;
sudo systemctl start mariadb.service
First steps at the secondary node (joiner)
Stop the MariaDB process;
sudo systemctl stop mariadb.serviceRename the current database data folder for a backup purpose;
sudo mv /var/lib/mysql /var/lib/mysql-$(date +%d%m%y%H%M)Create a new database data folder;
sudo install -d /var/lib/mysql -o mysql -g mysql
Second steps at primary node (data donor)
Stop the MariaDB process;
sudo systemctl stop mariadb.serviceEnable the replication:
Edit the
/etc/mysql/conf.d/galera.cnfconfiguration file;Locate the
wsrep_onparameter and change it value toONSave the file and exit the editor;
Into another terminal, keep your attention to the database logs:
sudo tailf /var/log/mysql/mysql-error.logRecreate the cluster;
sudo galera_new_clusterWait for the complete initialization;
Second steps at secondary node (joiner)
Confirm that the replication is enabled at the
galera.cnfconfiguration file;Edit the
/etc/mysql/conf.d/galera.cnfconfiguration file;Locate the
wsrep_onparameter and change it value toONSave the file and exit the editor;
Into another terminal, keep your attention to the database logs:
sudo tailf /var/log/mysql/mysql-error.logStart the MariaDB process;
sudo systemctl start mariadb.serviceCheck if the number of cluster members are correct at database log (E.g.: if there is 2 members, the message
members = 2/2(joined/total)should be printed);Check if the sync confirmation appears
WSREP: Member 0.0 (vsrv-senhasegura-cert05) synced with group.
Application status and services
All the services used by senhasegura platform can be managed by orbit command line. This powerful tool has it own manual. Check out all available commands for a better senhasegura administration experience.
For now, we will explain the most common commands sequences for restarting its basic services.
Restarting primary instance
A primary instance is an instance that centers all services execution. And also used as a primary member of the cluster schema.
You can check how the instance is configured using the orbit status command.
To switch a instance to primary and activate it usage, use the following command sequence to grant a correctly usage:
sudo orbit application stop;sudo orbit application master;sudo orbit application start;sudo orbit proxy fajita restart;sudo orbit proxy rdpgate restart;
The orbit application stop and orbit application start will also restart the basic web server services NGINX and PHP-FPM.
Restarting Linux services
All services can be restarted using the orbit command interface.
Use the sudo orbit service command to restart a linux service.
Keep a close attention to the following services status. You can restart it by yourself if an unexpected service stop happens.
nginx: Web server service. If restarted, restart php-fpm service also;
php-fpm: PHP Wrapper service;
mariadb: Database service;
docker: Proxy isolation service;
wazuh-manager: HIDS service;
IP blocked by HIDS
If an IP has being blocked by the HIDS, you can unblock the IP using the command orbit firewall.
sudo orbit firewall –showsudo orbit firewall unblock –host=[blocked IP]
Restarting cluster environment
Into a cluster environment you should restart or shutdown instances into the right order to avoid problems.
Use the sudo orbit shutdown into cluster members, one instance at time, waiting for the complete shutdown to start the process into another member.
Doing this way, the available cluster members will understand that members are going down. Keep the primary node to be the last one to be shutdown.
Orbini services and task execution
Orbini services is the senhasegura abstraction layer for services executed by senhasegura modules.
You can control its execution into the menu Settings ➔ Execution processes ➔ Processes.
Every process has an execution timeout configuration, and sometimes multiple processes can be accumulated waiting to be executed.
To understand why the oldest process is stuck on the task list, execute the process manually.
sudo orbit execution --code ID --verbose --debug