Proxy
Introduction
This book will explain how to use, the senhasegura proxies.
Symbols used in this cookbook
This book uses the following symbols to highlight information that should be taken into account for the best use of senhasegura :
Info - useful information that can make the use of the solution more dynamic
Caution - actions and items that cannot be ignored
commands: data that must be entered in the same way as described in this book- URLs : paths to access web pages.
<KEYS>: keyboard paths that will be used to perform actions.
Proxy architecture
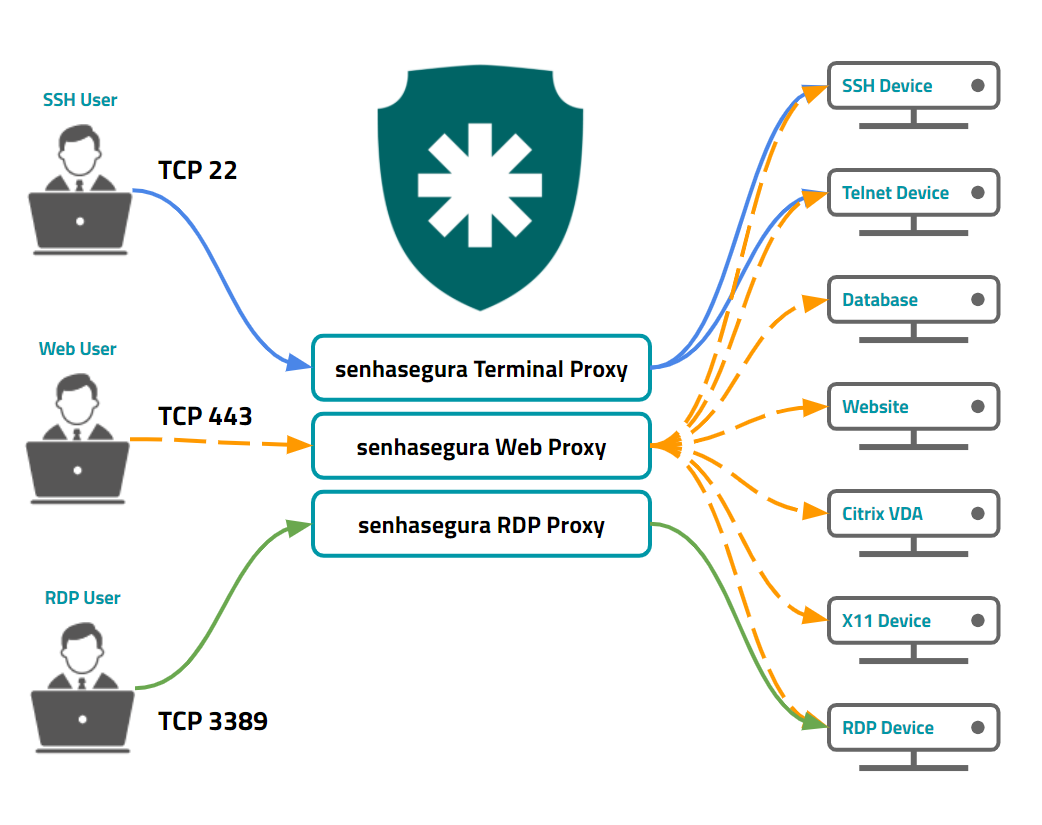
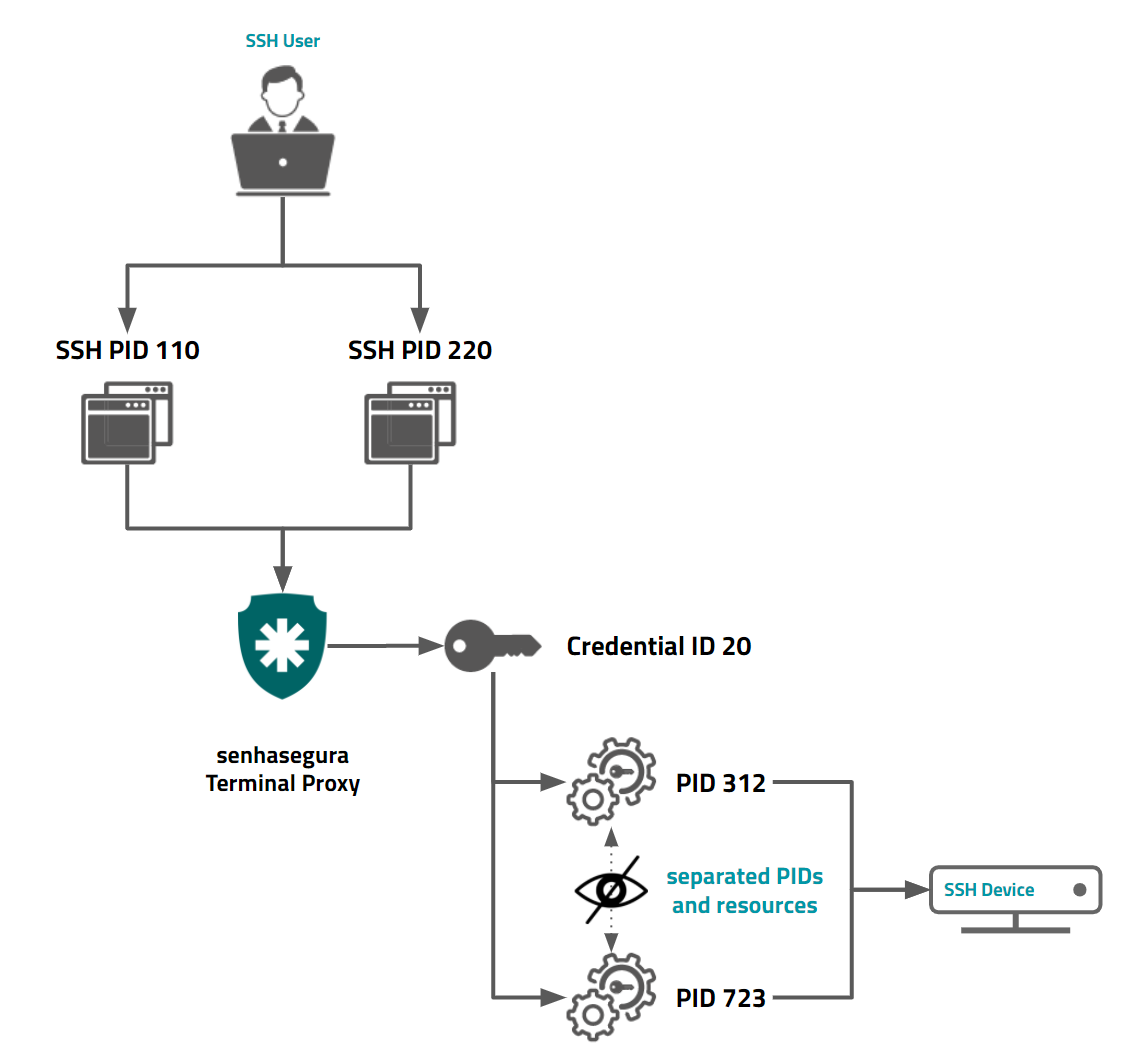
senhasegura gives proxy technologies to many target protocols and applications. And also gives to the user three ways to connect. Every gateway has its particular features, cryptography capabilities, segregations and session recorders.
Each user session receive a separated internal PID running over security hardenize layers and abstractions using best CIS and NIST pratices. There is no possibility to share data between running sessions even when it comes from the same senhasegura user.
Proxy features
Proxy
Proxy sessions have several functionalities that occur at different times, and that are performed by different types of users. Let's then introduce which users' types and steps of a session, before we talk in practice the functionalities.
The types of users in a session:
Operator: It is the user who requests access and performs tasks on the target device;
Approver: The user who participates in the workflow process. It has the decision-making power whether or not the session can be executed;
Auditor: It is the user who observes the sessions that have already occurred looking for behaviors, commands or videos;
Administrator: It is the user who configures all options and functionality of a session and decides intervention actions into ongoing sessions;
Session stages
Sessions are influenced in three main steps: Before, During, and After.
Each step allows different actions to be taken, giving greater control to the Administrator, traceability to the Auditor, vision to the Approver and usability to the Operator.
Actions before a session
Before a session the Administrator has the control to decide several settings that determine how the operator will log in and take advantage of it:
Device connectivity: In addition to being used in Dashboards, connectivity testing, automated password exchange, and other modules, connectivity determines the type of proxy system that will be used to reach the device.
Credential activation control: As seen in the Executions module, the credential can be activated and inactivated on demand.
The password policy for exchange after session: As seen in the Executions module, the credential can be recycled after use in a proxy session.
The access group and workflow configuration: The credential usage workflow into a proxy session, as well as the possibility of emergencial use, is configured by the administrator in the access groups.
Macros and RemoteApp credentials: Macros and RemoteApps can be configured and made available on certain credentials.
Global and segregated audited commands: Audited commands for SSH sessions can be configured globally or segregated into Device, Credential, Access Group, or Origins. Action Triggers can be linked to commands, and if the command is executed, the action is taken.
Security levels per protocol: Each protocol can have version specifications, security level, and encryption algorithm. senhasegura allows the configuration of proxies systems and protocol-specific characteristics at the global and segregated level.
Ignoring certificate errors: RDP connections typically present certificate errors during the connection step. The administrator can force only valid certificates or ignore certificate errors at the connection handshake.
Session functionality: During the session the user can perform some actions such as transferring text, a file, pressing
<Ctrl+Alt+Del>, performing an automated privilege elevation, etc. These actions can be allowed or blocked at the global or segregated level.Indexing input and output texts: If the session requires auditing of the typed texts and displayed texts, you can configure whether this audit is to be recorded at the global level or segregated. By default this feature is disabled, we recommend enabling it only on credentials and devices that require it.
Allow wallpaper in RDP sessions: Some companies use custom wallpapers that contain device information, session or security policies. By default wallpaper transferring during RDP sessions is disabled to improve the RDP protocol performance.
Types of Linux and Xterm terminals: Some Linux systems have differences in use of client terminals using Linux or Xterm format. This is influenced by the handling of ANSI codes. You can segregate the device configuration for each terminal.
Use of personal credentials: Some devices may allow operator users to use personal credentials that are not managed by the platform, but that must still comply with other access, control, and audit rules. Under these scenarios we recommend that you do not index texts typed by the user.
Concurrent proxy sessions limit: Security policy can be changed to prevent a user from running more than a certain amount of proxy sessions simultaneously.
Actions during a session
During the session the operator user is passive to other functionalities that have been previously configured by the administrator, and other actions that can be immediately taken by the administrator.
The settings must be configured before a session starts. It set up several aspects of the session that cannot be reconfigured after the session starts. For example, an audited command created or modified during a running SSH session will not be considered by the current sessions. Only new sessions after the creation of the command will be affected.
Let's understand the actions that can occur during the session:
Execution of audited commands: As we have seen, audited commands that were previously registered will be considered during the session. If the operator executes these commands, the session will be scored with the risk level of the command and the administrators will be reported by SIEM messages. The operator user can still suffer a previously configured action linked to this audited command, such as prohibiting execution, interrupting the proxy session, or even inactivating its senhasegura account.
Evaluation of file transfer: Files that are transferred from both the operator's workstation to the target device and from the target device to the operator's workstation can be evaluated through plugins. The demand for these plugins should be forwarded to our Commercial team.
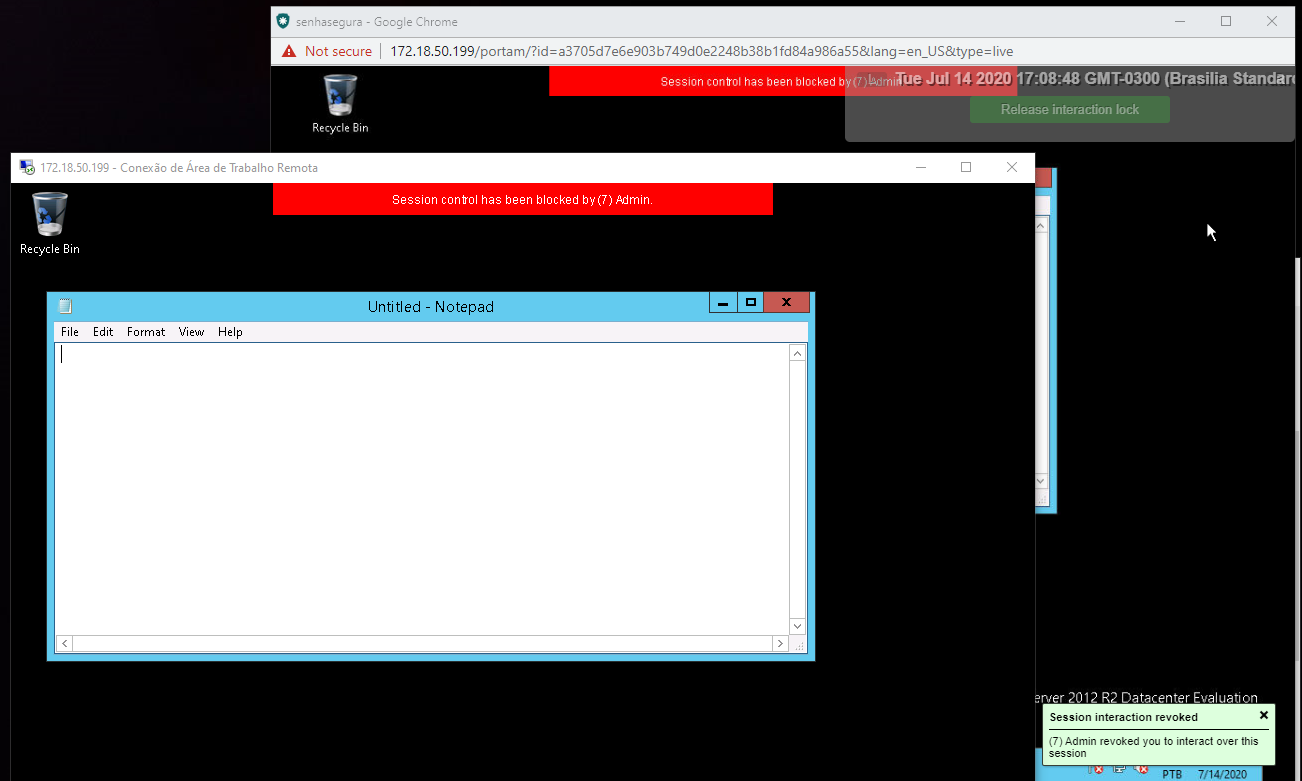
Session livestream: Administrators can perform a live view of the ongoing session without the operator's knowledge. From this preview window the administrator can make the decision to stop the user operator's interactivity. So, the operator will be notified that the interaction has been interrupted by an identified user, and cannot start new sessions until that lock is released. The preview and lock action are recorded in the session logs.
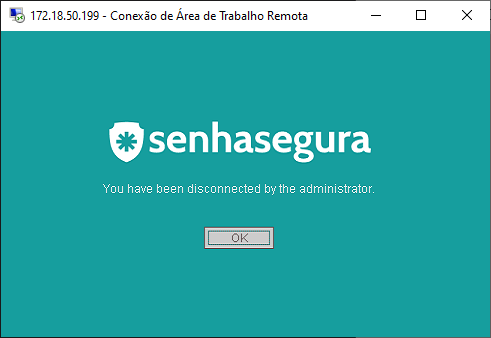
Session interruption: The administrator may interrupt without user consent and without notice an ongoing session. This action will be recorded in the session logs.
Elevation of privilege in SSH sessions: During the SSH session the user operator can perform elevation of privilege through the SUDO binary. Thus, senhasegura will capture user interactivity and automate authentication without displaying the access credential password.
Actions at the end of a session
Once the session is finished, the administrator user and the auditing user can observe the session details individually and observe the general table of sessions, credentials, and user behaviors. The credential used is available for blocking or recycling actions.
Let's look at what actions are available in this step.
Log session events: During the session, several actions may have occurred. All of these actions are available in the session logs.
Session video: Session recording can be played exactly as it occurred.
Audit request: The session can be forwarded for one or more users to evaluate the session. This request is made by e-mail and the session will be separated into an audit report. The user requesting the audit can write a short text explaining their reasons.
Purge Prevention: By default senhasegura will purge session files at a configurable interval. But when a session is protected from this purge, it will be available for as long as it takes.
infoCheck the Tool Administrator Manual to adjust the robot's "Data purge" parameters.
Video export of the session: If necessary, you can export the session video in MP4 format for an external audit.
Risk assessment: Audited commands detected in the session add scores to the session. This score is reflected to the Device, Credential, and User operator. The administrator has a major overview of the risks involved in your business.
Text indexing: Text that was typed or presented in the session is available in a report that contains the text of all other sessions that have occurred. This allows the administrator to search for text that has appeared in a period of time on any device.
Technologies
Now that you are aware of the functionality, let's learn about the available proxy technologies and what functionality they support.
senhasegura Terminal Proxy
senhasegura Terminal Proxy is a service available on port 22 under SSHv2 protocol, which will audit the target SSH and TELNET connections.
It has a simplified terminal for querying credentials and basic operations for file transfer. But its main purpose is to deliver the connection to the remote device.
Protocols supported:
SSH and Telnet.
senhasegura RDP Proxy
The senhasegura RDP Proxy is a service available on port 3389 through RDP protocol that will audit the target RDP connections.
It mediates all functionality available on a common RDP connection between Microsoft Windows devices, without interfering with the user's operator experience. But with all security guarantees and audit of senhasegura .
Protocols supported:
RDP versions 5.2 and higher.
senhasegura Web Proxy
The senhasegura Web Proxy delivers all kinds of connectivity to target devices through an HTML5 interface with WebSockets that can be accessed by any modern browser.
All features that are used by standard protocol clients are available on these connections. Some functionality may vary somewhat in usability from running in a web browser, but deliver the same goals successfully.
Because it is a more flexible channel, without the limitations of clients dedicated to exclusive protocols, senhasegura Web Proxy allows proxy sessions including particulars protocols and tools, such as X11, VNC and HTTP/HTTPS websites.
Protocols supported:
SSH, Telnet, VNC, X11, Citrix VDA, Kubernetes, Websites, Databases ODBC, RDP versions 5.2 and higher.
For the activities in this section, users can use any client of their choice, such as PuTTY, MobaXTerm, SecureCRT, Windows RDC and others.
Encryption Keys
To make better use of proxies in senhasegura you need to understand that there are two types of connections:
A connection that originates from the user's workstation to the vault.
And another that leaves the vault to the device the user wants to access. Secure connections must be made through encryption, so check the encryption keys supported by each proxy.
senhasegura recommends that you use encryption algorithms in their latest version for security reasons.
senhasegura RDP Proxy
Uses the ciphers according to the encryption level.
From user workstation to vault
Uses Arcfour (RC4) or Triple DES (if the encryption level is FIPS) ciphers. Generated message authentication codes (MAC) can use: MD5 or SHA-1.
Supported external security protocols are:
TLS 1.0
TLS 1.1
TLS 1.2 (recommended)
From Vault to Destination Device
Uses Arcfour (RC4) or Triple DES (if the encryption level is FIPS) ciphers. Generated message authentication codes (MAC) can use: MD5 or SHA-1.
Supported external security protocols are:
TLS 1.0
TLS 1.1
TLS 1.2
CredSSP
senhasegura Terminal Proxy
The senhasegura proxy system makes connections through the SSH or Telnet protocols.
When using the Telnet protocol the connection from the vault to the device does not use encryption, there is encryption only when access is made from the user's station to the vault.
From user workstation to vault
senhasegura supports the following encryptions:
Ciphers
Poly1305
AES256-GCM
AES128-GCM
AES256-CTR
AES192-CTR
AES128-CTR
MACs
hmac-sha2-512-etm
hmac-sha2-256-etm
hmac-sha2-512
hmac-sha2-256
KexAlgorithms
curve25519-sha256
ecdh-sha2-nistp521
ecdh-sha2-nistp384
ecdh-sha2-nistp256
diffie-hellman-group-exchange-sha256
Using weak algorithms reduces the security scope of the tool. Consult our experts on how to deal with legacy systems.
Proxy Usage
We previously learned the features and technologies available on the platform. Let's now learn in practice how these features are configured and used during a proxy session.
Features that are valid for more than one proxy system, such as video and text indexing, will be exemplified using only a single proxy technology so it does not make our learning repetitive.
Setting up the proxy environment
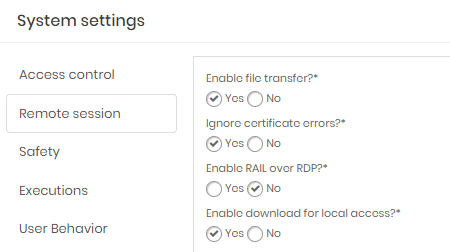
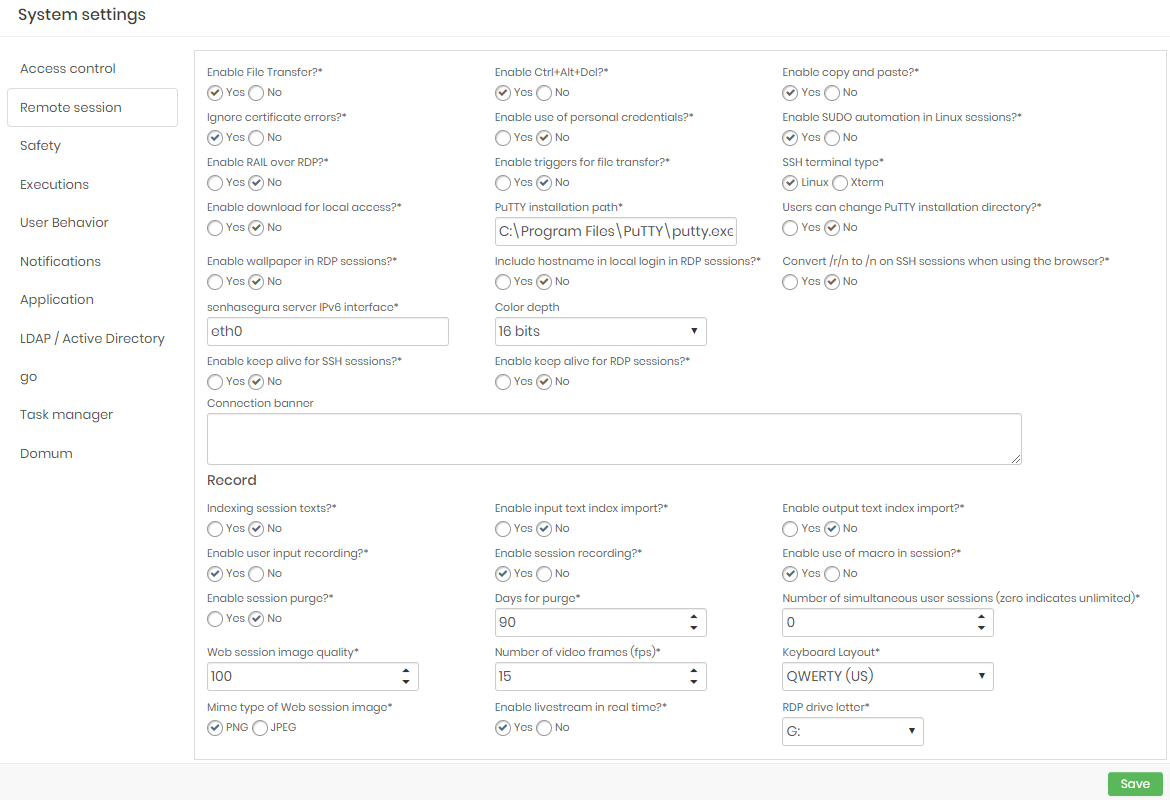
The general functionalities of proxy sessions can be seen in the Settings ➔ System parameters ➔ System parameters menu.
Because it is a screen of several controls of various functionalities, we will list here only the controls that reflect the proxy.
Some features in older versions of senhasegura are no longer present in this documentation. We suggest that you avoid changing parameters that are not in this document.
Let's look at the settings in the Remote session tab.
Enable file transfer?: By default marked Yes , Flag whether sessions can transfer files between the source workstation and target device, or in the opposite direction;
Enable Ctrl+Alt+Del?: By default marked Yes , flag whether in RDP graphical sessions, if the operator user can press the key sequence and access advanced controls of the device;
Enable copy and paste?: By default marked Yes , flag whether the operator user can transfer the contents of their clipboard to the target device, or in the opposite direction;
Ignore certificate errors?: By default marked Yes , flag whether invalid certificates on RDP connections should be ignored;
Enable use of personal credentials?: By default marked No , flag whether the user can use personal credentials to start remote sessions;
Enable SUDO automation on Linux sessions?: By default marked Yes , flag whether privilege elevation automation is active;
Enable RAIL over RDP?: By default marked No , flag whether Microsoft rails over RDP technology is active. When active, the RemoteApp connection will have even greater usability;
Enable triggers for files transfers?: By default marked No , flag whether files transference will be evaluated by external plugins. The demand for these plugins should be forwarded to our Commercial team;
SSH terminal type: By default marked Linux , it may vary as Xterm . Flag the type of terminal that will be used in the SSH and Telnet sessions;
Enable download for local access?: By default marked No , flag whether the RDP extension file or BAT file running PuTTY1 can be generated by senhasegura and downloaded by users operators facilitating access to a credential;
PuTTY installation path: Flag the path where putty binary will commonly be found in operators' workstations;
Users can change PuTTY installation directory?: By default No , flag whether users operators can change the binary location directory at the time of download. If allowed, users can choose a new location from the user preferences menu;
Enable wallpaper in RDP sessions?: By default No , flag whether the RDP session wallpaper will be presented during the session;
Include hostname in local login in RDP sessions?: By default No , flag whether the destination hostname will be displayed as window title;
Convert /r/n to /n on SSH sessions when using the browser?: By default No, flags whether the standard Microsoft®Windows end-of-line characters (\r\n) will be replaced for Unix format (\r), when copying and pasting text in senhasegura Web Proxy sessions with SSH protocol.
senhasegura server IPv6 interface: senhasegura Server IPv6 network interface name
Color depth: Color depth that will be used in VNC HTTP sessions only. The user will be able to choose between 8 bits up to 32 bits, according to the performance he wants to reach.
Connection banner: When starting a proxy session, a message will always be presented to the user. Configure this message in this property;
Index session texts?: By default No, flag whether session texts should be indexed. This setting should be used in conjunction with the following two others:
Enable input text index import?: By default No, flag whether the input texts of the operator user should be indexed. That is, anything that is typed will be captured, regardless of whether the target field is masked (e.g.: a password field), or if the text itself had any use to the target application (e.g.: a cat dancing over the keyboard);
Enable output text index import?: By default No, flag whether output texts presented on screen to the user should be indexed. It is worth remembering that the text typed by the user will be recorded if it is also an output;
Enable user input recording?: By default Yes. Unlike text indexing settings, this property flag whether inputs will be logged individually in the session and is not available in the report that crosses all texts from all sessions;
Enable session recording?: By default Yes. Flag whether the session video will be recorded. This video is an optimized binary copy of the protocol that has been carried over. Do not confuse with the exported MP4 file;
Enable use of macro in session?: By default Yes, flag whether the use of macros and RemoteApps is allowed;
Enable session purge?: By default No, flag whether the platform should automatically discard videos of sessions that have reached a certain expiration date;
- Days for purge: By default 90 days. Flag how many days the video should be kept;
Number of simultaneous user sessions: By default 0 , indicating that users can run as many simultaneous proxy sessions;
Enable real time livestream?: By default Yes, flag whether the administrator can perform livestream monitoring on the proxy session;
Let's now look at the properties available in the Security session
Force two-factor authentication to start session?: By default No, flag whether you need to use the 2FA token to start proxy sessions;
Enable password change after session opening?: By default No, flag whether senhasegura will change the password right after the proxy session starts;
RDP safe mode: Security level of target RDP connections. By default Automatic , where the client and server will determine the level of security. Because it is a bridge, the client in this case is the senhasegura platform. To configure the security level of connections that arrive at senhasegura , see the senhasegura RDP Proxy settings manual;
Allowed IPs to start session: If active and populated, you can determine a list of IPs, individual or at intervals, that will be allowed to start a proxy session;
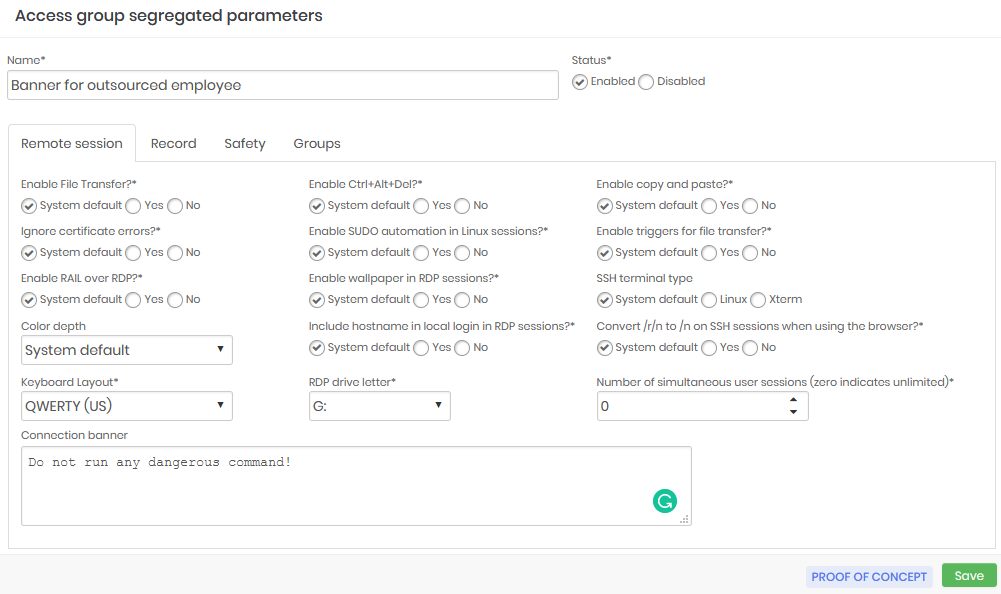
Segregations
Because there are many settings in the global level definition, there is a need to segregate some of these settings to facilitate security policy management and possible exceptions on devices that do not support certain configurations.
For example, some RDP devices do not support the TLS security level, and must be isolated in a separate configuration if the global level is not configured in Automatic mode.
Another example is Linux devices that by strategic decision, or technical limitations, do not support automated privilege elevation with SUDO.
To isolate these Devices and Credentials in segregated configurations, we must first understand the password segregation hierarchy.
Segregation levels
Through the Settings ➔System parameters ➔ Segregated parameters menu, you have access to all registered segregation for proxy sessions.
Segregations respect the hierarchy and order of rewriting. Acting as a chain of settings layers, the next layer will always have the rewriting power under the previous layer:
Global Parameters
Access Group Segregations
Device Segregations
Credential Segregations
Origin Segregations
Thus, a parameter defined in the Global layer can be overwritten by Access Group segregation, which in turn can be overwritten by Device segregation, and so on.
Devices and credentials cannot be included in more than one segregated parameter.
The segregating layer has the option of keeping the current parameter unchanged. Therefore, there is no obligation to define all parameters for each layer.
Note that in the Color depth field, (which is displayed in all segregation layers) you can choose which color depth you want to use in VNCHTTP, VNCX11 and VNC sessions to suit the performance you want. The options range from 8 bits to 32 bits.
Imagine an example where the Connection Banner was defined in the Global layer. So, all proxy sessions will display the same banner.
But there is a specific access group for outsourced employees who need a different message from the others. The administrator should then create an Access Group level segregation, change the banner value, and choose the appropriate access groups for that segregation.
All sessions that occur from that access group will have a different banner than the Global banner.
If there is still a case where a particular Credential requires a different banner, the administrator can then create credential segregation, modify the banner, and link the required credentials.
So even if the user is an outsourced employee framed in the group that already contained segregation, the banner message will again be changed by credential segregation because of its prevalence under access-group segregation.
With each proxy session, senhasegura will always frame the requester to an Access Group that allows the use of a Device Credential. And this user always starts from a source workstation. Hence, senhasegura will always be able to determine an appropriate combination of parameters for this session.
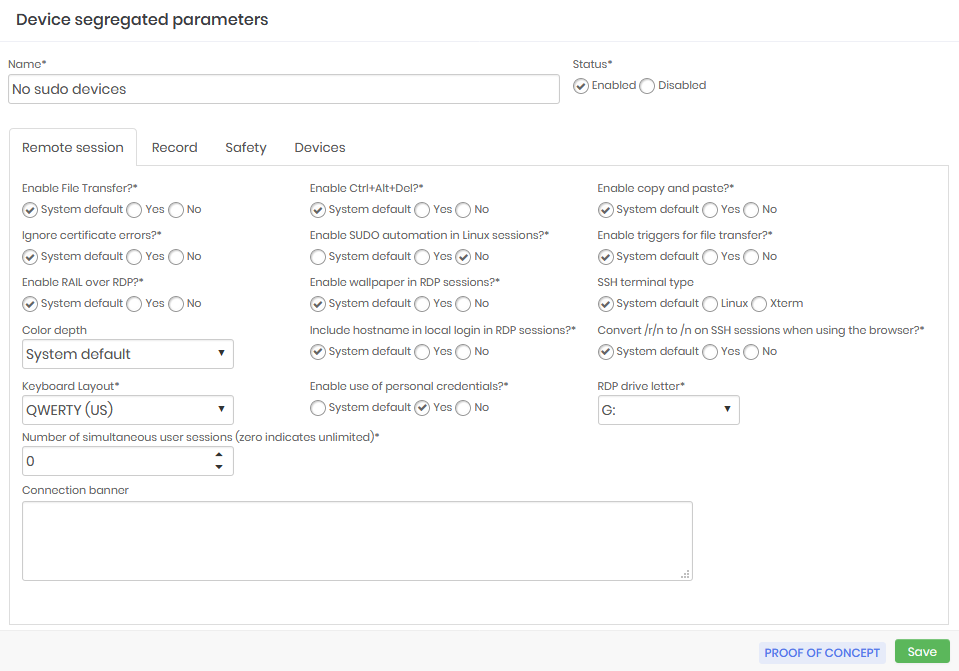
The image proxy-100 shows that the Global setting allows file transfer.
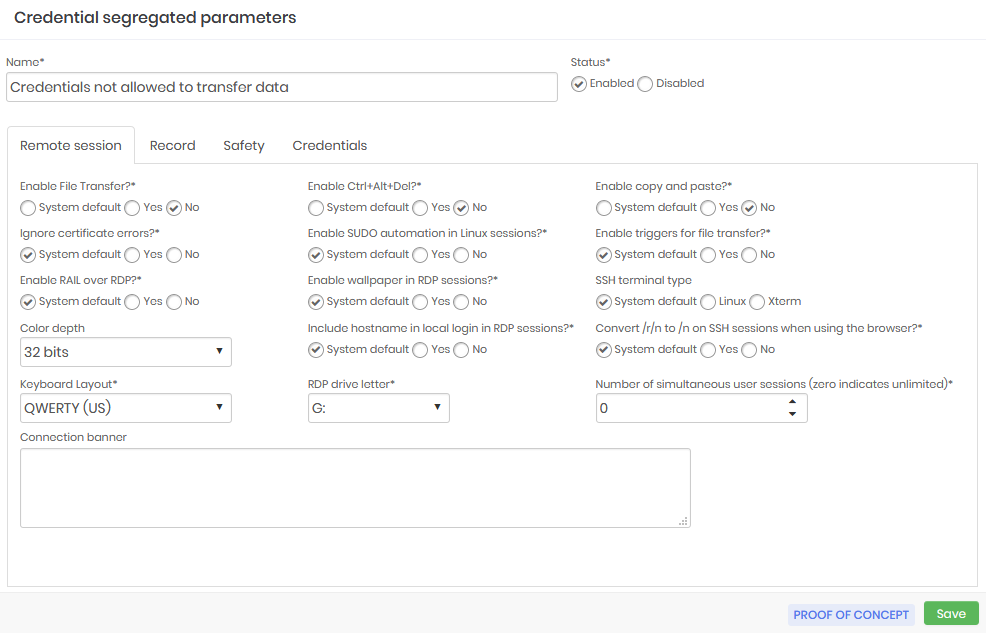
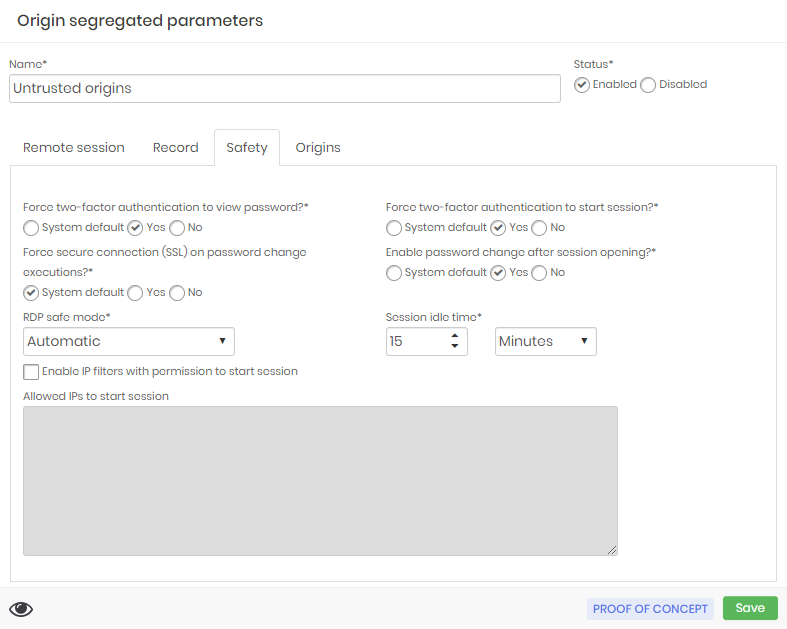
The image proxy-110 demonstrates that there are segregations for all layers, and each segregation has a name that makes clear the intention to use.

The banner segregation example kept all other parameters unchanged. Only the banner has been set.
Device segregation example inactivated automated privilege elevation execution and allowed the use of personal credentials.
The credential segregation example does not allow file transfer, clipboard use, and does not allow the use of <Ctrl+Alt+Del> key combination.
Source segregation example is forcing the use of the 2FA to view passwords and start proxy sessions and allows immediate password recycle after the proxy session is opened.
Note that there is a possibility that a session may have to consider some of these rules, all, or none at all. Making the configuration possibilities very flexible.
senhasegura Terminal Proxy
senhasegura authenticates on the target device using the native protocols of the requested session.Delivering the user an already authenticated session, with no risk of exposing the credential used.
senhasegura Terminal Proxy is an SSH service operating on standard port 22 that authenticates the senhasegura user using the same account that the user uses in the web interface. This login respects the same account lockout and 2FA settings.
Basic use
When logging in, the user will be directed to the default prompt as below.
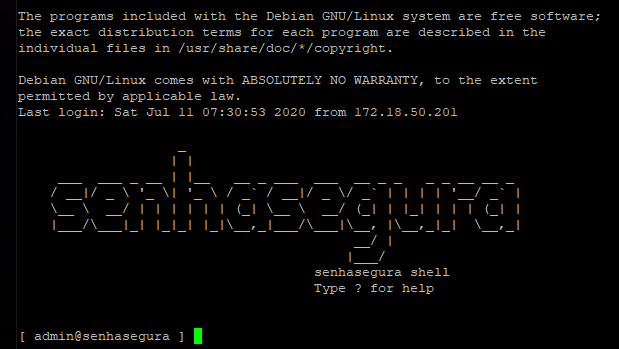
This simplified terminal has only commands to start a proxy session to a remote device and transfer files between the source and destination device. Use the help command to list the available commands.
To list access credentials, use the list command.
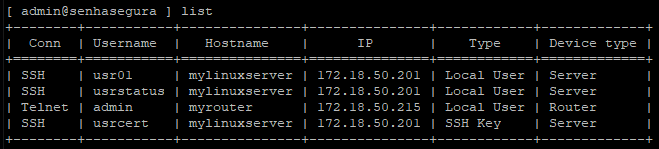
Note that the available connectivity is displayed in the first column, and access data such as Username , Hostname, and IP are listed next.
Domain credentials are not listed using this command. To perform access with domain credentials you need to use the following syntax: ssh domain\user@server
Cloud module virtual machine credentials are not listed using this command. To perform access with credentials from AWS OpsWorks instances you must use the following syntax: list –cloud.
Remember that virtual machine management is handled by the senhasegura Cloud module, see the Cloud IAM Manual for more information.
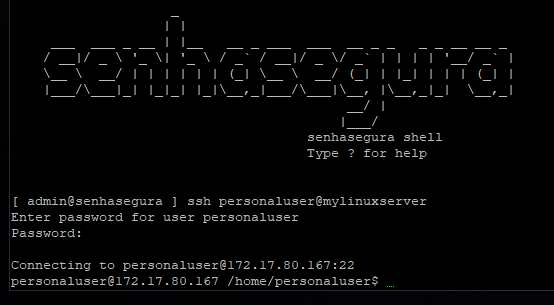
To make an SSH connection to a device that has this connectivity linked to a valid credential, run the ssh command followed by the credential and device as you would on a standard SSH connection.
Example: ssh usr01@mylinuxserver or ssh usr01@172.18.50.201.
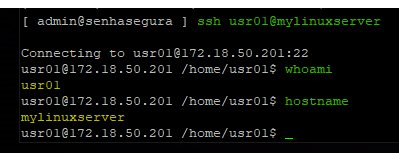
For TELNET sessions, simply run the telnet command followed by the credential and device in the same way. Example: telnet admin@myrouter.
When you log out of the remote device, the user will return to the senhasegura Terminal Proxy prompt.
Access using ssh key
To perform an access with ssh keys use the following syntax, replacing the following strings with:
keyValue: ssh key value
valtServer: senhasegura instance
targetDevice: device you want to access
ssh keyValue@valtServerAcessando a instânciassh key keyValue@targetDeviceAcessando outro dispositivossh key\keyValue@targetDeviceAccessing another device or when a key and credential have the same name.
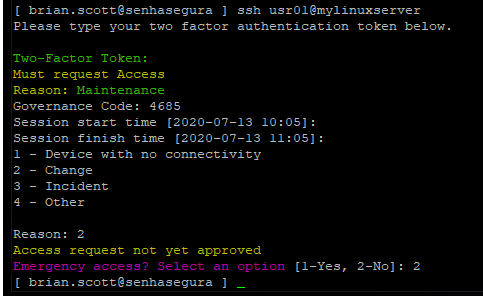
2FA token access
According to the User Security Posture Rating, the use of 2FA so start a session may be mandatory or required more frequently
If 2FA access is configured, the token will be prompted when you log in to the Terminal Proxy.
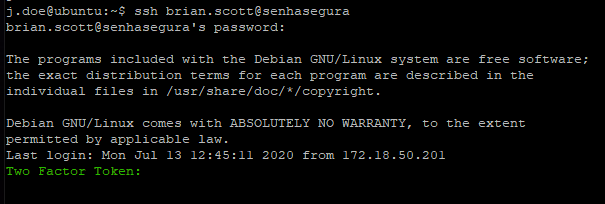
If you configure to request a 2FA token even when starting proxy sessions, you will be prompted again.
Access workflow and emergency access settings will also be applied if necessary.
Access using Multihop
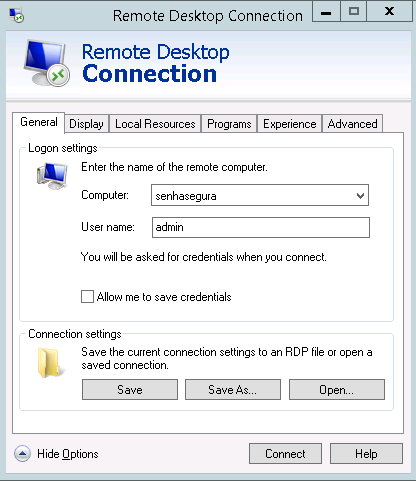
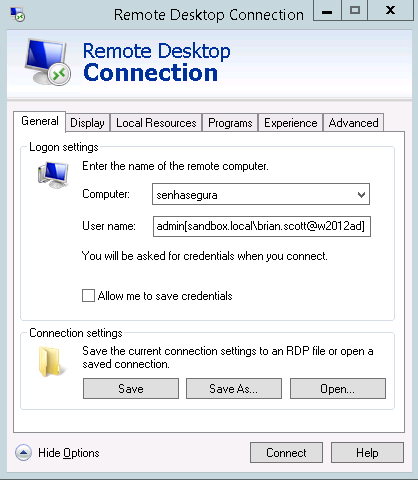
To facilitate access to the target device in applications that do not provide interactive prompts, or even to facilitate access to users who prefer to leave saved connection-specific settings, senhasegura Terminal Proxy accepts a connection syntax that contains the destination access credential.
This is useful to applications connect direct to the target without the need to execute additional steps. Take a look into it's syntax variations, replacing the following strings with:
valtUser: senhasegura user
valtServer: senhasegura instance
targetUser: credential you wish to use for access
targetServer: server you want to access
valtUser@valtServerDefault connection string with only the user and senhasegura server.valtUser[targetUser@targetServer]@valtServerConnection containing the user and senhasegura server. The credential and target device are in brackets. In this case, the senhasegura Terminal Proxy will connect directly to the destination server without delivering the intermediate terminal.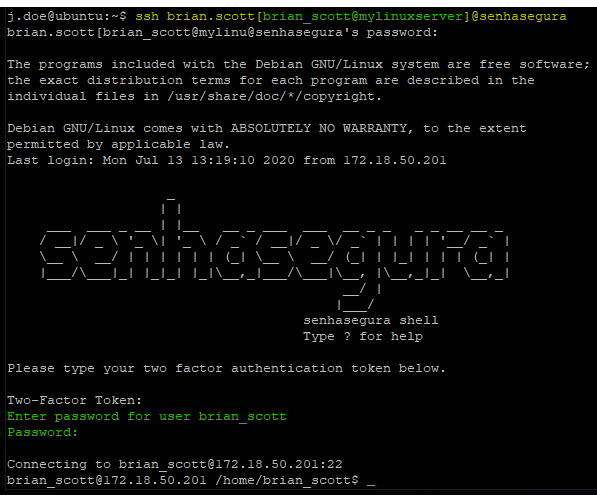
Connection containing the user and senhasegura server valtUser[targetUser@targetServer]2faToken@valtServerMultihop connection containing the OTP token.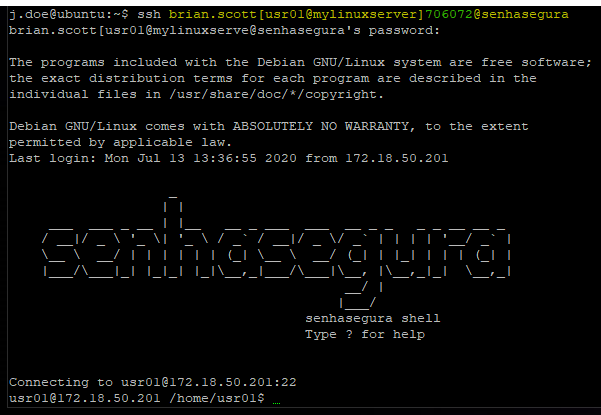
Multihop connection containing the OTP token exemple
File transfer
For file transfer, directly to a target server, is mandatory the use the of multihop connection, because the binaries that travel under SFTP do not have a way to interact with the intermediate terminal.
File transfer does not allow the use of personal credentials due to a protocol limitation. It is not possible to use a second credential for authentication. Only the senhasegura user account will be used.
If the user has an OTP token configured, make use of the token in the connection string.
The example below uses the WinSCP program as an example.


The imageproxy-terminal-220 uses a command-line version of SFTP.

To use the scp command, use the syntax below, replacing the strings with:
fileName: File to be transferred
vaultServer: senhasegura instance
vaultUser: credential that will authenticate to the senhasegura instance
fileDestination: Location where the file should be transferred to
scp fileName vaultUser@vaultServerUploading a file to the senhasegura instance.scp vaultUser@vaultServer:fileName fileDestinationDownloading a file from the senhasegura instance to the requester workstation.
There are need two steps to transfer a file using SCP from a user workstation to a target server. At the first step, the file is uploaded to the senhasegura instance. And into the second step, the user has to connect into senhasegura Terminal Proxy to upload the same file to a target server.
The SCP syntax does not support multihop connection string, turning these both steps mandatory.
Use the SFTP transfer for a better experience.
Automated privilege elevation
Linux systems in SSH connection have automated privilege elevation using SUDO binary. In these cases, the user will have its interactivity captured and senhasegura will perform the elevation using the same credential used to authenticate in the target device.
Thus, the user will be allowed to perform elevated tasks without having to know the credential password.
Note in this first example that the user executes a super command without having to enter the credential password.
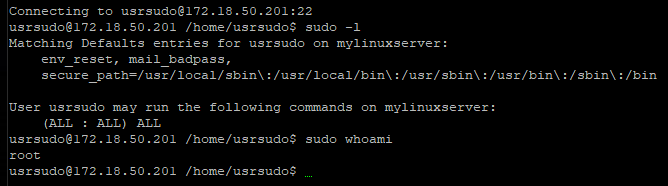
If privilege elevation is inactivated on the session, the device credential password is requested.

Interactivity blocking and compulsory logout
If the administrator activates interactivity blocking, the operator user will be warned by a message in the upper right corner.
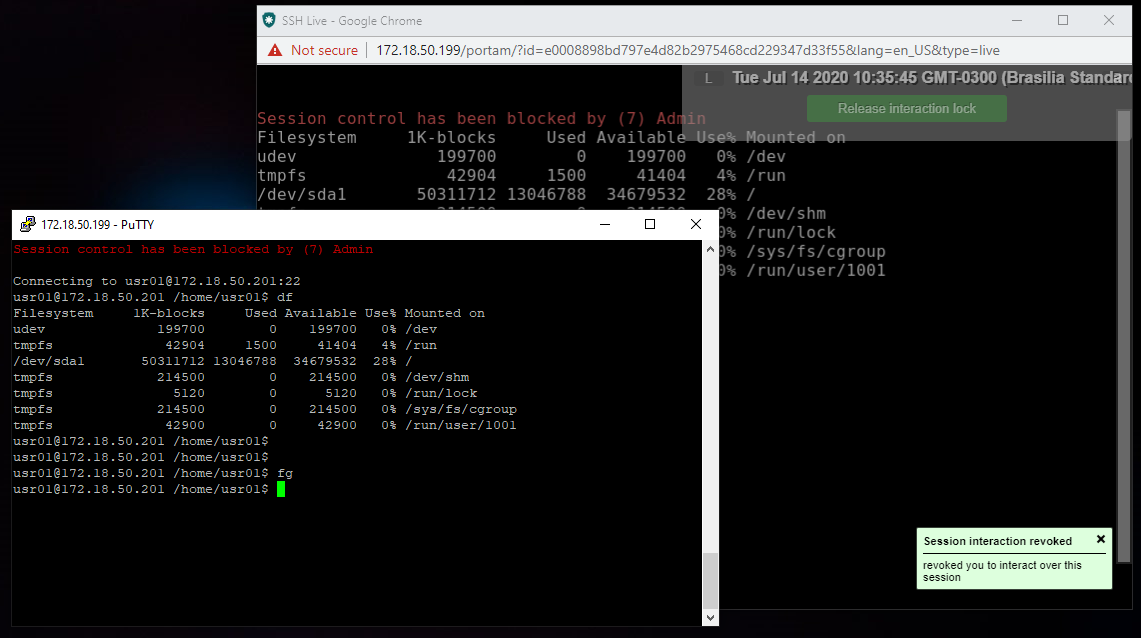
And if the administrator compulsorily logout the session, the user is also warned.

SSH RemoteApp
A RemoteApp in SSH connection is accomplished by leveraging the protocol's channels. The connection is established and a channel is opened directly in the desired binary.
If the binary requires authentication, it can be accomplished through the binary arguments or by the automation macro.
The operator user will be isolated in the RemoteApp binary because there is no intermediary terminal. If the user closes the RemoteApp binary, the session is terminated.
For RemoteApp the Audited Command feature will not be available.
To configure RemoteApp it is necessary to configure the macro through the menu PAM ➔ Settings ➔ Access ➔ RemoteApp. In this report, you have access to all Macros and RemoteApps registered on the platform.
We will use RemoteApp MySQL as an example.
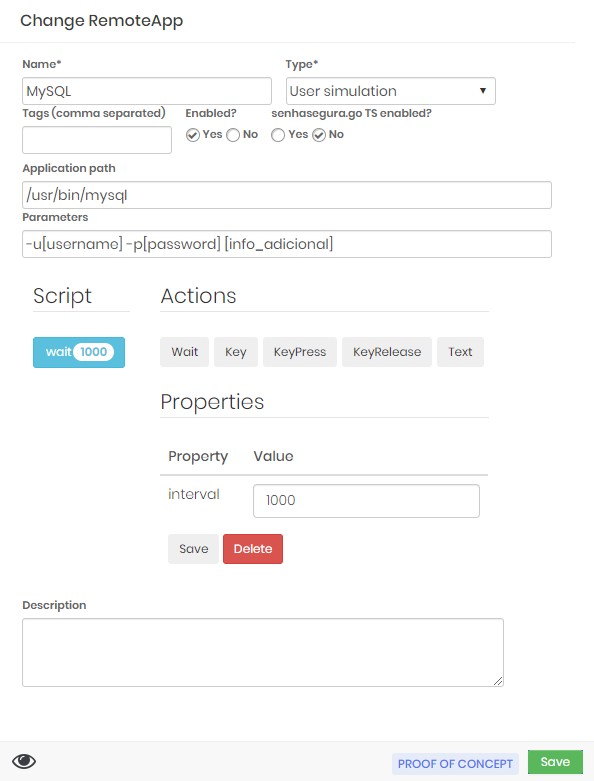
Note that the setting is populated with the location of the binary, and as arguments, the masks will be applied to the user, password and additional information. The additional information will be filled in with the name of the database that will be connected.
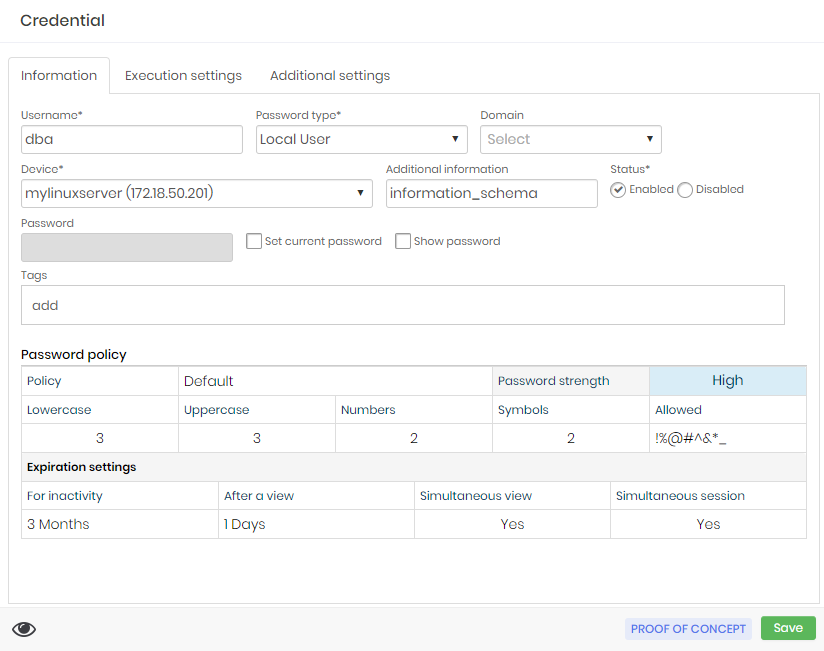
Finally, configure the credential with the RemoteApp macro to use, and if necessary, provide the device access credential.
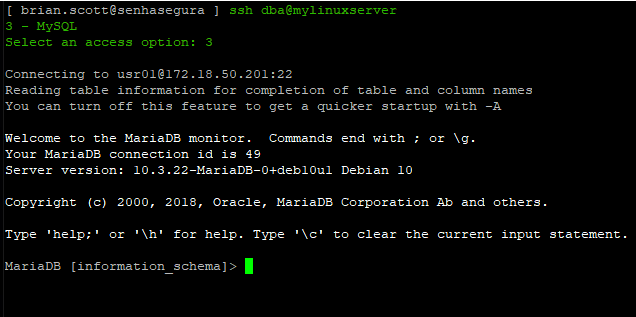
When you log in using senhasegura Terminal Proxy, the application will be presented immediately.
Keep Alive
For situations where the administrator or user needs to keep the session in inactivity, there is a possibility to enable the keep alive setting.
This setting can be configured in the menu 'Settings ➔ System Parameters ➔ Remote session'.
By enabling the 'Enable keep alive for SSH session?' parameter, senhasegura will send the session an empty packet every 1 minute of inactivity, thus keeping the session alive.
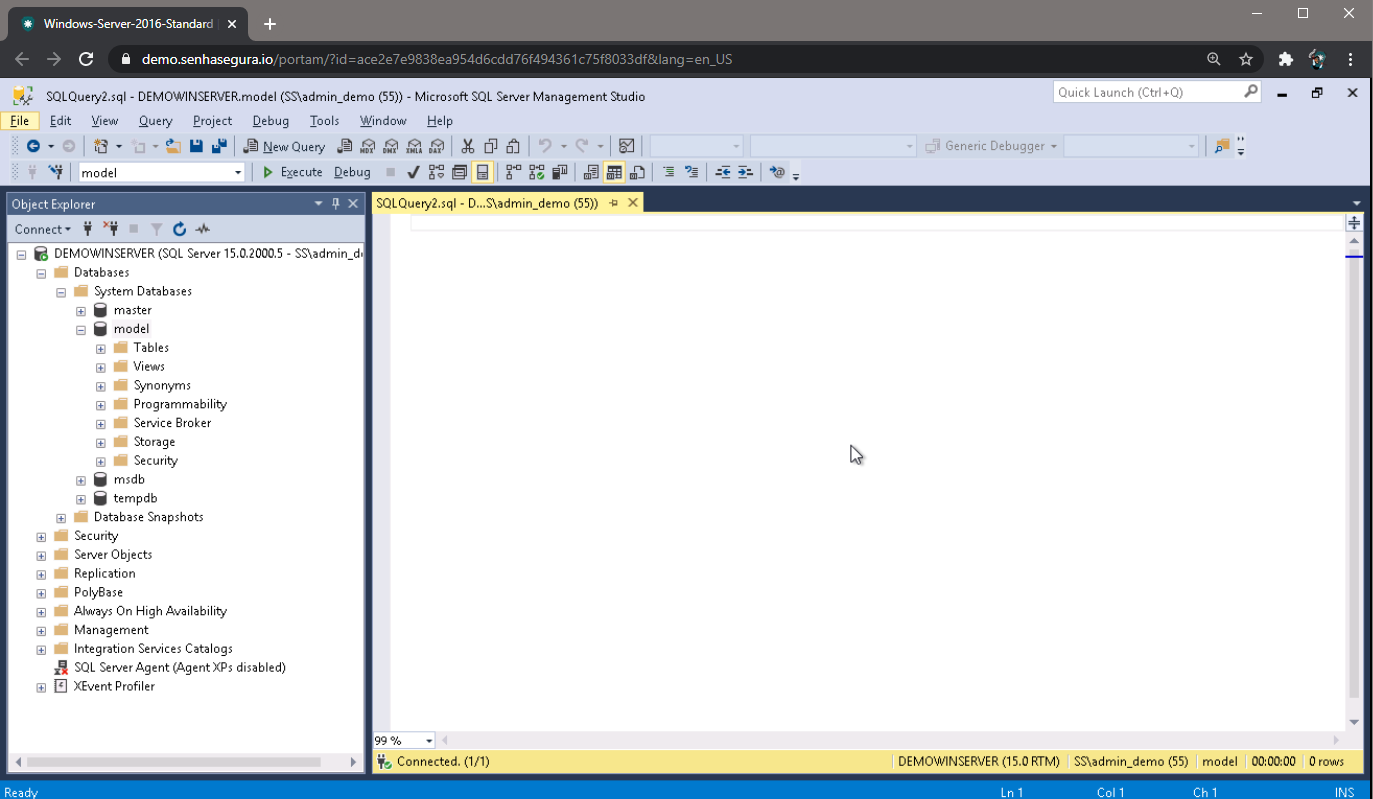
senhasegura RDP Proxy
senhasegura authenticates on the target device using the native protocols of the requested session. Delivering the user an already authenticated session, with no risk of exposing the credential used.
The senhasegura RDP Proxy is an RDP server running on the default port 3389. Its purpose is to perform the proxy between the operator user and the target RDP device by offering the same functionalities described above, without intervening in the natural usability of RDP sessions, commonly in Microsoft Windows sessions.
Any device that offers the RDP protocol connection can be connected as long as it is aligned with the security levels offered while senhasegura acts as a server (in the communication between the user's workstation to the senhasegura platform), or as a client (in the communication between the senhasegura platform to the target server device).
Support for Windows RDP versions 5.2 and higher;
Support for Microsoft®Windows®2003 and higher;
Support for Linux XRDP servers versions 0.9.x and higher;
Support for RAIL session connection;
Connecting to a remote device
Using any RDP client, make a connection to the senhasegura server. You can connect to senhasegura using the multihop connection string to speed up the filling of the following fields.
Once connected to senhasegura RDP Proxy, you must fill the authentication data and the data of the remote device to connect.
If the device accepts the use of personal credentials, provide the personal credential in the indicated field.
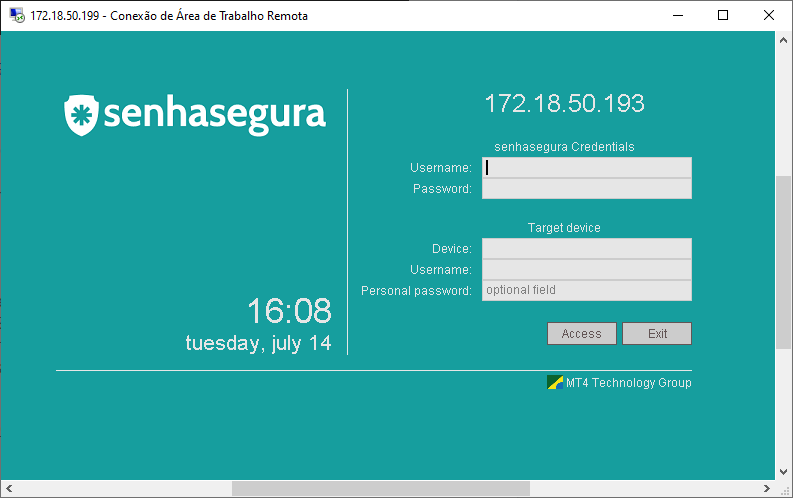
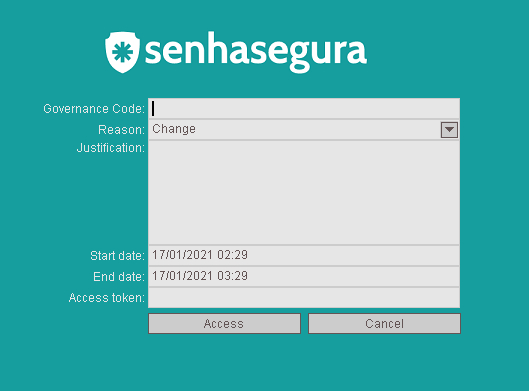
If it is necessary to register justification or request authorization to make the connection.
Access using Multihop
To facilitate access to the target device use a connection syntax that contains the destination access credential.
Take a look into its syntax variations, replacing the following strings with:
valtUser: senhasegura user
targetUser: credential you wish to use for access
domain: domain of the device to be accessed
device: device you want to access
valtUser[domain\targetUser@device]Connection containing the user, device and domainvaltUser[targetUser@device]Connection containing the user and devicevaltUser[domain\targetUser@device]tokenConnection containing the user, device and access token
Users with configured 2FA tokens will also be presented to the token prompt in the next step.
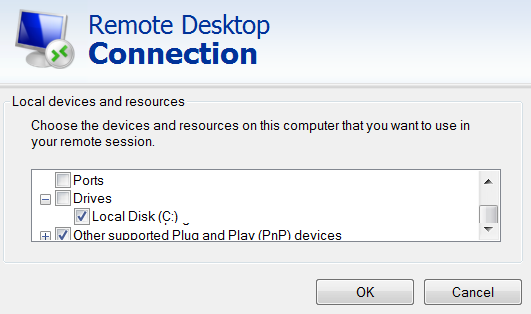
File transferring and clipboard area
senhasegura RDP Proxy uses the native RDP protocol. So every shared resource between the client-side and the destination side will work as a natural RDP connection even with the senhasegura monitoring layers.
It is important to remember that file transfer must be enabled in the remote session parameters to work. Go to the Settings ➔System parameters ➔ System parameters ➔ Remote session menu and choose the Yes option in parameter *Enable File Transfer?**.
To transfer a file from the client-side to the target device, copy the desired file and paste it into a folder into the target device. senhasegura will then log this action and if any file transfer plugin is active, it will be triggered before the file reaches the target destination.
For text data stored at the clipboard area, the data will be logged at session indexed texts, but no plugin will be triggered.
You can also transfer local resources to the target machine using the remote area connection of Microsoft®Windows®.
Interactivity blocking and compulsory logout
If the administrator activates interactivity blocking, the operator user will be warned by a message in the upper corner.
And if the administrator compulsorily terminates the session, the user is also warned.
Keep Alive
For situations where the administrator or user needs to keep the session in inactivity, there is a possibility to enable the Keep Alive setting.
This setting can be configured in the menu Settings ➔ System Parameters ➔ Remote session.
By enabling the parameter Enable keep alive for RDP session?, senhasegura will send the session a signal to move the mouse every 1 minute of inactivity, this way keeping the session running.
2FA token access
According to the User Security Posture Rating, the use of 2FA so start a session may be mandatory or required more frequently
If 2FA access is configured, the token will be prompted when you log in to the RDP Proxy.
If you configure to request a 2FA token even when starting proxy sessions, you will be prompted again.
Access workflow and emergency access settings will also be applied if necessary.

senhasegura Web Proxy
senhasegura authenticates on the target device using the native protocols of the requested session.Delivering the user an already authenticated session, with no risk of exposing the credential used.
senhasegura Web Proxy is the proxy that runs directly in the browser. Just be a modern browser with HTML5 and WebSocket support. You do not need to install agents on the operator user workstation.
The destination protocols are more comprehensive. Through the web browser, the user will have access to target devices operating in the following protocols:
SSH and TELNET: With the same features as senhasegura Terminal Proxy
RDP: With basically a difference in uploading and downloading files and without the possibility to share resources from the source machine. However, with the same usability to operate remote applications;
HTTP: Authenticated access to a destination website through an embedded and isolated browser;
VNC: Protected access to devices with VNC support;
X11: Protected access to devices with X11 support;
Of course, by being in a browser the integrations that would occur naturally on dedicated end-to-end clients are not the same. But the main features are provided by quick and practical means.
Performing access
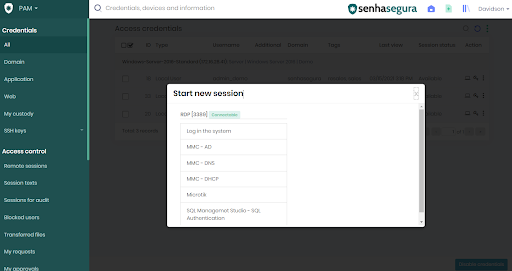
Proxy sessions can be started from different pages at senhasegura Web Interface:
Through the credentials report on PAM module;
Through the SSH key report on PAM module;
By searching for credentials on the desktop Desktop module
On these listed pages, when the credential or key is listed, and if the operator has permission to run a proxy session, the Start a session record action can be used.
This action will validate the same premises as other proxies, except only the need for user and password authentication, as you are already authenticated by the web interface. Other steps such as RemoteApp Macro selection, Token typing, and Workflow request will be presented if necessary.
The big difference is only in the additional HTTP, VNC, and X11 protocols. And the way they transfer the files.
Transfer files in Web RDP session
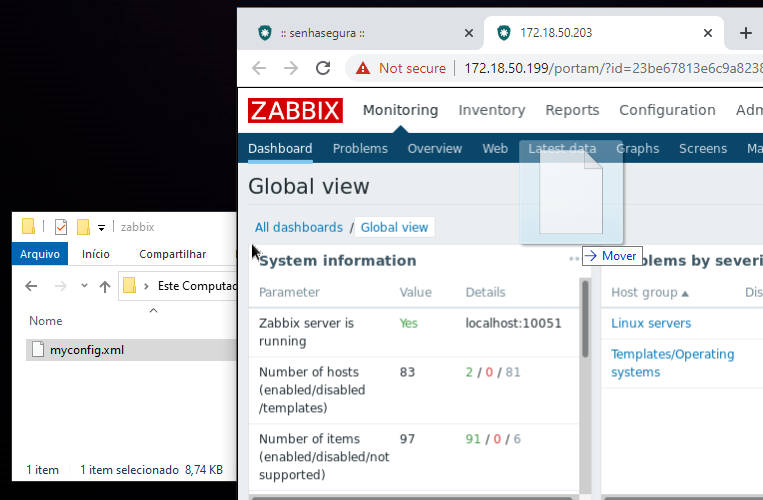
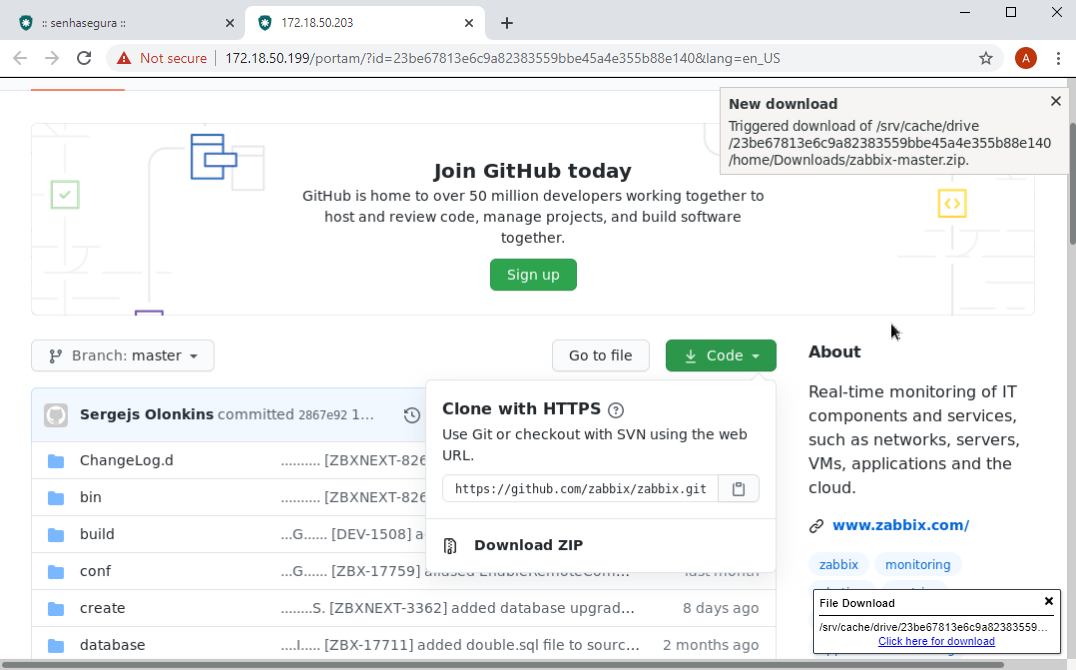
When you start an RDP Web session, if you are allowed to transfer files in both the senhasegura session properties and the target device, Web Proxy will make a mapped drive available in the target session on a mapped G drive named as senhasegura .
Through this mapped drive you will have access to files that have been uploaded to the destination, as well as transfer files from the destination to the operator user using a download.
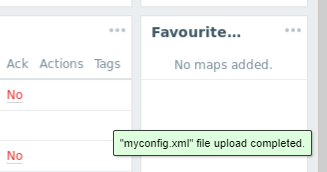
To do an upload, just drag a file from your source workstation into the browser tab that hosts the session. You'll see a progress bar for this upload in the lower right corner of the session. And at the end of the transfer, this file will be available in the root folder of the G drive.
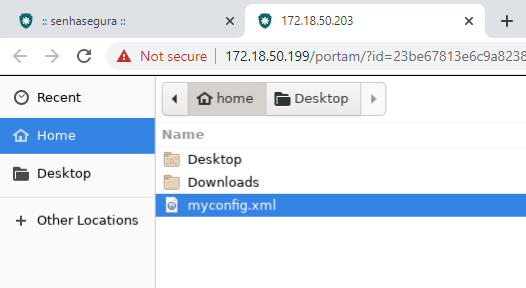
To download it, simply copy a file from the target device into the G:\Download folder. You will be presented with a download prompt in the lower right corner of the browser. Confirming, the file will be transferred to your workstation.
The HTTP Web session
The HTTP web session takes place in an isolated environment containing an optimized and protected browser to perform access to websites. User interactivity is similar to the RDP session.
The browser is configured to prevent the opening of new tabs. All graphical components of the browser are hidden. Even the interaction menus and hotkeys are locked.
To set up a website to be accessed, you need a complementary procedure, compared to other devices, where you only need the device with connectivity and an access credential.
Websites require an authentication setting. This setting allows our embedded browser to perform the login steps automation.
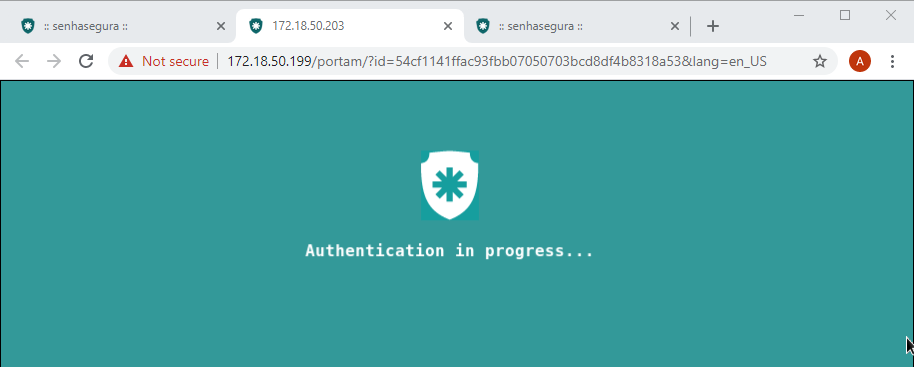
During this authentication process, the user will be presented with a protective banner that prevents the user from interfering and seeing authentication in progress. Your interactivity will be returned only when the login process ends with success or failure.
Modern sites have confirmation steps using Captcha and 2FA/MFA Tokens to prevent automated systems from performing unwanted access. In these cases, Web Proxy returns interactivity so that the user continues the authentication step. Usually, these steps occur after user and password confirmation. But if more automated steps are required after external submit, you can continue from this point on.
Configuring a Set of Device, Credential, and HTTP Web Authentication
We will initially register a device that will represent the Website.
If it is a website installed on its own infrastructure means that you will also have management of database users and operating system.
However, in order to perform web access automation, a device must be created to represent only the Website. This allows us to link our automation to the product indicated in the Product field. This separation also allows for better segregation in access groups.
In our example we will register a server that is hosting a Zabbix2 monitoring service accessible by port 80 with HTTP protocol.
The Device type field should be filled in the Web Application and the Vendor and Product fields can be created automatically with the desired value if necessary.
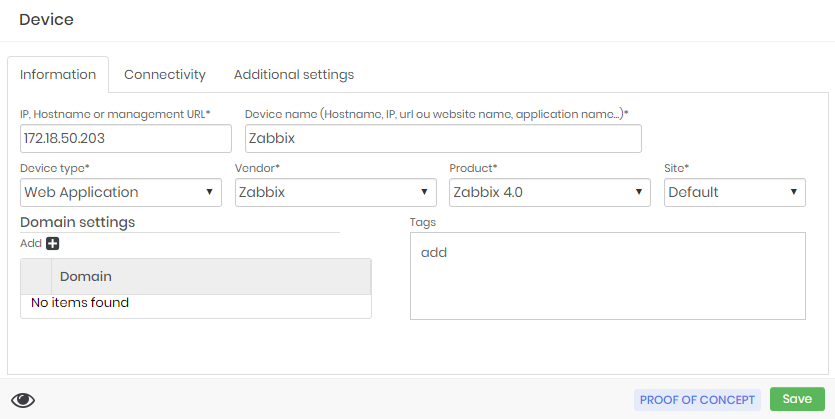
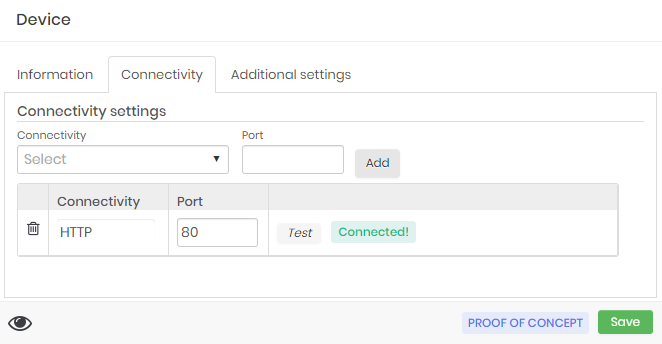
In the connectivity tab, fill in the correct connectivity for the website being accessed.
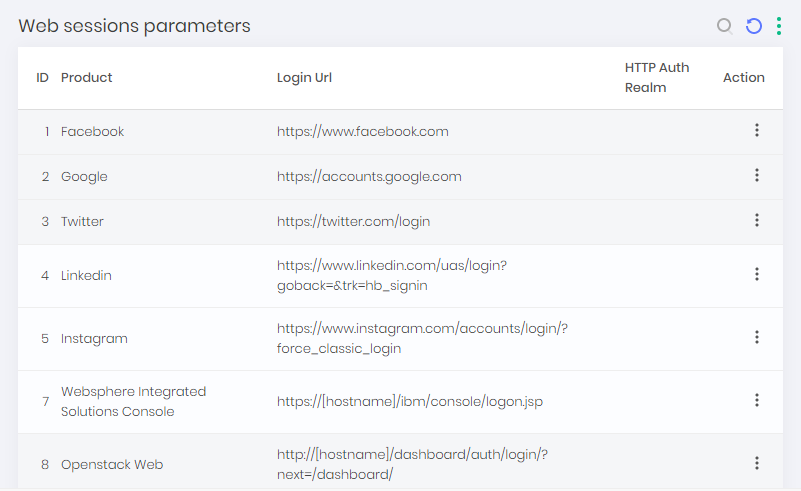
Now we will register the automation steps. Go to the menu Settings ➔ Access ➔ Web sessions . In this report you will see all automation already registered. To create new ones, go to the report action New.
On the registration screen, fill in the Device product field with the same product as the Device record. This will be the necessary link between the configuration and the device to perform the automation.
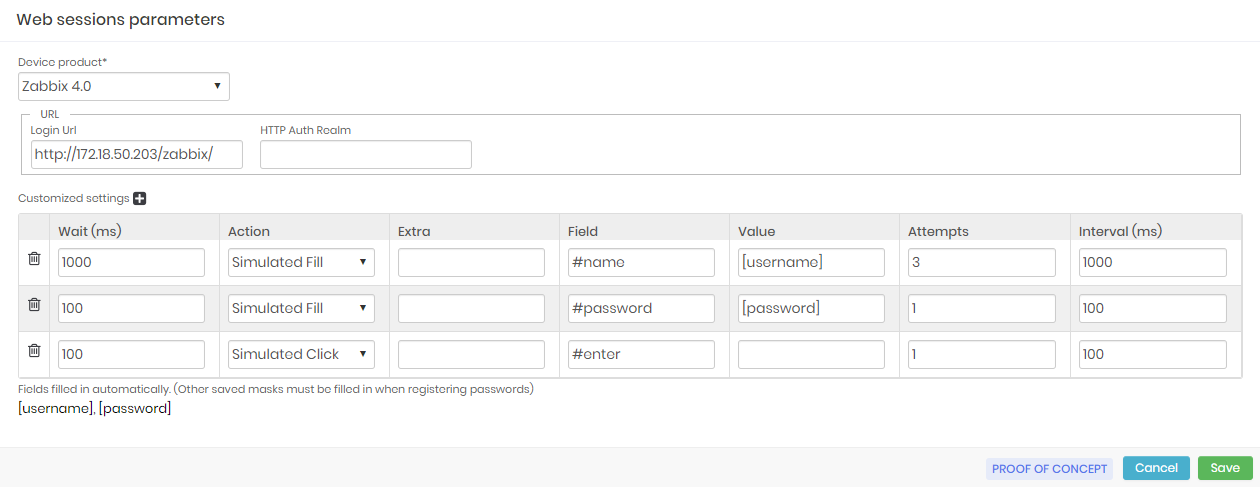
In the Login URL field, provide the website login URL. If the website uses HTTP authentication, provide it's password in the HTTP Auth Realm field.
In the grid below, we'll configure each authentication step. The actions are composed of the following fields:
Wait (ms): Wait time in milliseconds before acting. The first action must have this time adjusted to the rendering time of the page;
Action: This is the type of action that will be performed simulating a user who is authenticating to the Website. Some of these actions have additional properties. See our official documentation for more information;
Extra: These are the additional settings for some actions. We will not explain this field right now;
Field: Is the jQuery selector3 used to identify the target field of the action;
Value: This is the value that will be used to fill the field. The values can be fixed by simply typing their value; You can fill in using tags such as
[username]and[password]; The custom tags defined in the Additional settings tab of the credential registration, in the Extra field grid, can be used here;Attempts: Number of times automation should attempt the action if it fails. The reasons for the failure often vary between a wrong selector, an inappropriate action, or even not having had time to render the page for automation find the desired field;
Interval (ms): This is how long automation must wait until it retries the action. Interestingly, that the first action has an adequate number of attempts and interval time;
The other automation steps can rely on smaller values for the Wait , Attempts and Interval field, as they will usually already be available if the first field has already been found.
For authentications that include later steps, fit the wait time of the initial actions of each step as if they were the first.
If you need to authenticate a Captcha, indicate the selector of the element that hosts the main component. Only this component will be presented to the user for him to finish the process. This isolation prevents the user from modifying any other value already populated.
Some more sophisticated captcha technologies need to present the entire authentication page because they do not allow manipulation of the component that hosts it. Therefore, terminate the automation at the time of the captcha. The session is already being recorded and if the user modifies authentication, you will have the video to prove it.
When you log in you will see the embedded browser access the website. Once the authentication page loads, you will be presented to a shield that prevents user interaction. This means that the authentication is still running.
In the end, if the automation is properly configured, the user will be released to use the website.
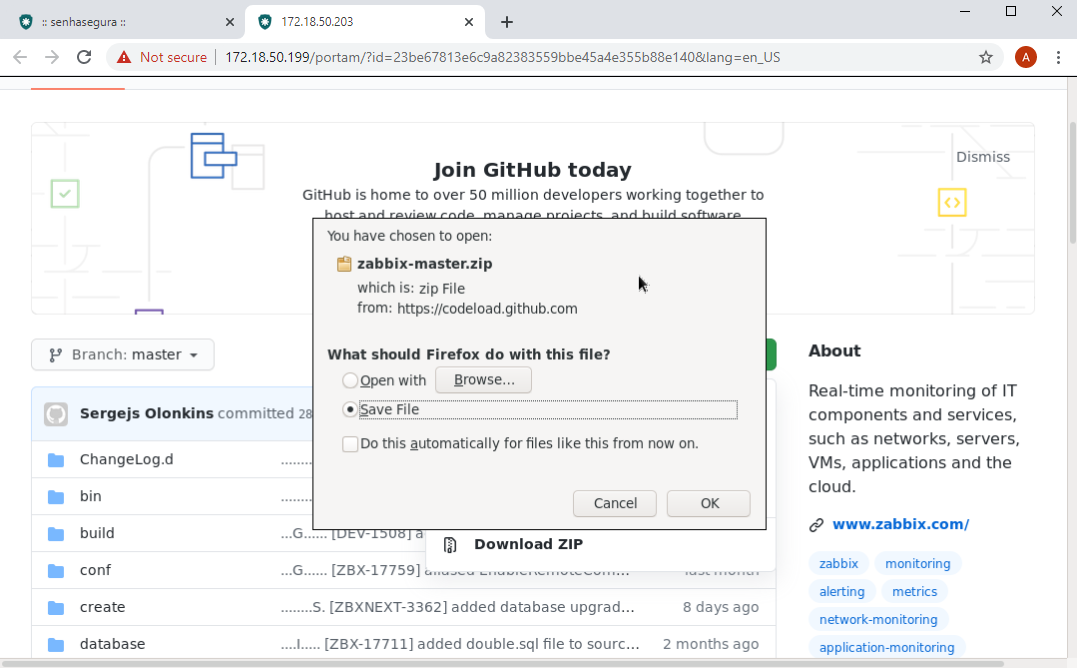
File transfer
Transferring files in HTTP Web sessions is similar to RDP Web sessions. You must drag the file into the tab that contains the session.
The file will then be transferred to a location visible only by your session. A confirmation message appears in the lower right corner.
On the website you are operating, if there is an upload field you can browse the home folder of your session. There will be all the files you uploaded.
For downloads the usability is even better. You will be asked if you want to download the file. Choose the Save file option and confirm.
At the end of the download, a message in the upper right corner flag that a new download has been made. This message is in the embedded browser.
In the lower right corner you will receive a message with a download link. This message is in your browser. That is, in the operator user's browser.
This download link will download the requested file from the target website.
These steps occur because you must first download the remote file to the area accessible by the embedded browser, and then download this area belonging to the HTTP Web session into your source workstation.
RDP RemoteApp
A RemoteApp in RDP connection is accomplished by leveraging the protocol's channels.
The connection is established and a channel is opened directly in the desired binary.
If the binary requires authentication, it can be accomplished through the binary arguments or by the automation macro.
The operator user will be isolated in the RemoteApp binary inside the RDP session. If the user minimizes the application window, it will not be possible to use other applications. Also, if the user closes the RemoteApp binary, the session is terminated.
For RemoteApp the Audited Command feature will not be available.
To configure RemoteApp it is necessary to configure the macro through the menu PAM ➔ Settings ➔ Access ➔ RemoteApp. In this report, you have access to all Macros and RemoteApps registered on the platform.
Note that the setting is populated with the location of the binary, and as arguments, the masks will be applied to the user, password and additional information.
Finally, configure the credential with the RemoteApp macro to use, and if necessary, provide the device access credential.
When you log in using senhasegura RDP Proxy , the application will be presented immediately.
2FA token access
According to the User Security Posture Rating, the use of 2FA so start a session may be mandatory or required more frequently
If 2FA access is configured, the token will be prompted when you log in to the senhasegura Web Proxy .

If you configure to request a 2FA token even when starting proxy sessions, you will be prompted again.
Access workflow and emergency access settings will also be applied if necessary.
Session sharing
During the session, the operator can invite other users or administrators to participate in the same session. This feature allows for collaboration between users, making it easier for two operators to perform actions at the same target device.
This feature are only available at senhasegura Web Proxy sessions. The local resources like mouse and keyboards should be switched between members. Only one user can interact with the target device by time.
To perform a session sharing:
The administrator will locate the target session at the Remote session report;
Click at the Session sharing action button;
In the Session sharing form, select which users will receive a dedicated session connected to the target session;
The selected users will receive an email with a link to connect into the shared session;
Using personal credentials
If the customer allows users to use their own credentials for authentication on remote devices. It is necessary that these devices, or users, are properly segregated with the permission to use a personal credential.
In these cases, when the user accesses the device, he will provide his user together with the name of the device managed by senhasegura . At this point, the proxy system will ask for the password for the personal credential.
The use of personal credentials does not prevent the use of Access Groups with workflow, 2FA tokens, emergency access, audited command, or any other mechanism available for proxy sessions.
It is recommended that for users and devices that use a personal credential, the indexing of typed texts should not be configured, in order not to infringe on the user's right to privacy. But if the user's personal password, or his personal data is displayed on screen due to the output of the target device, these texts can be indexed if configured. And they will be present in the video of the session.
The use of personal credentials is available only for senhasegura Terminal Proxy and senhasegura RDP Proxy.
Session logs and videos
Applying security policies and delivering optimized access to operators are important steps in the operation. But traceability, speed and decision-making based on operations data are the differentials that enhance the business.
All proxies technologies are recorded next to the raw protocol. All data sent by users, and data received by users, are recorded. This way, user inputs, clipboards area, file transfer, mouse movement, glyphs, metadata, and all other communication abstraction layers can be identified and recorded as is, if the native protocol supports its interaction.
Unlike other solutions on the market, senhasegura does not perform image-format screenshots, or real-time rendering of MP4 videos or other media formats. The real protocol persistence guarantees a true and optimized copy of the session. Downtimes are recorded using a timestamp of 4bytes per second, unlike screenshots that would consume far more resources. Recording in native protocol format already takes into consideration the protocol's native compression format.
We will now see how senhasegura helps auditors to evaluate sessions in a most effective and efficiently way leveraging all our session management capabilities.
Logs for a session
Through the PAM ➔ Access control ➔ Remote sessions menu you have access to proxy sessions. Both the sessions that are running and the sessions already finished.
In the ongoing session record actions you have access to the following operations:
Live Stream: Live tracking of the running session. This action is only available if the configuration applied to the session allows recording;
Drop session: Possibility to immediately interrupt the session;
Lock / Release interactivity: Blocks or releases user interactivity in the session. This block can be performed from within the Live Stream.
In the finished sessions you will have the following operations:
Session logs: Details of access and logged events. On this screen it is possible to perform an export in CSV of the details;
Video Session: Possibility to play the session by recording the protocol. This action is only available if the configuration applied to the session allows recording;
Possibility to export the video in MP4 format for an external audit;
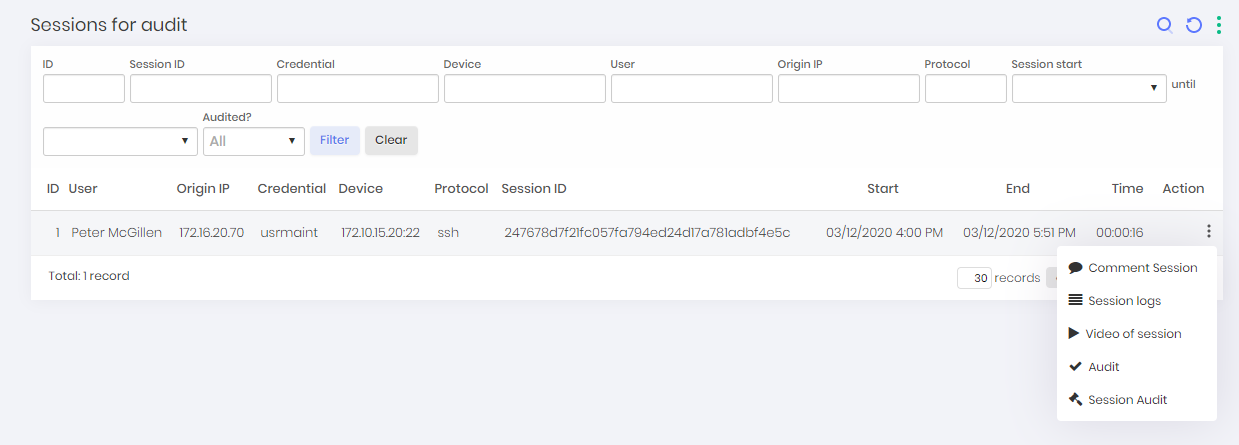
You can view a series of session information such as session user, source IP, Credential, protocol, session ID and session start and end.
For all records, regardless of state, you have the following operations:
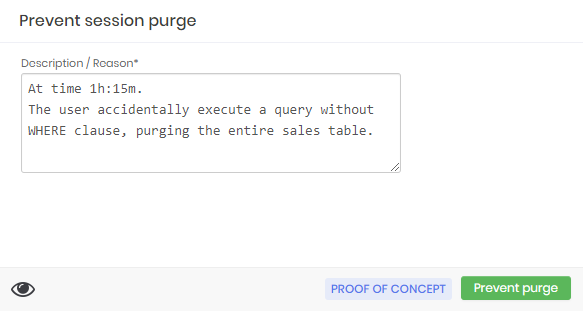
Prevent purge: Prohibit automatic session purge;
Configure session auditors: Forward an e-mail message to a platform user for them to audit the session. This session will be available in the Access control ➔ Sessions for audit menu. This feature will be better explained into section proxy-auditoria at page proxy-auditoria in this same manual.
Session Logs
To view remote session logs, from the list of remote sessions, click Session Logs. In this screen you can view a series of session information such as session user, source IP, Credential, protocol, session ID and session start, end and time.
Beside that is registered the users that had access the session's log and the ones that played the session's video, like the image access-0007.
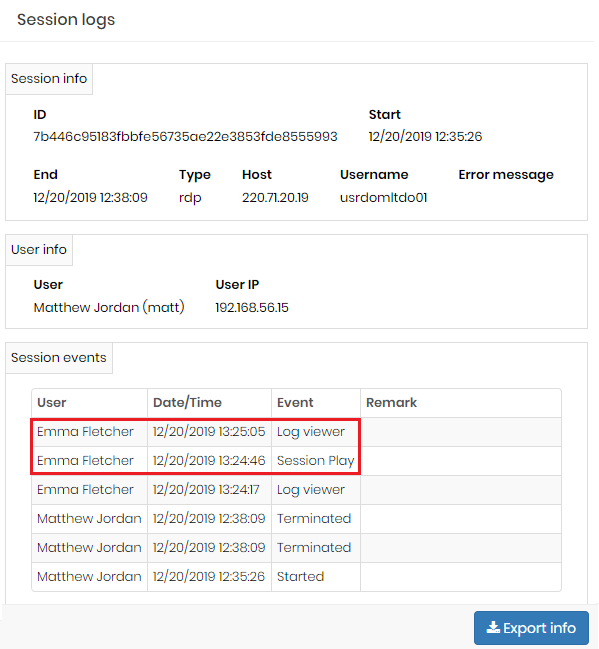
To export session logs, click Export Data.
Centralized indexed texts
All sessions that allow input and output text recording will be processed after the session ends. And then your texts can be queried in the Access control ➔ Session texts report.
In this report you can search for any term in the Information field to get a report of all sessions where this term was typed or presented to the user, regardless of protocol.
It is important to note that sometimes the text appears broken because based on the time it was exposed or because of system characters that might interrupt text.
RDP sessions running over senhasegura RDP Proxy are indexed using both OCR and native RDP Glyphs. Into the OCP step, senhasegura RDP Proxy render the entire screen to grant a better text capture using Google Tesseract. All texts printed into user session will be considered next to 90% of success.
Differents types of text can be scanned by natural protocol texts and OCR:
Windows names;
Fields names and values;
Terminal commands and output;
Desktop and windows icons names;
Open text contents;
Websites contents;
Application launch;
Blocked users
As we explain in the operation of proxies, a user can have their interactivity blocked and remain blocked until an administrator decides to release usage.
This lock prevents the user from starting new sessions regardless of credential, device, or proxy technology.
To list blocked users, and release them if necessary, go to the Access control ➔ Blocked users report.
Files transferred in session
If the installation has any file monitoring plugin, these files will be available in the Access control ➔ Transferred files report.
Access Workflow Requests
The details of how access workflow works have been explained earlier.
Requisitions are present in three different menus. If you are the requester, you will see your request in the Access control ➔ My requests report.
If you are an approver, you can view pending approvals in the Access control ➔ My approvals report.
To list all registered approvals, go to the Access control ➔ Requests report.
Dashboards
Through the Dashboard ➔ PAM ➔ Remote sessions menu, you will see the proxy technologies usage.
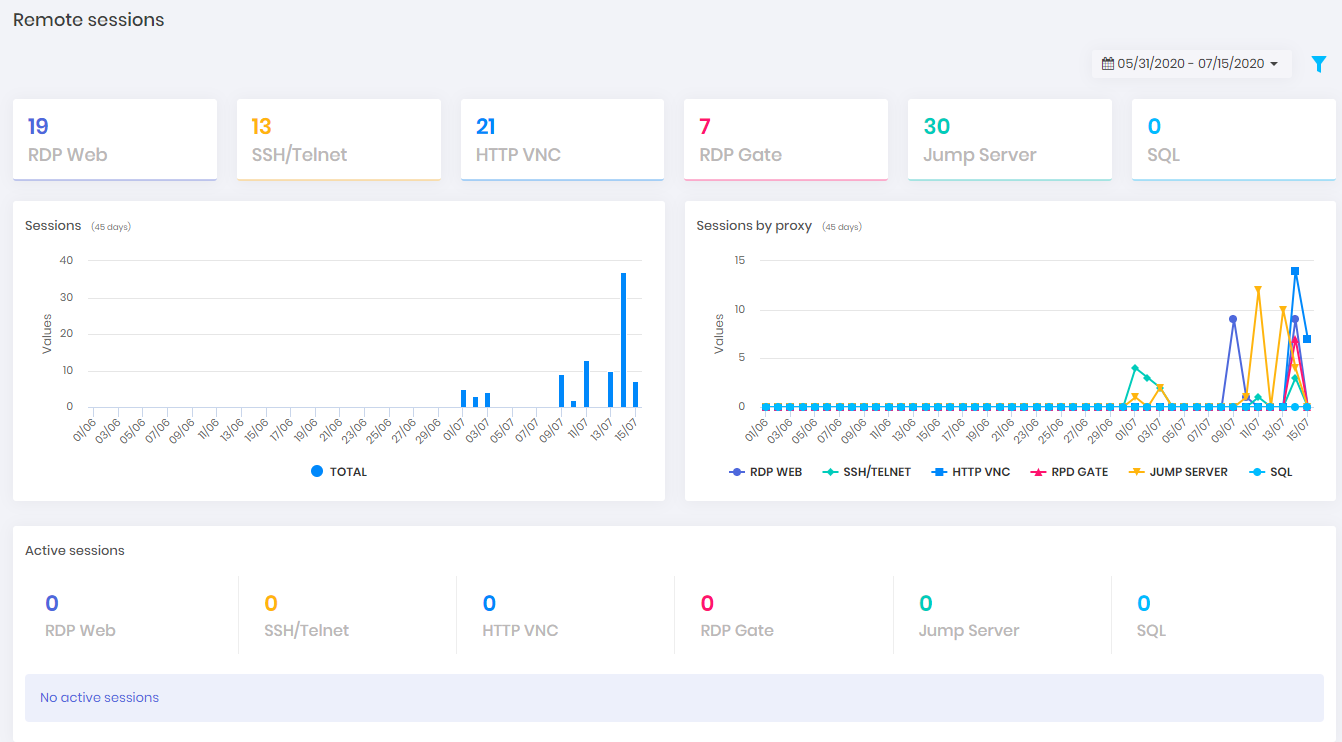
The Saved dashboard displays some numbers about how disk consumption is running, based on saved sessions. As well as how many session hours have already been audited.
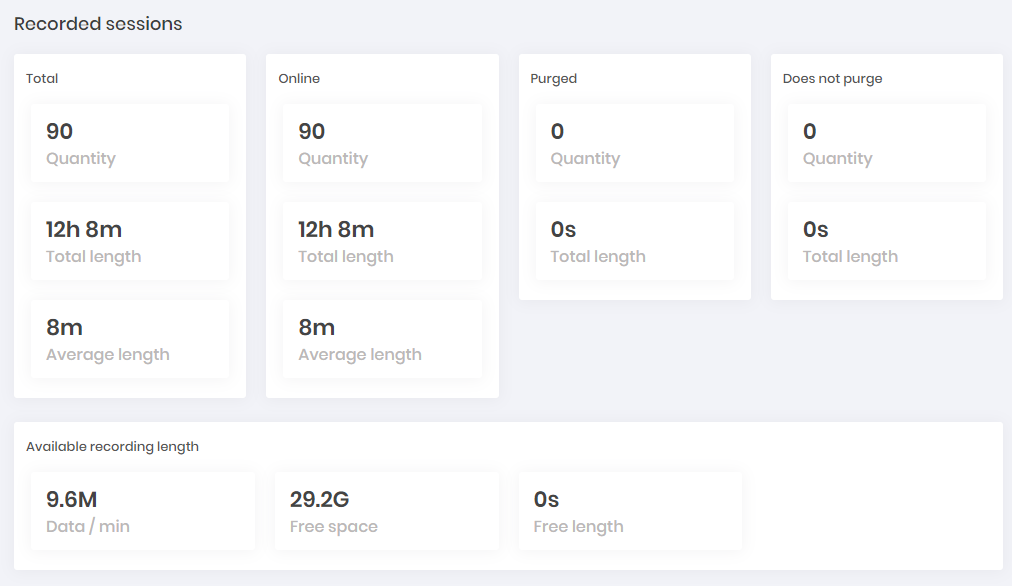
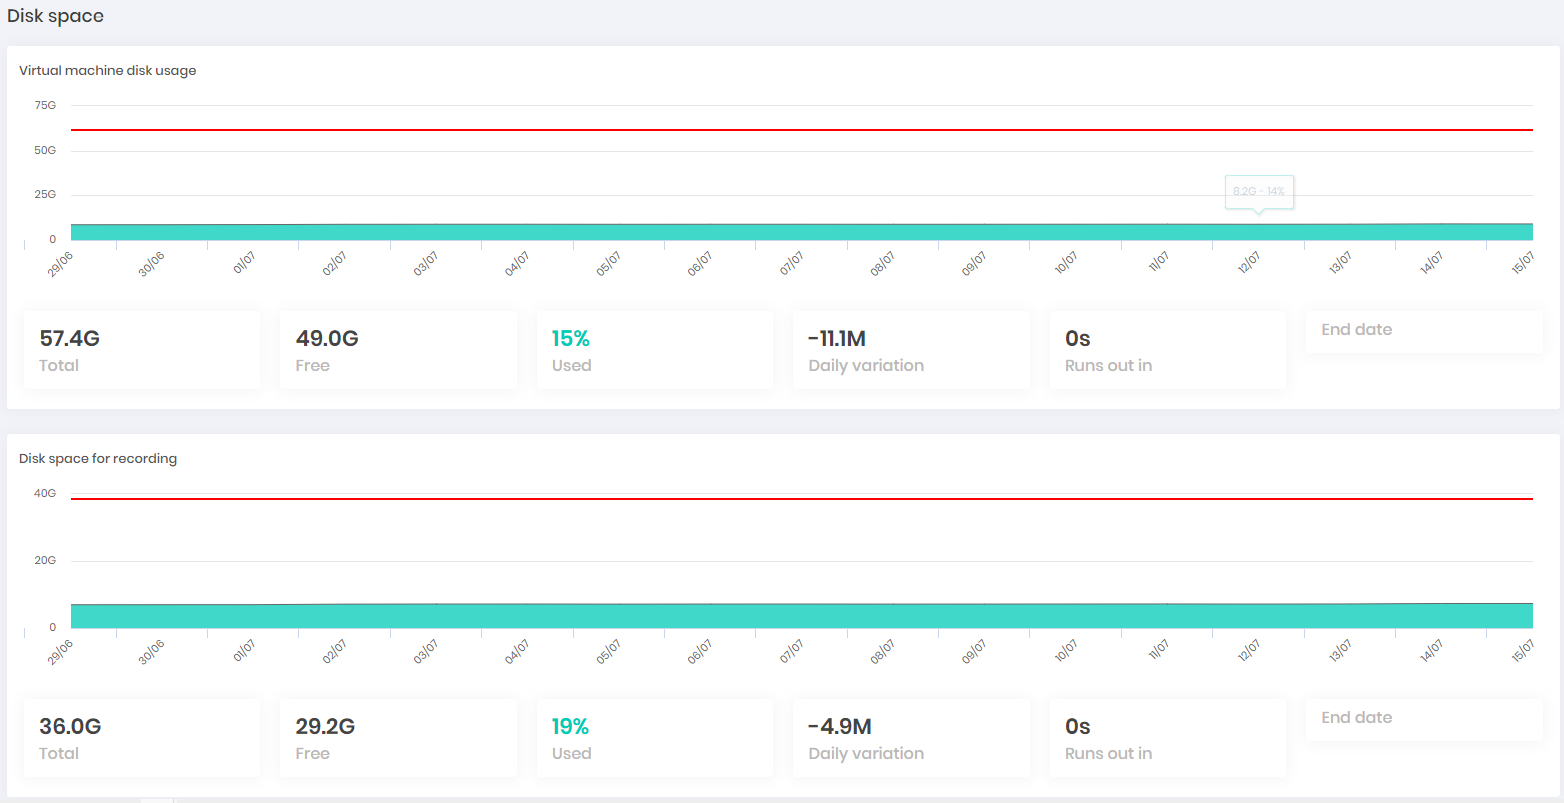
The Disk space dashboard displays disk consumption in a graphical view. These numbers can be monitored under SNMP.
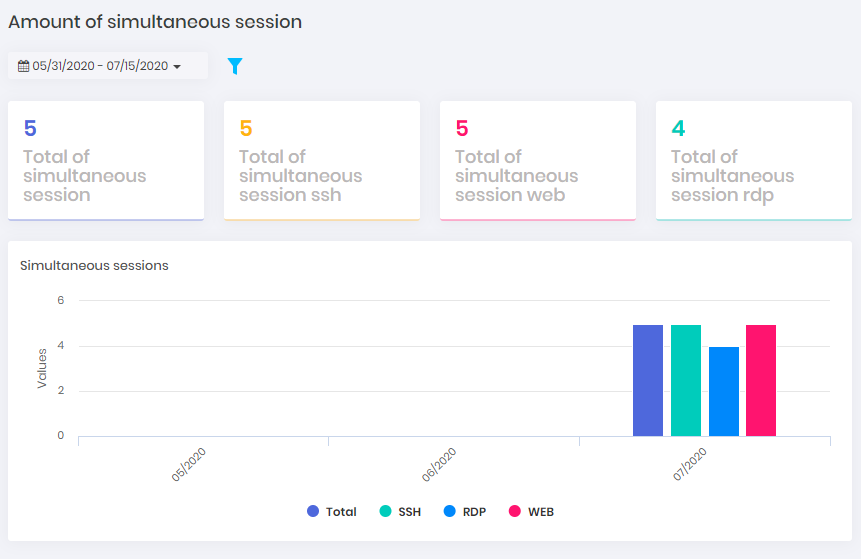
To obtain a concurrent resource consumption view, see the dashboards available at the System consumption menu. The dashboard below shows the simultaneous consumption of proxy sessions.
Audit request
The remote sessions listed at the PAM ➔ Access Control ➔ Remote Sessions menu, can be blocked for purge and redirected to auditors. In this case, the auditors' users receive access only for the proxy session where they are related. Can also play the session video and interact over comments about decisions make.
At the session report, click at Prevent purge action to open the reason form. This action will prevent the session to be purged;
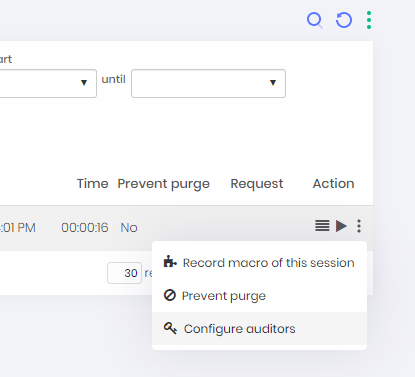
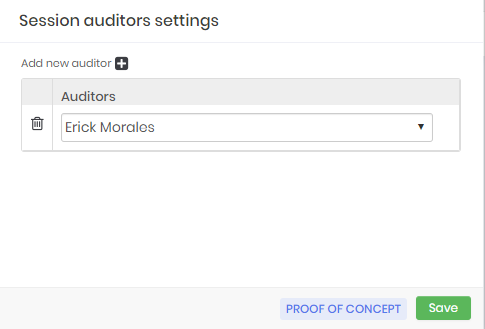
Session report actions Configure the auditors int the Configure auditors action. Those users will receive an email warning that new sessions are ready to be audited;
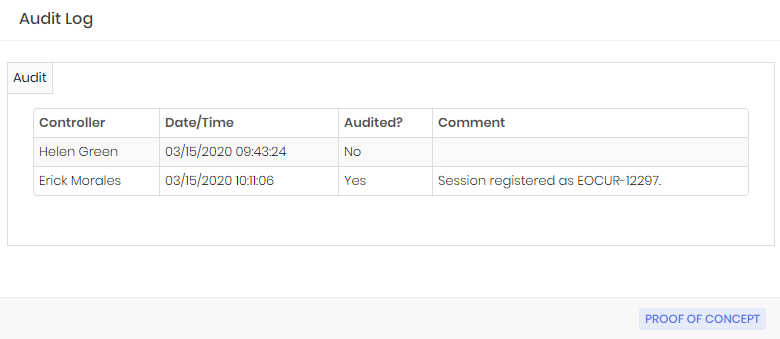
Auditors configuration As an auditor, over the menu PAM ➔ Access Control ➔ Session for Audit you have access to tall sessions under your responsibility;
Sessions to be audited report Using the Comment session action, you can add comments that will be related to the target session;
Audit reason record 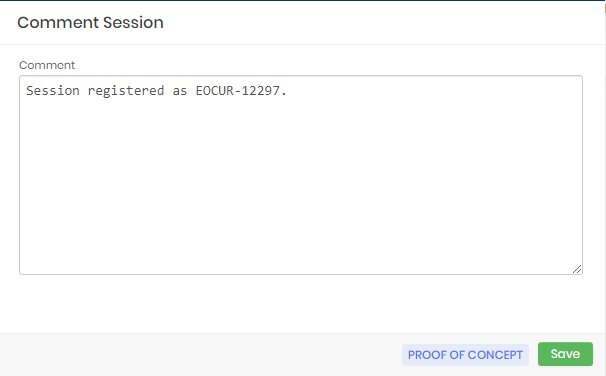
Auditor observation record Using the Session audit action, the auditor can take a decision about the target session;
Audit decision
Audited commands
The command filter functionality is not available for RDP Proxy for security reasons. To use it check our content about RDP command filtering for PowerShell and CMD in the senhasegura.go Manual.
In SSH sessions it is possible to identify user-typed commands that are to be executed on the target device.
These commands can be evaluated using regular expression patterns defined by the administrator himself, and if they fit the pattern, an action can be taken.
In this way you can create several types of settings that allow or inhibit the execution of certain commands. But it is necessary that the person configuring the commands have a good knowledge of regular expressions in order for the commands to be evaluated correctly.
Let's understand which type of actions a command can trigger, how sessions are affected by these actions, and what the difference of a session with and without audited commands is.
SSH sessions with and without audited commands
Sessions that do not have audited commands will start directly to the target device in the same way that the user connects to the device without using senhasegura . Hence, the terminal configured in the target user's account will be allocated to a session TTY, and all key combinations typed will be immediately forwarded to the target device.
When audited commands are configured we must be careful that the commands typed in the terminal are evaluated before allowing execution. This would be much more complex acting directly on the natural terminal of the remote device. And it would be much more intrusive if there was a need to install agents on all target devices.
In this scenario, senhasegura offers an intermediate terminal that runs internally on SSH proxy technologies. This intermediate terminal evaluates the command at run time and determines based on the active rules whether or not it can be routed to the remote device.
But if the client has started a binary on the target server, this binary will then be delivered to the user operator control. And in this case the audited commands are no longer evaluated. This allows there no conflict between terminal commands and texts and arguments used in other binaries.
Actions triggered by execution of audited commands
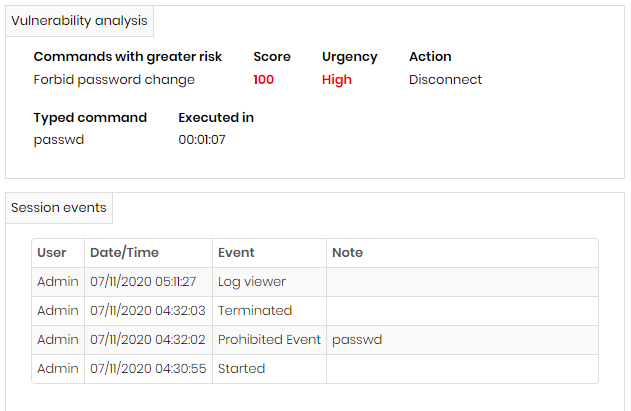
When an audited command rule is applicable to a command line that the operator user wants to execute, senhasegura will record the time of the proxy session when it happended, and sum the score of the risk of this executed command into the session. This notification will also be sent under SIEM.
Additionally, the rules defined by the administrator will be applied. There are four direct actions and one indirect action that can be performed.
Allow execution: Execution will be allowed;
Deny execution: The operator user will be prevented from executing the command. These commands are considered a deny-list;
Interrupt session: The operator user will be prevented from executing the command and will have the proxy session interrupted. These commands are considered a deny-list;
Force: The user will only be able to execute the commands allowed by these rules. These commands are considered a mandatory-list;
The rules will be summed up. This means that the administrator can record as many rules as he finds convenient. But when the session starts, senhasegura will initially validate the rules considered mandatory-list, later the deny-list rules, and finally the registration rules. If the command is applicable in one of the evaluated rules, the check chain is terminated.
The mandatory-list rules end up completely overlapping the others, since they will always apply.
Rules will always be evaluated within your groups. If there is more than one mandatory-list rule applicable to the session, both are evaluated. Therefore the command may not be allowed by a first rule, but can be valid by the second rule. The command would only be denied if no mandatory-list rule allows the command.
These deny-list and mandatory-list rules are the direct actions. There are also indirect actions that can be configured.
Lock senhasegura account: If the rule is applicable, regardless of type, the user's access account can be locked after a number of repetitions of the command;
User Behavior Score: The command can receive three types of scores that will feed the user, device, and credential behavioral statistics;
Registering new commands
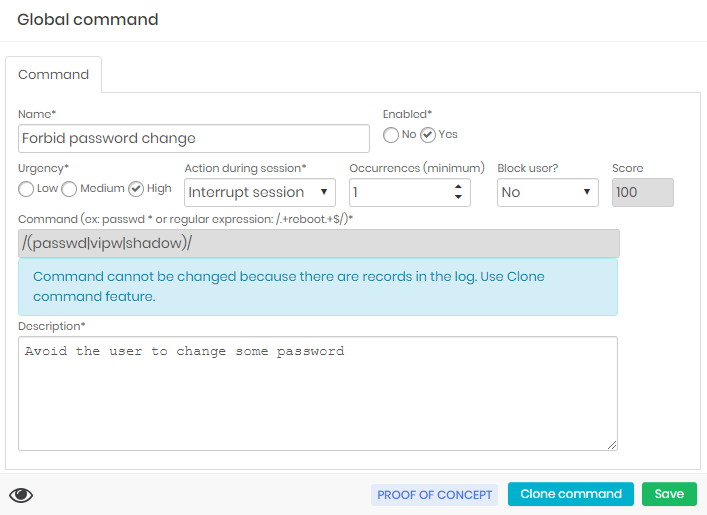
Through the PAM ➔ Settings ➔ Access ➔ Audited commands you have access to the report where all applicable commands are related.
Like other proxy session settings, audited commands allow segregations at the Global, Access Group, Device, and Credential level.
The difference is that there will be no overlap of a command based on the chain of segregating entities. It's a sum of rules.
See this segregation as a possibility to isolate commands pertaining to certain credentials and devices from a particular manufacturer.
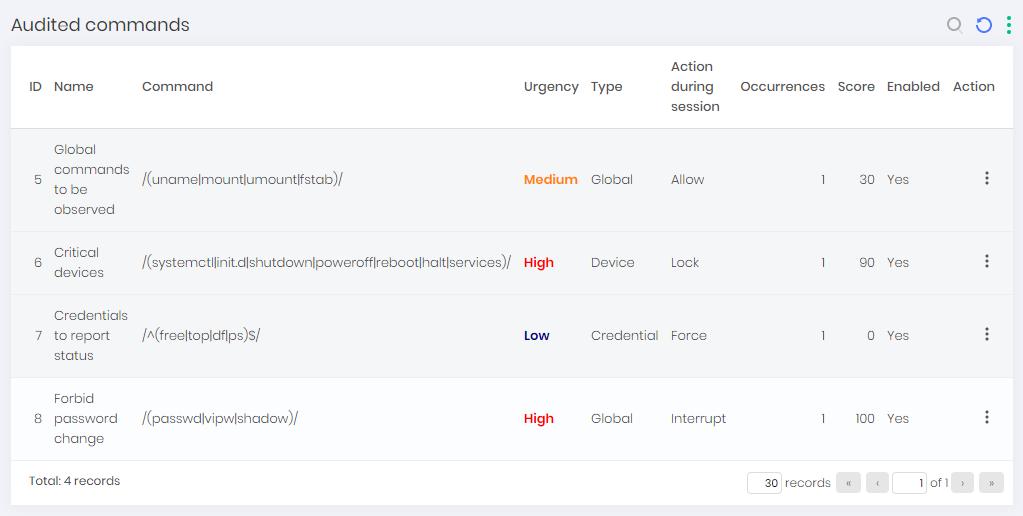
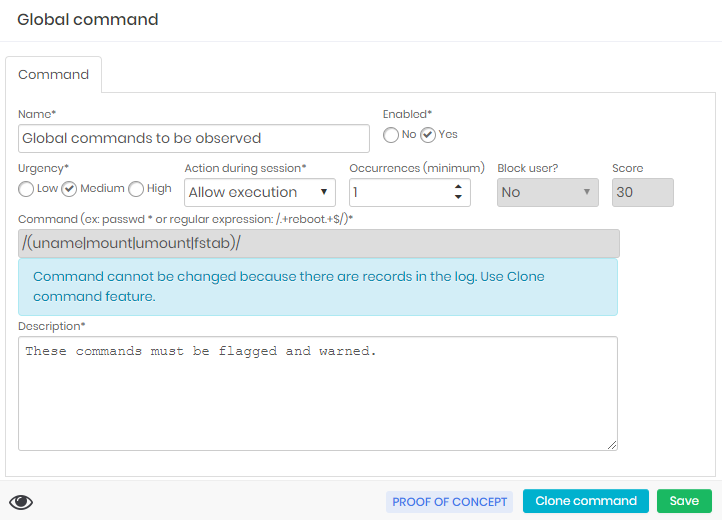
A command can be changed as long as it has not been linked to a proxy session. But it can be inactivated.
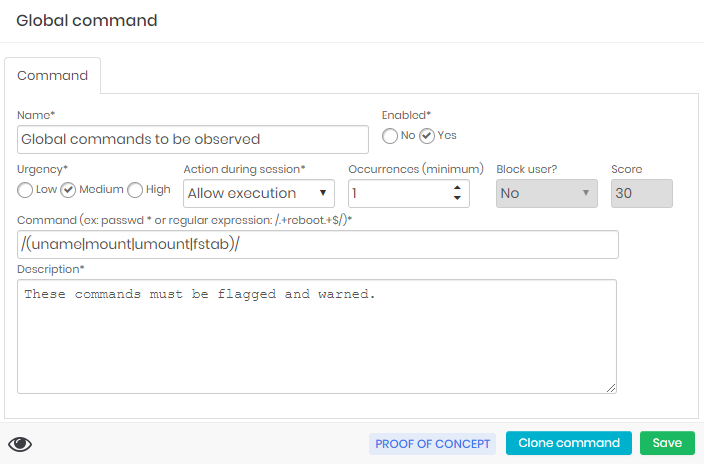
Within the editing form you have the Urgency and Score field to determine the score in User Behavior.
The Occurrences and Block user fields determine whether the user will have their senhasegura account blocked.
The Action during session field are the primary actions that will be taken.
The Command field is the regular expression that will be applied to the command that is to be executed.
If you need to create a command similar to a command that already exists, including entities that are already linked (such as device, credential, or access group), you use the Clone command footer action in the editing form of an existing command.
Let's now look at how a command reacts when it is framed to a rule.
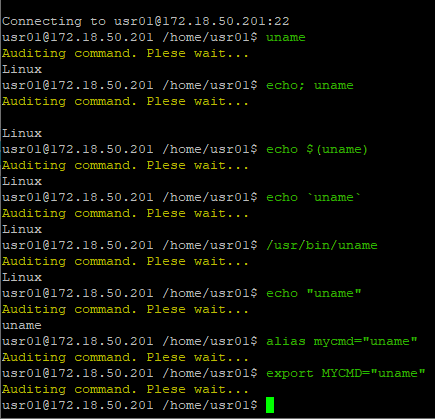
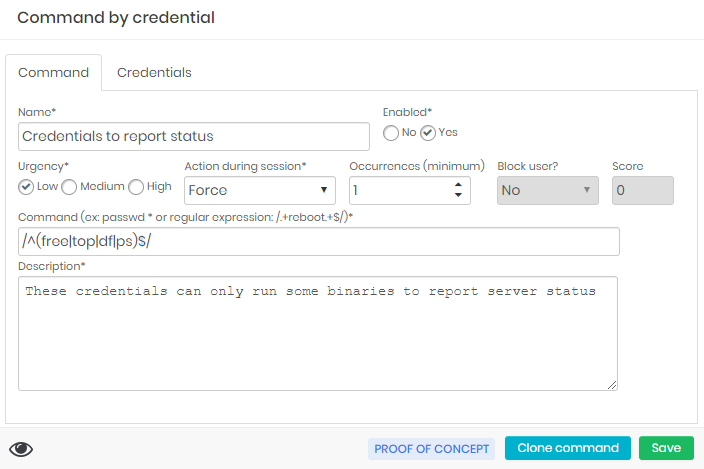
The Global command below allows you to execute commands that contain some mapped binaries.
Note that when executed, commands run normally. But first they will be registered in senhasegura .
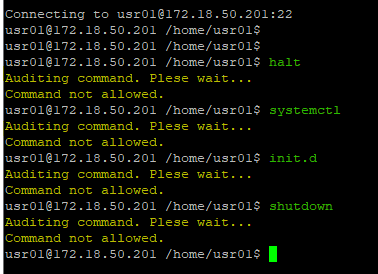
Now we will see a rule that denies executing commands. The rule below denies executing commands that interfere with services on some devices.
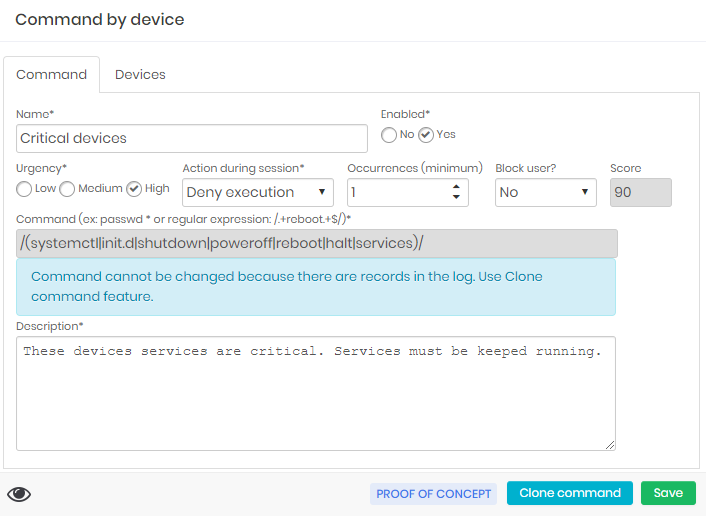
Note that when run on a related device, the command will stop and the attempt will be logged.
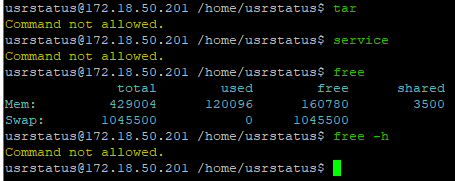
allowlist commands behave similarly but there is no notification if something outside the allowlist is blocked.
In cases of session interruption, there is an additional step for the compulsory session logout.

Logs and Command Executions
As soon as commands are matched to an audited command rule, both the session and the rule are now linked.
Through the audited commands report you can observe every time the rule has been applied through the View audit history record action.

Session logs also display the details of this run detailing which audited command is matched, its score applied, and the time of execution.
Session logs can be accessed in the PAM ➔ Access control ➔ Remote session report.
Audited commands and User behaviour
The User behavior module will link various information related to resource usage in senhasegura . But for the audited commands we have special screens that bring a view of how users are operating the systems.
This helps the administrator understand whether procedures need to be adjusted, whether users require training, and whether credentials and devices are at risk.
Through the Behavior ➔ Occurrences report you will have access to reports that deliver a view of which Devices, Credentials and Users are outside the scheduled usage curve.
You can get a graphical view of the risky command executions involved through the Threat radar Dashboard. Accessible at the Dashboard ➔ PAM ➔ Radar ➔ Threat radar Dashboard menu.
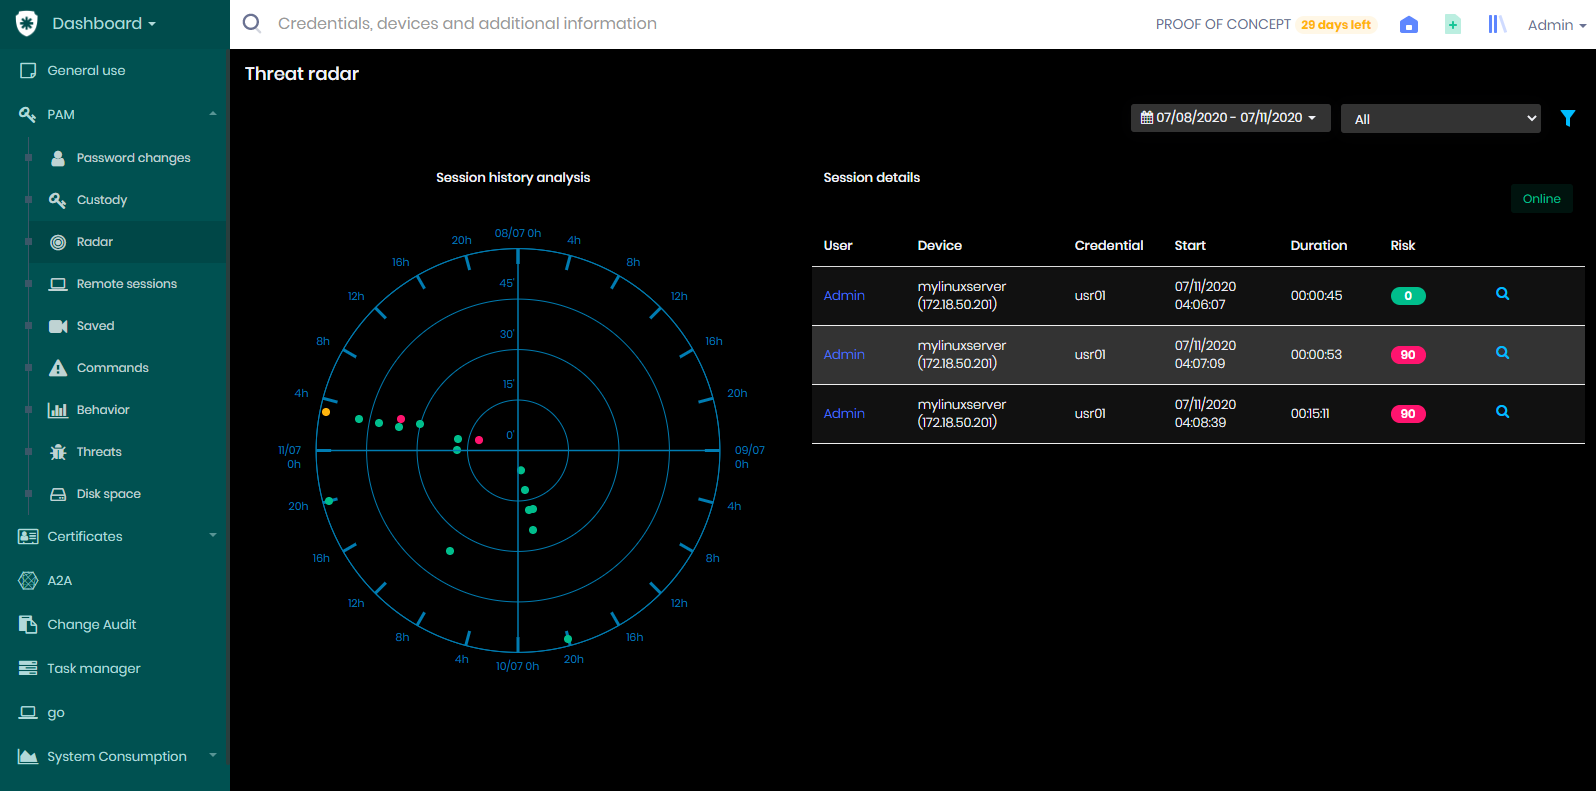
This radar displays the sessions running and that have some audited command registered. If you click the History button, located in the upper right corner of the dashboard, you have access to the execution history of the last four days. You can change the period through the top filter of the dashboard, but let's explain the radar.
The radar shows several colored dots. Hot colors present sessions that have had risk commands executed. And the cool colors have no risk commands.
By clicking the point, you have details of the sessions that occurred at that time. And when you click the session log action, it will display a card with the session details.
The axes of this radar always show the interval applied in the filter divided into four quadrants. The proximity of the epicenter, flag that the session occurred near the full hour, and the proximity of the peripheral area, flag that the session occurred in the last minutes of the hour.
The placement in the wind rose flag the date (or time) when the command occurred.
Note the example image that the commands were almost all executed in 11-day sessions between 0 and 4 hours.
Through the Dashboard ➔ PAM ➔ Commands menu, you have access to a dashboard dedicated to commands.
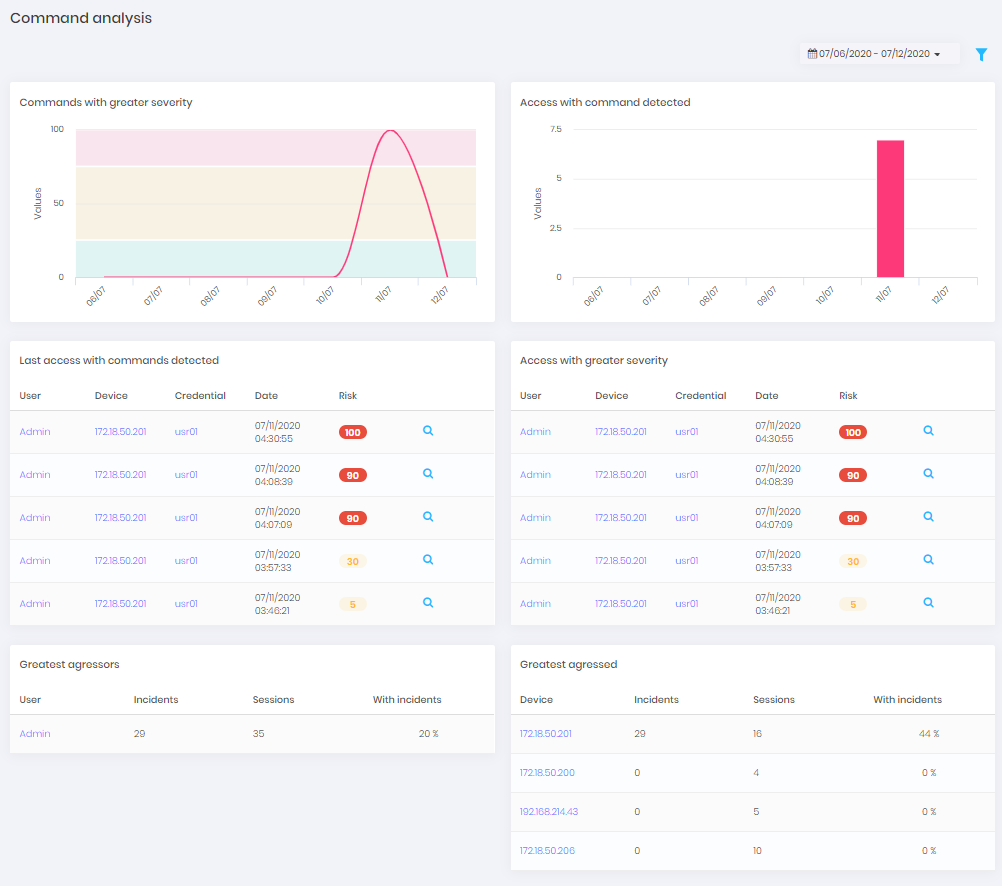
The commands will also be presented in a general ranking that allows you to map the most risky accesses and who are the most affected users and devices.
Download PDF of HTTPS session pages
After registering a session VNCHTTP it is possible to download in PDF a page print which is accessed through the browser.
To do so, go to the page you want to download and press the right mouse button and choose the option Save as PDF.
Then choose the location where the file should be saved and its name. A download conclusion banner will appear at the bottom of the screen.
You can open the PDF file through the shortcut link on the banner or by accessing the folder where it was determined to be saved.
Conclusion
By the end of this book you will have acquired knowledge to carry out the senhasegura proxies related activities.
If you wish to continue learning how to use the senhasegura in the best possible way, please ask our support team for our available documentation according to your profile and needs.