Citrix® Integration
Citrix Integration Settings
Introduction
The purpose of this document is to provide guidance for senhasegura administrators regarding senhasegura configuration for running applications published by Citrix Virtual Apps and Desktop, as well as details of its use, benefits, concepts and procedures.
To achieve the purpode of this manual, it is recommended that senhasegura administrators have technical knowledge of Citrix environments and applications.
Citrix Virtual Desktop and Apps solutions offer desktop virtualization solutions, enabling access to Windows devices and applications regardless of the user's device, allowing them to run from any workstation or operating system.
In this context, senhasegura allows from RemoteApp functionality to run using an RDP client of applications published in the Citrix Store using the senhasegura solution.
Citrix settings
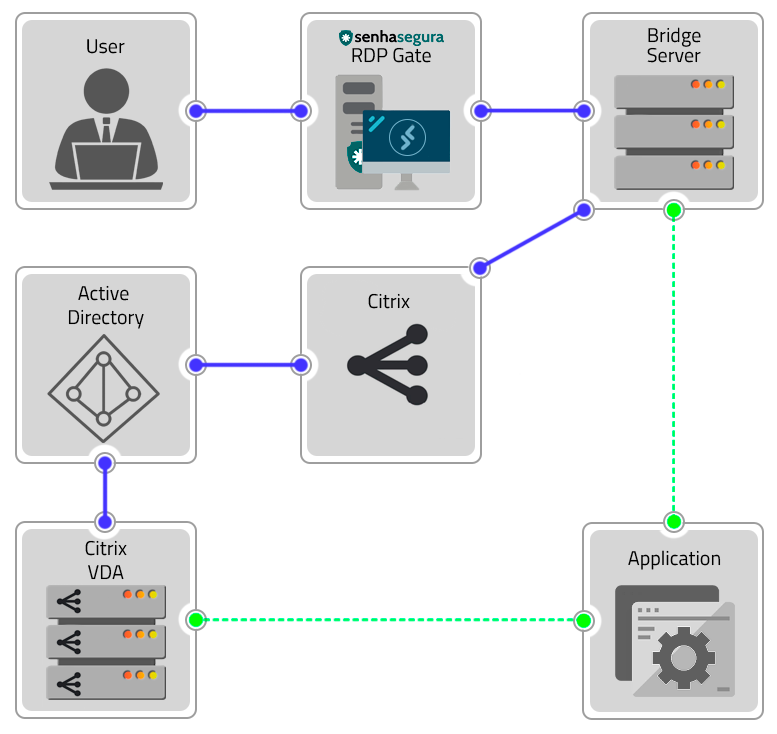
Citrix Virtual Apps and Desktops is an application virtualization solution, allowing universal access to virtual applications and server-based desktops from any device. Using senhasegura 's RemoteApp functionality and registering a bridge server, you can configure running applications published to Citrix Virtual Apps and Desktop using an RDP client. Setting up Citrix Virtual Apps and Desktops involves the following components to function:
User workstation
senhasegura server
Bridge server
Citrix Store
Active Directory
Citrix Virtual Delivery Agent

From their workstation, users will access through senhasegura the bridge server configured in the solution. This connection will be made via remote senhasegura RDP Proxy session. The bridge server will query the Citrix Store application catalog and authenticate the user configured from the server in Active Directory.
At this time, the application will be instantiated on Citrix Virtual Delivery Agent to be delivered to the bridge server, accessed by the user through senhasegura .
Assumptions
For configuring Citrix Virtual Apps and Desktop for senhasegura access, the following assumptions are true:
Customer has contracted SSA RemoteApp functionality in addition to Microsoft Remote Desktop Services
Client has Active Directory as directory service
The bridge server has a Debian distribution of the Linux Operating System
The credential for access to the bridge server is also registered in Active Directory
The application to run is published in Citrix Store
To use the file transfer feature, a fixed share folder must be created in the C:\senhasegura_share path of the user's workstation
User has an RDP client installed on the workstation, such as Microsoft Remote Desktop
Check which firewall releases the bridge server must have to connect to the Citrix Store
Activities
In this section, we will cover the following functions of setting up Citrix Virtual Apps and Desktops for senhasegura access:
Customer has contracted SSA RemoteApp functionality in addition to Microsoft Remote Desktop Services
Configure the RemoteApp macro for application execution
Run the application
Configuration and Operation
Configure senhasegura for application execution
To configure running the Citrix Store app using senhasegura :
Register the bridge server device in senhasegura
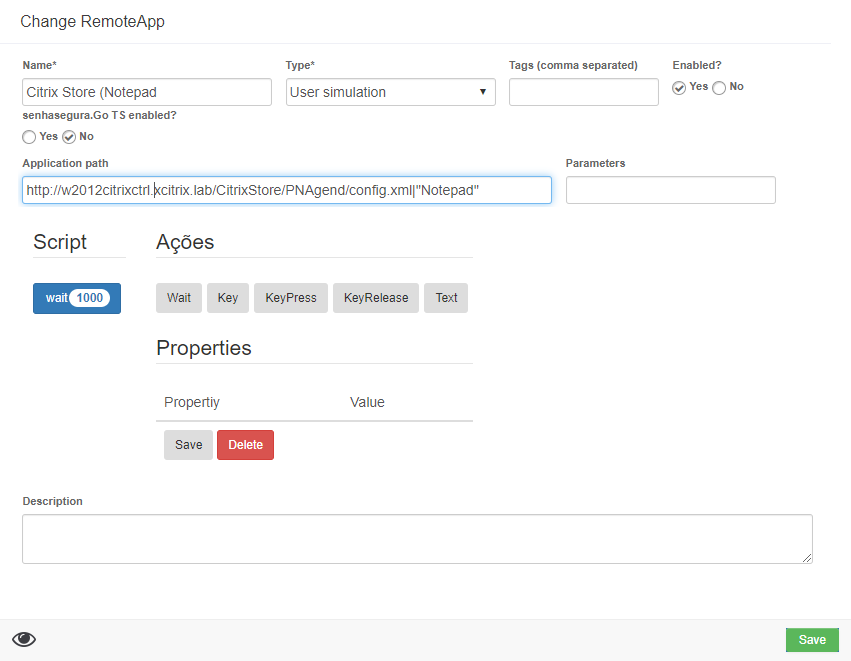
Register the application to run on senhasegura RemoteApp:

RemoteApp form Field Description Name RemoteApp Application Description Type Select the User Simulation option Tags (comma separated) Macro categorization tags Enabled? Indicates whether the command is active or not senhasegura.go TS Enabled? Select No Application path Citrix Store application executable URL and application nickname, in the format http://path
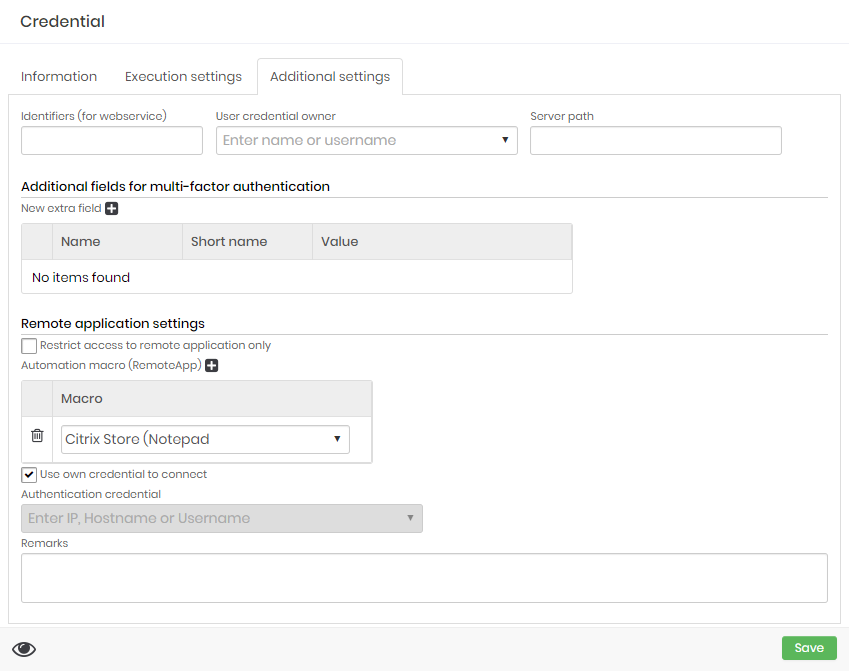
Register a credential associated with this bridge server in senhasegura , and associate it with the previously registered RemoteApp application:

RemoteApp form After this senhasegura configuration step, you will be able to perform the RDP connection to the bridge server for running the configured application.
Execute Application
To run the application published on Citrix Store through senhasegura :
Create the folder
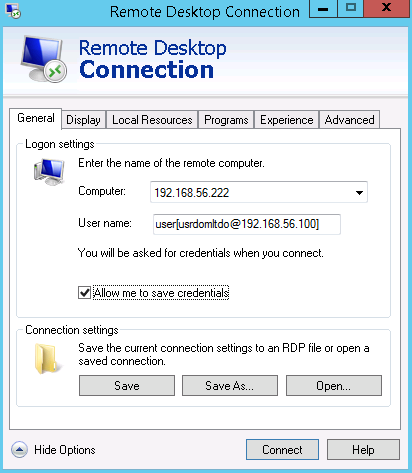
C:\senhasegura_shareon the user's workstationFrom the user's workstation, start the RDP client

Remote Access screen infoAfter completing the configuration steps, you can save the settings for later quick access by creating a shortcut on the desktop.
On the General tab of the connection screen, complete the following fields:
Field Description Computer senhasegura Server IP or URL User name Fill in the connection string in the format usr_vault[usr_cred@dev]
On the Local Resources tab, uncheck the option to use workstation printer resources
Click the More button to configure disk unit sharing. Select drive C: and click on OK
On the Programs tab, select the option Start the following program on connection and fill in the Program path and file name field with the same address as the RemoteApp configuration in senhasegura
Click on Connect
Aplication access In the Select an access option field, select the application configured to run and click on Access
The remote session will be started along with running the configured application.