Orbit Web Interface
The Orbit Web interface
Orbit Web is a senhasegura interface created to make it easier to perform the main senhasegura configurations. This feature allows you to activate the application, define backup locations and settings, change network settings, among other things, through a friendly interface.
In addition, Orbit Web is a great ally from the point of view of Information Security, by dispensing with the use of the system terminal to perform configurations, minimizing the risk of errors and vulnerabilities.
Symbols used in this cookbook
This book uses the following symbols to highlight information that should be taken into account for the best use of senhasegura :
Info - useful information that can make the use of the solution more dynamic
Caution - actions and items that cannot be ignored
commands: data that must be entered in the same way as described in this book- URLs : paths to access web pages.
<KEYS>: keyboard paths that will be used to perform actions.
The panel and its elements
The Orbit Web system presents a different interface from the other operational screens of the system. Its forms and reports, although containing slight design changes, follow the same operating principles.
At the bottom of the screens you will see the application and replication status indicators.


Application status
The instance of the senhasegura can distinguish between Enabled and Disabled. The status Active indicates that this instance can be accessed by users in all functionalities. When inactive, only administrator users can login, and will be limited to using only the Orbit Web interface.
The fact that the application is active does not mean that asynchronous services (nicknamed as robots) are active in this instance. However, every time the application is inactive, the asynchronous services are also inactive.
Replication Status
When in a cluster, the instance of the senhasegura may be either Enabled or Disabled as to its presence in the cluster. Also, the instance may be configured as a Secondary Cluster or Primary Cluster.
Primary Cluster
When the instance acts as a Primary instance, it means that it is in this instance where the main asynchronous services will be executed, such as backup and master key operation.
Secondary Cluster
It indicates that this instance will not execute the main asynchronous services. It can be used by users as long as the Application Status is Enabled.
Instance type
The type of instance determines the use for which it is intended. This distinction generates variations in the behavior of the use license.
Production
This type of instance stops working 7 days after the expiration of the use license. While active, all functionalities will be active according to the type of license applied, and emails and notifications will be triggered to the users.
Contingency
Similar to production, this type of instance will only be activated for use of users by decision of the administrator or through intelligent balancing mechanisms. In senhasegura versions prior to the 3.0.0 the contingency could not operate together with the production instance. This limitation no longer exists. However, users will be alerted by a banner on the login screen indicating that they are accessing a contingency instance.
Acceptance
This type of instance will cease to function immediately after the expiration of the license of use. But the recipient of the emails will always be replaced by the requesting user email to avoid confusion between productive environment and acceptance environment that put at risk the operation of the corporation.
POC
In this type of instance the expiration of the license immediately prevents the use of the web interface, proxy systems and asynchronous services. It is an instance used by potential customers, so its functionalities are similar to a production environment.
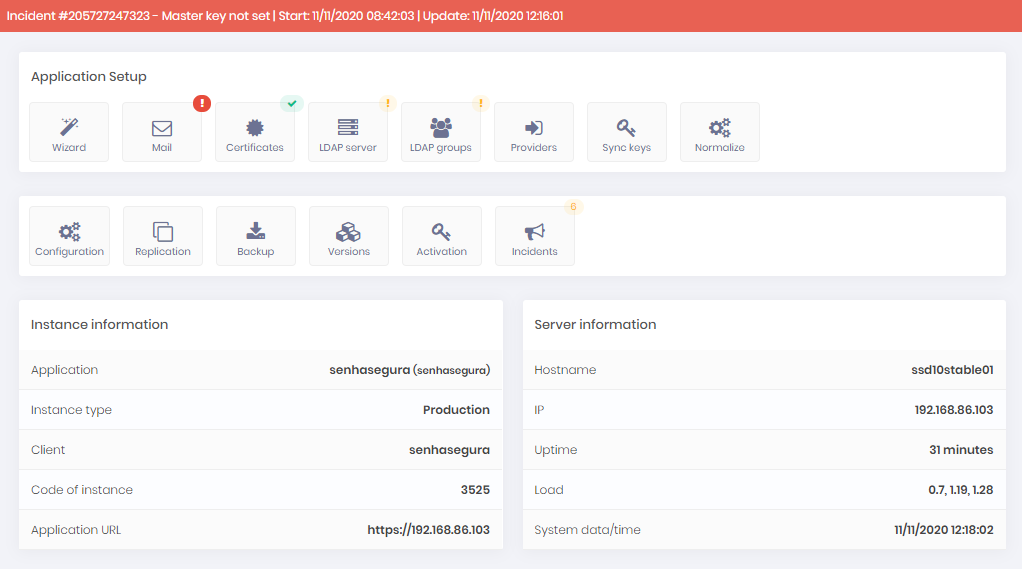
Main Panel
The Orbit menus follow the same pattern as the rest of the system. But some actions can be accessed quickly through the main panel.
In this panel you have access to a button bar that can display indicators of incidents and pendencies in their upper right corner. Pay attention to these indicators because the configuration pendencies can influence the functioning of the platform.
Some Instance information and Server information are arranged in frames in order to assist the process of identifying the instance.
A red top banner can be displayed every time an incident has occurred. Be aware of the incidents presented in this banner to prevent service and data indisposability from occurring.
Normalize
The normalize button is the only button that will not redirect to a specific screen that can be accessed from the menu. This button should be used if after an update the system shows the absence of important records as WebService A2A . In these cases, when activating normalization, the senhasegura will recreate the fixed system registers. It is not recommended to manipulate this control without the supervision of the Support team.
Using the Wizard
The Orbit Wizard is a three-step facilitator that establishes the central network and senhasegura environmental services.
All Orbit Wizard settings can be changed later through specific screens in the Orbit system itself.
In a new instance of senhasegura , right after activation through license, you will be presented with the first step of the Orbit Wizard. If for any reason you wish to review the Orbit Wizard procedures, a button on the main panel can be used to restart your steps.
First step
In this first step you can define: Hostname, Application URL, Application title, Default language, Timezone, NTP settings e DNS Settings.
When you change the Hostname, the server will be restarted.
When changing the NTP server, the NTP service will be restarted and users will be logged off.
When changing the DNS server, make sure that the senhasegura will have access to the other network elements already configured.
Second step
In the second step you can configure Backup. If you want the backup to be exported to a remote disk partition, you can configure it through CIFS, NFS or direct sending using RSYNC. The partition type is specified later in the section "Managing disks and partitions".
There is no need to install third-party software to manage the backup. And this attitude should be discouraged, as the platform is homologated with restricted third-party software.
If the client has a backup agent, we indicate that this agent is installed on the server that contains the remote folder that will receive the backup copy.
If the system loses access to the remote backup directory a notification via email and SIEM will be sent.
Third step
In this third and last step you can add the instance to an existing cluster.
The senhasegura cluster is restricted to the database. However, you can configure that the files generated by the instance are also replicated to other members.
If you have chosen to configure the cluster, the database service will be restarted.
The steps of this third step of the Wizard can be summarized as follows:
If you want to activate the cluster, select yes in enable high availability and/or Contingency environment
By default, the senhasegura will only replicate the database layer between the instances. If you also want to replicate the video files, select yes in enabling replication of session files
In the members of the section members of the High Availability or Contingency environment, indicate the IP of the cluster members.
cautionThe order of these members should be the same among all members
If cluster members are in different datacenters, select yes from the the members are in different datacenters field; Configure latency between clusters within field options Latency between nodes. Also, set the instance indicator in the Network segment field if you have more than one instance of senhasegura in the same datacenter.
Click Finish for Orbit to apply cluster settings
You will be directed to the replication status screen to check the results.
When you finish the third step, wait for the instance to normalize and you will be ready to activate the application and use all functionalities!
To activate the application, proceed with this document.
Controlling the application
The following actions are divided into several screens. In this document we will index the activities by context.
Instance status control
As said before, an instance can be either Enabled or Disabled. The status Enabled indicates that this instance can be accessed by users in all functionalities. When inactive, only administrator users can login, and will be limited to using only the Orbit Web interface.
The fact that the application is active does not mean that asynchronous services (nicknamed robots) are active in this instance. However, every time the application is disabled, the asynchronous services are also disabled.
To change its value, go to the menu Orbit ➔ Settings ➔ Application and change the control Enable application.
Besides the status of the instance, other important controls concerning the functioning of the instance can be seen on this screen:
Disable robots: This switch determines whether the instance will execute the asynchronous tasks or not. If it is on a cluster and is the Primary instance, all asynchronous tasks can be turned on or off with this switch. If it is not the Primary instance, it will be limited to only execute some asynchronous services.
Restart process every minute: Indicates whether asynchronous services should be restarted every minute during their idle period. This switch is only used in cases of troubleshooting. It is not recommended to manipulate this control without the supervision of the Support team.
Disable process log on database: It indicates whether the asynchronous service execution logs will be saved in the database or in the file system. By default, the logs are saved in the file system for a better database performance. It is not recommended to manipulate this control without the supervision of the Support team.
Enable cache: Indicates if the senhasegura should use the cache for the basic data of the application. By default the cache is not used to avoid problems in the post update process. It is not recommended to manipulate this control without the supervision of the Support team.
Clean all cache: This button will clear the caches generated by the senhasegura . Use after updates if cache is enabled in the control Enable cache.
General application data
Data such as application URL, title visible to the user, and email notification in case of incidents, can still be configured on the screen accessible by the menu Orbit ➔ Settings ➔ Application.
Application title: This title will be presented as page titles and can be customized by the client.
Application URL: It is the URL that will be used in the configuration of other services of the senhasegura for communication. For example, this URL will be provided to the senhasegura.go facilities so that they can locate the senhasegura server.
Notification e-mail: It is the list of emails that will receive the incident notifications issued by Orbit.
Database connection data
Through the Orbit ➔ Settings ➔ Database menu you can change the connection data of the application to the local database.
This action is discouraged. This screen is only used by the support team of senhasegura in cases of extremely critical calls. The misuse of this screen can cause the whole service to crash.
List of active licenses
Although license activation is the first task performed after the security passwords are deployed, it is necessary to access this screen again for a license renewal.
To have details of the license that was applied to the instance, go to the menu Orbit ➔ Application ➔ Licenses. In this screen you can see all applied licenses, their expiration date and which modules are active.
When the license is about to expire, an incident will be automatically created by Orbit and users configured to receive the notification will be alerted.
License activation
To install a new license, go to Orbit ➔ Application activation menu. Execute the procedure as described in the Getting Stated Cookbook, copying the request code and creating a new license in the senhasegura Affinity.
Listing installed versions
senhasegura is versioned as a complete package of solutions. However, in its modularized composition, several other components may present different versions. This versioning is an important information in troubleshooting.
Through the Orbit ➔ Application ➔ Application versions menu you have access to the senhasegura , Orbit and its module groups and individual modules. Still on this screen there is a button on the top right corner called Version file download. This download can be requested by the support team. The downloaded file must be forwarded to the support ticket created.
To list the versions of packages installed on the operating system it is necessary to login via SSH of the instance.
Updating the system
System updates can be viewed through the Orbit ➔ Application ➔ System Updates menu. In this screen you can see the version that is currently installed and the most modern version candidate for installation. Use the Check for Updates button to search from our official mirror which are the candidate versions.
Orbit itself will check for updates from time to time, but will not apply them. For security reasons, the senhasegura update can only be performed through the Orbit Command Lineon an SSH connection.
Proxy settings
Proxy systems have a dedicated menu section in order to centralize their controls and logs. Some systems can be presented in their old nomenclature. Let us now make a brief presentation to facilitate knowledge.
ssproxyweb: It is responsible for proxy access using the user's HTML5 browser.
ssproxycmd: Is responsible for proxy access to devices with SSH and Telnet connection through a secure client SSH connection to senhasegura .
ssproxyrdp: Is responsible for proxy access to RDP devices through a secure client RDP connection to senhasegura .
Through the menu Orbit ➔ Access Proxy ➔ Settings you have access tp the following configuration options:
Enable SUDO automation: Indicates if the functionality to automate sudo in Linux SSH sessions will be active for the systems senhasegura Web Proxy and senhasegura Terminal Proxy.
RDP Proxy: Encryption Level: Indicates what level of encryption will be accepted by clients trying to connect to the senhasegura RDP Proxy.
Proxy Versions and Services
Through the menu Orbit ➔ Proxy Access ➔ Proxy services you can check the version of installed proxy systems and their underlying software. Since senhasegura Web Proxy and senhasegura RDP Proxy depend on services running continuously, you can control the status of your services on this screen.
senhasegura Terminal Proxy do not depend on a dedicated service on the instance. Its execution is linked to the SSH server of the passwords itself.
Proxies logs
As mentioned, all proxy technologies make use of the wisdom. Your logs can be accessed through the menu Orbit ➔ Access Proxy ➔ API - Proxy requests.
In this same menu tree you will be able to access the access logs of the PEDM systems for Windows and Linux.
Managing the server
In this chapter you will learn how to check the server information. This information is not linked to the senhasegura features. Here we will talk about the settings that are common Linux operating systems.
Listing hardware information
Through the menu Orbit ➔ Server ➔ Information you can view the Uptime of the server, IP, CPU Load, Memory, details of the network interfaces, DNS configuration, firewall rules applied and configuration with NTP service status.
Managing disks and partitions
Through the menu Orbit ➔ Server ➔ Disks and partitions you can view the partitions that are mounted on the operating system senhasegura . The possible views are:
Disk use: Describes how the partitions use space.
inodes use: Presents how the partitions use inodes. A high use of inodes can lead to unavailability of services.
Partitions: Presents the relationship between virtual and physical partitions, their UUIDs and partition types.
Look at the mounted partition as /var. This partition receives the recorded session files and the backup files. Orbit will monitor growth and alert through incident when it is close to exhaustion.
On this screen you can also add remote partitions using CIFS and NFS protocols. Fill the authentication methods based on the desired protocol. Orbit will automatic mount the partition without restart the instance.
Remote Partition Passwords must not contain the characters \, & and ! in remote partition mapping
Disk resize
On this same screen is also possible to expand the free space of the physical disk in the virtual partitions. Orbit itself coordinate this resizing, without need for user intervention. But be careful! Take an instance snapshot before performing this procedure.
The primary hard disk where senhasegura is installed can be expanded up to 2TB. This size limit is based on the MBR partition scheme, choosed as default by senhasegura to ensure that old hypervisors can host the solution.
To expand the LVM patition to sizes over 2TB, you should add a new virtual hard disk and resize the partition using the Orbit interface.
To resize the primary hard disk or add a new hard disk, you should shutdown the instance. Into a cluster schema, keep every instances with the same hardware profile to avoid replication issues.
Adding an AWS S3 bucket for backup
This subsection aims to specify the installation of the AWS S3 client and the administration format for uploading the senhasegura backup files.
For general use, the aws configure command is the fastest way to configure the AWS CLI installation: aws configure.
Next enter the Access Key ID, Secret Access Key, and if necessary fill in the rest of the information.
Access keys consist of an access key ID and a secret access key, which are used to sign programmatic requests that you make to AWS. If you do not have access keys, you can create them in the AWS Management Console.
To start synchronizing data to the bucket, use the following command:
aws s3 sync /var/orbini/backup/senhasegura s3://mybucket/folder
Change the //mybucket/folder information according to the bucket configuration used.
Once this is done the bucket is configured and ready to receive the backup data from senhasegura .
To automate the backup process via bucket you need to create a file as follows:
vim /etc/cron.d/aws_sync
In this file enter the following information:
*/1 * * * * root /usr/local/bin/aws s3 sync /var/orbini/backup/senhasegura/ s3://mybucket/folder/ 2> /dev/null 1>/dev/null
*/10 * * * * root /usr/local/bin/aws s3 sync /var/senhasegura/arz/ s3://mybucket/folder/ 2> /dev/null 1>/dev/null
*/1 * * * * root /usr/local/bin/aws s3 sync /srv/cache/coba/ s3://mybucket/folder/ 2> /dev/null 1>/dev/null
If you do not want to backup videos, use the following parameters:
*/1 * * * * root /usr/local/bin/aws s3 sync /var/orbini/backup/senhasegura/ s3://mybucket/folder/ 2> /dev/null 1>/dev/null
*/1 * * * * root /usr/local/bin/aws s3 sync /srv/cache/coba/ s3://mybucket/folder/ 2> /dev/null 1>/dev/null
To apply the settings, save the file and run the following command to restart the service used for calling backups: service cron restart.
Basic System Services Control
Through the Orbit Web interface you can view and control the status of some server services. Through the Orbit Command Lineinterface you have access to all services, but for security reasons, through the Web interface your choices are limited.
Access the Orbit ➔ Server ➔ Services menu to view and control the CRON, Zabbix Agent, Open VMWare Tools, Database and SSH server services.
We do not recommend that the CRON, Database and SSH server services be shut down or restarted without necessity. Please contact our support if you need to perform this type of operation.
Changing the SSL Certificate of the application
Attention! The certificate exchange will restart the web server service.
The default senhasegura installation includes a self-signed 512-bit SSL certificate. It is highly recommended that you change this certificate for a valid market certificate.
Access the menu Orbit ➔ Server ➔ Certificates to access the screen where you can upload a new pair of certificate files and your key.
Being a valid certificate, it will be listed in the list of certificates installed in the application. To apply it, click on the Install button of the desired certificate. At that moment, Orbit will apply the certificate to the web server and restart the service.
The certificate must be of the type PEM. Being a file extension crt for the certificate and a file extension key for the key.
Certificates of the type DER or PKCS#12 (PFX and P12) must be converted.
Network Services
DNS
Although it is in the Orbit Wizard process, you can change DNS settings at any time. Just be aware that this action, although not restarting services in the instance, can put the senhasegura in a network situation that will prevent you from reaching devices that were previously accessible.
By accessing the menu Orbit ➔ Server ➔ Settings you have access to the DNS configuration fields, being able to inform up to three DNS server addresses, Domain information and Search information.
When changing, apply the changes with the Save button and wait for Orbit to perform the necessary operations.
NTP
The NTP server can also be changed even after executing the Orbit Wizard steps. By changing the NTP server you are changing the time zone of the entire system. Users may be logged off the platform.
By accessing the Orbit ➔ Server ➔ Settings menu you have access to the configuration fields Primary NTP server and Secondary NTP server.
Firewall information
By accessing the menu Orbit ➔ Server ➔ Information you will have access to all firewall rules applied in the senhasegura . These rules cannot be modified through the web interface. System updates will always normalize firewall rules by removing non-standard rules.
HIDS Block (Wazuh)
senhasegura has an embedded HIDS system using Wazuh1. This system prevents SSH connections with authentication failure from continuing to try to access the passwords. Every three failed attempts, the source IP will be blocked.
This blocking is not immediate. Wazuh must perform the logs analysis for decision making. Therefore, the user can be prevented from accessing at any time from the third fault. Once blocked, the IP will not be automatically released. It is necessary that the administrator releases the IP manually.
You can access the menu Orbit ➔ Server ➔ Security and locate the IP in the block list. Each blocked IP contains an action to Exclude the block. When confirming the action, Orbit will schedule the unblocking. This action may take a few minutes.
senhasegura account blocking through failed attempts in the web interface are not considered in Wazuh blocking. However, blocking also occurs after three attempts and with manual release by the administrator.
Server Tuning
When there is a change in the usage profile, or when there is a change in the hardware configuration, it is recommended that the load parameters of the web server and database be reconfigured so that the senhasegura always work in the best configuration of the hardware that is hosted and within the user's usage profile.
You can perform this maintenance in a practical way from the menu Orbit ➔ Server ➔ System tuning. On this screen you can choose between different system usage profiles, which will calculate the best configuration with the available hardware resources.
This calculation may show low or no value variation if the available hardware is not sufficient for a change in usage profile.
This action will reboot the systems and affect the senhasegura behavior. Be aware of downtime.
Configuring the monitoring
senhasegura allows the monitoring of the platform using reputable market tools.
Some notifications are sent by email or SMS to configured users. See our monitoring manual for more details. In this part of the Orbit documentation we will only describe the hardware, operating system and service monitoring that can be consulted through SNMP protocol and Zabbix2 agent. In addition to SYSLOG messages that can be forwarded to SIEM systems and notification emails triggered by Orbit.
We do not allow the installation of monitoring agents not approved by the senhasegura . Only the tools described in this document are approved for use.
Monitoring through Zabbix
The installed version of the Zabbix agent is 4.0. If you need to install a higher version, please contact our support team.
By default, the Zabbix Agent service will be inactive in the instance. To activate it, access the Orbit ➔ Server ➔ Services, locate the service Zabbix Agent and click on the action Start.
To configure the Zabbix Server that will receive the data, go to the menu Orbit ➔ Settings ➔ Application and fill the fields Server IP and Server Port with the data from the destination server. Fill the field Listen IP with the IP of the instance access interface, and keep Listen Port with the port 12700.
To set up an access using TLS, use the Orbit Command Lineso that the data Identity and Pre-shared key be presented.
Monitoring through SNMP
The instance has support for SNMPv2 and from version 3.8 there is support for SNMPv3 configured only by Orbit Command Line. See the Orbit Command Linemanual for more details.
The implemented MIBs and the returned OIDs can be consulted in the Monitoring Manual.
Through the Orbit Web interface, it is possible to configure the servers allowed to read and the community, through the menu Orbit ➔ Server ➔ Settings.
The SNMP service will be restarted with each change.
Monitoring through SYSLOG (SIEM)
The senhasegura is compatible with the most used SIEM tools in the market, and offers support for the transmission of messages in CEF, Syslog (RFC 5424) and Sensage formats. For more details on these formats, please consult our manual Orbit Command Line.
To configure access the menu Orbit ➔ Settings ➔ Application and fill the following fields:
Notification plugin: Used only in cases of paid customization projects. Keep this field at its default value. It is not recommended to manipulate this control without the supervision of the Support team.
Message sending protocol: Choose between TCP or UDP.
Servers for message sending: A list of IPv4 servers, separated by commas, that will receive the messages.
Orbit alerts and incidents
Some alerts are specific to modules and features of senhasegura . These alerts are monitored by Orbit and forwarded to certain users depending on their criticality. The complete list of notifications can be seen in the manual Orbit Command Line.
To configure the recipients to receive these alerts, go to the menu Orbit ➔ Settings ➔ Applications and add the emails in the field Notification e-mail. The pending solution incidents will be presented in the menu Orbit ➔ Application ➔ Incidents.
The emails will be sent whenever the incident is created or updated. Only the types and event LOG_EMERG, LOG_ALERT, LOG_CRIT and LOG_ERR will be notified.
Incidents of the type LOG_CRIT generate email sending to all users logged in at the moment and will also be echoed to users who are logged in SSH in the instance senhasegura . Users who are in proxy sessions through the senhasegura Web Proxy or senhasegura Terminal Proxy will not receive these echoed notifications.
Application activation
The activation key is required to use the application. The access to your application will be blocked in DAYS
Priority
LOG_ALERT
Resolution
Get in touch with our support team to renew your application license.
Mysql Service
Mysql service failed: MESSAGE
Priority
LOG_ALERT
Resolution
If you are running a senhasegura cluster environment, first at all assume the next node as Primary.
If you are running into a DR schema, enable the DR instance as primary.
After normalize the environment, isolate the problematic instance and start a database recovery mirroring the new primary instance.
DB Cluster
Database Cluster failed: MESSAGE
Priority
LOG_ALERT
Resolution
First at all assume the next node as Primary.
After normalize the environment, isolate the problematic instance and start a database recovery mirroring the new primary instance.
Cluster Replication Health
The node cannot apply write-sets as quickly as it receives them: AVG_VALUE
The node flow control was paused to a long time: FLOW_CONTROL_VALUE
Replication throttling or network throughput issues: AVG_QUEUE_VALUE
Priority
LOG_ERR
Resolution
Network latency should be configured. At the Orbit cluster configuration set that nodes are in different data centers.
Cluster Replication Issues
Node is not synced: STATUS
Priority
LOG_ERR
Resolution
Checkup if the node can reach the others cluster members and reconfigure the problematic node.
Database Primary key increase alert
Database Primary key increase alert: Table TABLE_NAME
Priority
LOG_ALERT
Resolution
Execute the Primary key maintenance procedure located at senhasegura PAM Solution .
Remote partition problem
Your remote partition has a problem! Please check your mounted partitions.
Priority
LOG_ALERT
Resolution
Check if the target device can be reached by the senhasegura instance.
Check if the credential used to authenticate is enabled and has the right permission to access the device.
Check if the target device support the configured protocol.
Inodes usage
Inodes block usage problem: DETAIL
Priority
LOG_ALERT
Resolution
Execute the INODE maintenance procedure located at senhasegura PAM Solution .
Disk Usage
Disk space usage problem: DETAILS
Priority
LOG_ALERT
Resolution
Attach a new virtual disk to the instance and execute the partition resizing described at section orbit-disk-resize of this manual.
Files Replication
Replication interval is too long! Last sync: TIME
Replication error! Pack: ID
Priority
LOG_ALERT
Resolution
Session files replication failure. Execute the rsync manually as described at Force files resync procedure at senhasegura PAM Solution .
Application version
Application version is different between nodes: DETAILS
Priority
LOG_ALERT
Resolution
Execute orbit upgrade into all instances.
System restart required
One or more processes require a full reboot.
Priority
LOG_ALERT
Resolution
Execute the system reboot. Into a cluster environment you should reboot one instance by time given the right time to the cluster identify every cluster leave and entrance.
Master key not set
Master key not set. It is not possible to create a backup of your credentials.
Priority
LOG_ALERT
Resolution
Perform the Master Key ceremony as described at the Master Key Manual.
Master key guardian inactive
Master key guardian inactive. You have inactive guardians in the system, redo the master key process.
Priority
LOG_ALERT
Resolution
Check if the guardian made wrong its login and disabled its user. If it is not the case, redo the master key process.
Proxy Service alert
Proxy Service not running: DETAILS
Priority
LOG_ALERT
Resolution
Restart the service using orbit service command. If the problem continue, restart the instance.
Default E-mail Account
E-mail Account is not set up
Priority
LOG_ERR
Resolution
Register an SMTP account.
System without initial key settings
System without initial key settings. Run the system setup wizard to resolve this issue.
Priority
LOG_ALERT
Resolution
This error should appears only into not configured instances. Execute the deployment steps to solve the incident.
System key is missing or corrupted
System key is missing or corrupted. Contact system administrator immediately.
Priority
LOG_ALERT
Resolution
The system key, generated into deployment stage, is not found. It can occurs when an really old backup is restored with an updated senhasegura software. Call our support team.
Default password not changed
The system default user account password must be changed. Use the command 'orbit security password' to change it.
Priority
LOG_ALERT
Resolution
Execute orbit security password to change the default password.
Server configuration tuning not applied
The server configuration tuning is different from the minimum required.
Priority
LOG_WARNING
Resolution
Check if the hypervisor changed the virtual machine hardware profile. After given the right hardware configuration to to the instance, perform the tuning again.
Disk expansion process is recommended
The size of your data partition is dangerously small. Please expand your disk capacity or add a new disk.
The size of your audit log partition is dangerously small. Please expand your disk capacity or add a new disk.
Priority
LOG_WARNING
Resolution
Attach a new virtual disk to the instance and execute the partition resizing described at section orbit-disk-resize of this manual.
Orbit Notify
Error to sent e-mail alerts: DETAILS
Priority
LOG_WARNING
Resolution
Check if the configured SMTP account has the right network, security and authentication configuration.
Application backup error
Remote Server SERVER: DETAILS
Priority
LOG_ALERT
Resolution
Check if the target device can be reached by the senhasegura instance.
Check if the credential used to authenticate is enabled and has the right permission to access the device.
Logs
As already noted, the Orbit Web schedules several asynchronous operations of settings that will be applied on the instance server. These operations generate execution logs (not detail logs) that can be followed in the following reports.
Application: All senhasegura application layer logs, including user operations and Orbit operations. Alerts also will appears into this logs;
API: WebService A2A requests. No sensitive data will be displayed;
Operations: Accessed by the Orbit ➔ Logs ➔ Operations menu, you will be able to see all Orbit operations that have been requested, date/time and request:
Hostname, NTP, DNS, SNMP and Gateway settings definitions;
Zabbix and Syslog definitions;
Backup, remote partition and Cluster definitions;
Task execution: Accessed by the Orbit ➔ Logs ➔ Task execution menu, you can follow the execution of these operations. That is, the moment of change of state of the operation from time to time;
Replication: Cluster node status and logs;
Backup: Backup definition and execute logs;
Database: MariaDB operationa and error log;
Web server: NGINX access and error log;
In this same menu you will have access to other service logs of the operating system. Use only for diagnosis.
Configuring and using Backup
The senhasegura backup files are encrypted using AES-256 encryption. To perform this procedure, you should be in contact with the senhasegura support team.
The senhasegura solution offers, in all its versions, support for system backup and password backup features. The objective of this function is to transfer a faithful copy of system settings and data to a backup server.
All backups performed by the senhasegura are stored in the client's backup solution. Thus, no data is stored in the solution's databases.
Using the solution senhasegura in production without performing the proper backup configuration may make system recovery impossible and cause loss of critical data in case of hardware failure or file system corruption.
The purpose of the backup resource is to allow the rescue of data information, application and system settings in case of data loss or unavailability of virtual or physical resources.
Generally, the backup is used to ensure the history of data in accordance with the company's backup policy, and to solve only the problem of recovery of historical information, not the availability of the solution.
senhasegura offers two types of backup:
Backup of secrets (Break the glass): guarantees that the privileged data registered in the passwords are available in encrypted format. The data can be stored in an external environment to the instance and protected by a master password for consultation in case of emergency. The backup of passwords is not used for system restoration, but for the client to have access to the credentials passwords even in case of total unavailability of the senhasegura solution.
System Backup: ensures that system information such as data, senhasegura settings or the environment where it is running, programs, applications and access records can be copied periodically to a client's backup repository following the client's security policies. This type of backup has a long reconstruction time and requires maneuvering space for its reconstitution.
Video Backup of proxy sessions: ensures that the video recordings of proxy sessions performed through senhasegura are available in encrypted format.
From version 3.10 Users and the Access Keys of the DevSecOps module are included in the password backup. The backup of the secrets (Console Credential and Access Keys) are performed in a dedicated directory.
Prerequisites for configuration
In order for the backup to be properly performed, and thus avoid compromising the client's data, the administrator must perform the following activities:
Having a remote unit available and accessible by senhasegura
The remote drive must be mounted on the file system of the Primary instance
Activate Orbit's backup system
Checking the senhasegura licenses
Passwords must not contain the characters \, & and ! in remote partition mapping
The purpose of system backup is to ensure the recovery of the environment and settings, as well as historical data. Data recovery occurs whenever information loss or failure is detected without possibility of correction by the system.
The backup routines are executed daily, at a predetermined time (5AM), and the data stored in the client's backup directory.
The following information must be provided:
Data for recovery
Configuration files (RECOMMENDED)
Database (RECOMMENDED)
Session logs (RECOMMENDED)
Videos (OPTIONAL, due to the great demand of storage volume)
Periodicity: Daily
Destination path and connection format: remote partition (CIFS, NFS) or remote server (RSync)
User and access passwords
E-mail alert for failure cases
Events of unavailability of backup infrastructure should be treated as high criticality. These incidents should be resolved as soon as possible in order to avoid unavailability of password data.
The time period for storing the history depends on the client's backup management.
System backup configuration
To modify the senhasegura backup settings, access the Orbit menu and fill in the information:
I would like to enable backup application?: This option indicates if the application backup is active or inactive
I would like to also activate the backup session files?: This option indicates whether the backup of the session files will be active or inactive.These session files refer to the faithful video recordings of the performed proxy sessions.
I would like to mount a remote partition?: If this option is enabled, you can mount a remote partition for backup:
- How will the how to send the backup files?: This option indicates whether the backup files will be sent to a remote partition (via CIFS or NFS protocols) or to a remote server (via rsync protocol)
Click the Save button to finish the backup configuration.
This screen also has a shortcut button to add a remote partition, click the button if you wish and follow the instructions in the Managing disks and partitions section.
Restoring a backup
The senhasegura backup files are encrypted. To perform this procedure, you should be in contact with the senhasegura support team.
The backups executed are exported to the remote drive of the customer's choice. But a copy of the backup is kept inside the instance to speed up the restore process if necessary.
The senhasegura enginer will execute the backup file opening procedure (decrypt) to get the backup file ready to be restored.
Once the backup file is decrypted, the senhasegura engineer should use the orbit backup command line tool to restore the target version.
Warning. This procedure will restore all database data and schema to the desired past time. You should restore all other binaries if performed a system upgrade was between the current time and the selected backup file. The binary application files can be restored using the Debian APT tool.
Logs
You can observe the execution of the backup through the CRON schedule in the report Orbit ➔ Logs ➔ Backup.
High Availability (HA) and Disaster Recovery (DR)
The HA+DR concepts of senhasegura
High Availability, can be classified into two categories: High Availability of Hardware and High Availability of Application.
In High Availability Hardware, there is a heartbeat connection between the hardware components, assuring senhasegura turned to other hardware in case one of them suffers unavailability. This architecture was designed to minimize interruptions in senhasegura caused by hardware failures, providing continuity of services through high redundancy components.
Disaster recovery involves a set of policies and procedures that allow the recovery of the infrastructure in case of disaster, natural or man-made. It enables the redefinition of senhasegura resources in an alternative environment when it is not possible to recover the main environment in a reasonable period of time.
It is possible to implement the senhasegura architecture using:
PAM Crypto Appliances running into on-premises datacenters;
PAM Virtual Appliances running into on-premises datacenters;
PAM Virtual Appliances running into cloud providers;
Replication technologies
There is many replication layers into senhasegura architecture to grant that all data will be available into all senhasegura ' instances.
Native database replication
senhasegura uses MariDB Galera Cluster to grant database data replication, configured by default to support high latency networks;
File system replication using rsync
All instances will echo its files between all cluster members;
Kernel layer replication
When working with PAM Crypto Appliances, you also have a DRBD implemented;
Hot-Spare features and self-made Load balancer
senhasegura instances has monitoring and administrative URLs to monitor its status that can be used by load-balancers to automatically switch instances into a unavailability scenario.
You can use a proprietary load-balancer or acquire the senhasegura Load-balancer into your cluster scenario. See more at senhasegura Load-balancer manual.
Administrative URLs are explained better at section hotspare section of this manual.
Active-Passive
You can implement the Active-Passive schema using:
Two PAM Virtual Appliances: Failover is done manually with synchronous automatic synchronization. In case of failure, the contingency environment will enter read-only mode, waiting for the manual failover to be done by the user or load-balancer rules;
Two PAM Crypto Appliances: Devices have a heartbeat connection for fault detection and their own synchronization cables. Thus, when it is necessary for one device to assume the role of the other, the process is automatic and occurs within a maximum of 120 seconds. If the cause of the PAM Crypto Appliance shutdown is a temporary failure, it will be reset automatically. In case of hardware failure, the return will be manual;
Hybrid Scenario with PAM Crypto Appliances and Virtual Appliances: Failover is done manually with synchronous automatic synchronization. In case of failure, the contingency environment will enter read-only mode, waiting for the manual failover to be done by the user or load-balancer rules;
Hybrid Scenario with on-premise and cloud instances: Failover is done manually with synchronous automatic synchronization. In case of failure, the contingency environment will enter read-only mode, waiting for the manual failover to be done by the user or load-balancer rules;
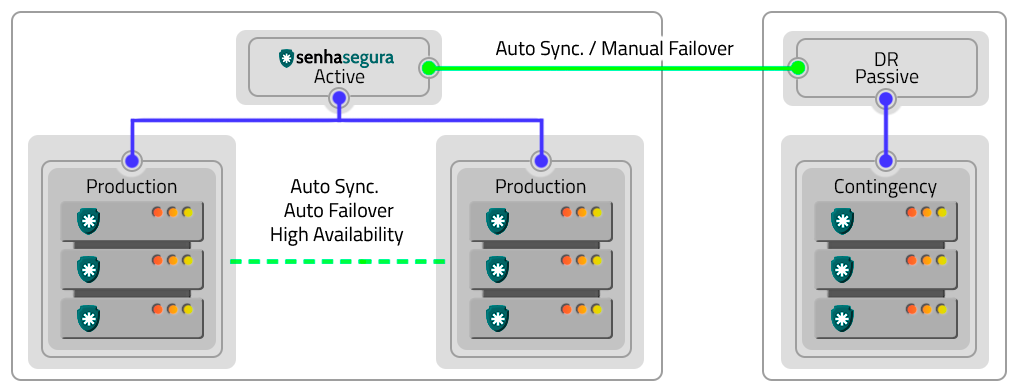
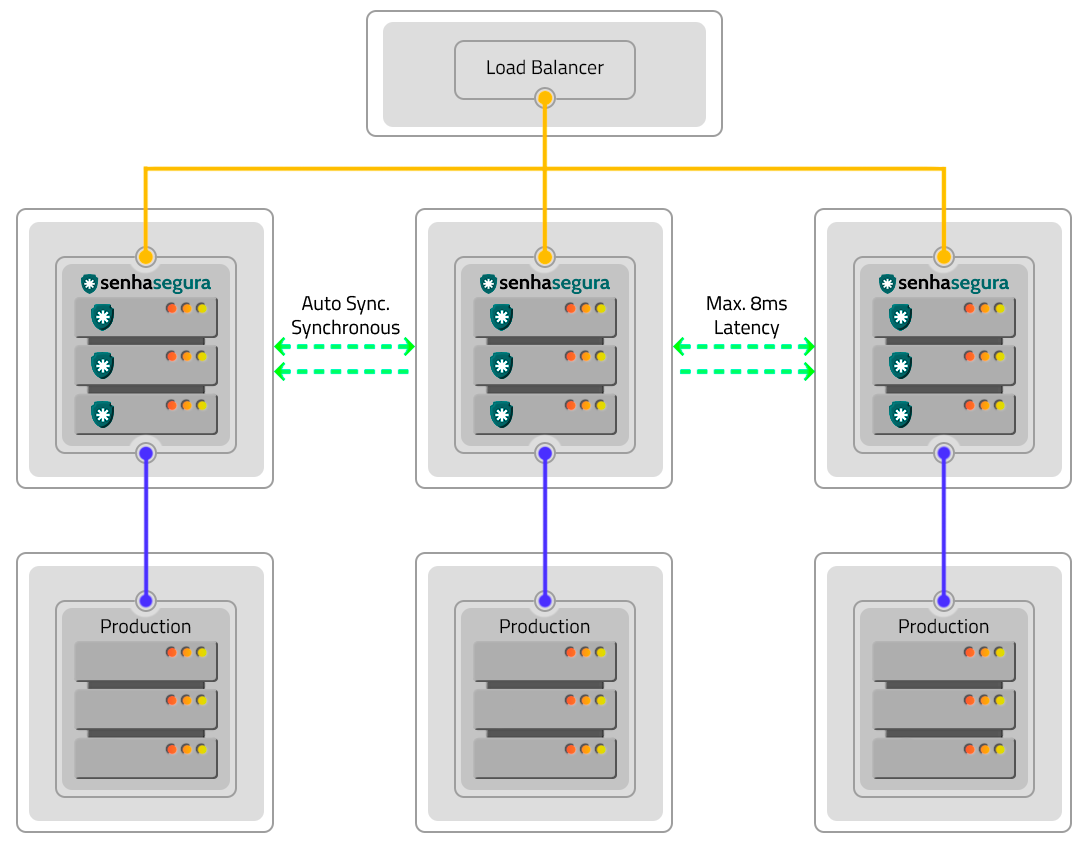
Active-Active
The Active-Active schema is a High Availability solution where multiple instances operate together, providing greater operational capacity and uninterruptible services.
The Active-Active schema is a High Availability solution where multiple senhasegura instances operate together, providing greater operational capacity and uninterruptible services.
By using this schema, the three applications will be active and in operation with synchronous automatic synchronization, executing processes in parallel. A load balancer will manage the distribution of work between the instances, besides ensuring the continuity of the service through the other instances, in case any of them stops working.
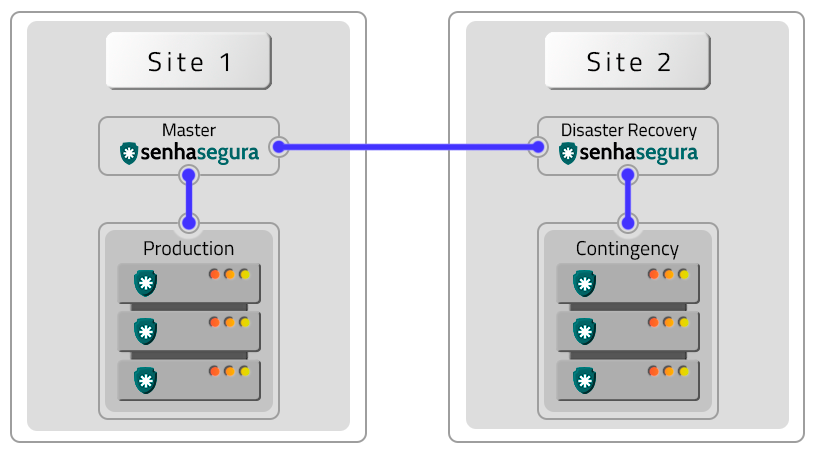
Disaster Recovery
The Active-Passive schema avoids cluster and site failures. To implement it, two clusters in different locations operating in the Active-Passive schema are required. Factors such as DR and production environments influence the configuration and operation in this way.
The difference in data will depend on the quality and speed of the links in relation to the volume of data generated by a cluster. If these variables are not appropriate, there may be data loss, production environment shutdown and DR environment activation. In case of hardware failures, resetting and returning occurs manually.
Homologated Architectures
All architectures bellow can be deployed into hybrid schemas using on-premisse datacenters and cloud providers services.
The following architectures are homologated by senhasegura :
A VM without Contingency (DR)

Two VMs with contingency location (DR)

Two VMs with Remote Contingency (DR)

A PAM Crypto Appliance without Contingency (DR)

Two PAM Crypto Appliances in HA without contigency (DR)

Three PAM Crypto Appliances in HA and Contigency (DR) without HA

Four PAM Crypto Appliances in HA with HA Contigency (DR)

Six PAM Crypto Appliances with HA and two DR with HA

Four PAM Crypto Appliances with HA with two DR without HA

HA and DR replication features
The senhasegura architecture operates with two information bases: one, where the configurations are stored, and the other containing the logs and videos generated.
Configuring High Availability
To configure a High Availability cluster it is necessary that all instances of senhasegura are configured with the following premises:
The activation license must be applied to all instances;
All instances must be visible to each other through the network;
TCP ports 22, 443, 3306, 4444, 4567, 4568 and UDP 4567 must be released between all instances;
The backup drive must be visible to all instances;
Only one unit should be active and with asynchronous services active;
An instance will be chosen as Primary after the cluster creation process;
Back up the data and get a snapshot of the instance as a guarantee back;
Having the premises resolved. All the rest of the operation can be executed through the Orbit Web interface.
Settings
During the configuration process of each instance, it will have its database restarted. It is extremely important that you wait for the instance to be restarted before you start configuring the next cluster member. Not respecting this time can lead the cluster to a split-brain scenario, where it will not be sure which information is most up-to-date among the instances. This scenario, although reversible, will increase the maintenance time.
To perform the configuration, go to the menu Orbit ➔ Replication ➔ Settings. On this screen you will perform the following steps:
Change the mode of operation from Standalone to Cluster;
Enable the flag Enable replication
Add the network IP of the first cluster member in the Primary member field;
Add the network IP of other members in the following fields;
Attention! The order of IPs registered as primary and other members must be replicated in all other instances!
If members are in different datacenters, activate the flag Members are in different datacenters;
In this case, also change the latency setting in the Latency between nodes field and its unique numeric identifier in the Network segment field;
Add in the Recovery screen display message field a message that will be displayed to all users in case of cluster failure;
Activate file synchronization with the Files flag if you want the files generated by one instance to be forwarded to the other instances using rsync;
Click save to finish the operation;
Hot Spare - Automatic intances switch
senhasegura instances can be remotely activated and inactivated through HTTP requests that can be carried out from its load balancer. This control allows an instance that is under maintenance or unavailable for some reason, to be not considered in the load balancer redirection.
To configure IPs allowed to perform such query and operation, you must register the IP list in the Remote system activation field at the Orbit ➔ Settings ➔ Recovery menu.
At this screen, switch on the flag Allow system remote activation
Fill the IP list allowed to execute automated requests at the field Allowed origin IPs to perform system remote activation
Save the configuration clicking in Save button
You should realize this operation at every cluster members.
At this moment, these IPs can request the monitoring and administration URL
GET /flow/orbit/mntr. E.g.: https://mysenhasegura/flow/orbit/mntr.
The response will be the current instance state. It can be:
HTTP 200: Application is enabled and available for user operation
HTTP 403: Application is enabled but unavailable for user operation
HTTP 451: Activation license is expired
HTTP 503: Application is disabled
Thus, in a practical case, if the administrator inactivates the application of an instance, it begins responding HTTP 403 for the load balancer, which in turn will no longer forward traffic to that instance. As if any instance loses communication with other cluster members, and as consequence, make it database unavailable, this instance will respond HTTP 503 to the load balancer, which will no longer forward traffic for this instance.
Automatic instance activation and inactivation
Another interesting control is to allow an external system to control which instances should be activated and deactivated automatically. Imagine a scenario where the load on an entire network must be redirected to a contingency data center. The target datacenter instance must be active and ready to receive the requests, and the old production instance must lose its role as Master.
It is possible to switch between the instances roles through the activation/inactivation URL.
GET /flow/orbit/mntr/activate
Activates the instance to be used by users as long as the activation license is valid. If executed successfully, the instance that previously performed the role of Primary in the cluster, loses its relevance and this new instance receives the title of Primary. The other instances will not be automatically deactivated.
E.g.: https://mysenhasegura/flow/orbit/mntr/activate.
GET /flow/orbit/mntr/deactivate
Inactivates the instance to be used by users. If this instance is the Primary, it will be inactivated without electing any other member of the cluster as the new Primary. This action will also not activate other instances if they are inactive.
E.g.: https://mysenhasegura/flow/orbit/mntr/deactivate.
Always be in control of which instances are active and inactive in the cluster. Do not run the risk of accidentally inactivating all instances, causing an interruption in users' operations.
Conclusion
By the end of this book you will have acquired knowledge to perform the activities related to the Orbit module.
If you wish to continue learning how to use the senhasegura in the best possible way, please ask our support team for our available documentation according to your profile and needs.