Installation
Through the PAM Solution portal, you will have access to the senhasegura.go installation binaries. These binaries are identified by their system version, platform, and installation process language. Once installed, the language displayed is associated with its Windows session language.
Before installing senhasegura, ensure to match the requirements.
After the installation, the four Windows services should start automatically. You can run senhasegura.go client in a low privilege session to test the opening.
Configuring the WebService client
For senhasegura.go agents to communicate with senhasegura it's necessary to configure a WebService client that represents all the client applications.
The first step is to ensure that the communication URL of senhasegura is correct. The URL is provided to each installation in the licensing process. That is why it is essential to validate this first time.
Go to Orbit module;
Access the menu: Settings ➔ Application;
Check that the URL supplied in the field Application URL matches the URL that can be accessed by all workstations that will run the senhasegura.go;
Change the address if it is necessary and confirm with the Save button in the footer;
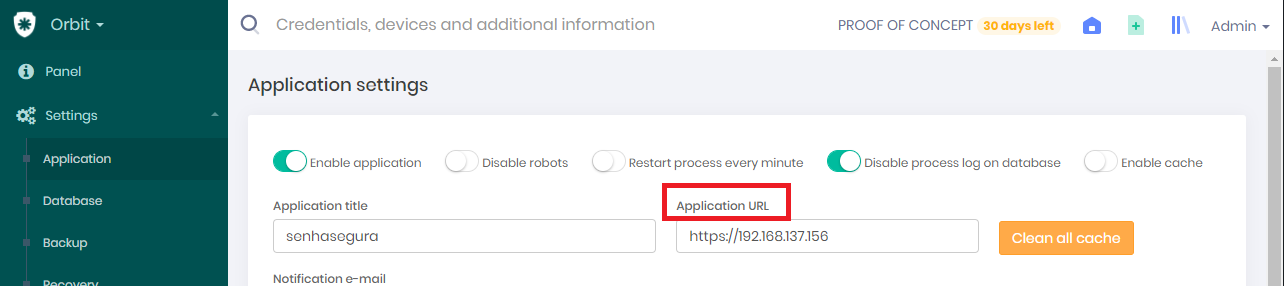
Configuring Communication URL
Generating a use license
At this stage, all data required to issue a license to use senhasegura.go are configured.
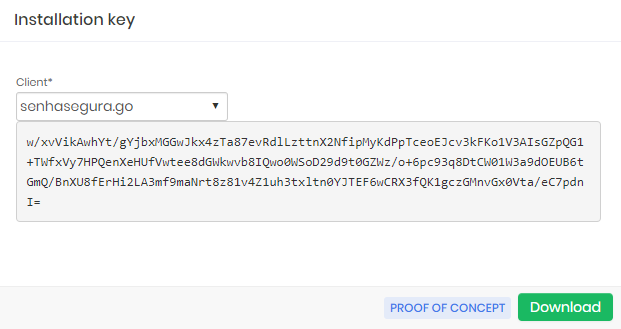
Go to the module Go and access the menu Settings ➔ Installers;
Click on the footnote button Installation key;
Select the client WebService A2A list create previously Client;
The text generated in the field below is the license of use that must be used to activate the client installations. You can choose to download this license from the Download footnote button.
The license file can be used if you perform a batch installation through Microsoft Active Directory.
Download Windows workstation Agent
You can find all the senhasegura Go versions and download them in the partner Portal.
Installing and activating a workstation Agent
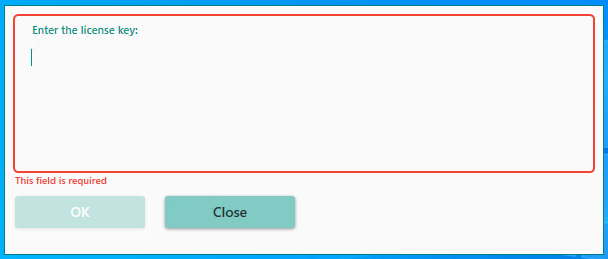
The installation process is simple. Read the term of use carefully and proceed with the installation. In the end, start the senhasegura.go through the shortcut available on the desktop screen.
You'll be presented to an activation form. Copy and paste the previously generated license and continue.
In case you receive one of the error messages bellows, perform the process suggestion:
1011: User inactive location: The relative user of the workstation is inactive in the senhasegura . In these cases, the user was already using senhasegura.go , but his workstation user is inactive in the relationship of the senhasegura.go module. Do not confuse with the user account of the web senhasegura .
1013: Local user does not exist on server: The workstation user does not have an account with the same username on the senhasegura platform
1014: User pending approval location: User is pending approval for use of senhasegura.go on the workstation;
1004: Invalid credential: The asymmetric workstation key does not exist on the senhasegura server;
1005: Unregistered Workstation: The workstation needs to be approved in the vault;
1008: Certificate inactive: The workstation was inactivated by the administrator in the workstations registration of senhasegura.go
1002: Registration of pending approval workstation: The workstation is pending approval by the administrator in the workstations registration of senhasegura.go
2028: The workstation version is prohibited: The version installed on the workstation was disapproved by the administrator of senhasegura
Approving user and workstation manually
Once installed and applied for the use license, the administrator must approve the use of senhasegura.go by the workstation user.
In case the message 1013 be presented, register a user on senhasegura with the same username as the account used to log in the workstation. The minimum access profile is for password visualization.
If the error message 1002 is displayed to the user, will be necessary to approve the workstation.

To approve a workstation go to the menu: GO Endpoint Manager ➔ Workstations
On the workstation report, find the desired workstation and notice that its status indicating that its pending of approval;
Utilize the register action Authorize to approve the senhasegura.go use by the workstation;
Start the senhasegura.go again on the workstation;
In case the error message 1014 be presented, it means the workstation is already approved, but the user needs approval. Probably it is another user in this workstation that already uses senhasegura.go . So it is only necessary to approve another user.
To approve a user go to the menu: GO Endpoint Manager ➔ Users
In the users' report, locate the username linked to the desired workstation. Notice that its status indicates that it is pending approval;
Use the registration action Authorize to approve the senhasegura.go use by the user;
You can determine an expiration date for this authorization. If you leave it blank, the approval will not be compulsorily revoked.
Start senhasegura.go on workstation again;
Automatic user and workstation approval
The workstation and users approvals can be automated to avoid the excess of interactions between the person who is installing the system and the administrator that has to approve the registers on the web interface.
By default the senhasegura doesn't have this automation enabled, it is up to the administrator to take this decision. Because once enabled any machine and user, that are in the company network, with a valid license, have the permission to operate the senhasegura.go without the dependence on administrator approval.
To configure the automatic approval, follow these steps:
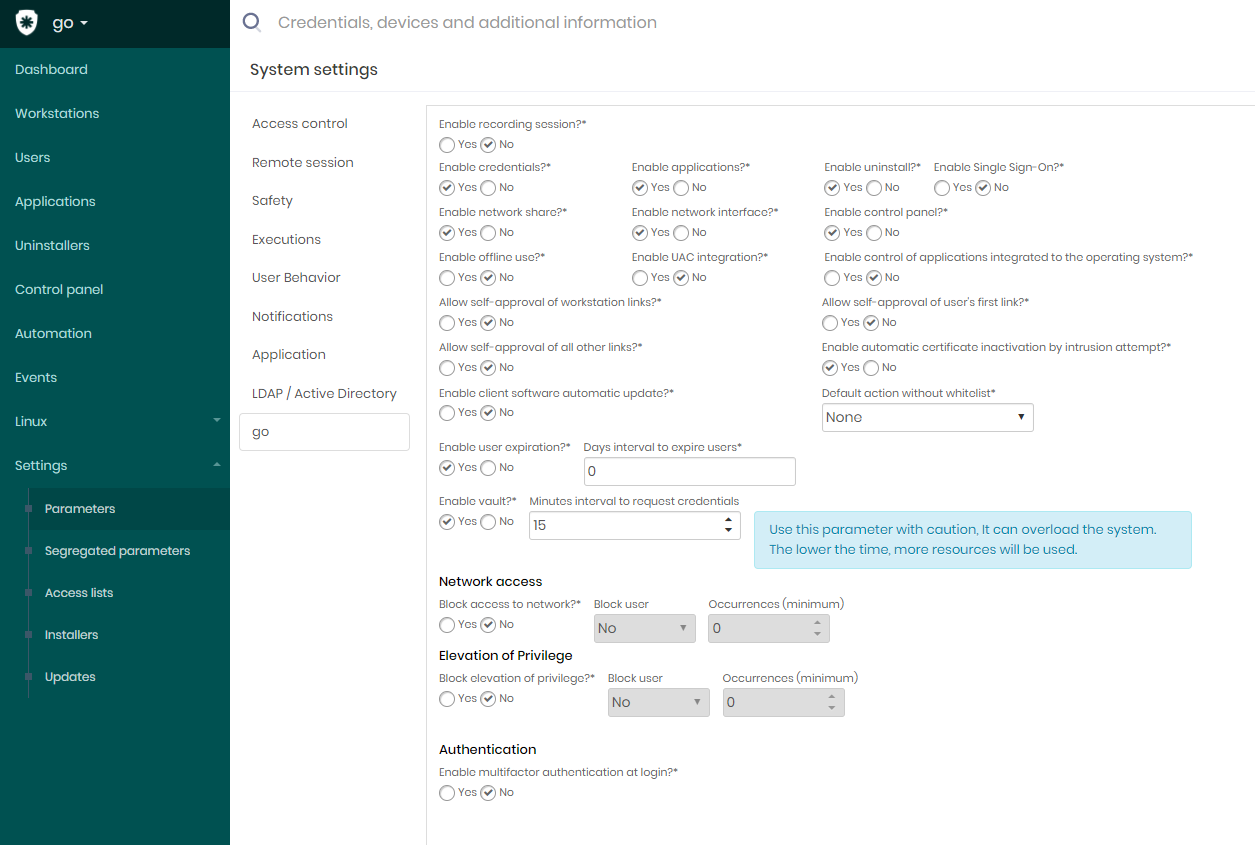
Go to the menu: GO Endpoint Manager ➔ Settings ➔ Parameters
On the screen System settings, make sure you are in the tab go;
Change the following parameters to Yes:
"Allow self-approval of workstation links?"
"Allow self-approval of all other links?"
"Allow self-approval of the user's first link?"
Confirm the change with the Save footnote button
senhasegura.go parameters