Operation Administrator Manual
Task Manager
In a corporate setting, it is important to take steps to prevent an individual's mistake from impacting the whole. The loss of a shared administrator password, for example, being able to remove everyone's access to a server, or even the execution of an incorrect command that drops a service and creates unavailability for the entire company. This type of case should be avoided.
Through its password vault functionality, senhasegura eliminates the risks related to sharing privileged credential passwords, weak, obsolete critical passwords, etc. However, there is still the risk that an authorized employee, with due access to an administrative credential, when using this access to perform some task on a critical device of the system, by accident or even bad intention, end up carrying out a command in addition to what he should have and being harmful to the system.
To better understand this scenario, let's imagine the following situation: company X has a datacenter with servers running 24/7, with essential services for the business running on these servers. The company has an IT team operating also 24/7 to take care of this infrastructure. A maintenance was planned to take place during the night, when the operational contingent is smaller and, therefore, is the most suitable for this type of maintenance. The employee who will perform the maintenance is a junior analyst who has been granted access to an administrative credential on the server to perform the maintenance. Maintenance consists of executing 3 predefined commands on the terminal and then restarting the services.
On the day of execution, the employee, due to inexperience, ends up missing one of the necessary commands and, when restarting the services, he discovers that these have stopped working. At that time, there is no senior analyst on duty and the unavailability ends up lasting for hours, causing great damage to the organization.
To deal with this type of problem, senhasegura developed Task Manager. Through this module it is possible to program commands and even macros and allow access so that they, and only these, can be executed, without anything else being done through the administrative credential used to execute them. In addition, these Tasks are executed when clicking on buttons, thus eliminating the risk that commands are entered in the wrong way in the system due to lack of knowledge or even typos. In addition, the accessibility, approvals and auditing features of senhasegura apply to the Task Manager, thus offering all the granular management and monitoring already known to senhasegura .
In this chapter, we will first discuss the Task Manager settings, such as access groups, reasons for execution and Templates and, later, we will demonstrate the visualization and execution of the Tasks themselves.
Supporting Entries
Within senhasegura , support entries are entities that aim to assist in the organization and segregation of policies and permission. Thus, in addition to the rules for access groups, it is also possible to register environments and systems, according to the needs of the Organization.
In addition to these, it is possible to register reasons for execution, in order to facilitate the organization and control of the execution of tasks.
Environments and Systems
The environments act as an entity that segregates rules and tasks. As an example, some customers use virtual environments such as Production, Approval and Legacy to segregate the location of their systems. They can be registered from the menu Settings ➔ System parameters ➔ Segmentation ➔ Environments.
Systems represent the systems where tasks reflect their actions, also acting as a segregating entity. Its filling is free choice of the customer. As an example, systems like Payment, Manufacture, Monitoring. They can be registered from the menu Settings ➔ System parameters ➔ Segmentation ➔ Systems.
Do not confuse Environments and Systems with the Site entity in the Devices registry, which acts as a segregating attribute for Credentials.
Reasons for execution
These reasons represent the factors that lead a task to be performed. They are used in the description of justifications and applications for authorization. As an example you can register Scheduled Maintenance, Unplanned Maintenance, Monitoring, etc. Use the Task Manager ➔ Settings ➔ Reasons menu to list the reasons you entered and have access to their inclusion and maintenance.
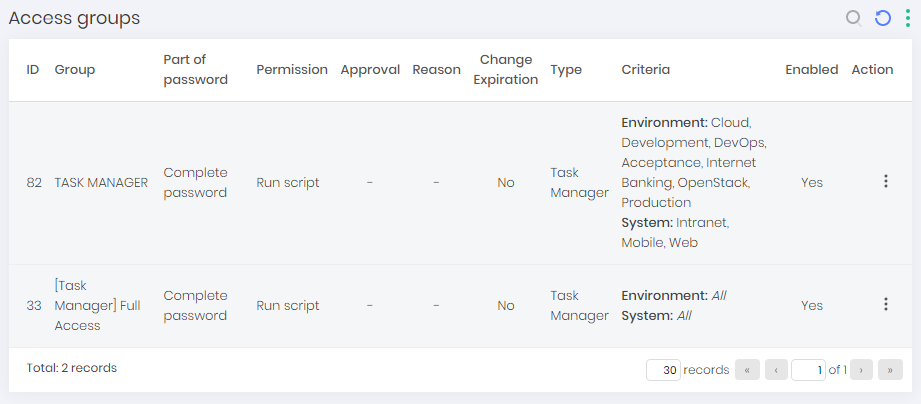
Access Group
Task Manager Access Groups are different from Credentials Access Groups. Therefore, the fact that a user has access to using a particular credential in Task Manager does not guarantee access to the same credential for password withdrawal or proxy session.
Through the Task Manager ➔ Settings ➔ Access Groups menu you will have access to all created groups, being able to create new or maintain existing groups.
Access Group Registration
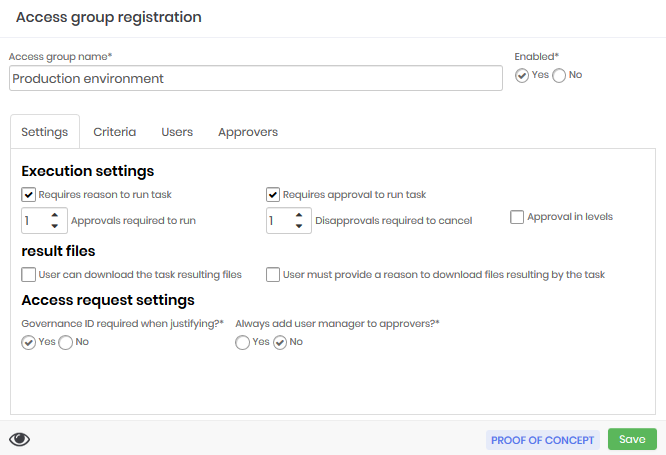
The access group registration form follows the same principle as Credentials access group registration. You will configure the approval flow and possible actions on the Settings tab, register the access segregators on the Criteria tab, configure the users belonging to the group on the Users tab and list the approvers on the tab Approvers.
Settings
| Field | Description |
|---|---|
| Access group name | Access group name |
| Enabled | Indicator whether the group will be applied to senhasegura |
| Requires reason to run task | Indicator if user needs to justify why they want to perform the task |
| Requires approval to run task | Indicator whether an approver will need to authorize the execution of the task |
| Approvals required to run | Number of approvals required to perform task |
| Disapprovals required to cancel | Number of disapprovals required for execution to be canceled |
| Approval in levels | Indicator if senhasegura will involve level-by-level approvers as approvals take place |
| User can download the task resulting files | Executing users will be able to download the output file of the execution. |
| User must provide a reason for downloading files resulting by the task | Users should indicate why they want to download the output file of the execution |
| Governance ID required when justifying? | Prompts the user for the linked maintenance ticket number |
| Always add user manager to approvers? | Indicator if the administrator of the Department to which the user belongs will be added as an approver at the time of request. |
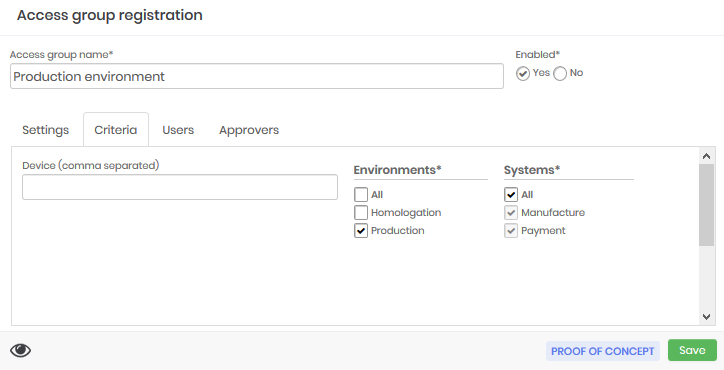
Criteria
| Field | Description |
|---|---|
| Device (comma separated) | Hostname of the devices to be considered in segregation. Use the wildcard character * to create a pattern. |
| Environments | Mark which Environments are considered in the segregation |
| Systems | Mark which Systems are considered for segregation |
Criteria
In this tab you will see which users fall under this access group setting. Click the footer button Add to open the available users dialog. Click the Remove button to remove users from the relationship.
Approvers
In this tab you will see which users are configured as approvers of this group. Through the Level column you set the approval step at levels that this approver will be notified of. Use the same button mechanism in the footer to manage participants.
Execution Templates
Execution templates consist of the commands themselves that will be executed when performing a task. These Templates can be registered through the Executions ➔ Settings ➔ Templates menu. Register templates of type "Task Manager".
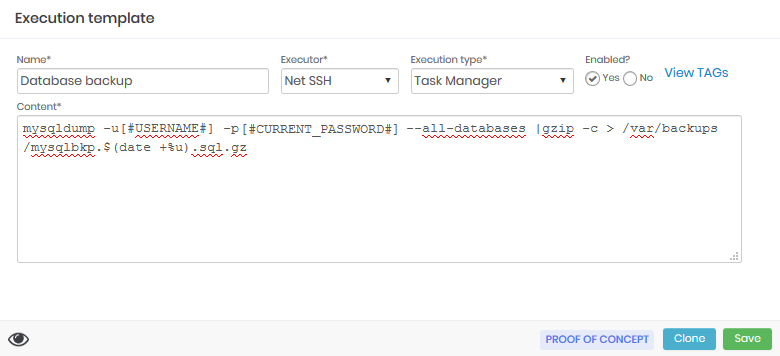
See the "Runs" manual for details on how to register a template.
Tasks
Through the Task Manager ➔ Tasks menu you have access to all registered tasks, as well as controls for registering new tasks and performing maintenance on existing tasks.
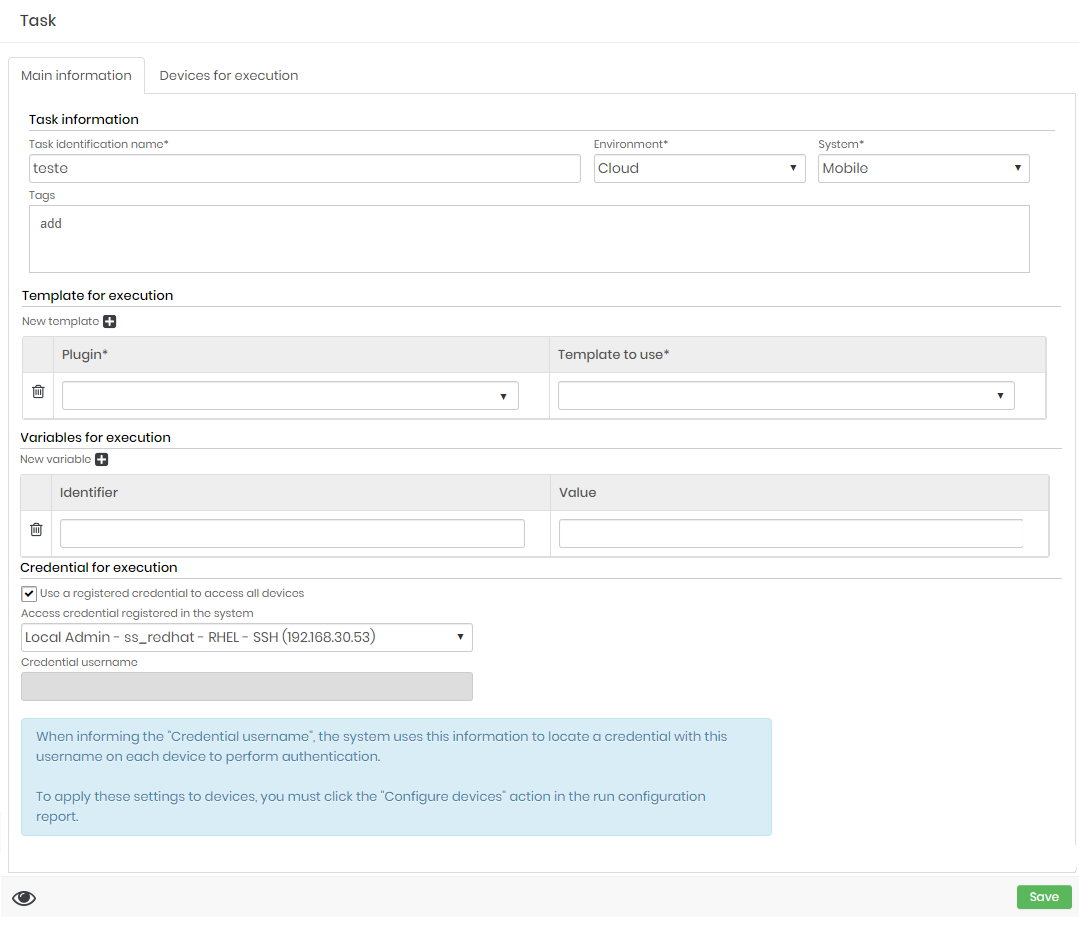
Task information
| Field | Description |
|---|---|
| Task identification name | Task name |
| Environment | Environment to which the task belongs. Used in segregation of access. |
| System | System to which the task belongs. Used in segregation of access. |
| Tags | Tags for control. |
Variables for execution (grid)
Variables are values that can be used in Execution Templates as substitution values. Use the characters [# and #] for use.
As an example, if you enter a variable LOREM with value Lorem ipsum dolor sit amet, it could be used in the Execution Template as follows:
echo '\[#LOREM#\]'
When execution occurs, the variable markup will be replaced by its value.
echo 'Lorem ipsum dolor sit amet'
| Field | Description |
|---|---|
| New variable | Adds a new entry in the variable list. |
| Identifier | Name of the variable. This is the name that should be used in the templates |
| Value | Value that will receive the variable. |
Credential for execution
You must list which Credential will be used to perform the task.
| Field | Description |
|---|---|
| Use the registered credential to access all devices | Indicator to switch between a registered credential or a credential username that is linked to the remote device. |
| Access credentials registered in the system | Enables the selection of an existing credential to perform the task. |
| Credential username | Allows username to be entered. A device-linked credential containing the desired username will be used. |
Devices for execution
You must select which devices the task will run on. When the execution of the task starts, each device will have its own separate operation. That is, each device will have its own execution log. Success or failure to perform the task on one device does not prevent or affect execution on the next device.
Running Tasks and monitoring
After all steps of setting up and creating tasks, users have access to perform tasks from shortcuts on User Desktop.
Approvals
When requested to execute, if this action requires approval, approvers will be notified. And only after their approval will the action be performed. You can track pending approval runs from the Task Manager ➔ My approvals menu.
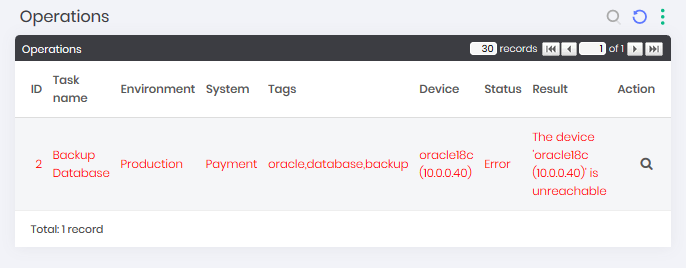
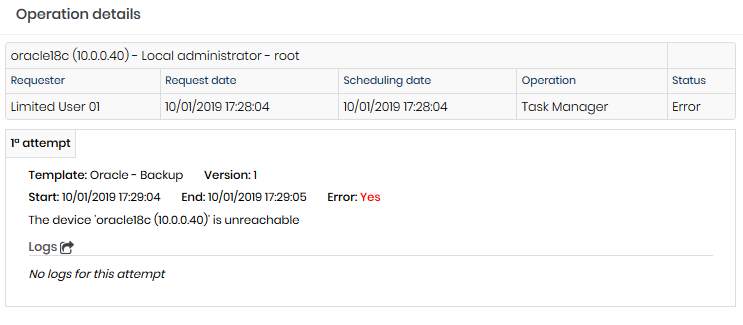
Executions and Operations
From the Task Manager ➔ Executions menu you will have access to all task executions performed. If you want more details of these runs, click the report action View operations.

This operations report, which can also be accessed from the Task Manager, Operations menu, demonstrates the result of tasks on each Device to which it has been assigned. Click the registration action Details to display the execution details.
Scheduling executions
You can schedule a task to run from the task report in the Task Manager ➔ Tasks menu. Click on the record row action Schedules to access the active schedules for this task. To register new appointments, click on the footer button Schedule execution to open the registration form for a new execution schedule.
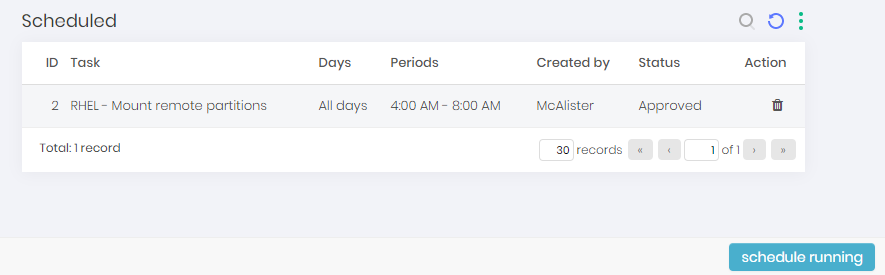
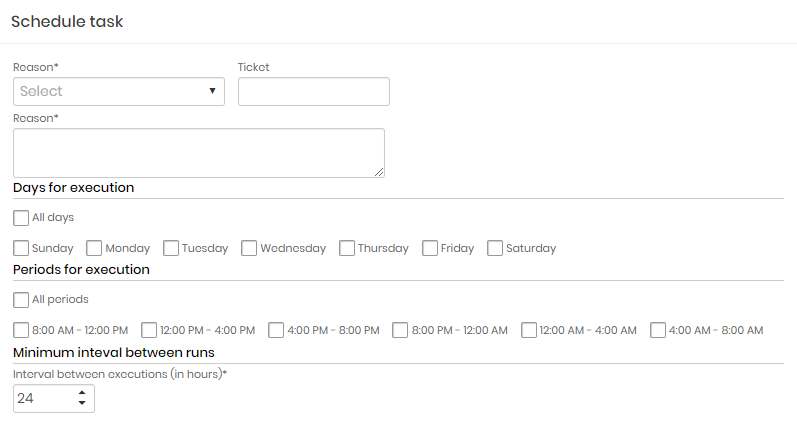
When changing the task record, all schedules will be automatically deactivated, preventing the automation of procedures not yet approved from being executed.
Multi-Tenant
The credentials managed through senhasegura are of extreme importance for a company. Many of them, for a specific set of departments. So important, that other departments cannot be aware of the existence of such credentials.
The Multi-Tenant local senhasegura function simplifies the segregation of credential access, allowing one instance of the software to be used by several "clients" sharing the same physical and logical structure.
In other words, data from an internal customer is not visible to others, as exemplified by the figure multi-0001-enus.

This way, we can say that the I.T. department credentials administrator has no access to the Development department credentials. Ensuring that information is accessible only to users who actually need it.
To set up a multi-tenant environment follow the instructions in the following sections.
By acquiring this function of senhasegura some screens will be segregated by tenant:
Creating users
Creation of credential
Creating access groups
PAM
Certificates
Task Manager
Protected Information
A2A
Creating a tenant
Before creating a tenant keep in mind the environments you want to be segmented, after that follow the instructions:
Go to the menu: Settings ➔ System Parameters ➔ Segmentation ➔ Tenants
In the action button of the report click on the New option
infoIn this same report you can also change an already created tenant. Click on the action button Change record.
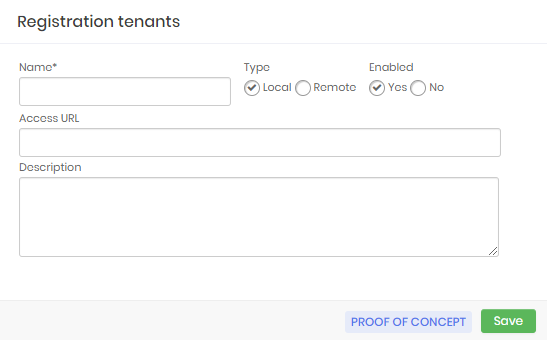
Tenant registration form Insert your tenant's name
Type the URL, if you have, of this tenant in the field URL access
And if you wish to insert a itemize about the scope of this tenant.
In the checkbox Type select whether the tenant will be accessed locally or remotelly.
Finally click on Save
Associating a user with a tenant
With your created tenant you will be able to associate a senhasegura user with it. To do this follow the instructions:
Go to the menu: Settings ➔ System users ➔ Users
Create a new user1 via the report action button and the New option, or change an existing one.
In the form, in the section Tenant select the tenant you want to associate this user with
cautionIf the user is not associated with any tenant, the system will associate him/her to default, so he/she can only be added to the access groups of the default tenant.
Click Save
Associating an access group with a tenant
After associating a user it is important to associate a group of access to tenant as well.
Access groups usually have different settings between them.
However, it is important that these groups are associated with the tenants to which they belong, and that users can access them. For example:
*A Financial tenant user should not be a member of Marketing tennant's access group since they are part of different departments that should not be aware of each other's information.*
It is therefore very important to have access groups for your respective tenants, so follow the instructions:
Go to the menu: PAM ➔ Settings ➔ Access ➔ Access groups
Create a new group2. using the report action button and the New Group option, or edit an existing one.
In the form, select the tenant that the access group should be associated
Go to the Users tab and select the users you previously associated with the same tenant from this group.
cautionRemember that if the user must be associated to the same tenant of the access group, in his registration or later be edited to be associated, otherwise he is not available among the options of users to become a member of the group.
Click Save
Associating a credential with a tenant
With users and access groups associated with tenant you must also associate credentials.
This way the associated credential will be visible only to the users who are associated to the same tenant, with this the objective of the module to restrict the access to the information, to those who actually need it, will be reached. To do so, follow the instructions:
Go to the menu: PAM ➔ Credentials ➔ All
Create a new credential3 through the report action button and the option New credential, or change an existing one.
In the form, select in the field Tenant the tenant to which this credential will be associated
This way the credential can only be accessed, or have your password viewed by users and members of access groups associated to the same tenant.
Security
The multi-tenant function will assist in segregating user access by separating information by location, department, or other type of tenant you wish to create.
However, administrators should pay attention to the following points:
Backup: The segregation by tenant does not cover the backup, which means that the administrator who holds the master key will know all the information present in each of the tenants registered in the vault.
Dashboards: Users, regardless of which tenant is associated, with permission to view the dashboards will be able to see all information present on these screens.
Change Audit
On critical, service-responsible servers, it is very common for changes executed in these environments to be highly controlled.
In cases like these, the user requests access to a device and the administrator releases access where he will perform the task. The auditor needs to know exactly what script, device and time the activity will be performed. For the compliance, it is necessary to physically follow or check the logs of executed commands.
These activities have a very high risk, because the user can make an execution that directly affects the productivity of a company, for example, stopping an Apache server that is hosted on the company's commercial site, or even making improper actions in order to steal information.
To facilitate auditing and compliance, the Change Audit module assists the administrator in ensuring that the necessary changes to a server are executed correctly, providing an approval flow to an access, confirming that everything that was proposed in the change was actually executed by the user.
And also calculating its effectiveness with evaluations indicating whether the user has reached the expected result, made more executions than should have been done or if not even managed to make the change correctly.
This demonstrates more security to the professional responsible for the environments, having audit and compliance of the commands executed inside their devices.
Another point is the possibility of splitting the workflow, where one user can be responsible for planning and creating the script and another for executing it.
Among other benefits this module can help:
Granting privileges to users in the authorized environment only
Prevention, detection and correction of security abnormalities in the environment
Creation of inviolable audit trails for privileged operations
Follow the instructions in the following sections to understand how to use this module:
Registering a change
To create a change follow the menu: Change Audit ➔ Change and follow the instructions:
Click on the More actions button in the report and choose the New option
In the report fill in the ID and the Title of this change.
If you wish to complete a Description of the purpose of this change.
In the Start Time field select the day and time that the change should start to be executed
Consequently, in the Due Date field, select the day and time that the change should be completed.
Select the Access group related to this change.
infoIf you need to create a dedicated access group for change activities or edit an existing one, entering users who can execute changes and those who have approved that changes be made.
If you do not know how to create an access group please refer to the section Access of this document.
Go to the Devices tab and click the add icon to select the devices that have gone through the change.
Click the desired devices in the list, and then click Add to select them.
cautionThis guide must be completed, otherwise the change will not be registered.
Going to the Script tab enter the commands that will be executed to make the change
cautionRemember that this script will be used as a comparison to prove the success of the change, so it must be entered correctly.
To finish click Save
Requesting a change
To request and execute a change you need to perform a remote session. To do so, follow the instructions:
Access the menu: PAM ➔ Credentials ➔ All
Choose the device you want to access to perform the change.
You can use the filter at the top of the report to find it.
cautionIn order for the change to be properly audited, it is necessary to search the devices associated with the desired changes.
Click the action button Start session.
If your access group requires justification, it will be necessary to fill it out, if not the request will be generated, wait for the change to be approved.
To check the status of your request access the menu: Change Audit ➔ My requests.
If you are an approved check the requests made to you through the menu: Change Audit ➔ My approvals.
When the request is approved or disapproved you will receive a notification and you will be able to perform the access (perform steps 1 to 3 again).
infoCheck with your senhasegura administrator to see if notifications are active to receive the notification of your request.
In the section perform the scheduled change.
Auditing the sessions
After a change you can check what was done during the session and see if the entered script was followed.
Access the menu: Change Audit ➔ Audited sessions and you can view the following data:
Change details
Choose the change you want to see the details.
You can use the filter at the top of the report to find it.
Click on the change action button and select the option Change details.
In the displayed report you will see the duration of the change, the IP and the user who made the change in addition to the score given to this one.
Change Audit
Choose the change you want to see the audit.
You can use the filter at the top of the report to find it.
Click on the change action button and select the option Change Audit.
A board with the executed commands will be displayed.
The lines in red are commands that should have been executed, according to the registered script, but were not.
And the green lines display the commands that were executed and were not present in the script.
Session Logs
Choose the change you want to see session logs.
You can use the filter at the top of the report to find it.
Click the action button for the change and select the Session Logs option.
In the report displayed you can see in detail the logs of the session that was performed to execute the change.
Watching the session video
It is also possible to watch the recording of what was done during the session:
Choose the change you wish to watch the recording.
You can use the filter at the top of the report to find it.
Click the action button for the change and select the Video of Session option.
The video will start automatically.
- If you don't know how to create a user and fill in the registration form, please consult the manual Tool Administrator↩
- If you don't know how to create an access group and fill out the registration form, please refer to the section Access↩
- Case you don't know how to create a credential and fill out the registration form please refer to the Credentials Administration section↩