Scan & Discovery
Introduction
In this chapter, we will cover the features of Scan & Discovery from configuring Discovery and creating glossaries to viewing Scans results and auditing the module.
Symbols used in this cookbook
This book uses the following symbols to highlight information that should be taken into account for the best use of senhasegura :
Info - useful information that can make the use of the solution more dynamic
Caution - actions and items that cannot be ignored
commands: data that must be entered in the same way as described in this book- URLs : paths to access web pages.
<KEYS>: keyboard paths that will be used to perform actions.
About the module
senhasegura , through its PAM module, allows centralized and secure management of various devices and credentials. To have this management, the devices and credentials must be registered in the vault, in principle.
Within an organizational environment, where there are several devices and their respective credentials, it can be difficult to register the entire park in the vault one by one, manually. It may be even more difficult to keep these records up to date with any changes that may occur in the organization's IT environment.
It was thinking about these situations that senhasegura created the Scan & Discovery module. The purpose of this module is to check the network to find connected devices and their credentials, such as passwords and SSH keys.
Scan & Discovery can connect to devices on the network using its standard protocols (SSH / TELNET, RDP) without the need to install a local agent. It collects the hostname, IP address, credentials list, privilege type, and user registration information, such as last access date and password change.
senhasegura Scan & Discovery is concurrent by default. This means that, no matter how many discoveries are registered, they will be executed in a concurrent manner depending on how many services instances are allocated to this execution, and each service thread can execute one discovery each.
Also, senhasegura discoveries support multi-ports. In the plugin tab (mentioned below), you can define multiple ports for each type of plugin.
Besides, it is possible to perform the automatic import of the objects found based on predefined glossaries, and even to monitor the unauthorized or suspicious accesses (performed outside the vault) on the network.
Among the devices that can be found by Scan & Discovery are:
Servers (Linux / Unix, Windows and VMWare)
Databases (Oracle, SQL, MySQL)
Network devices (Firewall, Routers, Switches, Balancers)
Work stations.
It is also possible to automatically identify privileged accounts in the following environments:
Unix
Linux
Windows, on local machines or in Active Directory
Oracle
MS SQL
MySQL
DevOps
It is important to mention that in addition to verifying devices and credentials, it is also possible to verify DevOps platforms such as:
Dockers: Containers;
Ansible: Playbooks and Roles;
Jenkins: Jobs, Nodes and Users;
Kubernetes: Secrets;
Scan & Discovery
View Discoveries
To view registered Discoveries, go to menu Discovery ➔ Settings ➔ Discovery.
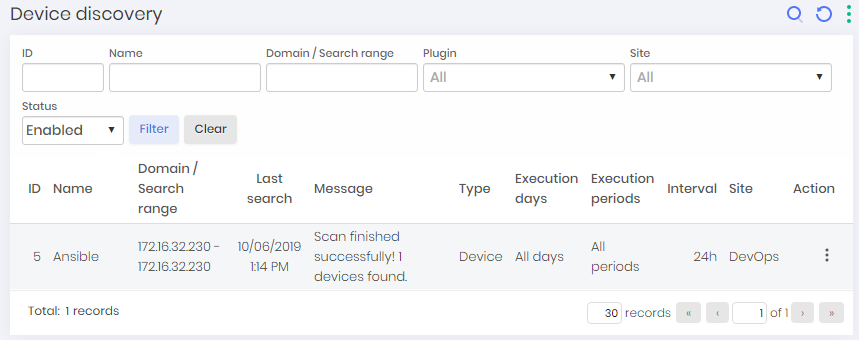
The report shows the scheduled scans with name, date, type, result etc.
The Report action button has the additional option: New The Register action button has the following options:
View situation: You can track the discovery's execution status as well as how many artifacts have already been identified. Its links allow you to see in detail the results of the discoveries.
View Discovery logs: See the history of all times that this discovery configuration was performed and what artifacts were found in each execution.
Synchronize: Request discovery to run immediately. This will create an on-demand execution of the discovery.
Edit record: Change the discovery settings. This will not affect ongoing execution or past results.
Create Discovery
During the senhasegura installation is configured some Scan parameters so that Scans can be automatically be done in different environments and a certain period of time.
senhasegura performs these types of Discovery: Domain, Application, Device and Containers. The screens to create a Discovery are very similar.
The screen shown below is typical and has a header depending on the Discovery type and the tabs are also different to each type.
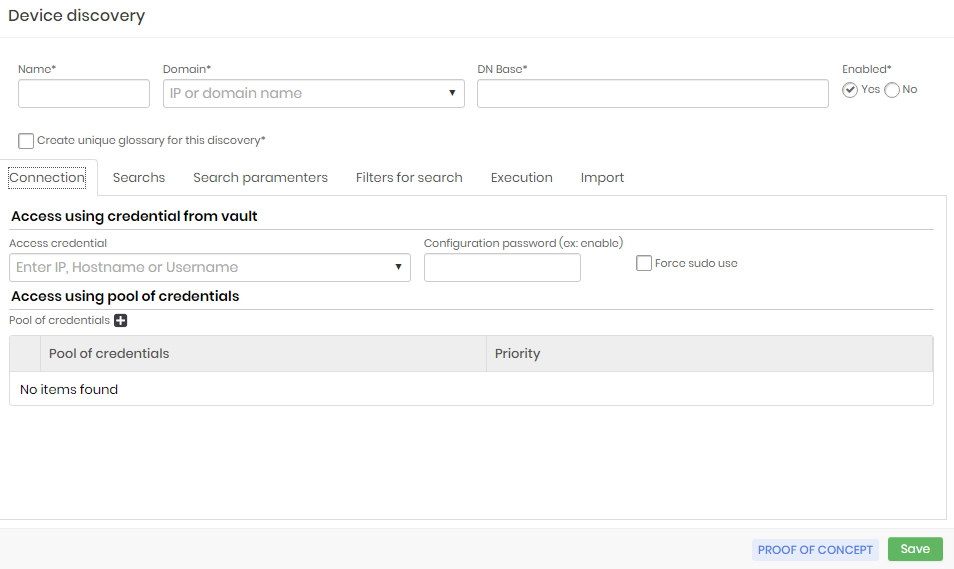
Depending on the type of Discovery the screen has the following tabs:
| Tabs | Domain | Device | Containers | Application |
|---|---|---|---|---|
| Connection | X | X | X | X |
| Searches | X | X | X | X |
| Search parameters | X | |||
| Filters for search | X | |||
| Containers | X | |||
| Plugins | X | X | ||
| Execution | X | X | X | X |
| Import | X | X | ||
| DevOps | X | X | X | |
| Certificates | X | X | X |
For better understanding will be explained the header part of each type and then explained once each tab.
To create a Discovery go to menu Discovery ➔ Settings ➔ Discovery and on the Report action button click on New.
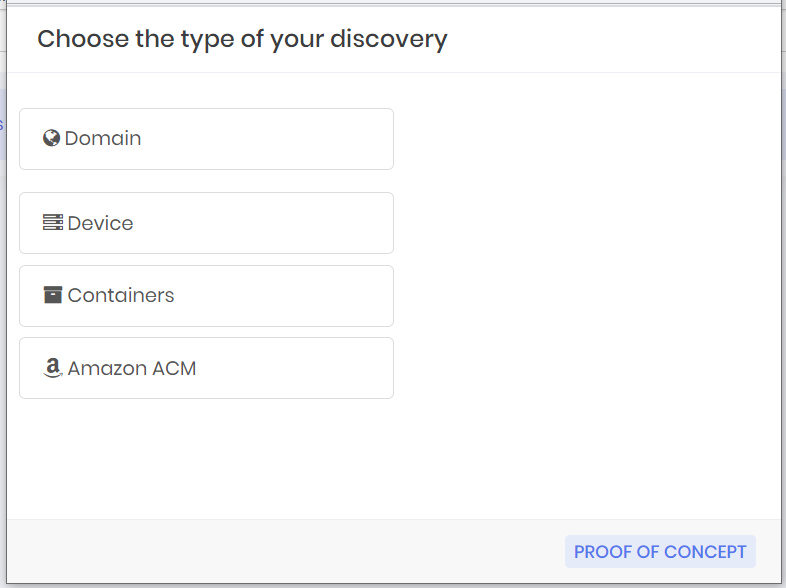
Click on the type of Discovery to be created.
Creating a Domain type scan

Fill the fields on header.
| Field | Description |
|---|---|
| Name* | Scan Name |
| Domain* | IP or domain name of this scan |
| DN Base* | Base Domain Name for Scan |
| Enabled* | Mark Yes or no |
| Create unique glossary for this Discovery" | Mark or not |
The tabs filling will be explained further
Filters for search tab
Only for Domain type.
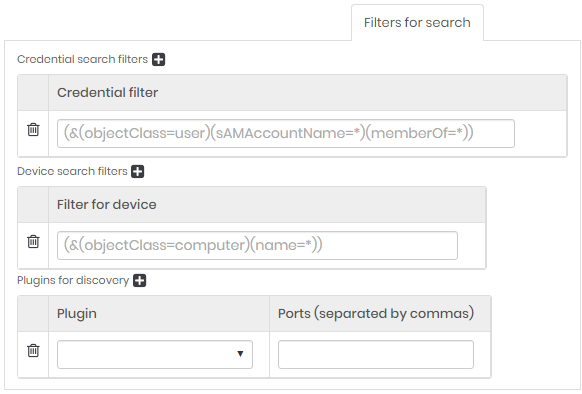
Credential search filters - Click on the plus icon to include a filter for credentials.
Device search filters - Click on the plus icon to include a filter for device.
Plugings for Discovery - Click on the plus icon to include a plugin to Discovery.
| Field | Description |
|---|---|
| Plugin | Plugins used to scan. The list of default system plug-ins will appear. |
| Ports (separated by commas) | Number of ports used to attempt to connect to devices. |
When choosing the Windows Plugin option, senhasegura will try to connect to devices using Windows RPC, Windows WMI, and Windows RM protocols.
Creating a Device type Scan

Fill the fields on header.
| Field | Description |
|---|---|
| Name* | Scan Name |
| Initial IP* | Initial Search Range IP |
| Final IP | Final IP of the search range. If this field is not filled in, only the IP of the initial IP field will be taken into account to Scan credentials and devices. |
| Site | Site name to Scan. All sites registered in senhasegura will be displayed |
| Enabled* | Indicates whether the scan is enabled or not. |
The tabs filling will be explained further.
SNMP consultation
The senhasegura performs an SNMP consultation to check if the balancers are active.
Having as necessary parameters the IP and SNMP community for SNMPv2, or IP, authentication type, username, authentication algorithm, authentication text, privacy algorithm and privacy text for SNMPv3.
From this information, hostname, server and service information is synchronized. The services must be within the same (common) partition to be mapped, following the recommendation of the main suppliers.
Therefore, we periodically perform a pooling to update the list of services.
When creating a new device scan, go to the Load Balance (VIPs) tab
Fill in the necessary information
To consult go to the menu Discovery ➔ Discovery ➔ Load Balance
Creating a Container type Scan

Fill the fields on header.
| Field | Description |
|---|---|
| Name* | Scan Name |
| Container host* | IP or Controller device name. Device where containers are hosted. All registered container hostnames will be displayed |
| Enabled* | Indicates whether the scan is enabled or not. |
Containers tab
Only for containers type.
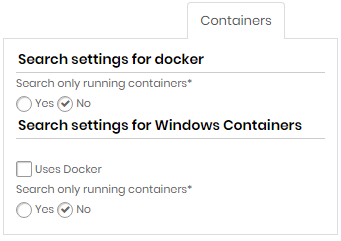
Search settings for Docker
| Field | Description |
|---|---|
| Search only running containers? | Indicates whether to search only running containers or not |
Search settings for Windows containers
| Field | Description |
|---|---|
| Uses Docker | Indicates if search containers use Docker |
| Search only running containers?* | Indicates whether to search only running containers or not |
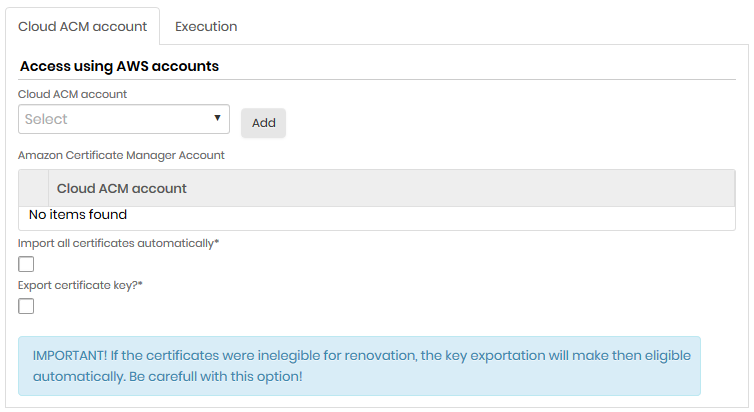
Creation of an Amazon ACM type scan
This type of scan aims to discover and bring information from Amazon Certificate Manager (ACM). Fill in the fields:
| Field | Description |
|---|---|
| Cloud ACM account | Amazon account to which CA refers |
| Import all certificates automatically* | Indicates that all Amazon ACM certificates that are found will be imported into the senhasegura |
| Export certificate key?* | It indicates that the Amazon ACM certificate keys found will be exported to the senhasegura . |
Going to the Execution tab fill:
| Field | Description |
|---|---|
| Keep scan active after import?* | Indicates that the scan will continue to work even after the import of certificates found |
| Days allowed for execution | Indicates the days that the scan can work and search for certificates |
| Periods allowed for execution | It indicates the time that within the defined days the scan can search for certificates. |
| Minimum interval between runs | It indicates the time between the end and the beginning of a new search. |
Common tabs
Connection tab
For all types of Discovery
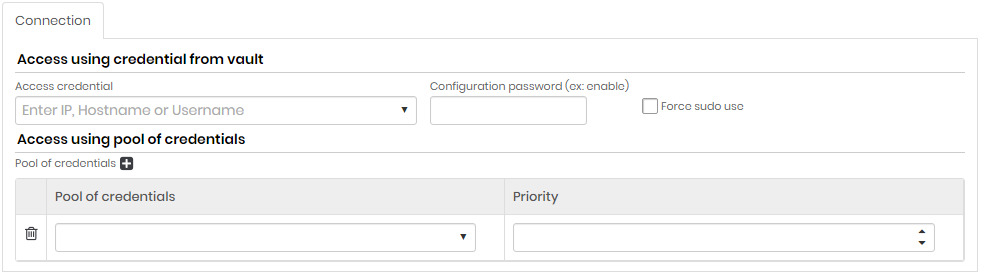
Access using credential from vault
| Field | Description |
|---|---|
| Access Credential | Enter IP, Hostname or Username. Access credential for the search. All credentials registered in senhasegura will be displayed |
| Configuration password (ex: enable) | Setup Password |
| Force use of sudo | If this option is enabled, the commands will be executed as super user. The access credential completed in the Access credential field must have sudo nopasswd permission |
Access using pool of credentials (click +)
| Field | Description |
|---|---|
| Pool of credentials | Credential pool used to scan |
| Priority | Credential pool priority. Higher priority credential pools prevail over lower priority credential pools |
Searches tab
For all types of Discovery.
In the Searches tab you can search for all credentials that are being used by a service, just select the option Search Windows Service Accounts
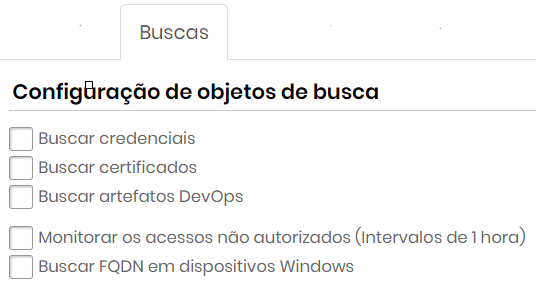
Mark the objects to be scanned.
Search objects configuration
| Field | Description |
|---|---|
| Search for credentials | If this option is enabled, credentials will be included in the Scan & Discovery process. |
| Search for devices groups | If this option is active, the devices’ groups will be included in the Scan & Discovery process. This option is standardly disabled. |
| Search for certificates | If this option is enabled, digital certificates will be included in the Scan & Discovery process. The tab Certificates will be visible if this field is marked. |
| Find DevOps artifacts | If this option is enabled, DevOps artifacts will be included in the Scan & Discovery process. The tab DevOps tab will be visible. |
| Monitor unauthorized access (1 hour intervals) | If this option is enabled, unauthorized access to credentials will be monitored and logs can be viewed in Scan & Discovery. |
| Identify accounts in application pools (IIS) | If this option is enabled, credentials in application pools (IIS) will be included in Scan & Dicovery. |
| Search FQDN in Windows devices | If this option is enabled, the search for devices will identify the its FQDN and consider it in the Scan & Discovery process. The FQDN will be the only device identifier if this option is enabled. |
Search parameters tab
Only for Domain type.
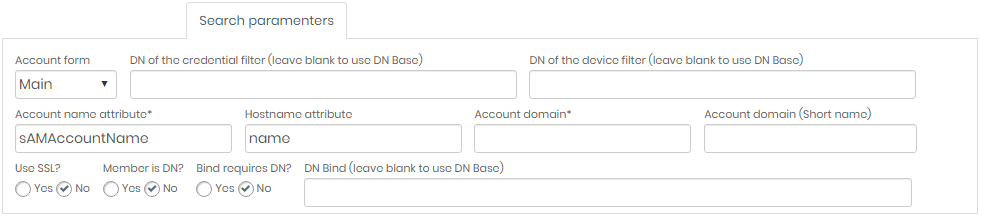
| Field | Description |
|---|---|
| Account Form | Form type used for accounts to search |
| DN of the credential filter | (Leave blank to use DN Base) Domain name of the credential filter. If left blank, base DN will be used |
| DN of the device filter | (Leave blank to use DN Base) Domain name of the device filter. If left blank, base DN will be used |
| Account name attribute | Name attribute of accounts to fetch |
| Account domain | Domain Name of Accounts to Fetch |
| Account domain (Short Name) | Simplified Domain Name (optional) |
| Use SSL? | Indicates whether or not to use SSL certificate when searching. Mark Yes or No |
| Member is DN? | Mark Yes or No |
| Bind requires DN? | Mark Yes or No |
| DN Bind | (Leave blank to use DN Base) Domain name of the user who will search. If left blank, the base DN will be used. |
Plugins tab
Only for Devices and Containers types.
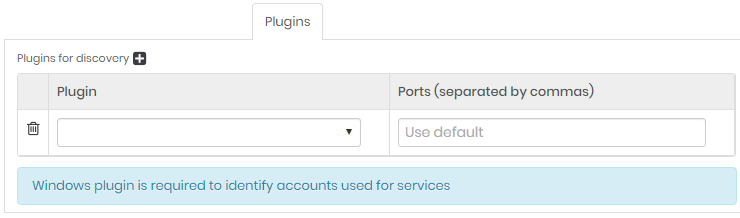
Click on the plus icon and fill the plugin field.
To search for Windows service accounts you will need to select a Windows plugin from the Plugins tab.
Execution tab
In this tab you can configure the period and interval of execution of this discovery configuration. Configurations that may take longer to execute compared to the configured period, will not be executed concurrently. In other words, executions of the same configuration are not carried out in parallel. Only different configurations are performed in parallel.
Be careful to configure very short intervals for configurations that need to look for large network intervals and evaluate various artifacts.
The shortest configurable interval is one hourly run.
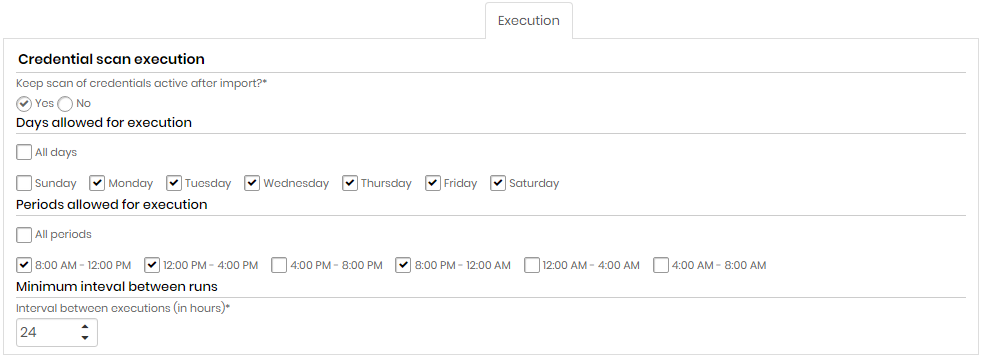
Credential scan execution
| Field | Description |
|---|---|
| Keep credential scan active after import?* | Indicates whether credential scanning will remain active after importing credentials or not |
| Days allowed for execution | Choose All days or select one or more week days for the execution |
| Periods allowed for execution | Choose All periods or select one or more period of time for the execution |
| Minimum interval between runs (in hours)* | Minimum interval, in hours, between scans runs. This criterion takes into account the values entered in the Days allowed for execution and Periods allowed for execution fields. |
Import tab
Only for Domain and Device types.
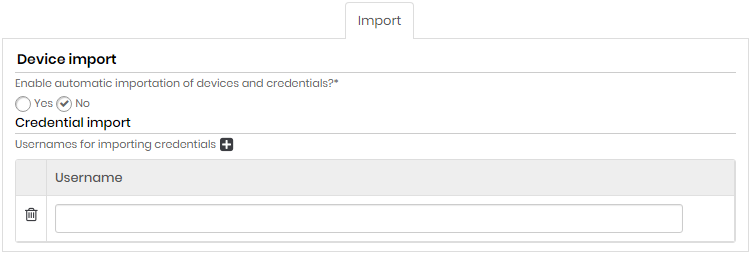
| Field | Description |
|---|---|
| Enable automatic device and credentials import ? | Indicates whether automatic device and credential import is enabled or not |
| Usernames for importing credentials (click on the plus icon) | Usernames of credentials that will be imported automatically (eg. Administrator). |
Certificate tab
For all types of Discovery that has in Search tab "Search for certificates" marked.
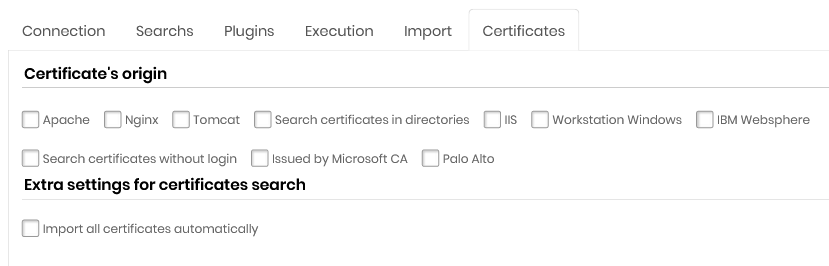
Certificate's Orgin
Apache
Nginx
Tomcat
Search certificates in directories
Microsoft®IIS
Workstation Microsoft®Windows®
IBM Websphere
Search certificates without login
Issued by Microsoft®CA
Palo Alto Networks®
On this tab there is the option Use credential pools to import certificates with keys (only nix systems)*. This option allows certificates with a password and key to be imported into the senhasegura . Select this option and then indicate the pool of credentials for this task.
Configuring Palo Alto Networks®scan
When you select the Palo Alto option, senhasegura will scan the certificates inside Palo Alto Networks®, two fields will be displayed:
API Key: Select a user, already registered with senhasegura , that contains the value of the API Key;
Import keys?: Indicates that upon finding the certificates the keys will be imported too into the senhasegura .
Go to the Discovery menu: Discovery ➔ Certificates ➔ Certificates to view the report of certificates found, use the action button to perform a manual import.
In the Plugins tab when selecting the Palo Alto plugin, indicate that the access port is the SSH 22.
DevOps tab
For all types of Discovery that has in Search tab "Find Devops artifacts" marked.
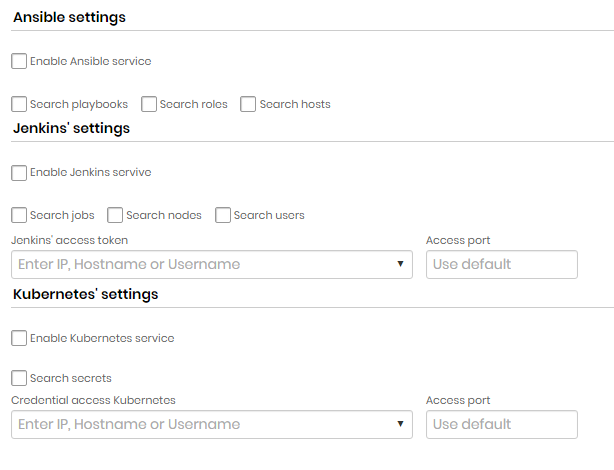
Ansible settings
| Field | Description |
|---|---|
| Enable Ansible Service | Indicates if Ansible service is enabled |
| Search playbooks | Indicates whether playbook search is enabled |
| Search roles | Indicates whether role search is enabled |
| Search hosts | Indicates if host lookup is enabled |
Jenkins settings
| Field | Description |
|---|---|
| Enable Jenkins Service | Indicates if Jenkins searches are enabled on this Discovery |
| Search jobs | If this option is enabled, Discovery will search for Jenkins jobs. |
| Search nodes | If this option is enabled, Discovery will search for Jenkins nodes. |
| Search Users | If this option is enabled, Discovery will search for Jenkins users. |
| Jenkins Access Token | Token that will be used to access Jenkins |
| Access port | Jenkins access door |
Kubernetes settings
| Field | Description |
|---|---|
| Enable Kubernetes Service | Indicates whether Kubernetes searches are enabled in this discovery |
| Search secrets | If this option is enabled, Discovery will search for Kubernetes secrets. |
| Kubernetes Access Credential | Credential that will be used to access Kubernetes |
| Access door | Door for access to Kubernetes |
senhasegura has a Kubernetes plugin that allows us to use credentials registered in the vault to use the service, increasing security when using the system. To get access to the plug-in, contact the senhasegura support team.
View Status
Devices
Access the menu Discovery ➔ Execution situation ➔ Discovery execution.
On this screen, you can see discoveries of active devices in the system along with a variety of information such as status, progress, number of devices on hold and total, number of successes and errors and date and time of start and end of execution.
In the filter bar, the filter selection can be made by device ID or name or by the status it can be:
Search for devices
Search for information
No devices
Finalized
Waiting
Not finalized
In the action button of the running registers you can get more details about the execution.
Scanning objects
Access the menu Discovery ➔ Execution situation ➔ Scan execution.
On this screen, you can see credential findings, SSH key, certificates, local authorities and services, along with a variety of information such as status, progress, number of successes and errors, date and time of start and end of execution. In the filter bar, the filter selection can be made by object ID or name.
View Discovery logs
Go to menu Discovery ➔ Logs ➔ Device Connections and in the Report Action button click View discovery logs.
Synchronize
In the Report Action button click Synchronize.
When synchronized a success Message will be shown.
Visualize Scan & Discovery Logs
Discovery ➔ Logs ➔ Scan Logs
Glossaries
Through the Scan & Discovery glossaries, you can automate the process of importing devices and credentials found in discoveries. This is because it is possible to predefine in the glossaries information such as site, type, manufacturer and device model, as well as set default and privileged credential type, automatic password exchange and connectivity.
This way, senhasegura automatically recognizes devices against the identification string defined in the glossary and performs imports if this option is enabled in the discovery settings.
Create a device glossary
Go to Discovery ➔ Settings ➔ Device Glossary
In this screen, you can view the glossaries created along with a range of information such as identification pattern, default password type, privileged password type, and enabled or unselected password change.
In the Report Action Button click on New Glossary button.
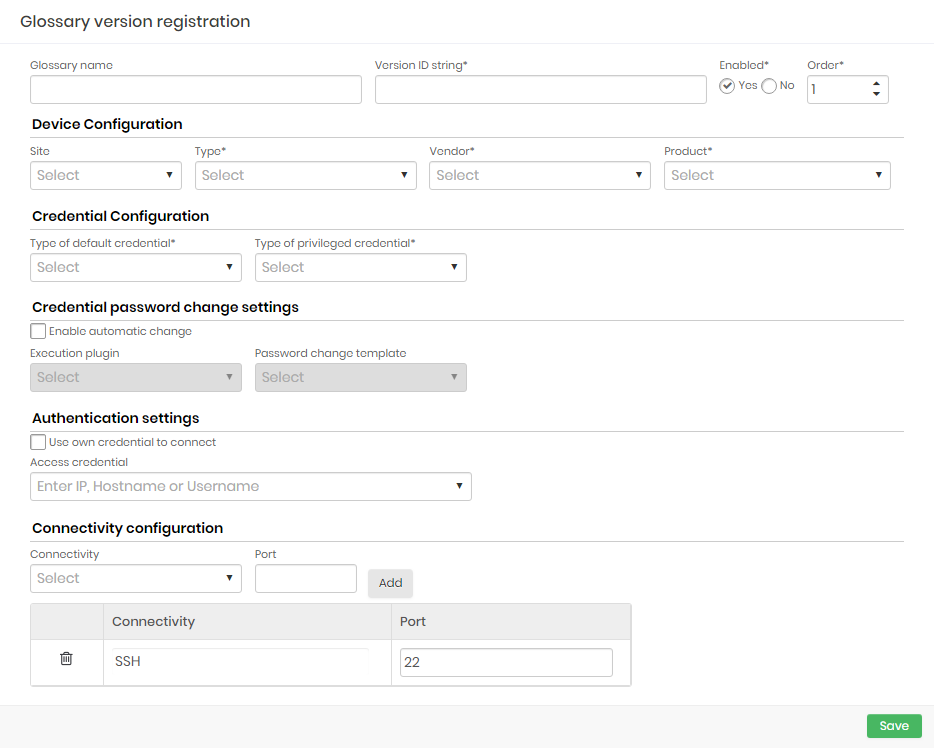
Complete the following fields:
| Field | Description |
|---|---|
| Glossary Name | Name for identification of this glossary |
| Version ID String | This is a string that defines which Discovery devices this dictionary will apply to. The value entered in this field will be compared to the operating system name of the device. You can use the character to symbolize any value for a string. For example, a ”Windows” string will select any Windows device. |
| Active | Indicates whether this glossary is active or not |
| Order | Order of priority of application of this glossary, if more than one glossary applies to the same device. Smaller orders take precedence over larger orders |
| site | Physical site of the device. All sites registered in senhasegura will be listed |
| Type | Device Type (Ex .: Server, Workstation etc.). All device types registered in senhasegura will be listed |
| Manufacturer | Device Manufacturer (Ex. Cisco, CheckPoint). All manufacturers registered in senhasegura will be listed. |
| Model | Device Model (Ex .: Cisco ASA, etc...). All models registered in senhasegura will be listed |
| Default Credential Type | Type of default credentials (eg. location, domain etc.). All default credential types registered in senhasegura will be listed |
| Privileged Credential Type | Type of privileged credentials (eg. location, domain, etc.). All privileged credential types registered in senhasegura will be listed |
| Enable auto switch | Indicates whether automatic credential password exchange is enabled |
| Execution Plugin | Plugins for running Discovery. All running plugins registered in senhasegura will be listed |
| Password Exchange Template | Template used to perform password exchange. All templates registered in senhasegura will be listed. |
| Use your own credential to connect | If this option is selected, the user credential will be used to connect |
| Access Credential | Access credential records in the vault. All access credentials registered in senhasegura will be listed. |
| Connectivity | Protocols used for device access. The default senhasegura security connectivity will be displayed. |
| Door | Communication port number. The field is populated with the default protocol port number. |
Fill the fields and click the Save to finish.
Create a domain glossary
In the Report Action Button click on New Domain Glossary.
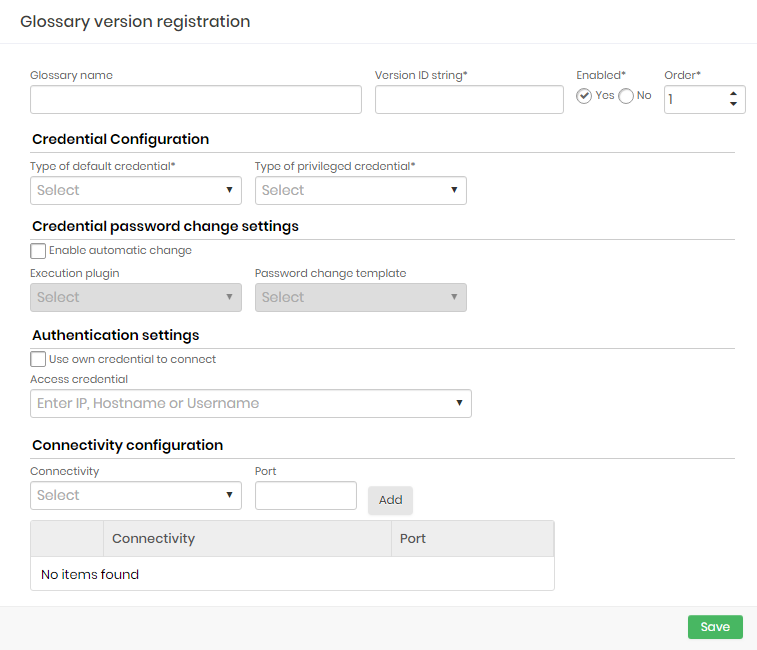
The fields of this screen are the same at the previous one except that the block of device information is not presented.
Complete the fields and click on Save to finish.
To edit a glossary
Click the Change Glossary button.
The screen is the same as creating a glossary and works the same.
Make the changes and click the Save button to finish.
Import found devices
To import devices found on Discoveries go to Discovery ➔ Discovery ➔ Devices

The register action button has the following options:
Import device
Device credentials
Groups
SSH keys
Device certificates
Device services
View scan log
Synchronize
Edit record
In this screen you can view the devices found along with a series of information such as search time and result message.
Select the device to import and click the Import Devices button.
A confirmation window will open. Click yes to import the selected devices.
Devices that have an IP already registered will not be imported. A new connectivity will be created if it not exist.
Complete the following fields:
| Field | Description |
|---|---|
| Management IP | Device fixed IP |
| Device Name (Hostname, IP, URL or Site Name, Application Name ...) | Device Description or Hostname / IP (System Identification Name) |
| site | Physical site of the device. All sites registered in senhasegura will be listed |
| Type | Device Type (Ex .: Server, Workstation etc). All device types registered in senhasegura will be listed |
| Manufacturer | Device Manufacturer (Ex. Cisco, CheckPoint). All manufacturers registered in senhasegura will be listed. |
| Model | Device Model (Ex .: Cisco ASA, etc ...). All models registered in senhasegura will be listed |
| Connectivity | Protocols used for device access. The default senhasegura security connectivity will be displayed. |
| Door | Communication port number. The field is populated with the default protocol port number. |
Click Save to finish.
Import found credentials
To import credentials found in Scans performed go to Scan & Discovery ➔ Discovery ➔ Credentials
The register action button has the following options: View record details, credential accesses and view last logs.
In this screen you can see the credentials found along with a series of information, such as privileged, date and time of last access and search. You can view credential details and access.
Select the credentials you want to import and click the Import Credentials button.
A confirmation screen will appear. Click Yes to finish.
Import SSH Keys Found
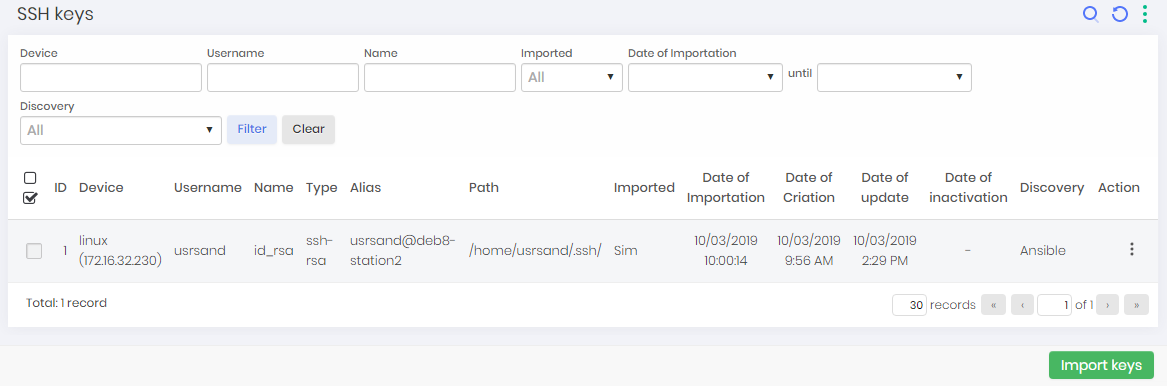
Go to Scan & Discovery ➔ Discovery ➔ SSH keys
The Register action button has the following options: View keys and view authorized devices In this screen you can view the SSH keys found along with a range of information such as device, name, type and path of the key. Additionally you can view SSH key details.
The report also displays the information if the credential found is privileged or not, so when importing, pay attention to this item to import the correct credential.
To import SSH keys select the credentials you want to import and click the Import keys button. If the register is already imported it cannot be selected.
A confirmation screen will appear: Click Yes to finish.
Import Certificates Found
To import certificates found on scans performed go to Discovery ➔ Discovery ➔ Certificates
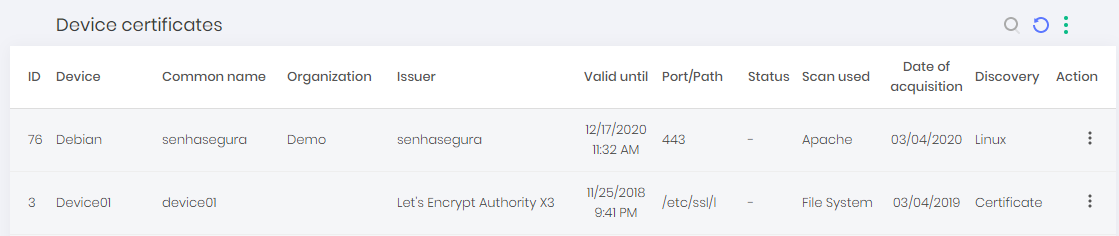
Click on the "Import Certificate" action button, a confirmation screen will appear. Click Yes to finish.
Go to the Certificates ➔ Operational ➔ Certificates menu to view the imported certificate.
Import Local Authorities Found
To view local authorities found on scans performed go to Discovery ➔ Discovery ➔ Local Authorities The following screen will appear:
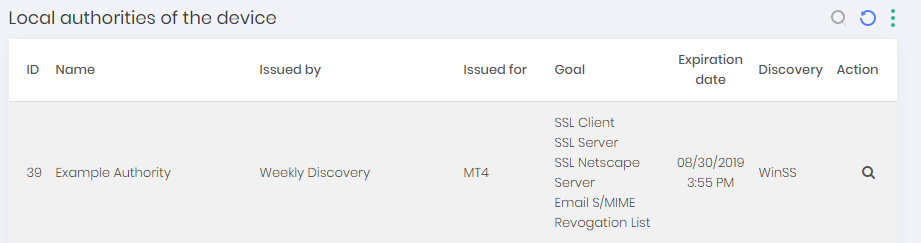
Click on the "Import Authority" action button, a confirmation screen will appear. Click Yes to finish.
View Services
Go to Discovery ➔ Discovery ➔ Services.
This screen shows the following information about the device:
Name
Device
All
Display name
Status
Installation date
Type
Discovery
Scan & Discovery Logs
Through the Scan & Discovery module, you can view a series of reports such as device discoveries logs, credential scans logs, Discoveries status, pooled connections, and a list of unauthorized access to devices registered in the vault.
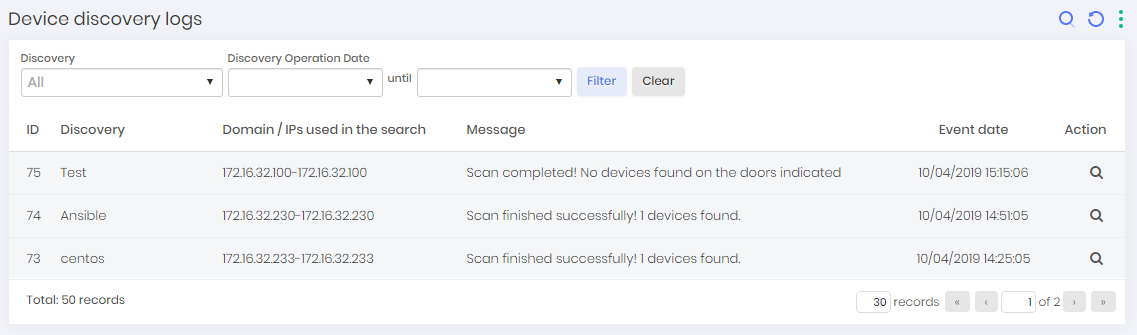
To view the discovery logs go to Discovery ➔ Logs ➔ Device Discovery Logs

On this screen, you can view device discoveries logs along with a range of information such as Discovery name, search range, message, and date of occurrence.
Credential scan logs
To view credential scan logs go to Discovery ➔ Logs ➔ Credential Scan Logs
In this screen, you can view the credential Scan logs along with a series of information such as device, message, date of occurrence and username used.
Details of pool connections by device
To view details of device pool connections go to Discovery ➔ Logs ➔ Credentials
In this screen you can view Discoveries configured using device-separated credential pools along with management IP, device name, and Discovery status.
Details of pool connections by credentials
To view details of pool connections by credentials go to Scan & Discovery ➔ Logs ➔ Device Connections Credential Devices.
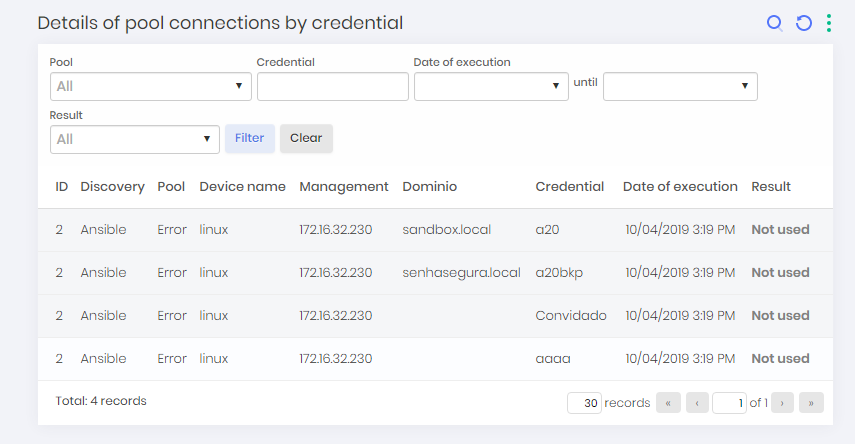
In this screen you can view Discoveries configured using credential-separated credential pools along with management IP, device name, pool name, date of execution, and Discovery result.
Report of certificates with import error
In this report you will present the certificates with import error during the Scan & Discovery. The report also includes a column to highlight the certificates that were not imported because they have a password or key.
Access the report along the way: Discovery ➔ Discovery ➔ Certificates ➔ Certificates with password
Audit
Non-authorized accesses
To view logs of unauthorized access to credentials go to Discovery ➔ Audit ➔ Non-authorized Accesses. In this screen, you can view the access to the credentials registered in the vault made outside the vault, or without authorization. You can view a range of information such as username, device, login date and time, duration and source of access.
Suspicious accesses
To view logs of suspicious access to credentials go to Scan & Discovery ➔ Audit ➔ Unauthorized Access. In this report you have access to credentials that are not managed by senhasegura but that are accessing the target device.
DevOps
Containers information
To view container information found on Discoveries go to Discovery ➔ Devops ➔ Containers menu.
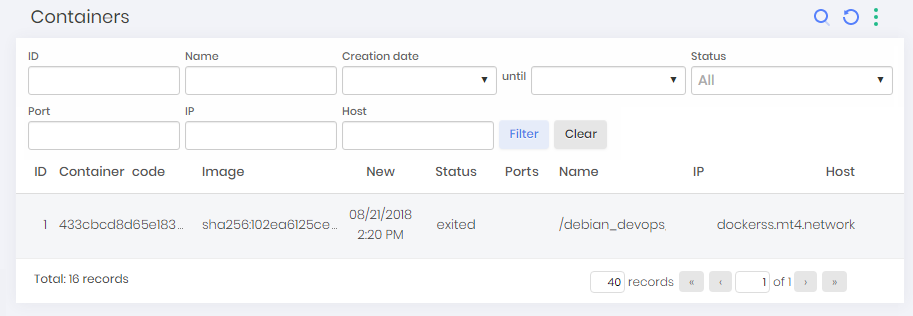
In this screen, you can view the found containers along with information such as container code, image, creation, state, IP and host.
Ansible Playbooks
To view information from the found playbooks go to Discovery ➔ Devops ➔ Ansible ➔ Playbooks.
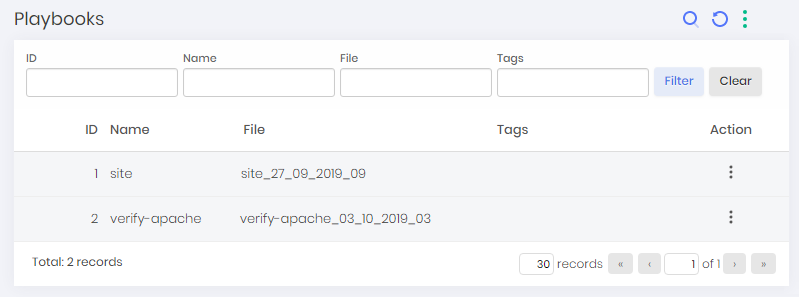
In this screen, you can view the found playbooks. You can still view the tasks of a playbook by clicking its Tasks button or its hosts by clicking the Hosts button.
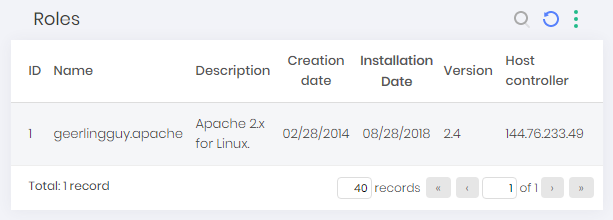
Ansible Roles
To see information from the found roles go to Discovery ➔ Devops ➔ Ansible ➔ Roles
Jekins Jobs
To see information from the found jobs go to Discovery ➔ Devops ➔ Jenkins ➔ Jobs
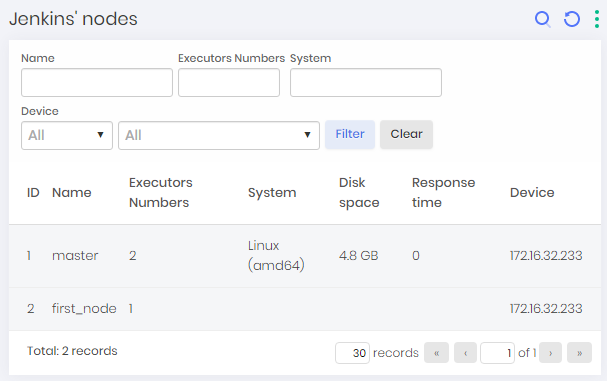
Jekins Nodes
To see information from the found nodes go to Discovery ➔ Devops ➔ Jenkins ➔ Nodes
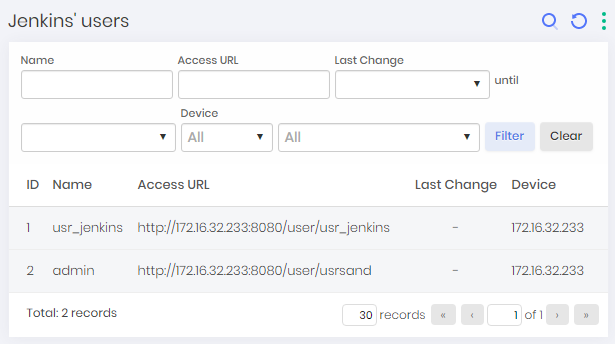
Jekins Users
To see information from the found users go to Discovery ➔ Devops ➔ Jenkins ➔ Users
Kubernetes secrets
To see information from the found nodes go to Discovery ➔ Devops ➔ Kubernetes ➔ Secrets
Windows Services
O senhasegura performs a discovery through a credential scan, looking for those credentials being used by some kind of Windows service.
If you have already conducted a search and want to check which credentials are associated with any service were found, access the menu: Discovery ➔ Discovery ➔ Services a report with the credentials found will be displayed.
However, if you have not yet configured the search to find these credentials follow the instructions:
Create a new search through the menu: Discovery ➔ Setings ➔ Discovery or change one already created
cautionIn order to configure the search for credentials used by service it is necessary to use the search by Domain.
Continue to the guide Searches and select the option Identify Windows accounts associated with a service
If you have not yet set up a Windows plugin, go to the Plugins tab and add a port and a Windows plugin to be used in this scan.
Lastly click on Save
After the scan is complete you can check the credentials found in the service report (Discovery ➔ Discovery ➔ Services).
Remember that they are credentials are associated with a service Windows, if your scan focuses on different system devices the search will not get results.
Special Features
Discovering and auditing configuration's changes
To discover and audit changes in configurations:
In Discovery ➔ Settings ➔ Discovery, when creating or editing a discovery, in the search tab you can check Identify systems configuration.
We integrate with the following systems:
Active Directory
Microsoft Exchange
SQL Server
File Systems
NetApp
For this configuration, we will need the Windows or SSH plugin.
After the discovery is done, the result will be shown in Discovery ➔ Discovery ➔ Configurations.
To restore a configuration, you can search in Discovery ➔ Discovery ➔ Configurations, the action History will show all different configurations, and in the button Restore you can recover any previous configuration.
Discovering privilege accounts in other applications
The senhasegura has a series of plugins to automatically find accounts with high privilege in several applications. Besides having a flexible platform that allows the inclusion of new third party systems, improving the monitoring and identification possible offenders in your company.
This integration with third party applications also allows the synchronization of equipment with the main CMDB tools on the market, such as ServiceNow and BMC, synchronizing their device base, ensuring visibility and control of your entire equipment park. Through our support service we are able to expand the interaction with third party systems according to the needs of our customers.
To do so, follow the instructions in the previous sections and create a new Discovery of Application and fill in the necessary data for the correct discovery.
IIS application pool accounts
senhasegura also performs the search for local and domain credentials associated with an IIS application pool.
To perform a search for these credentials follow the instructions:
As explained in the dry antherors create an Application Discovery through the menu Discovery ➔ Settings ➔ Discovery
Uma vez no formulário, siga para a guia Buscas selecione a opção Identify accounts in application pools (IIS)
cautionOnly Windows plugins may be used on this Discovery
Save and carry out the search.
IIS Application Pool Report
At the end of the search it will be possible to analyze a report containing the information collected such as: name of the pool, username of the credential linked to the pool, untime version of the application pool and other data.
To do this, go to the menu: Discovery ➔ Discovery ➔ Devices.
Select the item in the report you want to check and click the action button Application pools IIS.
A report with the collected data will be displayed.
Secrets Discovery in Kubernetes
It is possible to perform the discovery of secrets in Kubernetes through the integration of the senhasegura with the orchestrator.
Before performing this type of discovery it is necessary to know:
The Kube API Server URL
On which port the Kubernetes is being executed. By default it is 6443.
Bearer token to access the Kubernetes API
Getting the bearer token
The token to be used in the senhasegura must have permission to list and search the secrets, so it must be generated according to our instructions.
Access the Kubernetes server and execute the following commands:
Command to create a service account on Kubernetes:
kubectl apply -f - <<EOF
---
apiVersion: v1
kind: ServiceAccount
metadata:
  name: senhasegura-discovery
  namespace: kube-system
---
apiVersion: rbac.authorization.k8s.io/v1
kind: ClusterRole
metadata:
  name: senhasegura-discovery
rules:
- apiGroups:
  - ""
  resources:
  - secrets
  verbs:
  - get
  - list
---
kind: ClusterRoleBinding
apiVersion: rbac.authorization.k8s.io/v1
metadata:
  name: senhasegura-discovery
subjects:
- kind: ServiceAccount
  name: senhasegura-discovery
  namespace: kube-system
roleRef:
  kind: ClusterRole
  name: senhasegura-discovery
  apiGroup: rbac.authorization.k8s.io
EOFcautionDo not change any data in this command, this may influence the effectiveness of the token. If you wish, only the name field can be changed, but we do not recommend this action since the string
secure-discoverywill help in identifying the policy.Command to export the service account token to environment variable:
export K8S_TOKEN=$(kubectl get secrets/$(kubectl get serviceaccount/senhasegura-discovery -n kube-system -o jsonpath='{.secrets[0].name}') -n kube-system -o jsonpath='{.data.token}' | base64 -d)cautionIf the name field was changed in the previous command it must be changed in this one too.
Command to print the token on the screen:
echo $K8S_TOKEN
Registering the credential
After executing the commands and with the token in hand it is necessary to associate it with an access credential to the Kubernetes server.
Go to PAM ➔ Credentials ➔ All click on the action button in the report to create a new credential.
Enter your credential username
Define the Password type
In the field Device select or Kubernetes server
Select the Set current password field and in the Password field enter the token obtained
Click Save
Performing the discovery
With the bearer token already registered in the senhasegura you will be able to perform the discovery. To do so, access the menu Discovery ➔ Settings ➔ Discovery and create a new discovery of Devices or Containers:
Containers Discovery
Please refer to the Create Discovery section of this chapter to understand how to complete the form.
This type of discovery will search for containers on a host. In the Container host field select the host where the search should be done.
In the tab Search select the option Find DevOps artifacts
When selecting the option a new tab called DevOps will be displayed, access the tab and go to the section Kubernetes' settings
Select the options:
Enable Kubernetes service: Enables the to search for Kubernetes services
Search secrets: Performs the search for secrets
Bearer token: Uses as a means of API Kubernetes authentication employing a bearer token
In the field Credential access Kubernetes select the credential where the bearer token was registered
Then select which port you want Kubernetes to search on.
infoThe default port of Kubernetes is 6443, or enter the number configured for your Kubernetes server.
To finish click Save to finish.
infoConsult Credentials Administration to understand how to complete the credentials registration form.
Device Discovery
Please refer to the Create Discovery section of this chapter to understand how to complete the form.
This kind of discovery will search for devices. In the *Initial IP** field enter the IP's range where the search should be done.
In the tab Search select the option Find DevOps artifacts
When selecting the option a new tab called DevOps will be displayed, access the tab and go to the section Kubernetes' settings
Select the options:
Enable Kubernetes service: Enables the to search for Kubernetes services
Search secrets: Performs the search for secrets
Bearer token: Uses as a means of API Kubernetes authentication employing a bearer token
In the field Credential access Kubernetes select the credential where the bearer token was registered
Then select which port you want Kubernetes to search on.
infoThe default port of Kubernetes is 6443, or enter the number configured for your Kubernetes server.
To finish click Save to finish.
infoConsult Credentials Administration to understand how to complete the credentials registration form.
Viewing the secrets found
Access the menu Discovery ➔ DevOps ➔ Kubernetes ➔ Secrets. This screen will display the list of Secrets found during the search.
Click on the action button to have more information about Secret.
Conclusion
By completing this book you will have acquired the knowledge to perform the related activities of Scan & Discovery.
If you wish to continue learning how to use the senhasegura in the best possible way, please ask our support team for our available documentation according to your profile and needs.