senhasegura.go for Windows
Introduction
This book will explain how to install, use, manage and analyze the data and functionalities of senhasegura.go .
Symbols used in this cookbook
This book uses the following symbols to highlight information that should be taken into account for the best use of senhasegura :
Info - useful information that can make the use of the solution more dynamic
Caution - actions and items that cannot be ignored
commands: data that must be entered in the same way as described in this book- URLs : paths to access web pages.
<KEYS>: keyboard paths that will be used to perform actions.
senhasegura.go
senhasegura.go it is a PEDM solution for Microsoft Windows environments. Through this solution you can perform the following tasks:
The Privileged Elevation is automated without exposing the password;
The Privileged Elevation on events request that use Microsoft Windows UAC;
The Privileged Elevation to Control Panel tasks and network interfaces;
Network shared directories access without exposing the credential;
Video recording for tasks with elevated privileges;
Denylist and allowlist control to workstation's applications;
senhasegura centralized audit;
2FA OTP use for tasks
Offline use of the credentials.
Just-in-time (JIT) elevation for Windows sessions;
senhasegura.go
Purpose
senhasegura.go it is a PEDM solution for Microsoft Windows platforms that aims to protect administrative credentials without preventing the user performs its privileged tasks.
Some applications need special rights that are not in the logged user scope. Or use special resources that need segregated credentials.
In this case, the administrator must have to guarantee the credential will be delivered to the user, but also guarantee the password change will be performed regularly. This can be expensive and a big risk in case the administrator has to reveal the credentials to the users, daily, after the password change.
Considering this scenario, senhasegura.go brings a solution integrated with senhasegura platform. Allowing users to be without the need to visualize the credentials to perform their tasks. Allowing that this password to be automated recycled continuously by senhasegura .
Besides this benefit, all the actions allow segregation and audit that brings decision and governance power to the administrator.
The purpose of this certification is to guarantee the senhasegura professional has conditions to install, configure use, audit and give support to senhasegura.go on a workstation as well on senhasegura platform administrative screens.
Architecture
senhasegura.go is constituted by an application that will install on users workstations, and a management module installed on the senhasegura web service.
The Windows application is composed of four executed services on the system layer (local system) and one performed desktop application on user sessions.
The Windows application
The application available to the user, which will execute on the user's Windows session with an authentication token of your session, has just the data visualization and available actions. In other words, it is simply the interface for the features.
The Windows services
The Windows services are all always automatically executed using the user LOCAL_SYSTEM.
The confidential data are stored safely on Microsoft Isolated Storage following security standards described by Microsoft.
The transfer data between senhasegura web platform and senhasegura.go occur through the connection HTTPS and API REST. This communication occurs inside the senhasegura.go services to prevent the capture by logged in users. Concluding, the messages exchange has additional asynchronous encryption with a dedicated random key for each installation.
These services are key to the product, because all communication for installation, deployment of policies, and settings in general happens through this communication channel.
Every service runs into separate threads to avoid unavailable service chained reaction.
They are:
ssgosvcidsprocess: "senhasegura.go - Elevation blocker"IDS Service to block administrative privileges applications executed outside the senhasegura.go .
Enables the identification of applications that have been automatically elevating privileges without the user knowledge, or even with its consent.
ssgosvclicense: "senhasegura.go - License Manager"Responsible service for the license file and machine register on the server, logs synchronization and directories and files monitoring.
Prevents workstation cloning or the attempt of senhasegura.go misuse by a workstation or ghost user.
ssgosvcidsnetwork: "senhasegura.go - Network access control"DS service for applications blocking that performs TCP/IP and UDP communication to destinies that are not the senhasegura .
Prevents horizontal hopping through network sharing or unapproved binary access to network resources.
ssgosvcbridge: "senhasegura.go - Bridge"Interconnection Service responsible for synchronization of any configurations from the senhasegura .
Interconnection Service with Windows Kernel for privilege elevation and session control.
Other Integrations
Besides these integrations through applications and services, senhasegura.go is also integrated through DLLs and Drivers that make it possible to act on Windows processes that involve user identification, such as login, RDP access and UAC elevation.
It is also possible to configure the obligatory use of the 2FA OTP token to increase the level of security at elevations.
Supported Architectures
senhasegura.go was developed for platforms Windows Server, and Workstations. 64-bit and 32-bit are supported.
Its dependencies are:
Microsoft .NET 4.8;
Microsoft Visual C++ Redistributable for Visual Studio 2017;
Microsoft Visual C++ Redistributable for Visual Studio 2019;
Supported versions are:
Windows 7 (32-bit and 64 bits);
Windows 8.1 (32 and 64 bits);
Windows 10 version 1607 and above (32-bit and 64-bit);
Windows Server 2008 R2 SP1 (64-bit);
Windows Server 2012 64-bit edition (64-bit);
Windows Server 2012 R2 (64-bit);
Windows Server 2016 (64-bit);
Windows Server version 1803 and above (64-bit);
Windows Server 2019 (64-bit);
The operation guarantee and compatibility are associated with the operational system vendor's support. Discontinued system versions may be at risk of not supporting the Microsoft .NET updates, resulting in a system incompatibility.
Get, install and configure
Getting and installing senhasegura.go
Through the PAM Solution portal, you will have access to the senhasegura.go installation binaries. These binaries are identified by its system version, platform and installation process language. Once installed the language displayed is associated with its Windows session language. In other words, the language switch belongs to the Windows environment settings.
Before installing senhasegura , be sure that your operational system, architecture and system premises .NET and Visual C++ have been supplied.
After the installation, the four Windows services should start automatically. You can start senhasegura.go client in a low privilege session to test the opening.
Configuring the WebService A2A client
For senhasegura.go installed clients to communicate with senhasegura it's necessary to configure an WebService A2A client that represents all the client applications.
This application audit is in the WebService A2A module and will not be detailed as much as the senhasegura.go management module. In this case, the WebService A2A works as a communication channel.
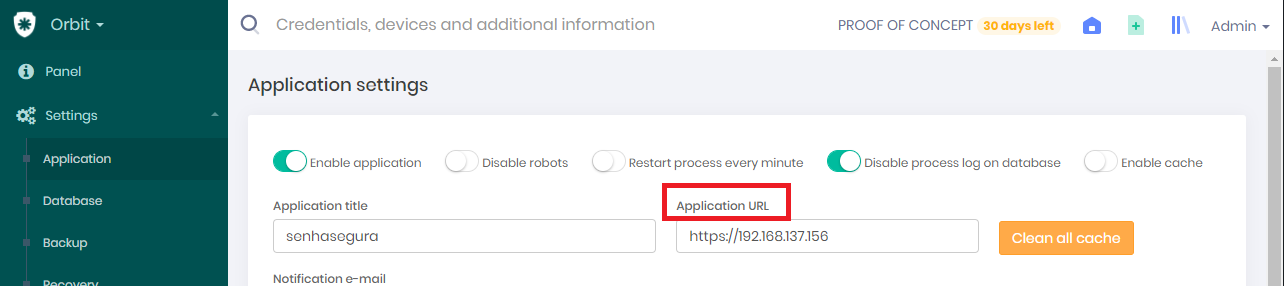
Configuring Communication URL
The first step is to ensure that the communication URL of senhasegura is correct. This is the URL provided to each installation in the licensing process. That is why it is essential to validate at this first time.
Go to Orbit module;
Access the menu: Settings ➔ Application;
Check the URL supplied in the field Application URL matches the URL that can be accessed by all workstations that will run the senhasegura.go ;
If it is necessary to change, change the address and confirm with the Save button in the footer;
Configuring Communication URL
Registering environment and system
An WebService A2A application has to be linked to an environment and system. These two support entities are used by other system modules.
Access the module Settings;
Access the menu System parameters ➔ Segmentation ➔ Environments
Check if the desired environment isn't already registered;
Otherwise, register a new environment through the New report action;
Access the menu System parameters ➔ Segmentation ➔ Systems;
- Register a system to senhasegura.go
Creating an WebService A2A client
This part of the process needs great attention because a failure in this registration will prevent the use of senhasegura.go in workstations.
Access the module WebService A2A
Access the module Applications
Register a new application without using OAuth
The communication between the senhasegura.go and senhasegura server is performed through the HTTPS connection and contains an additional dedicated asynchronous key.
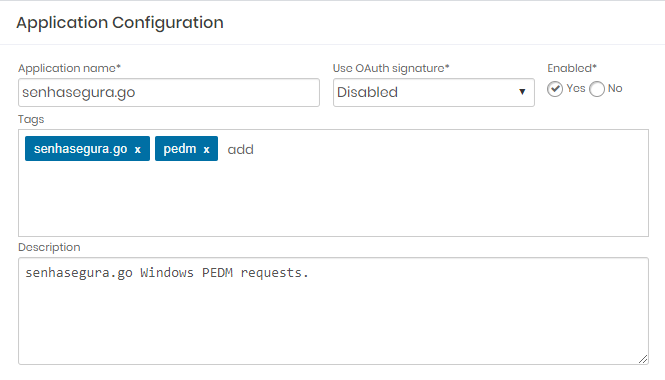
Application Configuration
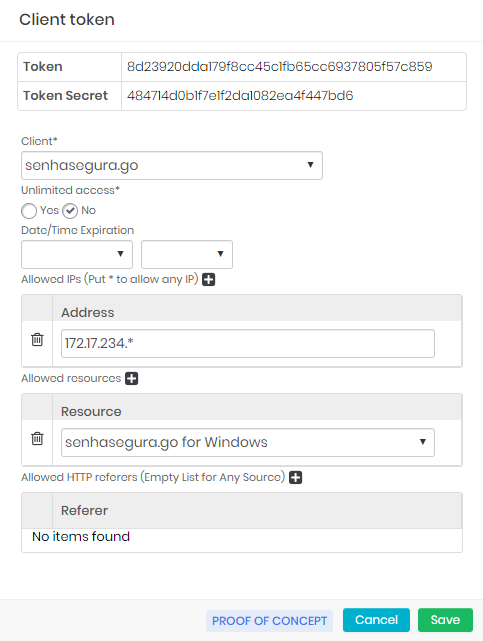
In the register created, configure the authorization of this application through the registration action Authorizations
In the presented report, add a new authorization in the New report action button
In the tab Credentials, configure the System and Environment;
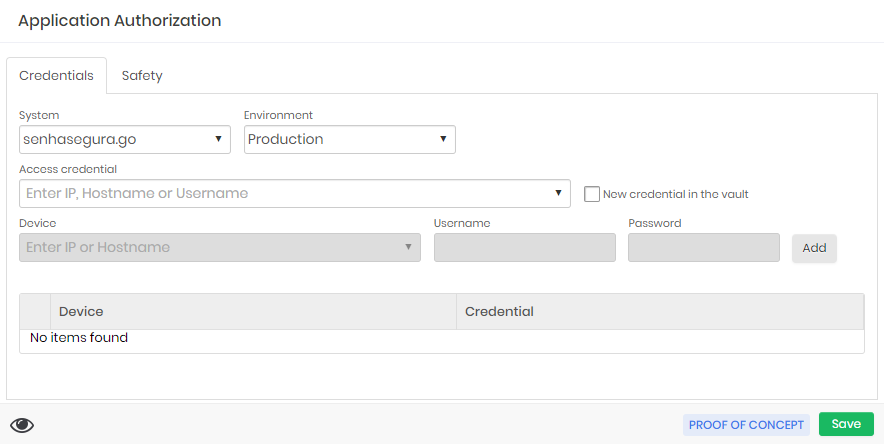
Application Authorization In the Security tab, configure the list of IPs that will use senhasegura.go . Use the wildcard character "*" to determine a network segment;
Maintain the checkboxes Authorized resources unchecked;
Maintain the indicator Enabled as Yes;
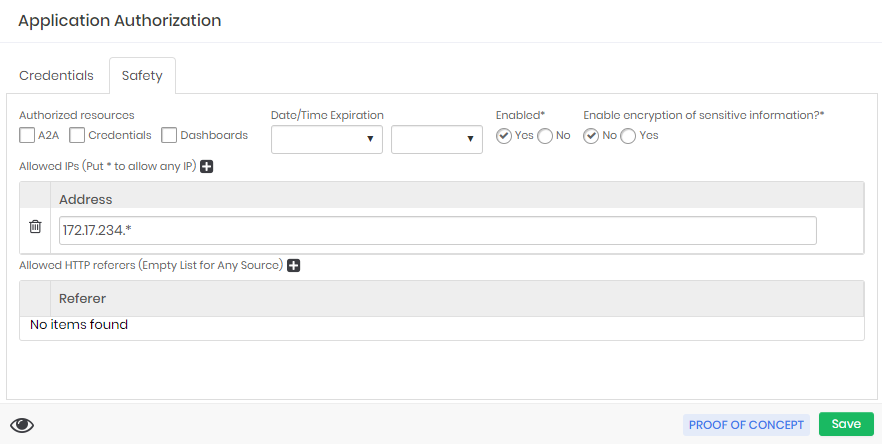
Application Authorization - Security tab Save the registration.
Go to a module Settings, menu Services ➔ API ➔ Tokens
Find the application created on the present list and click on the action Edit client token
In the form presented, add in the list of resources the API "senhasegura.go for Windows"
Save the configuration.
Token configuration
Generating a use license
At this stage, all data required to issue a license to use senhasegura.go are configured.
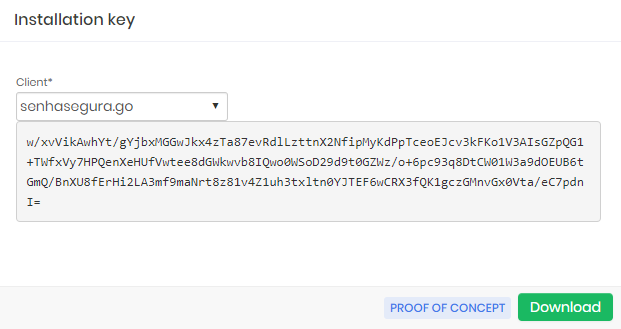
Go to the module go and access the menu Settings ➔ Installers
Click on the footnote button Installation key;
Select the client WebService A2A list create previously Client;
The text generated in the field below is the license of use that must be used to activate the client installations. You can choose to download this license from the Download footnote button.
The license file can be used if you perform a batch installation through Microsoft Active Directory.
Installing and activating a workstation
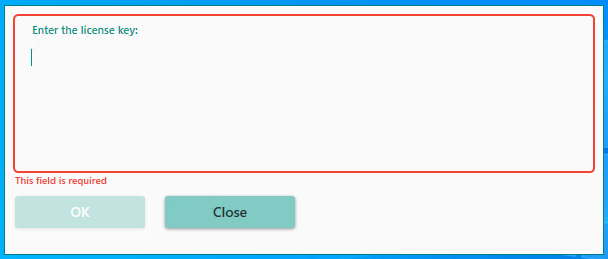
The installation process is simple. Read the term of use carefully and proceed with the installation. In the end, start the senhasegura.go through the shortcut available on the desktop screen.
You'll be presented to an activation form. Copy and paste the previously generated license and continue.
In case you receive one of the error messages bellows, perform the process suggestion:
1011: User inactive location: The relative user of the workstation is inactive in the senhasegura . In these cases, the user was already using senhasegura.go , but his workstation user is inactive in the relationship of the senhasegura.go module. Do not confuse with the user account of the web senhasegura .
1013: Local user does not exist on server: The workstation user does not have an account with the same username on the senhasegura platform
1014: User pending approval location: User is pending approval for use of senhasegura.go on the workstation;
1004: Invalid credential: The asymmetric workstation key does not exist on the senhasegura server;
1008: Certificate inactive: The workstation was inactivated by the administrator in the workstations registration of senhasegura.go
1002: Registration of pending approval workstation: The workstation is pending approval by the administrator in the workstations registration of senhasegura.go
2028: The workstation version is prohibited: The version installed on the workstation was disapproved by the administrator of senhasegura
Approving user and workstation manually
Once installed and applied for the use license, the administrator must approve the use of senhasegura.go by the workstation user.
In case the message 1013 be presented, register a user on senhasegura with the same username as the account used to log in the workstation. The minimum access profile is for password visualization.
If the error message 1002 is displayed to the user, will be necessary to approve the workstation.
To approve a workstation go to the menu: go ➔ Workstations
On the workstation report, find the desired workstation and notice that its status has an orange circle indicating that its pending of approval;
Utilize the register action Authorize to approve the senhasegura.go use by the workstation;
Start the senhasegura.go again on the workstation;
In case the error message 1014 be presented, it means the workstation is already approved, but the user needs approval. Probably it is another user in this workstation that already uses senhasegura.go . So it is only necessary to approve another user.
To approve a user go to the menu: go ➔ Users
In the users' report, locate the username linked to the desired workstation. Notice that its status will be with an orange circle indicating that it is pending approval;
Use the registration action Authorize to approve the senhasegura.go use by the user;
You can determine an expiration date for this authorization. If you leave it blank, the approval will not be compulsorily revoked.
Start senhasegura.go on workstation again;
Automatic user and workstation approval
The workstation and users approvals can be automated to avoid the excess of interactions between the person who is installing the system and the administrator that has to approve the registers on the web interface.
By default the senhasegura doesn't have this automation enabled, it is up to the administrator to take this decision. Because once enabled any machine and user, that are in the company network, with a valid license, have the permission to operate the senhasegura.go without the dependence on administrator approval.
To configure the automatic approval, follow these steps:
Go to the menu: go ➔ Settings ➔ Parameters
On the screen System settings, make sure you are in the tab go;
Change the following parameters to Yes:
"Allow self-approval of workstation links?"
"Allow self-approval of all other links?"
"Allow self-approval of the user's first link?"
Confirm the change with the Save footnote button
senhasegura.go parameters
Using senhasegura.go
Understanding the interface of senhasegura.go
The senhasegura.go can be customized. The image displayed and the description of the items may vary from version to version, or by the administrator's decision to release some features to users or not.
In the header, you can see the default credential selected by the user. This default credential will be used for privilege elevation actions inside and outside of the senhasegura.go interface.
If active, you have the offline options of senhasegura.go and the single sign-on shortcut (SSO) to the web portal. We will explain this functionality further below.
In the left sidebar, you have access to the submodules of senhasegura.go .
Execute: General application privilege elevation;
Control Panel: Privilege elevation for control panel applets;
Credentials: List of credentials available to the user;
Network adapters: List of workstation network interfaces. The administration of these interfaces is performed in this sub-module, not by the Control Panel;
Network sharing: Shared network directories used by the user. The credentials will be used to access the directory without the need for exposure or mapping;
Uninstall: Applications available for workstation uninstall;
Automation: Automation macros made available to the user by the administrator;
For each sub-module, the central area will display its listing and provide filter fields above its header.
Using credentials
Before we present the possible actions that a user can perform using the credentials managed by senhasegura , it is necessary to understand how credential management is integrated with senhasegura.go .
Users of senhasegura.go will always be linked to the account used to login to Windows. Therefore, this Windows username must have an equivalent user in the senhasegura , as presented in the installation activation process.
This senhasegura user account is passive to all access group controls. That is, user can use of the access workflow, emergency access and credential segregation.
Therefore, if the user depends on an approval process to view or use a credential, this rule also applies to the use of the credential by senhasegura.go .
From senhasegura.go you can make use of the credential, view or copy your password. These actions are equivalent to proxy use, viewing or copying via the web interface. Therefore, all these actions will be audited and forwarded via SIEM.
Performing an elevation of privilege
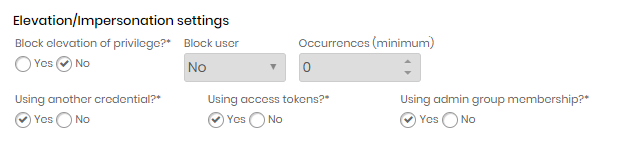
There are several ways to perform a privilege elevation, each has a different approach on how to perform the elevation. They are:
Elevation using another credential;
Elevation through access tokens;
Elevation through group memberships. For each elevation type, we also have JIT access.
Selecting a credential to use
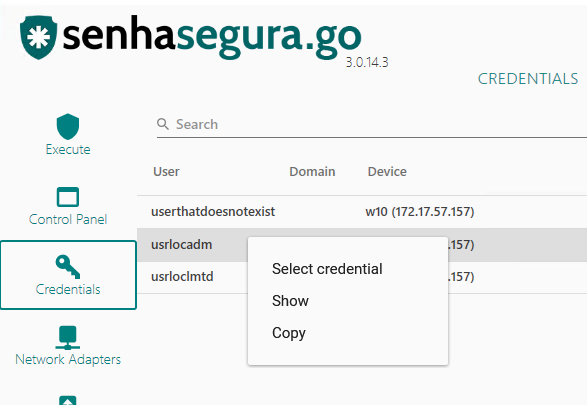
To select the credential that will be used for the elevation, go to the Credentials sub-module, locate the desired credential in the list and double click on its register.
Note that the credential username is now selected in the upper right corner. You can also right-click on the registration and select the option Select credential to select the use of the credential.
In this same context menu of the right-click button of the mouse, you can view the credential password using the Show option, or copy its value with the Copy option.
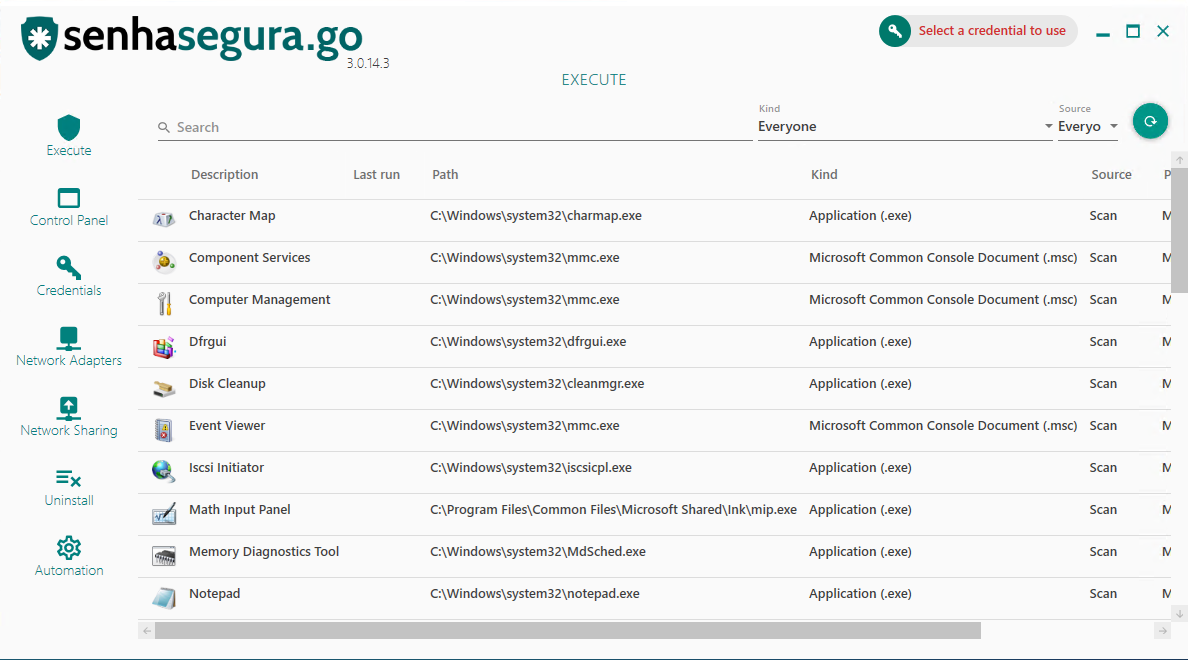
Elevating an application from the list
In the Execute sub-module there is a list of applications available for elevation. This list is initially formed by a scan of applications from the start menu. Therefore, not all applications will be present.
The refresh button located in the top right corner of the list will make a new search to start for new applications.
If an application is not present on the list, you can drag its shortcut or execution binary into the list. EXE, LNK, MSC and MSI files are accepted as executable. Locating the desired application, just double-click on its register to start the elevation. Another way is to right click under the registration and choose the way to run the application.
Run as with privileges: Will run the application with elevated privileges within a dedicated session of the selected credential;
Execute: Will only run the application within a dedicated session of the selected credential;
When running the application, notice that the applied theme differs from the logged-in user. This occurs because the application is being executed in another profile. You can validate.
Elevating an application outside senhasegura.go
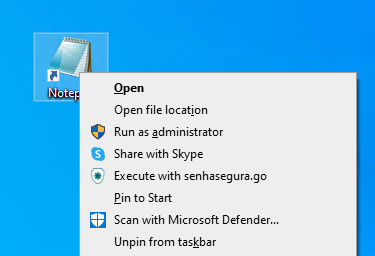
All the executable application or shortcuts have in their context menu an action "Execute with senhasegura.go ". With this action, you can run an application, if the credential has been selected previously. In case there isn't a selected credential, you'll be alerted to select one.
In these cases, the elevation that will be used is Run as with privileges, which the application runs with all the administrative privileges.
Elevating privileges for Control Panel applets
In the sub-module Control Panel you'll have access to the available applets on the Control Panel. All the available applets allow the elevation as much as the applications.
Till the version 3.0.14, by a technical limitation, isn't possible to perform a session recording of the control panel applets. However, the auditing use is registered on senhasegura .
Managing network interfaces
In the Network adapters sub-module you will see the list of network interfaces available for configuration.
The principle is the same as the Control Panel applets. By double-clicking or accessing the context menu of the registry, you have access to the settings panel of the network interface.
Till the version 3.0.14, due to a technical limitation, session recording for network interface applets is still not possible. However, the usage audit is registered in senhasegura .
Access to shared folders
On the sub-module Network Sharing the user can access a network shared folder using the selected credential. This credential doesn't necessarily be a domain credential.
The folders accessed through senhasegura.go are registered, and can be accessed again because of the credential cache managed by Windows. These folders won't be mapped as a unit.
Folders accessed previously can be removed from the list through the option Remove sharing of the same context menu.
To add a new folder, click on the right button and choose the option New from the context menu.
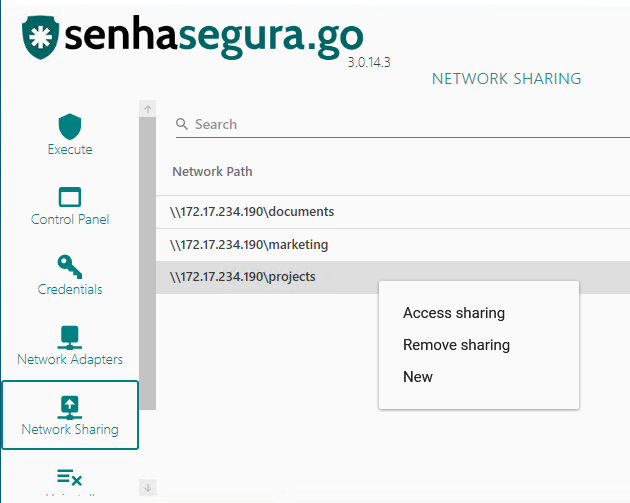
Once authenticated the access to the folder, Windows can create a local cache with the network access allowing the folder to be accessed without using senhasegura.go . The main purpose of senhasegura.go is to automate this access without showing the password to the user.
Uninstalling Applications
The uninstallation of applications is performed by the Uninstall sub-module. In this sub-module the list of installed applications will be displayed.
To uninstall an application, have a privileged credential selected and right-click on its registration and select the action Uninstall in its context menu.
At this point, you have been presented to the main features of senhasegura.go .
There are also several features to explore, but before we can understand them we will learn a little more about the reports on the web platform and next we talk about the senhasegura.go advanced features.
Synchronizing Policies and Credentials
Policy and credential changes that occur on the senhasegura server will be automatically updated in the senhasegura.go interface through its services every 5 minutes.
Sometimes it may be necessary for this update to be immediate. Then the senhasegura.go user can choose to click on the systemtray icon and select the Update credentials or Synchronize policies options.
The Backoffice
Now that we have used the main features of senhasegura.go , we will see the registers that were sent to the server and its applications.
Operational screens
Operational screens are screens where the administrator can influence the behavior of the senhasegura.go installation.
As we have seen in the installation process, it is possible to deal with operations of the workstation where it is installed and separately with the user who is using it. Sometimes more than one user can use the same workstation. And the settings and operations of one user cannot affect the other.
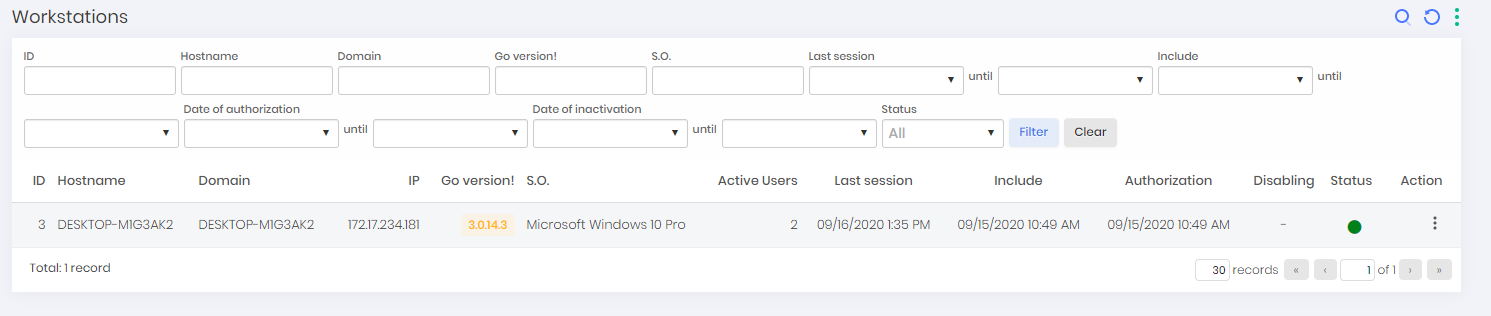
Workstations Report
Through the menu go ➔ Workstations you can have access to the workstations that have an installation of senhasegura.go .
The registers are distinguished by their features, and have a color status indicator on the column Status. The values can vary from:
Pending (Orange): New installations that have not yet been approved or refused by the administrator. Not allowed to operate while there is no approval
Authorized (Green): Installations that have already been approved by the administrator and can use the features on the workstation;
Disabled (Red): Installations that have been revoked by the administrator. That is, they cannot operate the senhasegura.go ;
The Orange (Pending) status will only be displayed if automatic approval of workstations and users is not active. senhasegura by default comes with these options inactive, forcing the administrator to manually approve workstations and users.
This report does not have actions to add a workstation. One workstation is just added in case there is an installation with senhasegura.go activation enabled on the workstation itself.
Some registration actions will also vary depending on the status:
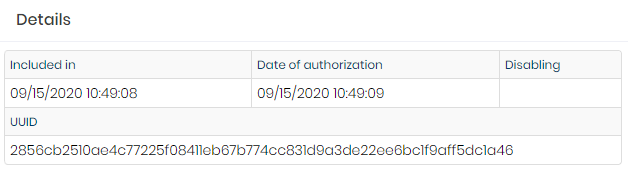
Detail: Presents the status dates of the workstation and its unique identifier. This unique identifier is used for in-depth diagnostics by our support team;
Detaisl report Users: Presents the list of users who ran senhasegura.go on this workstation. This report will be explored further;
Events: They are all events captured by senhasegura.go services or executed by users through senhasegura.go in this workstation. This report will be explored later;
Disable: Present only in the Authorized state, this action inactivates the use of senhasegura.go in the workstation;
Authorize: Authorizes the use of senhasegura.go on this workstation. This the present status;
Users Report
Through the menu go ➔ Users, you can have access to the users that have used senhasegura.go . This report allows the administrator to filter by fields that allow crossing different origins and identify the different connections between the senhasegura users and the workstations where they made use of senhasegura.go .
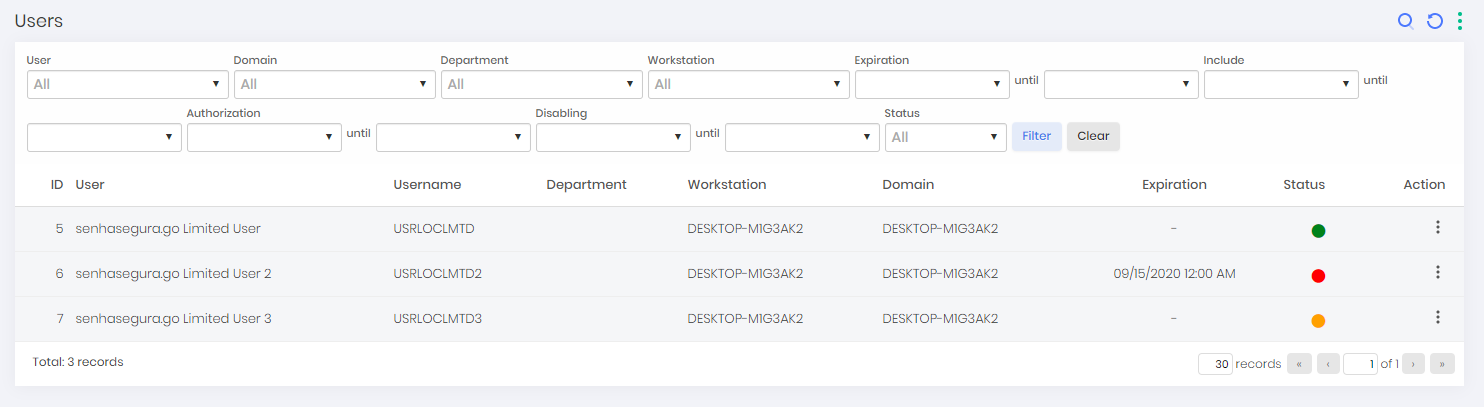
The Status field, just like in the workstation report, shows the status of this user on that particular workstation. Therefore, a username may be enabled to use the senhasegura.go on one workstation and be prohibited to use on another workstation.
Pending (Orange): Users who have not been evaluated by the administrator to use senhasegura.go . Not allowed to operate while there is no approval;
Authorized (Green): Users who have been approved by the administrator and can use the features on the workstation;
Disabled (Red): Users who have been revoked by the administrator. That is, they cannot operate the senhasegura.go ;
It is not possible to add new registers through this report. The user registration just occurs in case a user makes use of senhasegura.go on a workstation where senhasegura.go is installed and activated.
Actions per record may vary between:
Authorize: Present in Pending and Disabled status, it allows the user to use the senhasegura.go . You can indicate an expiration date of this approval, which after expiration, automatically will be the approval will be revoked
Revoke: Present in Pending and Authorized status, refuses the use of this user's senhasegura.go on the workstation. This does not prevent the user from making a new request on another workstation. The refusal will also not be expanded to other valid approvals this user has on other workstations and will also not disable the use of the workstation for other users;
Detail: Presents this user's details regarding approval, inactivation and inclusion dates;
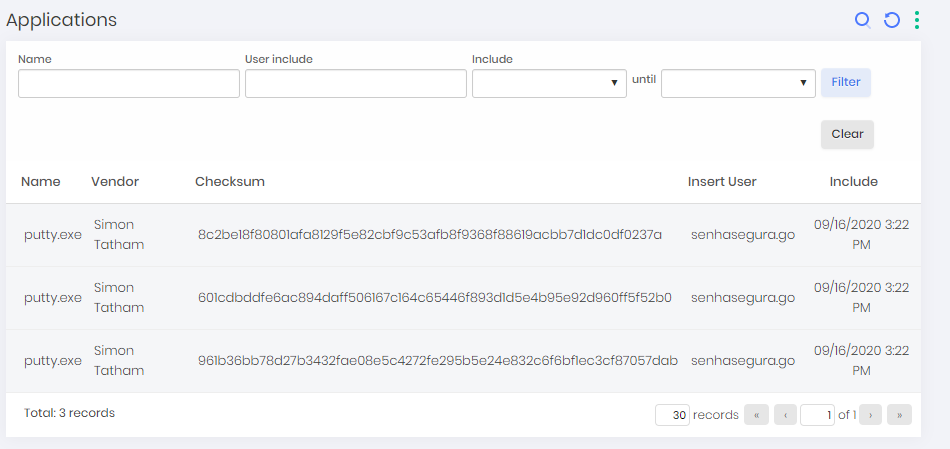
Applications and Uninstallers Report
In the menu go ➔ Applications you can view all applications that have already been automatically mapped by the services of senhasegura.go , or executed by users through senhasegura.go .
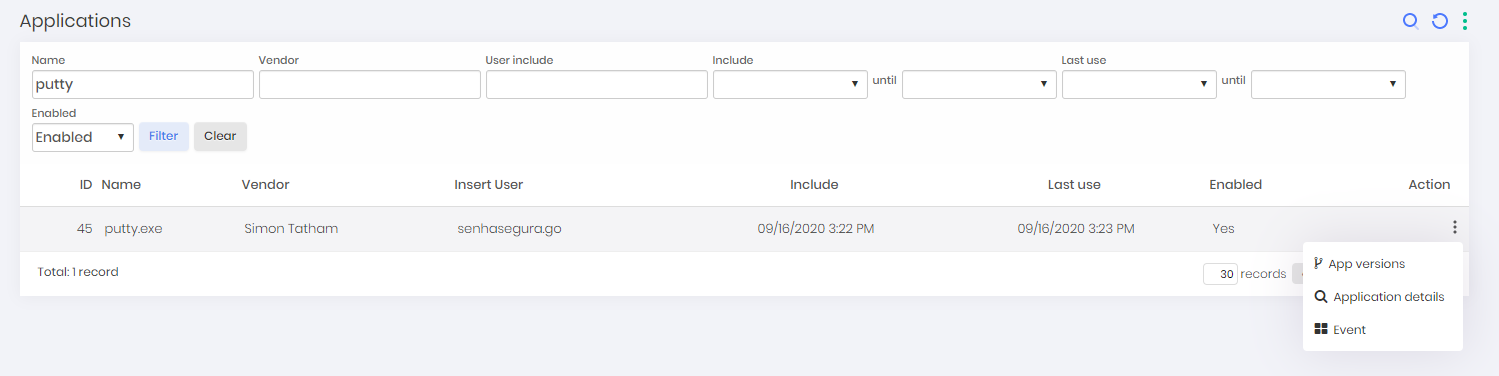
An application is unique to the senhasegura , regardless of its installation folder and the name of its binary. This way, senhasegura.go is able to identify its different versions and centralize the registration to create the segregation.
This also allows the administrator to identify the different versions installed in your machine park. Its registration actions also allow visualization of execution events.
In the menu go ➔ Uninstallers there is a list of all uninstallers of applications identified in workstations.
Because they are also applications, their registration actions are identical to the actions of the application report.
Control Panel applet report
The Control Panel applets are pre-configured. This is necessary because Microsoft has different ways to access the controls for each Windows version.
You can access the controls through the menu go ➔ Control panel.
In this report you can observe each command used to achieve control, and which Windows versions are compatible.
The registration action presents a report with all events from when a workstation executed the high access control.
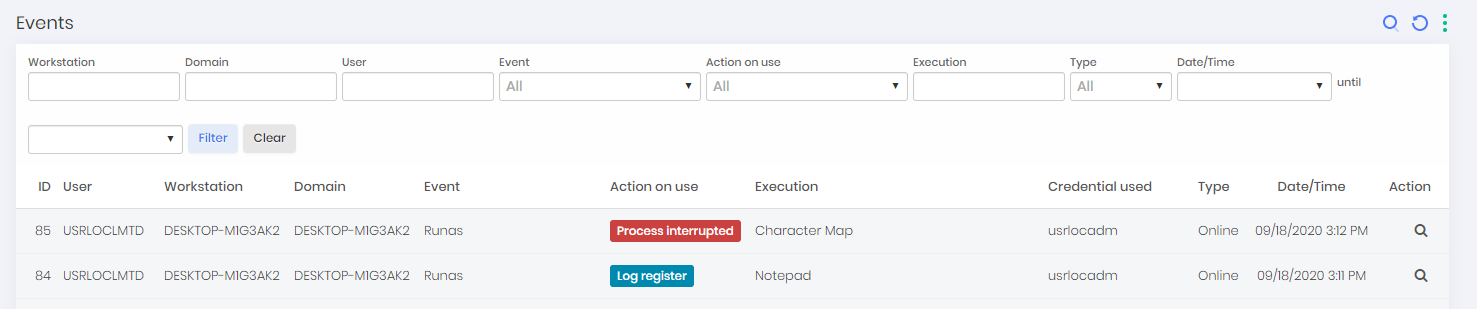
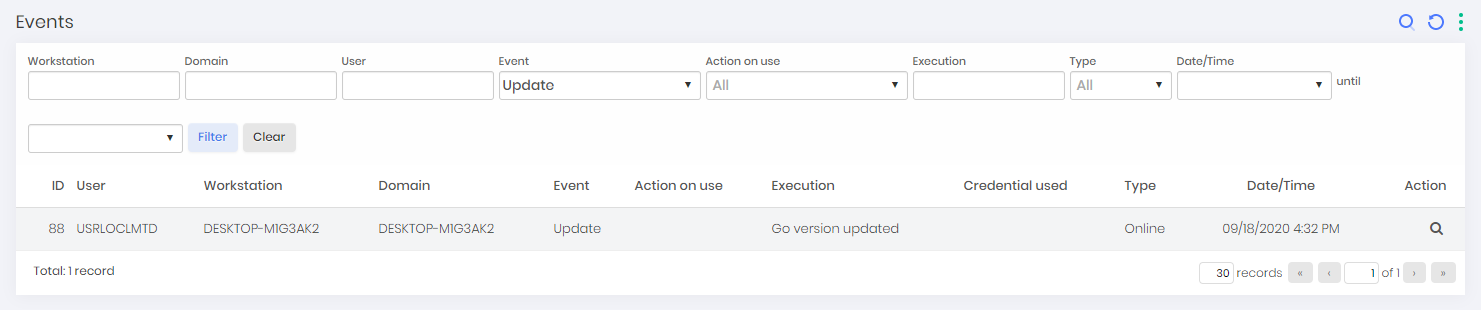
Event Report
This report is present as a detail in all records of the Workstations, Applications, Uninstallers and Control Panel reports.
In this report, each automatic or intentional action of the user is centralized from senhasegura.go . When accessed as detailing, you have the filtered and reduced view of the source entity. But accessing through the menu, you have access to all filters and the possibility of combinations to identify the events that are occurring in workstations.
In the action field is possible to change permissions of a previously executed application by the user, restricting or allowing the application so that the user will or won't be able to use this tool again in a future moment.
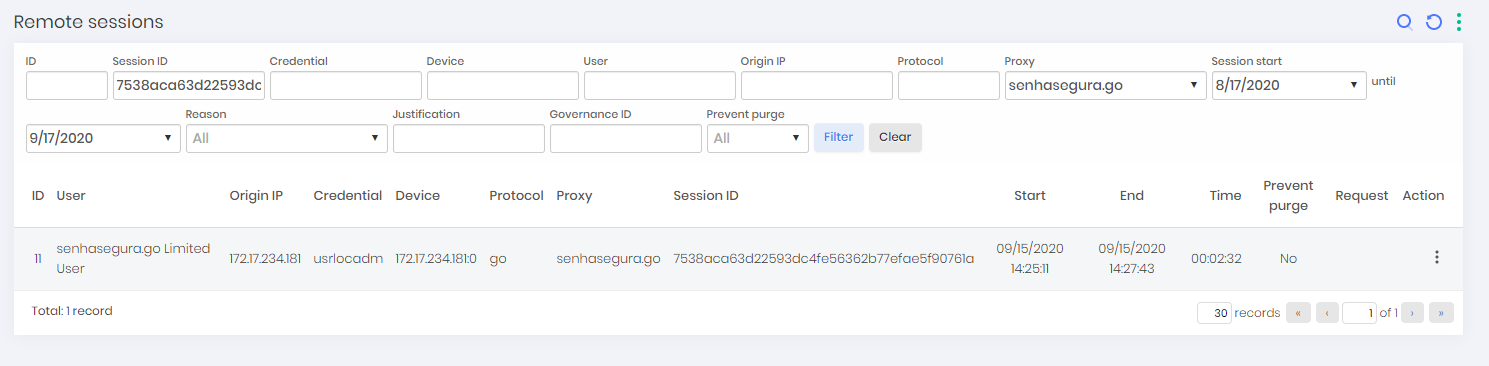
Report on elevations and videos
When a user performs an elevation of an application, senhasegura will record a video while the thread of that application is active. As soon as the thread is finished, the video is sent to the senhasegura server and becomes available for evaluation.
Like all recorded sessions, it can be accessed in the menu PAM ➔ Access control ➔ Remote sessions. You can filter through the Proxy filter with the value senhasegura.go to list only the sessions coming from senhasegura.go .
Through the register action Video of session you can watch the video.
This feature will only be available if the Enable recording session parameter is active.
Workstation Access History
Through workstation access history located in Go ➔ Reports ➔ Workstation Access History, it will be possible to verify how many access, the last and the first access of a determined user on a determined workstation. It is possible to filter by user, access, date, time, and ID.
Configurations and segregation
By default, some features of senhasegura.go are inactive. You must activate them manually to use them.
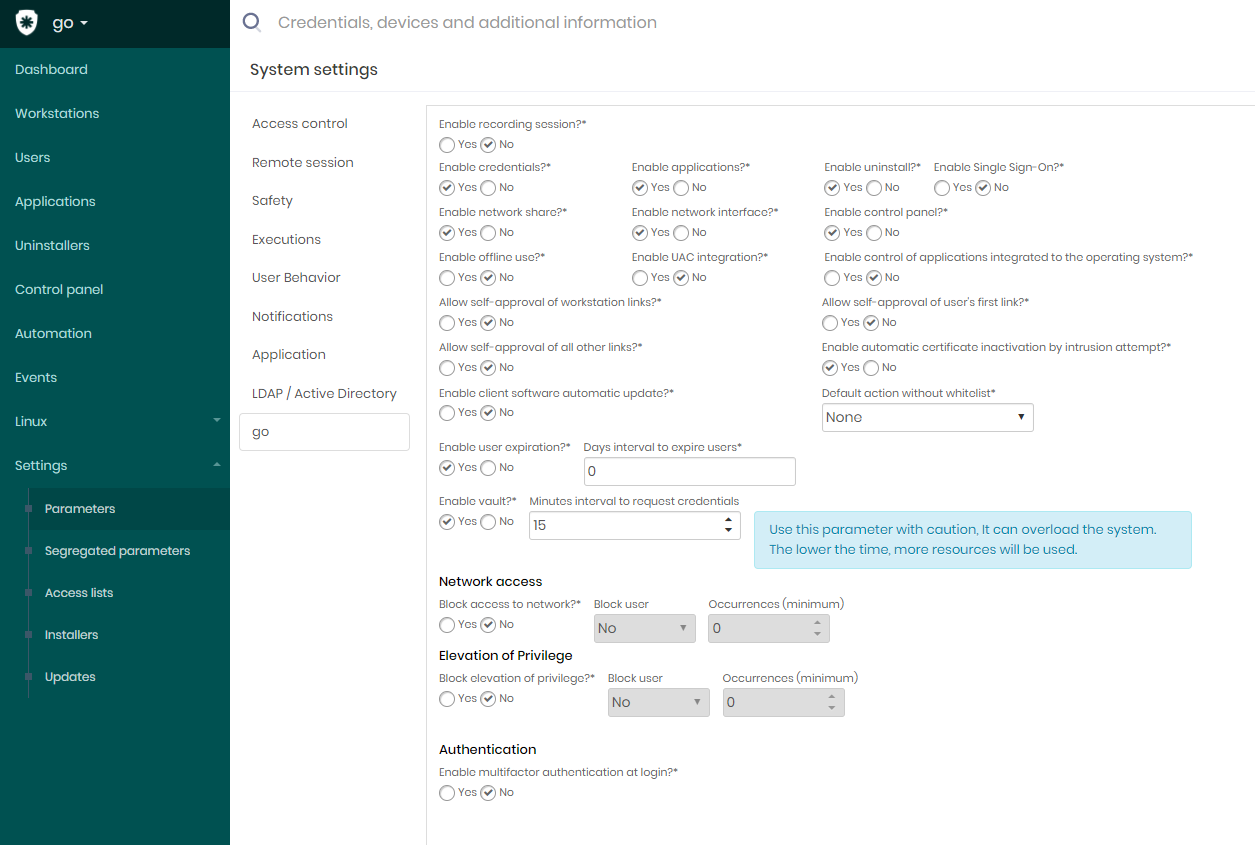
Global settings
The parameters can be accessed through the menu go ➔ Settings ➔ Parameters or Setting ➔ System parameters, and finally by accessing the go tab.
All parameters on this screen are of global level, that is, valid for all users. We will talk later about segregation that allows us to create different combinations of settings for each workstation or users.
The parameters are separated into sections:
Modules
The module settings control the display of the senhasegura.go respective sub-modules. They are:
Enable credentials;
Enable applications;
Enable uninstall;
Enable network share;
Enable network interface;
Enable control panel;
Installation settings
The Installation settings control the installation settings for senhasegura.go client.
Allow self-approval of workstations links: Indicates whether a workstation should be automatically approved when receiving a valid license from senhasegura.go ;
Allow self-approval of user's first link: Indicates whether the first user should be automatically approved if you use the senhasegura.go on a previously approved machine;
Allow self-approval of all others links: Indicates if all other users who come to use senhasegura.go on a previously approved machine will also be automatically approved;
Enable client software automatic update: Indicates if the senhasegura.go should be automatically updated if a new version is available on the server;
Enable user expiration: Indicates whether it will be mandatory to set an expiration date for the user's authorization;
Days interval to expire users: It will be the number of days that the user will expire after approval. This value will determine the end date on the user approval form;
General settings
The general settings are a generic section in the settings for senhasegura.go client.
Enable recording session: By default inactive, it indicates if the recording of high applications should be recorded on video during its execution. At the end, the video will be sent to the senhasegura server;
Enable Single Sign-On: If active, it allows the senhasegura.go to start an authenticated session of the senhasegura web in the user's default browser, without the user having to enter a password. If the user is required to have a 2FA token, it will be requested in the web system;
Enable UAC integration: If active, the senhasegura will intercede at UAC moments allowing the user to type a credential that can continue the process;
Enable control of applications integrated to the operating system: If active, senhasegura.go will activate the driver that monitors the applications running in Windows and will interfere if the application is outside the allowlist or inside the denylist. Only applications from user sessions will be evaluated;
These parameters are linked to the installation and approval process:
- Enable automatic certificate inactivation by intrusion attempt: Indicates if the single communication certificate between workstation and server will be inactivated in case the server detects an intrusion in the senhasegura.go ;
These parameters are linked to special features of senhasegura.go :
Enable vault: Indicates whether the senhasegura.go Offline is allowed. This feature will be discussed in more detail later on.
- Minutes interval to request credentials: While the workstation is online, a secure cache of credential information will be updated within this time frame.
Block access to network: Indicates whether the user will be blocked from any attempt to access a TCP or UDP network address.
Block user: Indicates if the senhasegura user linked to the action will be blocked after exceeding a number of network access attempts;
Occurrences (minimum): These are the quantities of times to consider before blocking the senhasegura user;
Elevation of privilege: Indicates if the senhasegura will monitor applications that try to execute privilege elevation outside the senhasegura.go . If active, the attempt will be prevented.
Block user: Indicates if the user senhasegura linked to the action will be blocked after exceeding a number of elevation attempts;
Occurrences (minimum): These are the quantities of times to consider before blocking the user senhasegura ;
Enable multi-factor authentication at login: If active and the user linked to the senhasegura has 2FA token configured, this token will be requested when performing local login on the workstation or access via RDP;
Enable JIT access: If active, the user using senhasegura.go will be added to the local Windows administrators group and their actions will be audited by video while they remain in this group.
If the user exits the JIT using the same activation button, perform a log off, or shutdown the computer, the user will be removed from the group immediately;
Segregated configurations
Segregated settings are used especially to deal with specific scenarios of a workstation. Sometimes the workstation belongs to a user who demands special attention or a differentiated use.
All previously seen settings are from a global context. That is, once determined it will be valid for all users. The administrator can then define a restrictive strategy at a global level and create permissive exceptions in a segregated context. Or, create a permissive context at a global level and create restrictive segregations in a segregated context.
To access the segregation settings, access the report in the menu "go ➔ Settings ➔ Segregated parameters". You can change an existing segregation in the "Edit" register action or create new segregations in the New segregation for workstation report action.
The configuration of a segregation should have the descriptive name for its purpose, to facilitate the tracking of a certain behavior of a workstation. For example, a configuration that requires the use of the 2FA token, should have in its name something like "Mandatory use of 2FA". This way, if any workstation presents this behavior, it is possible that it is within this segregation.
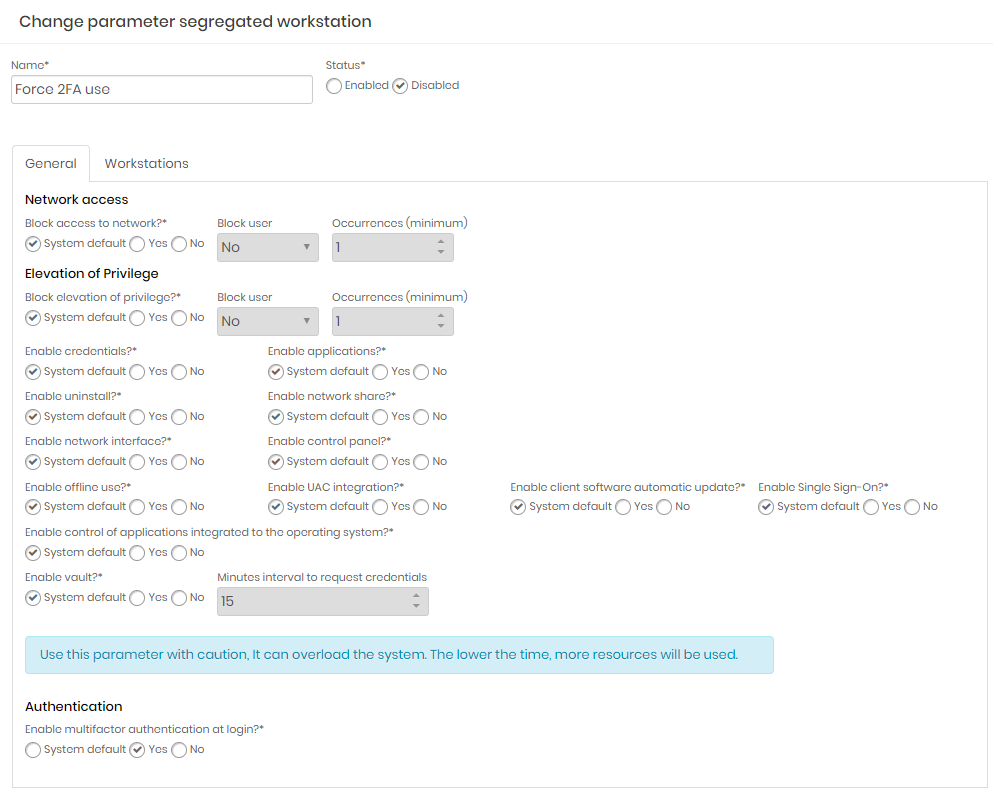
The configurations are similar to the global settings. The only difference is in the possibility of maintaining the value of the global settings or setting a fixed value that will take precedence over the global value.
System default: It will use the value from the global settings;
Yes or No: Overlap the value of the global settings by the chosen value;
After creating the rules on the General tab, it is necessary to save the record before linking the workstations on the Workstations tab. When you return the saved setting, go to the Workstations tab and add the workstations that will have the global settings overwritten by segregation.
Segregation will only be applied to the client when the application is started. In case of a segregation change, the user must load the application again for the new rules to be applied.
senhasegura.go Special features
Some features of senhasegura.go are installed inactive by default and it is up to the administrator to decide if he will activate them. These functionalities have a low level of operating system involvement and may present incompatibility or unmapped behaviors if used in conjunction with other software that acts on the same driver or kernel layers of the operating system.
We recommend that you conduct a machine experiment with the software packages normally installed on the client's workstations before making the decision to enable production features.
With the exception of the offline mode, all other functionalities depend on a synchronism with the server that occurs every 5 minutes. That is, once the functionality is activated on the server, it will still take another 5 minutes for the functionality to be active on the workstations.
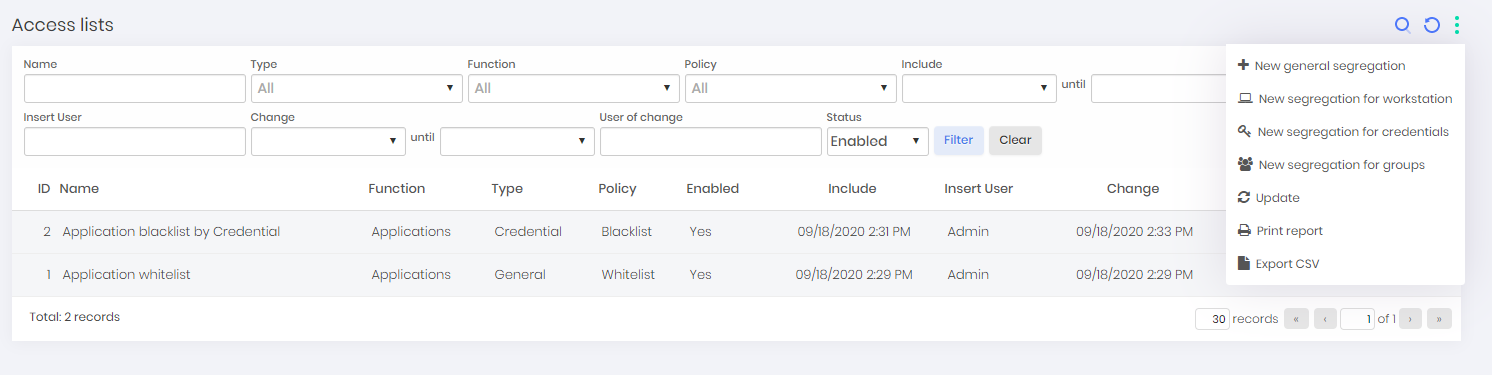
Denylist and Allowlist Rules
The Applications, Automations, Uninstaller and Control panel sub-module records can be separated by denylist and allowlist lists. They also allow segregation using global levels, workstation, credential used and access group used.
So, you can control the elevation of these sub-modules in your records independently.
Sometimes the administrator would not like to allow applications like Microsoft Powershell or Windows Command Line (CMD) to be used by users. He can then create a global denylist rule. But sometimes he may want only a few users to have access to these applications, so he can create an access rule based on access groups.
The registered rules can be accessed in the menu go ➔ Settings ➔ Access lists. To register a configuration, follow the steps:
Access the reporting action at the desired segregation level:
New global segregation: New global segregation valid for all users;
New workstation segregation: New workstation-based segregation;
New segregation for credential: New global segregation based on credential. It will apply to all users with access to the credential;
New segregation for groups: New global segregation based on credential access group. It will apply to all users who use a credential through the specific access group;
You will be presented with a screen to select the segregation entity, as follows:
Name: Name of the segregation. Use a name that makes clear the purpose of this configuration;
Action: Choose between the Allowlist and Denylist options;
Status: Keep Active for the rule to be applied;
Record the session of these applications: Indicates if a video recording all the application's execution event should be recorded and forwarded to senhasegura;
Applications: Are the applications that should be filtered. It is possible to apply filters by different characteristics of the application:
Certificate: If the certificate the application has is valid, if it is valid it will be checked against the rule (whether it is allowed or denied), and if there is no certificate it will not be checked;
COM class ID: It is information that all applications have, it is in GUID format;
Directory: This is the application path, to be checked against the rule, the registered path must be completely the same as the file;
File hash: This is a unique piece of information that each file has, a new hash is generated for every change made to the file;
File version: This is the file version;
Internet Zone Identifier: This information refers to the origin of the file, when it is downloaded from the internet, it will be as Internet Zone, usually all files that were downloaded are classified like this, whereas the executables that are installed, by example, it has this information as Local Zone;
Product Name: This is the name of the program, it evaluates to both the file name and the program name;
Product Version: This is the product version;
source URL: contains information you have in video files;
Update Code: This information is also a GUID of each program, and can be found in the Windows registry;
Vendor name: This is the name of the manufacturer;
Windows store publisher: This one is boolean, and it's about applications that were downloaded from the Microsoft Store, it's validated against the file directory, which is in ProgramFiles (and x86 too), and in a folder hidden that calls WindowsApps;
Segregation rule values can be filled with regular expressions.
The rules will apply both for applications started by the client senhasegura.go and for applications started outside senhasegura.go .
Once created, users automatically start to admit these rules.
The rules will be added. For example, if a user has an allowlist application and a denylist credential for the same application, the application will be presented as available. But if he tries to execute using the denied credential, he will be blocked and notified.
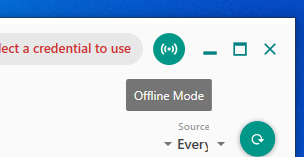
Offline Mode
senhasegura.go provides a way to offer the credentials in offline mode for cases where the user has a notebook that transits in areas where the network does not offer reach to senhasegura , or in scenarios where the senhasegura is actually offline.
To activate the functionality, activate the parameters Enable offline use and Enable vault on the screen of global or segregated parameters.
When active, the senhasegura.go will query the valid credentials within the time interval configured in the Minutes interval to request credentials parameter.
It is recommended that this time interval is not less than 15 minutes if you have many workstations with permission to use the offline mode. Too many queries may influence the performance of the senhasegura server.
To activate the offline mode, click on the button with signal icon and hint offline mode to allow senhasegura.go to be used with local data only. senhasegura.go will synchronize the data and send an event that the workstation has started working in offline mode, so that the administrator knows about it. At this point, senhasegura.go stops sending requests to the senhasegura.go server and its audit is stored securely locally.
To return to online mode, simply click on the button again for senhasegura.go to consult the senhasegura server, and for the audit logs to be sent.
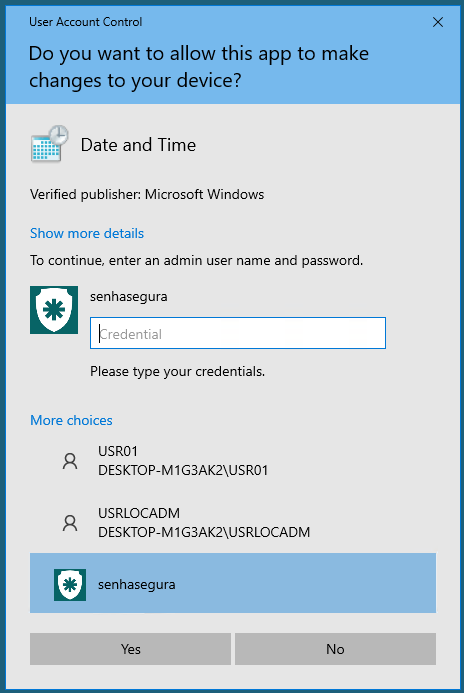
Integration with UAC
senhasegura.go is able to integrate with UAC authentication in cases where an application needs to raise the privilege on demand. In these cases, besides the authentication options normally offered by Windows, the senhasegura.go logo will be displayed.
When selected, the user will have to type in which credential from senhasegura he wishes to use to perform the elevation. If the user has a 2FA token configured, he must also enter the token in a second step.
Being fully integrated to Windows, the entire process is clear to the user, who will be able to continue the work he was doing. To make this feature active, change the Enable UAC integration configuration on the parameter screen.
Due to a technical limitation, the process of elevation through UAC is not registered in the senhasegura events.
Token 2FA OTP use
If the Enable multi factor authentication at login setting is active on the parameter screen, and the linked user has a 2FA token configured in senhasegura , every time this user logs in to the workstation or an access to the workstation via RDP connection, the 2FA token will be requested.
Network access blocking
When you activate the Block access to network parameter, senhasegura.go will stop any process initiated by users trying to access a TCP or UDP connection that is not for senhasegura .
If the parameters Block user and Occurrence are active and filled in, the linked user of the senhasegura will be inactivated if he exceeds the configured number of occurrences, preventing the user from using the senhasegura.go or logging in again on the web platform.
The blocked events will be sent to the senhasegura server.
Privilege elevation block
When the Block elevation of privilege parameter is enabled, any attempt of privilege elevation that is not performed by senhasegura.go , will be blocked.
If the parameters Block user and Occurrence are active and filled in, the linked user of the senhasegura will be inactivated if he exceeds the configured number of occurrences, preventing the user from using the senhasegura.go or logging in again on the web platform.
The blocked events will be sent to the senhasegura server.
Automatic update
After senhasegura.go is installed and activated in the workstations, it is possible to update the version from the senhasegura server itself.
New version verification is performed every time the workstation client application is started. So, a user will only be informed that there is a new version available if he starts the application from senhasegura.go .
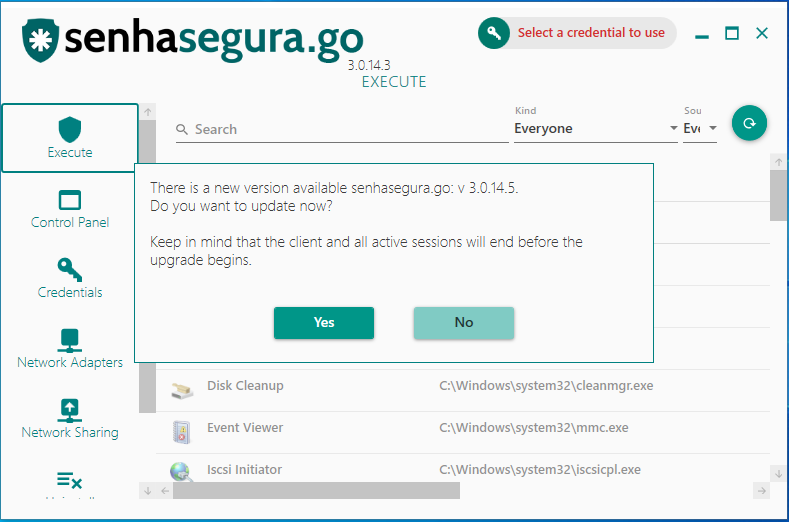
To make a new version available it is necessary for the administrator to upload the new version to the senhasegura platform and approve the installer. The process of approving the installer defines that the client is aware of the new version, the changes, features and impacts that the new version will bring to your business.
After this approval it is possible to configure an update schedule and in which workstations the new version will be installed. Let's make an example:
Accessing the menu go ➔ Settings ➔ Installers you have access to the report of available installers;
To upload a new version, access the New reporting action;
Select the official MSI file of senhasegura.go in the Installation file field;
Confirm with the Save button;
The registers allow you to approve or disapprove a version
Approving a version does not automatically make it available for update;
A disapproved version prevents its use if it is already installed on some workstation. The user will be alerted with the error code 2028;
Once a version has been uploaded and approved the registration. The version will be available for update scheduling.
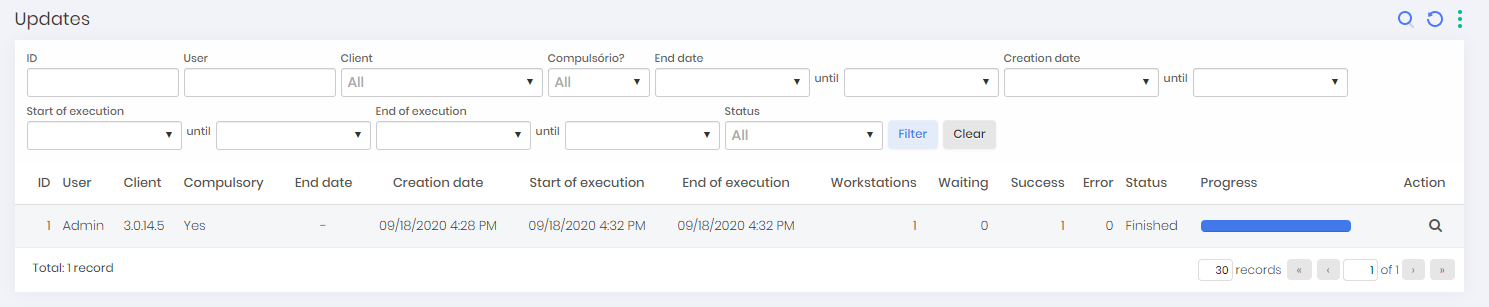
Accessing the menu go ➔ Settings ➔ Updates you have access to the update process report;
- Each register represents a selected process of updating a version to a number of workstations defined by the administrator
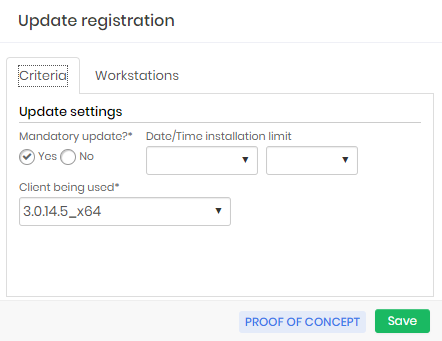
To create a new update process, click on the New reporting action
In the form presented, indicate if the update is mandatory or not.
Mandatory updates do not allow the user to use the version previously installed. When starting senhasegura.go it will have no other option than to update the version;
Optional updates allow the user to decide when to install the new version;
Indicate if there is a date and time limit for the update. This field will only be used for non-mandatory updates
In the Client being used list select the approved version that should be installed;
Save the settings and go to Workstations tab;
Add which workstations you want to receive the new version.
By creating the schedule, when a workstation of the relationship that is with the version different from the indicated version starts the client senhasegura.go , an update alert will be presented for the user to update the version.
The configuration will be updated with the progress of the process and an event will be recorded in the senhasegura logs.
Authentication automation
The authentication automation functionality allows the senhasegura.go to authenticate installed applications or web pages that are accessed directly on the user's workstation. This automation uses the credential selected in senhasegura.go to fill in data such as username and password.
These macros are not the same as those used in proxy sessions. Your registration is individual and is released for use by users through access lists.
Creating a new authentication
Accessing the menu go ➔ Automation you have access to all registered automations. We will create a web page automation as an example. Use the "New" report action to register a new automation and follow the steps below.
Fill the name of the automation in the Name field. This name will be displayed to the senhasegura.go user.
Choose the type of automation in the Type field. This type determines whether senhasegura.go will start an application installed on the workstation or if it will start the workstation's default browser to perform web automation.
Keep the Active? field active so that the senhasegura.go user can use automation.
Fill the Application path field with the physical path of the application or the URL of the website to be authenticated. In this field it is also possible to provide arguments to the execution binary, as long as the binary is enclosed in double quotes, and the arguments are then outside the quotes, as per the Microsoft®standard.
The optional fields Tags and Description can be filled if necessary.
For Web Authentication senhasegura.go uses the default browser chosen by the user. But only the browsers Google Chrome and Mozilla Firefox are supported. Microsoft Edge and Microsoft Internet Explorer are not supported.
You can now write your automation. At this part the screen will be divided into three blocks. Script, Actions and Properties.
Script: Have the already programmed sequence of actions that make up automation. Actions can be rearranged by drag and drop, changing the execution order. When you click on a specific action, it will open for editing its properties.
Actions: These are the actions that can be added to the automation script. When you click on one of the options, it will be added as the last element in the Script and its properties can be edited
Properties: Here you can describe the details of the action. Each type of action performs a different task in automation, and has different properties.
Let now understand what are the possible actions and their properties.
Button: Used when you want to "click" on an element that acts as a button. Your label property must be filled in with the visible text that defines it.
Menu: Application menu path. Fill in the path property with the path to automate. Separate the levels with
;. Ex:Edit;Preferences;Sourcewill automate the path Edit ➔ Preferences ➔ Source;Input: Fill a text field at the application or website. Fill the Label property with the name visible to the user, which identifies the field. And fill Value with the value to be entered in the target application field.
infoThe Value property can be filled in with the tags
[#USERNAME#],[#PASSWORD#],[#DOMAIN#],[#HOSTNAME#]and[#HOST_IP#]. It will be replaced by the selected credential username and password for elevation in the senhasegura.go interface.
When you have finished filling in the properties, save with the Save button in the properties box and continue programming the chain of actions. At the end, click on the Save button in the lower right corner to finish configuring your automation.
Releasing automations for users
Automations are delivered to senhasegura.go users via access lists. Go to the menu go ➔ Settings ➔ Access lists to access all access segregations already created.
Using the reporting actions, choose between New general segregation and New segregation for Workstation to create a Automation type segregation.
On the presented screen, name the list to be created and click on Save. After saving the configuration record, you can edit it again to add which configured automations will be made available to all users (if it is a global segregation) or to certain workstations (if it is a segregation by workstation).
At the end, senhasegura.go users will be able to access the automations through the senhasegura.go interface.
Performing an automation
Once automation is available in the senhasegura.go interface, the user can select a credential to be used by the automation script and finally, select an automation to run.
Some important automation details:
Automations are not recorded on video.
The execution will be performed in the logged user's session. There is no impersonation.
There is a 1 minute timeout for attempting to execute the automation. During automation the user will be limited in his actions.
Directory and file control
The Directory and file control functionality allows the administrator to register settings that will control the permission of Windows files and directories.
This configuration is done through the web interface of the senhasegura where the permission of files and directories, determined, will be given to all users of the indicated workstation. That is:
"If for the Documents" directory of the workstation "01" users will receive only the permission of Read, that is, they will only be able to see and list the files and sub-directories contained inside "Documents" (directory) in the workstation "01"."".
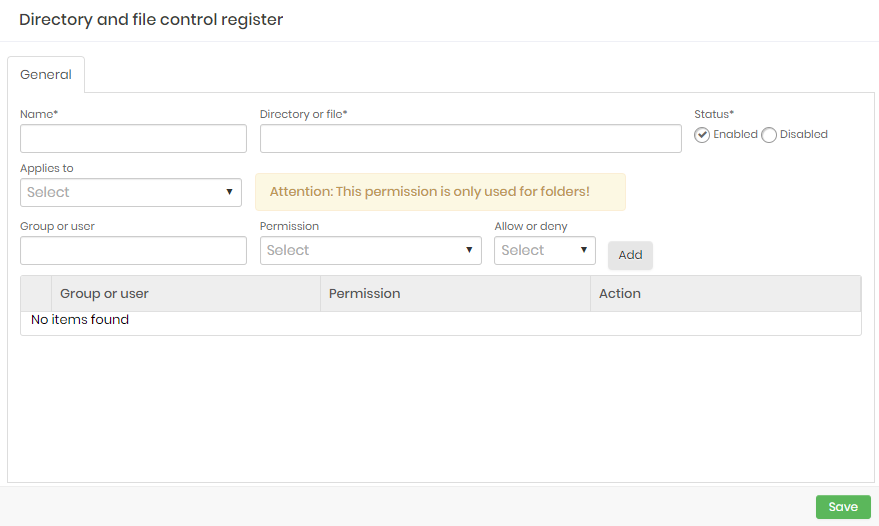
By accessing the go ➔ Policies ➔ Directory and file Control menu you have access to the report of previously configured controls. These controls can be:
General rule: Valid for all workstations.
Segregation for workstation: The setting will only apply to the workstation defined in the form.
To create a new control click on the reporting action General rule or Segregation for workstation;
In the form presented, indicate the name of this new control;
Indicate the complete path of the file or directory you want to be controlled;
cautionThis registration does not allow regular expressions.
Also indicate whether this control will be active or not;
In the Allow or deny field select whether or not the permissions that will be indicated in the Permission field will be granted to users:
Allow: Permission will be granted to users or groups
Block: Users or groups will not be able to have this permission
In the Permission list select the type of permission to be configured:
Read: Can just view and list the files and sub-files/sub-directories;
Write: Can edit or add the file/directory in a directory;
Read and execute: Can view, execute and access the files/directory;
List folder contents: It allows visualizing, reading, and executing the contents of the directory in the matter;
cautionOnly directories have the permission "List folder contents", the permission will be denied if applied to a file.
Modify: Allows reading and writing in the file/directory
Full control: All previous permissions
Click the Add button to include permission for control. You can add as many permissions as you want to this same control.
If you have chosen the control option Segregation for workstation the form will have a tab called workstation
When accessing this tab click the add button and select from the list the workstations that were part of this configuration and click Add.
To finish click Save
After save the directory and files policies, the senhasegura.go client will synchronize the permissions and will apply the controls for users and groups in the directories and files.
Control of executed commands
The control of commands executed through senhasegura.go allows to indicate the commands that can be executed in CMD and Powershell, that is, commands not indicated in the configuration will be blocked.
The control of commands through the senhasegura.go works only locally, for remote executions of commands use the functionality Audited commands of the PAM module. Consult the senhasegura Proxy Manual to use this functionality.
This functionality is configured through the web interface of the senhasegura in the menu: go ➔ Settings ➔ Windows command.
By creating a control for a command automatically you can only use CMD and Powershell through the client senhasegura.go
On this screen you have access to the report of previously configured commands, which can be segregated in the following ways:
General rule: They are valid for all workstations where the senhasegura.go is active and approved.
Segregation for workstation: The configuration will only apply to the workstations defined in the form.
To create a new command control click on the reporting action General rule or Segregation for workstation, as you prefer;
Indicate the name of the control, whether it will be enabled or not and in the *Commands** field enter the complete command that can be executed in the CMD or Powershell of the workstation. This field can be filled with regular expressions.
If you have chosen the control option workstation segregations the form will present a tab called Workstation.
When accessing this tab click the add button and select from the list the workstations that were part of this configuration and click Add.
To finish click Save
At the end perform a workstation access where the control was configured and try to insert commands different from those registered in CMD or Powershell.
JIT Access
senhasegura.go allows the user to be added to the local administrators group via the Just-in-time access button, located on the senhasegura.go top bar.
This feature is disabled by default in senhasegura.go parameters. And it can even be segregated by workstations.
When the user starts a JIT process, all his actions will be audited by video and forwarded to the server senhasegura just like a RunAs elevation.
If the user interrupts the JIT process, or performs a log off or shutdown of the workstation, his user will be immediately removed from the group of local administrators.
Malware Analysis
If enabled in the system settings, senhasegura.go will evaluate binaries that the user requests elevation of privilege. To perform the analysis, the binary will be sent to the online service VirusTotal1, where it will be evaluated. The result of this analysis will be stored in senhasegura and will determine if the binary can be executed.
The Malware Analysis functionality does not replace an antivirus solution, and should not be confused as such. This functionality comes as a reinforcement to protect the credentials used by users.
A binary will only run if it is categorized as CLEAN by VirusTotal.
Configuring to use Malware Analysis
Go to menu Go ➔ Settings ➔ Parameters;
Enable the parameter Enable application malware and reputation scan?;
Enter the VirusTotal API token in the Virus total API token field;
Click Save;
Evaluating a binary
Once the functionality is enabled, in the senhasegura.go application interface, right-click and select the Analyze program option. The analysis result will be displayed in the column Analysis result.
While the binary is under analysis, senhasegura.go will not allow it to run. The binary under analysis shows the state "Analysis in progress..." in the column Analysis result.
Results report
Through the senhasegura server it is possible to obtain a list of all analyzes that were carried out on the workstations where senhasegura.go was installed.
Go to Go ➔ Reports ➔ Application Malware Analysis menu for more details.
The report columns show the analyzed binary, the analysis date and time, and the source workstation. In addition, there are three other columns that show the result of the analysis:
Reputation
Ranging from -100 to 100, is the way the VirusTotal service will present the binary score;
Verdict
The verdict is a categorization of the analysis, which can vary with the following values:
CLEAN: Clean, VirusTotal Allowlist or undetectable;
MALWARE: May be interpreted as malware;
GREYWARE: Possible unwanted software (PUA/PUP);
RANSOM: Ransom or crypter;
PHISHING: User or device phish attempt;
BANKER: Banking Trojans;
ADWARE: Displays unwanted advertisements;
EXPLOIT: Contains or executes an exploit;
EVADER: Contains logic for parsing evasion;
RAT: Remote Access Trojan;
TROJAN: Trojan or Bot;
SPREADER: Spreads to USB, drivers, network, etc;
Conclusion
By completing this book you will have acquired the knowledge to perform the related activities of senhasegura.go .
If you wish to continue learning how to use the senhasegura in the best possible way, please ask our support team for our available documentation according to your profile and needs.