Certificate Manager Cookbook
Introduction
This book will explain the simple way to manage, request and import certificates through senhasegura
Who is this cookbook for?
Certificate Manager Cookbook was written to familiarize deployers, users, and system administrators with the need to request certificates and signatures, publish certificates on devices, and monitor their status.
What you need to understand first
This book requires the reader to have already had a first experience with senhasegura and have an instance of the solution with at least one device and one credential registered. Before continuing reading, if you have not yet had this first experience, you should consult the following content:
- Getting Started Cookbook: This cookbook explains in a simple way the use of senhasegura from its installation to the use of basic functions.
Symbols used in this cookbook
This book uses the following symbols to highlight information that should be taken into account for the best use of senhasegura :
Info - useful information that can make the use of the solution more dynamic
Caution - actions and items that cannot be ignored
commands: data that must be entered in the same way as described in this book- URLs : paths to access web pages.
<KEYS>: keyboard paths that will be used to perform actions.
Setting up your Certificate Manager
As mentioned in the introduction to this book, you should already know the basic functions of senhasegura to configure and use the Certificate Manager module.
Administrators, users and deployers who intend to use Certificate Manager must also have a basic knowledge of the subject of digital certificates, as well as nomenclatures and their use in a system.
To introduce how senhasegura deals with certificates for inexperienced users we present the following problem:
You, a system administrator of a large company, would like to have control over how many certificates are published on the network, on which devices, and their validity period.
In addition, you need to apply for new certificates and the renewal of those are close to their period of validity.
The senhasegura provides a complete view of the organization's certificates, performs the request for new certificates and the signature with the certifying authorities. It also sends notifications to those responsible for the certificates when the expiration time is near.
This chapter will focus on the preconfigurations that must be performed before using this module. Follow the instructions in the following sections to get the module ready for use.
Registering environments and systems
If you have not yet registered these two entities it is necessary to do so, because systems and environments are important to categorize and associate a certificate. Follow the instructions to make the registration, if you already have these entities registered go to the next session.
Access: Settings ➔ System parameters ➔ Segregation ➔ Environments.
Use the View actions button in the report and click the New button.
Fill in the required fields and click Save to finish.
Access: Settings ➔ System parameters ➔ Segregation ➔ Systems.
Use the View actions button in the report and click the New button.
Fill in the required fields and click Save to finish.
Registering an organization
The entity organization is necessary to fill out some requests made in this module, so you must register it.
The organization to be registered is the one that will use the certificate that will be requested.
To insert or consult organizations already present in the system, access the menu: Certificates ➔ Settings ➔ Organizations.
Click the report action button
Choose the option New
Fill in the field Organization with the name of the organization to be registered
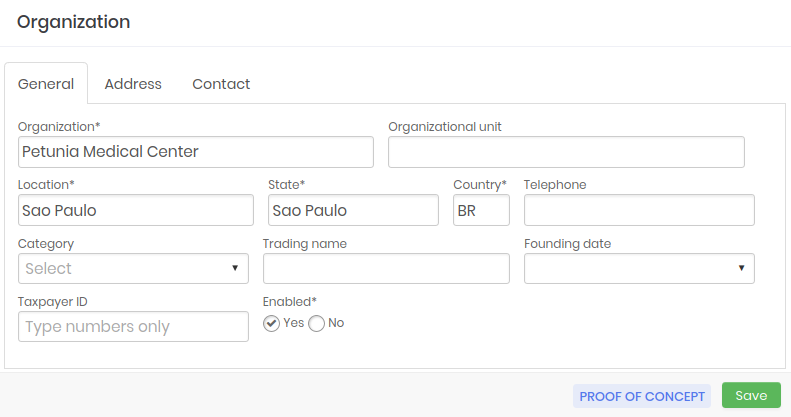
Organization Registration Form In the organizational unit, fill in the name field for an organizational unit if there is
In the other fields fill in the address data of the organization, as in the figure organizacao-enus
Click Save
Creating an access group
The Certificate Manager module can also be configured with permissions, for certain users to enter justification or wait for approvals of their requests.
Before learning how to request a certificate or other management activities it is pertinent that access groups be created so that permission is already adequate and assigned to users when the module begins to be used by them.
To create an access group, go to the menu Certificaes ➔ Settings ➔ Access group and follow the instructions:
In the report click the View Actions button.
Choose the option New
In the Access group name field, type a name for the group.
Then select the permissions that the group will have as the possibility to download the certificate or key, permission to view the certificate password, permission to publish and sign.
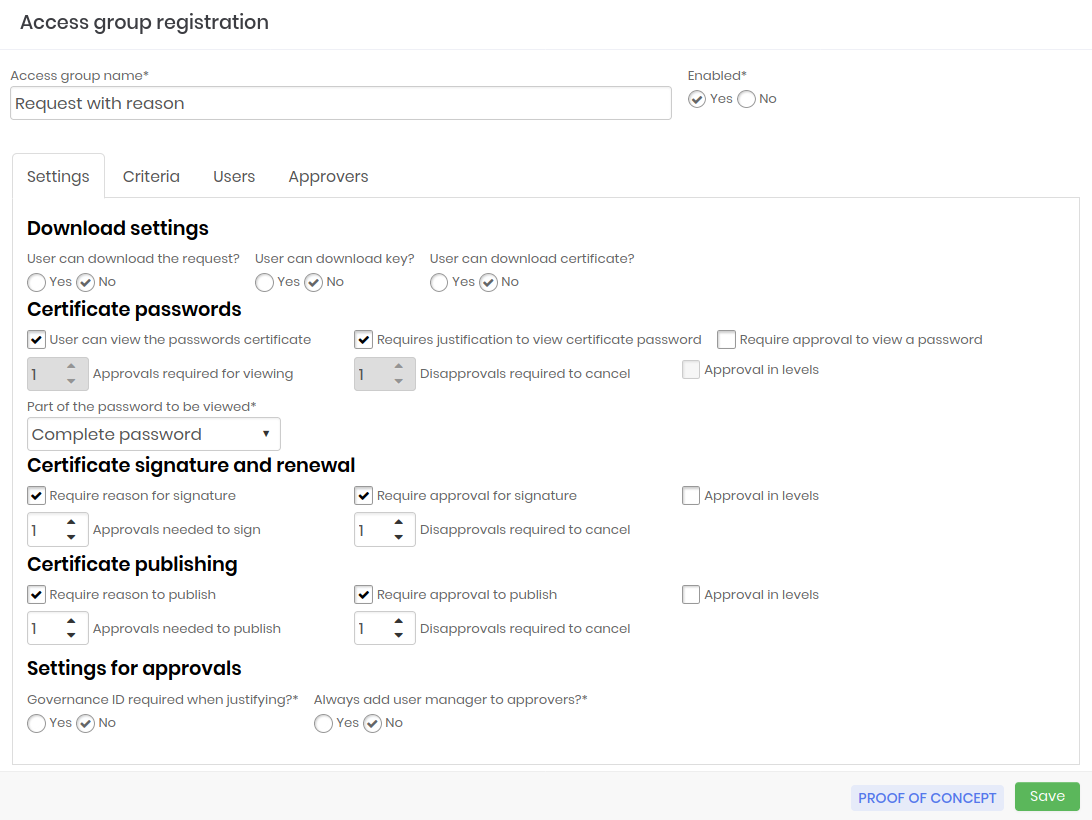
Certificate access group registration form Go to the Criteria tab and select the certifying authorities for which this group may request signatures.
Save the configurations and wait for the page to reload.
Then go to the Users tab and select via the Add button the users that will be part of this group and assume the configured permissions.
infoIf the group doesn't need approval, your group will already be finished.
If you have selected the option that this group should receive an approval to perform some activity, go to the next guide, Approvals..
In addition to the users tab, click Add to select the approving users for this group.
cautionRemember that these approving users will have the "power" to allow or deny the activities of group members to be performed or not, so choose them carefully.
After adding the approvers, if you selected approval in levels1, choose the level of each approver.
Click Save to finish
My requests
Group members who need approval for their activities can monitor the requested approval status via the My Requests menu. Access: Certificates ➔ My requests.
The report displays the requests made by the user and whether they have already been: approved, still pending, rejected, expired or canceled. To learn more about the requests, click the action button on the request.
My approvals
Approved users can view a report on their approvals, access the menu: Certificates ➔ My approvals.
This screen shows the user's approvals as status, applicant, reason and validity. If it is a pending approval, you can also approve or disapprove a request using the Approve or Disapprove buttons, respectively.
To view more information about the approval request:
Click the Request Details button.
On this screen, you can view additional information about the request, such as code, access group and justification, as well as approve or disapprove the pending request, using the Approve or Disapprove buttons, respectively.
Registering a publication profile
The publication profiles are ideal for similar and recurrent types of publications.
Imagine that in your organization there are dozens of devices Apache where the certificates must be published and renewed in your system. A profile configured with the Apache publishing plugin and a list of devices where the profile will have access to publish will make the process much faster and more practical.
To enter or view the publication profiles already present in the passwords, access the menu: Certificates ➔ Settings ➔ Publication profile and follow the instructions:
In the report click the buttonView actions.
Choose the option New
Enter the name of this profile
Select the Plugin that will execute the publication on the server
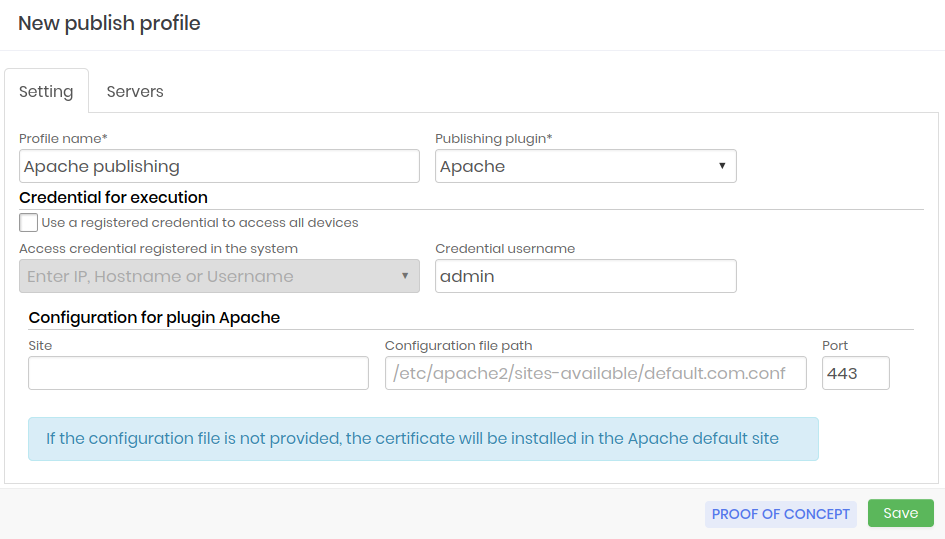
Certificate publication profile form Select a credential already registered in the senhasegura to access the device and perform publication, or deselect the checkbox and enter the credential username.
The plug-in settings will be partially filled according to the settings. Enter all configuration fields present, otherwise the certificate will be installed on the plug-in's standard website.
cautionThe figure perfil-enus shows the form with fields to fill in settings of the Apache plugin. The form will be different according to the choice of the plugin.
Click Save and wait for the reload page.
Go to the Servers tab and click the Add button to enter the servers on which this profile will act.
Select the desired servers and click Add. If you made a mistake, click the Remove button and select the servers you do not want the profile to act on.
Click Save.
Certification Authority
For a certificate to be signed, it is also important to have the desired Certifying Authority, registered in the senhasegura . To register a certifying authority access the menu: Certificates, Settings, Authority and follow the instructions:
In the report click the buttonView actions.
Choose the option New
Among the authority options click on the desired one
infoIf the desired authority is not in the list, choose the option External authority and enter a new one.
Enter the Name of this authority
cautionEach certifying authority option a different form will be displayed, as each certifying authority needs different information, such as CA Hostname, username. Enter the required information which is marked with (*).
Click on Save to complete the registration
Therefore the certificate request, signature and publication forms will display the information included in these settings.
Requests
After configuring the required items you can create a certificate requisition, or even import a previously created requisition.
Requisitions are necessary so that the security understands which type of certificate you want to obtain, and by which authority it should be signed, so please follow the instructions in the following sections correctly:
Manual request
To request a certificate manually you will need to fill out a form with the details of the desired certificate, to do so access the menu: Certificates ➔ Requests, and:
Click the View actions button in the report and choose the New option.
In the form choose the Certificate type that you want to obtain, which may be:
DV SSL: only checks and validates the address
OVSSL: gives a name, documentation and physical location for the organisation of the information.
EV SSL: the organization goes through a complete validation of domain, name, registration, physical address, current operations and others.
Then choose the type of domain that the certificate will be part of.
In the Organization field select the option you created in the previous chapter. And click Add.
Enter the Common name, this field is important for the identification of the certificate in the system, this way it will be easier to find the certificate that you want to be signed by a certain authority or that is published in a specific device. So put a name that helps you and other users of this module understand its relevance.
Select the type of Encryption algorithm you want the certificate to have, remember to choose the algorithm that fits your organisation's security criteria.
Also select the Encryption key size.
Choose also the Certificate signing algorithm, this algorithm will be used to sign the certificate through the certification authority.
Finally select the period in days that you want this certificate to remain valid and click Save.
For more security you can also determine a password for viewing the certificate in the Store password field. Likewise, determine a password for the certificate to be revoked in the Revocation password field, i.e., only those who know the password may revoke the certificate.
Import Requisition
If you already have a requisition ready, you can import it into the senhasegura that will process it to generate the certificate. To import a requisition follow the instructions below:
On the menu: Certificates ➔ Requests and click the View actions button and choose the option Import request.
Select the certificate file
.csr2 on your machine and then select the file.keywith the certificate key.infoPFor more security you can also determine a password for viewing the certificate in the Store password field. Likewise, determine a password for the certificate to be revoked in the Revocation password field, i.e., only those who know the password may revoke the certificate.
Choose the Certificate signing algorithm, this algorithm will be used to sign the certificate through the certification authority.
Then select the Certificate type you want to get, which can be:
DV SSL: only checks and validates the address
OVSSL: gives a name, documentation and physical location for the organisation of the information.
EV SSL: the organization goes through a complete validation of domain, name, registration, physical address, current operations and others.
Choose the type of domain that the certificate will be part of.
In the Organization field select the option you created in the previous chapter. And click on Add.
Click Save
With that the certificate will be generated by the security password and will be ready to be signed.
If the user requesting the certificate is in a group that requires approval, the certificate will only be available for signing after approval by one of the group's approving users.
Signing a certificate
A certificate may only be published in a device after it has been signed by a certification authority.
Since the signature is a trustworthy establishment that guarantees that the device is in fact who it says it is.
After making the request as explained in the previous chapter and the request changes to the status Generated, the option to request a subscription can be made.
A certificate may be self-signed or signed by a certificate authority.
self-signed: A self-signed certificate is recommended for devices that will only communicate with others who are on the same network, who in other words know each other and therefore trust each other. Thus one recognizes the other's signature as valid.
Signed by a certificate authority: Authority-signed certificates are recommended for devices that will communicate with others outside your network since they do not have an established trust relationship with your device and will trust the signature of an authority (known and proprietary) that says the device is who it says it is.
To do so, access the requisition form: Certificates ➔ Requests and search for the certificate you want to sign and confirm that it has been generated in the status column, then follow the instructions:
Click on the Action button of the certificate you wish to sign and select the Request Signature option.
On the form select whether the certificate will be self-signed or No (the signature will be made by a certification authority)
If the answer is No, select from the options the certification authority that will sign the certificate.
In the field Reason describe why you want to sign the certificate
Then select the Reason from the certificate signature and finally click Save.
If the user requesting the signature is in a group that needs approval, the certificate will only be signed after approval by one of the group's approving users.
When the certified authority signs the certificate it will be displayed in the certificate report: Certificates ➔ Certificates.
Importing a certificate
If you already have a certificate and you want the senhasegura to manage it you can import it into the system by following these instructions:
Access the certificate report: Certificates ➔ Certificates
infoYou can use the Quick Actions button and select the Certificate option to display the import form.
Click on the View actions button in the report and select the option Import certificate.
Select the certificate file on your machine
Then also select the key file that corresponds to the certificate key.
Click Import to finish
For more security you can also determine a password for viewing the certificate in the Store password field. Likewise, determine a password for the certificate to be revoked in the Revocation password field, i.e., only those who know the determined password may revoke the certificate.
Update the report and the imported certificate will already be available for management by senhasegura .
Publishing a certificate
With the certificate available in the senhasegura you can now publish it on the desired device.
Remember that the certificates can only be published on devices registered in the senhasegura .
In the certificate report Certificates ➔ Certificates click on the action button of the desired certificate. Use the filter to find it faster.
Select the reason you want to publish the certificate.
Then choose which plugin of publication will be used.
infoYou can also select the publication profile created in the Configurations chapter, where the plugin and device settings from which the certificate should be published are already predetermined. If this is your choice just describe the justification for publishing this certificate and choose the authentication credential to perform the publication and click Save.
infoYou can also create a publication profile in this same form that can be used in future publications, select the box Create a new publication profile and fill in the necessary data.
Enter a description of why you are publishing this certificate.
Then select the credential registered in the senhasegura or enter the username that the system should use to authenticate itself on the devices where the certificate will be published.
Click Save and wait for the page to update.
Go to the Servers tab and select the devices where the certificate should be published.
infoYou can also schedule the time of publication to do this by going to the Scheduling tab and selecting the Yes option. Then determine the date and time of publication and click Save.
Finally click on Save.
If the user publishing the certificate is in a group that requires approval, the certificate will only be published after approval by one of the group's approving users.
Published certificates
To view the published certificates, and on which devices go to the menu: Certificates ➔ Publishing.
In the report find the certificate you want to check, use the filter to find faster and click the corresponding Action button so that the list of devices where the certificate is published is displayed.
Renewing a certificate
When a certificate expires or is about to expire, the user must make a renew request which is nothing more than a request for a new certificate with the same data as the previous one. The renew of a certificate can also be done through the senhasegura to do so follow the instructions:
Access the certificate report: Certificates ➔ Certificates
Find the certificate you want to renew, use the filter to find faster and click on the corresponding action button and select the option Renew certificate.
Choose from the options to create the renewal request along with the subscription request or just create the renewal request and click Yes to proceed.
Generate the request and sign:When you choose this option the screen will be reloaded and the order form will be loaded so you can edit and request more information about the renewal. For instructions on how to complete it, please refer to the chapter Requests.
Just generate the request: This option generates only the renewal request. With this step reproduced, the renewal will be requested and the renewed certificate will be ready for your signature to be requested next. Please refer to the chapter Signing a Certificate on how to request a signature.
The renewal request may also depend on an approval if you are a member of a group that requires approvals
As soon as the certificate is renewed and signed it will be available in the certificate report with the status: Valid.
If the certificate has not yet been renewed the status will be displayed as: Renewal requested, wait a little longer and reload the page.
Access the requisition report: Certificates ➔ Requests to check the status of the renew request
.
Dashboard
To learn more about certificates that need to be renewed or have their expiration periods coming to an end, access the certificate dashboards:
Genaral Dashboard: It shows the general information of the certificates as: number of certificates that expired in the next 180, 90 to 7 days; number of certificates by environment, by Certificate Authority, by type and others.
Access: Certificates ➔ Dashboard ➔ General
Risk radar: The radar displays the certificates, by certifying authority, that are closest to the due date. Clicking on them displays a page with information about the certificate, such as: exact expiration date, responsible for the certificate, devices where the certificate is published. It is still possible on this same page to renew the certificate by clicking on the Renew button at the bottom of the page.
Access: Certificates ➔ Dashboard ➔ Risk radar
Revoking a certificate
Access the certificate report: Certificates ➔ Certificates and find the certificate you want to revoke and click on the corresponding action button and click on Revogate certificate.
Performing the downalod or sending a certificate by e-mail
After the certificate has been published in the system it is possible to download a certificate and also send it by e-mail.
Access the certificate report Certificates ➔ Certificates and find the certificate you want to download or send by e-mail, use the filter to find easier
Click on the corresponding action button and choose the option Certificate Information.
On the information page displayed click the footer button:
Send by email: The certificate will be sent by e-mail to the chosen users. Click the Add button and a list of users with e-mail addresses registered in the senhasegura will be displayed. Select the users you want to receive the certificate, click Add. If the list of users is correct click Send.
Certiicate Download: By clicking this button the download of the certificate files will start automatically.
Conclusion
By the end of this book you will have acquired the knowledge to carry out the basic activities of certificate management through the senhasegura .
If you wish to continue learning how to use the system in the best possible way, please ask our support team for our available documentation according to your profile and needs:
Manuais
Especificação Técnica
Technical Specification
User Manual
Tool Administrator Manual
Operation Administrator Manual
Auditor Manual
Developer Manual
Guias
DevOps Reference Guide
Monitoring Guide
Cookbooks
Getting Started Cookbook
Password Change Cookbook
Task Manager Cookbook
Certificate Manager Cookbook