Dynamic provisioning
To grant a high security level into elastic environments, senhasegura DSM allows secret automatic provisioning and deprovisioning on cloud providers, environments and systems such as databases, Windows and Linux servers, etc. This allows administrators to create a more secure secret management approach, where every application can have its secrets provisioned through Just-in-Time policies.
This configuration is specially useful in environments such as Kubernetes and OpenShift, where normally a secret would be shared between a certain amount of Pods. Using senhasegura DSM Dynamic Provisioning approach, it is easy to enable every Pod to have its own access credentials to databases and cloud services, preventing privileged information leakage since once a Pod is deleted, DSM can deprovision secrets related to it automatically.
Configure Dynamic Provisioning of Access Keys
Access Keys are credentials used by applications and scripts to access services from cloud providers. DevOps Secret Management module allows dynamic provisioning of access keys at major providers like AWS, Azure and Google Cloud Platform through provisioning profiles. For more information on how to integrate with one of these cloud providers, please check the Cloud IAM guide.
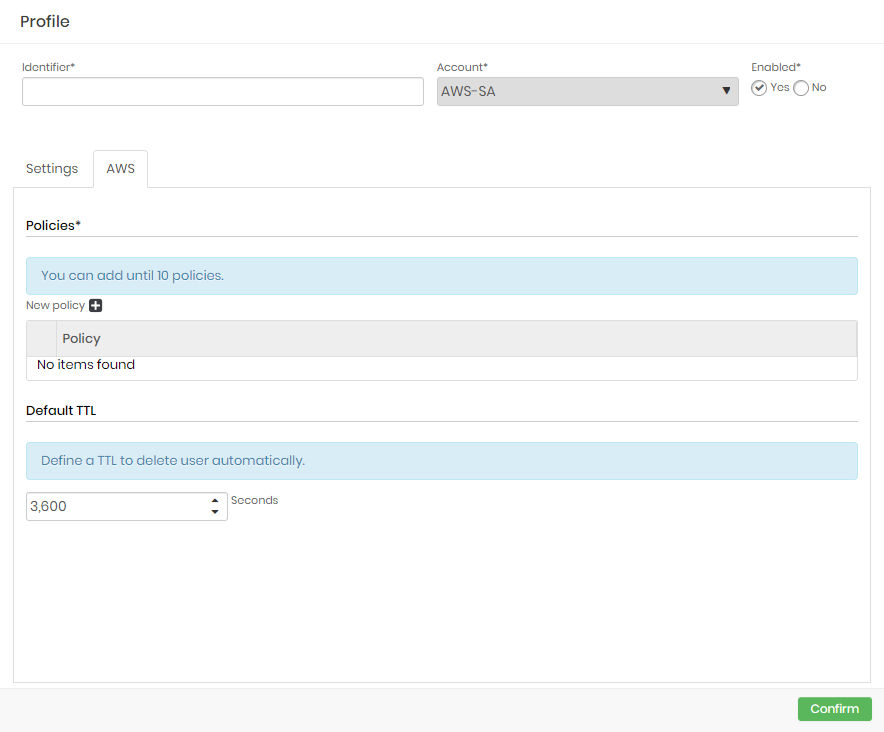
To create a dynamic provisioning profile for cloud credentials follow the menu Cloud IAM ➔ Cloud IAM ➔ Dynamic provisioning ➔ Profile.
- In the report's action button, click on Add profile;
- Select a configured account so senhasegura can use that to create and delete Cloud Credentials on a provider;
- Provide the following information:
- Identifier*: A profile identification name. Credential usernames will be composed using this identifier plus a time-based string;
- Account*: A provider account which will be used to create and delete credentials and access keys;
- Enabled*: Whether this profile is enabled for use or not;
- In the Settings tab, provide the following information:
- Provider*: A provider which senhasegura will connect to and create credentials;
- Description: A detailed description of this profile;
- In the Provider Name tab, the information will change based on the selected provider. For AWS, provide:
- Policies*: Which policies the credentials will receive when created;
- Default TTL: A credential lifetime in seconds. When the time runs out the credential will be automatically removed from the cloud provider;
- To finish, click on Confirm.
Fields marked with asterisks (*) are required and it is not possible to proceed if they are not provided.
To dynamically create and delete credentials on cloud providers, senhasegura need an already pre-configured account with the correct permissions.
Configure Dynamic Provisioning of Credentials
Besides cloud credentials, senhasegura DSM also offers this same automated feature to create Just-in-Time access on systems and environments such as databases, Linux and Windows devices, providing secure access to applications using ephemeral credentials. For more information on how to manage credentials for those environments, please check the PAM guide.
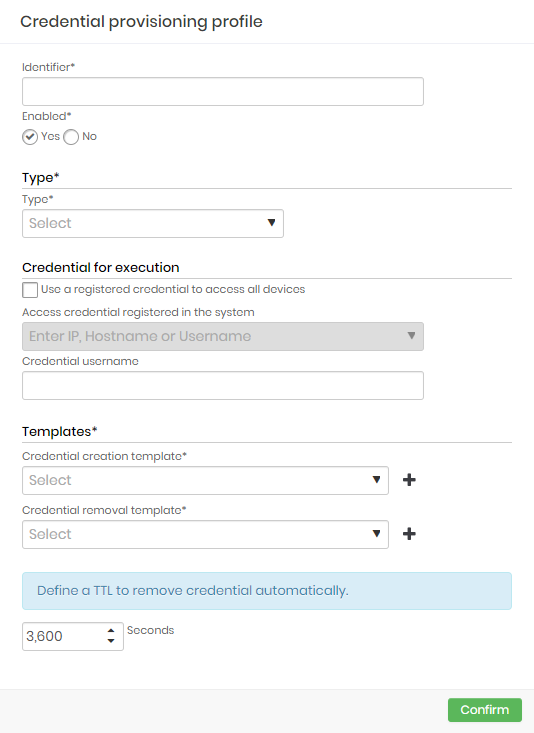
To create a dynamic provisioning profile for systems and environments follow the menu PAM Core ➔ Dynamic provisioning ➔ Profile.
- In the report's action button, click on Add profile;
- Provide the following information:
- Identifier*: A profile identification name. Credential usernames will be composed using this identifier plus a time-based string;
- Enabled*: Whether this profile is enabled for use or not;
- Type*: Type of profile identifying the target devices.
- Credential for execution*: A credential which will be used to create and delete credentials;
- Templates*: The templates for the selected Type containing the instructions to create and remove credentials;
- Default TTL: A credential lifetime in seconds. When the time runs out the credential will be automatically deleted from the target device;
- To finish, click on Confirm.
Fields marked with asterisks (*) are required and it is not possible to proceed if they are not provided.
DevOps Secret Management uses templates registered as Secret Management Automation type on the Executions module. For more information on how to create templates, please check the Automated Executions.
To dynamically create and delete credentials on target devices, senhasegura need an already pre-configured credential with the correct permissions.
This credential can be selected manually through the dropdown option or a username can provided, this way senhasegura will look for a credential with that username for each device configured to run the template.
Enable Dynamic Provisioning on Applications
Once configured, it is possible that each application have its own related profiles.
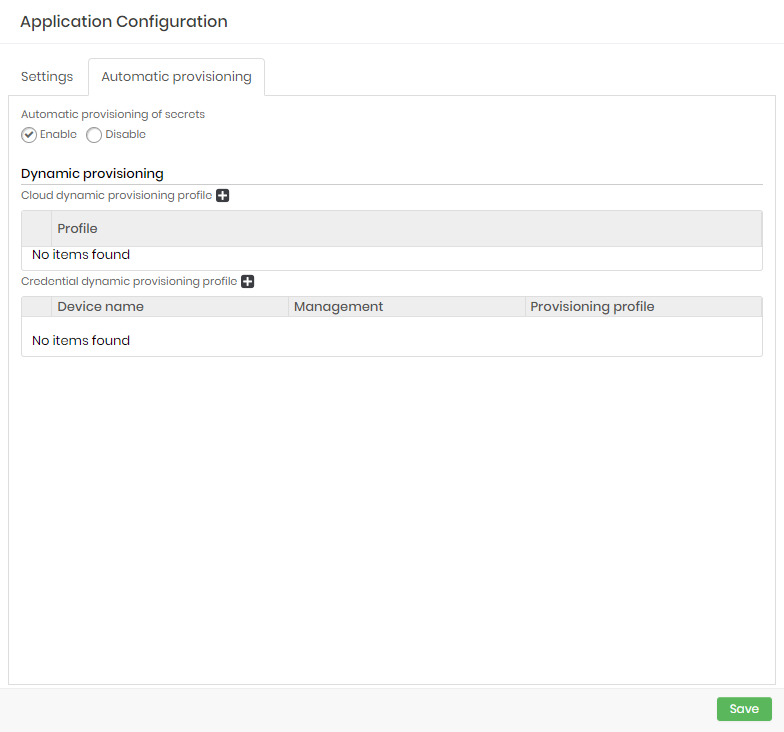
To set an application dynamic provisioning profile follow the menu DevOps Secret Manager ➔ Applications ➔ Applications.
- Edit or create an application and go to the Automatic provisioning tab;
- Enable Automatic provisioning of secrets option;
- On the Cloud dynamic provisioning profile option, add an already created profile;
- On the Credential dynamic provisioning profile option, add a device and select and already created profile;
- To finish, click on Save.
Enabling Secret Auto-renew
After configuring an application to have one or more dynamic profisioning profiles attached to it, secrets can automatically rotate their data on a pre-determined time interval, creating a new credential on target devices or cloud providers and registering them as part of that secret.
This configuration enables credential rotation without the risks of creating an unavailability scenario since the old credential will not be rotated or deleted automatically, allowing applications to still use that data until they receive an update through a rollout proccess.
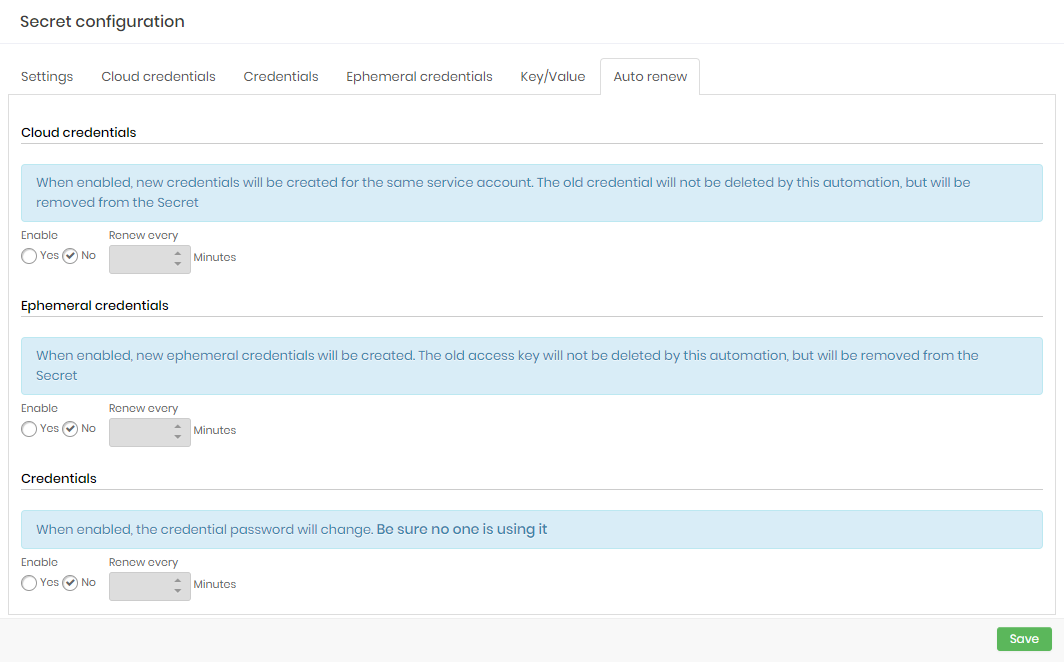
To enable secret auto-renew follow the menu DevOps Secret Manager ➔ Secret Management ➔ Secrets.
- Edit or create a secret and go to the Auto-renew tab;
- Enable auto-renew for Cloud credentials, Ephemeral credentials and/or Credentials;
- For each option, provide a interval period in minutes. The minimum allowed is 10 minutes;
- To finish, click on Save.
Enabling Credentials auto-renew will trigger an actual password rotation on the credentials from a secret, which may cause systems to stop depending on how they are using the credentials.
Make sure that the application will recieve this update without any downtime as well.