Task Manager and its actions
Now that the necessary settings have been defined, Task Manager can start to be used to manage the privileged tasks on your devices.
To better understand the use of the module we can present the following scenario:
"In an organization there is a hired employee who performs all activities related to the management and monitoring of the system backup. Within a week this employee will go on vacation and stay away from his activities for a month.
The Information Security Manager knows that this employee has a high privilege credential to perform backup activities and understands that even during his absence the backup must continue to be managed and monitored.
But what worries him is that it will be necessary to give the credential with high privileges to another employee or create a new one only for another to perform the backup activities.
This only increases the risk surface since a user will have the power, even temporary, of a credential that is not his own, and by creating a new one the number of privileged credentials to be exploited increases."
In this case the backup activities can be created in Task Manager and executed by another employee who will not have knowledge of the credentials or access to the device where the activities will be executed.
Still with this scenario in mind, the following sections presented how to register and run a task in this context. Access the task report through the menu Task Manager ➔ Tasks to reproduce the instructions of the sections.
Registering a task
Click the Display Actions button on the report
Click the New option
infoYou can also use the Quick Actions button and select the Task option and the registration form will open automatically.
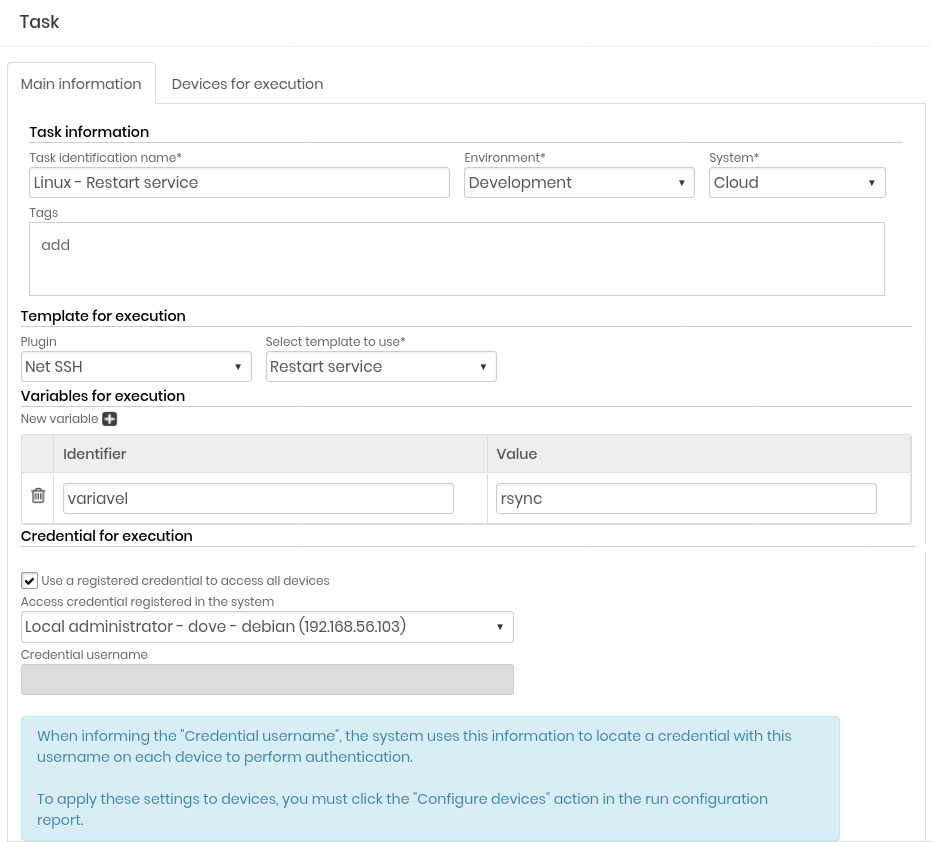
Task registration form Set or name to task no field Task identification name as in figure cadastrotask-enus
infoChoose a name that refers to the purpose of the task so that it is easy to find it whenever you need it. E.g. Restart backup services
Select the Environment and System of this task
In the Template for execution field choose the template created previously.
cautionRemember that the chosen template is a set of commands that will be executed for the task, that is, if your task has the objective to "Restart the backup services", but the chosen template contains commands to change the password the senhasegura will respect the chosen template and will execute the commands described in it.
In the following division Variables for execution it will be possible to insert a value for the variable present in the template, as we mentioned in the section Registering a template.
Variables allow us to use the same template in more than one task, for example, observe this excerpt from the template:
#Restart the service
    expect "*#"
    exec "service [#VARIABLE#] restart"
In our current task we need to restart the backup services so we will set the value of the variable [#VARIABLE#] as rsync like in the picture variavel-enus.

Task registration form - variable field In case you need to restart MySQL services I can create another task with the same template just by setting the variable value to mysql.
infoWhen using the variables in the template describe them this way: [#NAME_VARIABLE#]
In brackets ([ ])
Hash (#)
Uppercase
In the task form the variable must be typed without the brackets and the hash and may or may not be capitalized.
If you don't want to use a variable, just enter all the desired commands in the template, always taking into account that the senhasegura respect the commands entered in it.
Select the credential for execution:
Use a registered credential to access all devices: Select this box if you want to use one of the credentials registered in the senhasegura to authenticate yourself on the device where the task will be executed
Credential username: Fill in the username of the credential you want to authenticate yourself on the device where the task will be executed
Go to the next tab Devices for execution and click the Add button and select the devices where the task will run as in the figure cadastrotaskdisp-enus
Then click Add selected.
If you have selected a device by mistake click the Remove button and similarly select the devices you wish to remove.
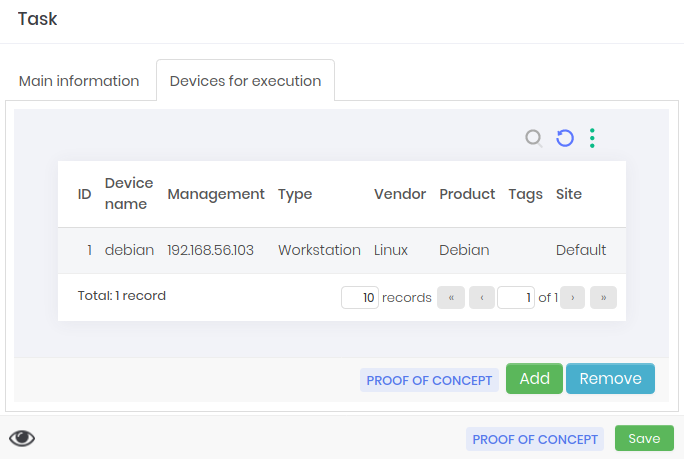
Task registration form - add devices To finish click Save.
Running a Task
After creating the task, update the report so that it is displayed and follow the instructions:
Find the task you want to execute and click the respective action button and select the Execute task option. You can use the filter at the top of the report if you have trouble finding your created task.
Select the reason for execution, already registered before.
If you belong to an access group that requires justificative the text field Reson as shown in the figure executartask-enus, should be filled in with a more detailed description of why you want this task to be executed.

Task execution justification form After filling out the form click on Run task
From this moment on the task is already being executed on the target device.
Scheduling a Task
You can also schedule the execution of the task, to do so follow the instructions:
Still on the task report and find the one you want scheduled.
You can use the filter at the top of the report if you have trouble finding your created task.
Click on the respective action button and select the option Scheduled.
At the bottom of the page click on Schedule running
Select the Reason to run, already registered.
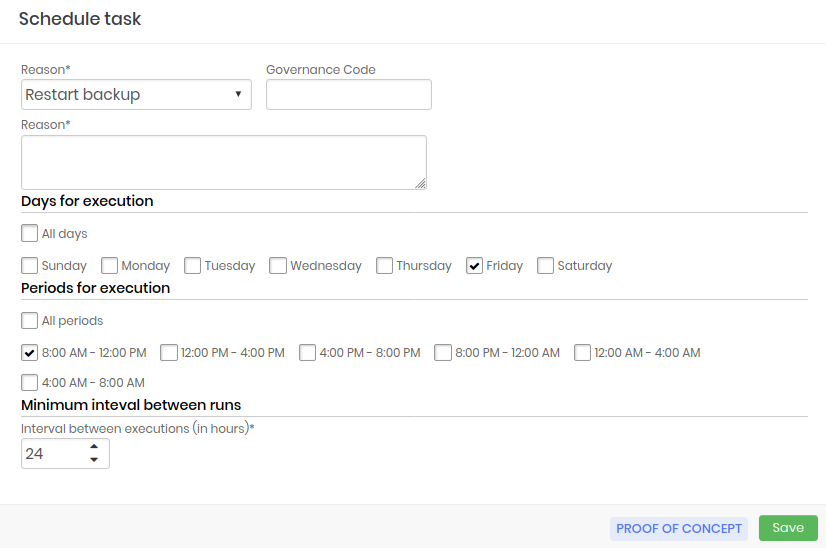
Task scheduling form Describe a detailed justification for why you want this schedule
In the next division Days for execution check the boxes with the days you want the task to run.
Em Periods for execution marque as caixas correspondente ao horário que desejada que a task seja executada.
Then choose the time interval between one run and another in hours
After setting these details click on Save.
With this the task will already be scheduled to be executed on the chosen day and time. If you wish to cancel this scheduling:
- In the schedule report click the action button Cancel schedule.
Checking execution
To check if the execution was successful follow the instructions:
Go to the operations report via the menu Task Manager ➔ Operations
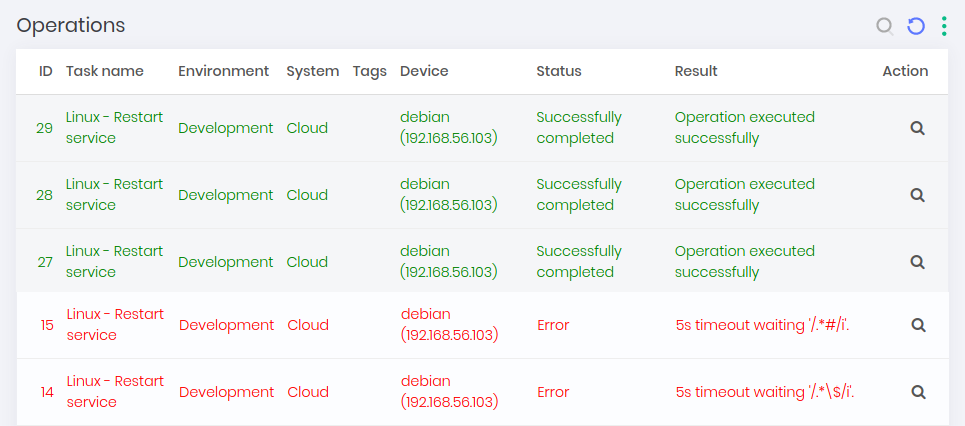
Task operation report The report will display all tasks performed, scheduled or running. The possible statuses are:
Scheduled: The task has not yet been executed and will only be on the day and time scheduled on your schedule.
In execution: At the time of opening this report the task is still being executed on the target device. Wait a few moments and reload the page to view its status after completion.
Successfully completed: The execution was completed without any errors.
Error: There were some errors during the execution of the task and it was not completed.
Cancelled: At some point before or during the execution a user requested the cancellation of the task and it was not completed.
Waiting approval: The user who requested the execution of the task is a member of a group that needs approval for its requests to be executed. The task is in standby mode until an approver of the group allows its execution.
Expired: The approval to execute the task took a long time and therefore the period for operation expired.
Use the filter bar of the form to find the desired task quickly. If your task, as in the picture operacoes-enus, is in color:
Green: was successfully executed.
Red: some error occurred in the execution.
Click the action button to confirm the Logs of execution to understand how the operation was executed and the problems in case of errors.
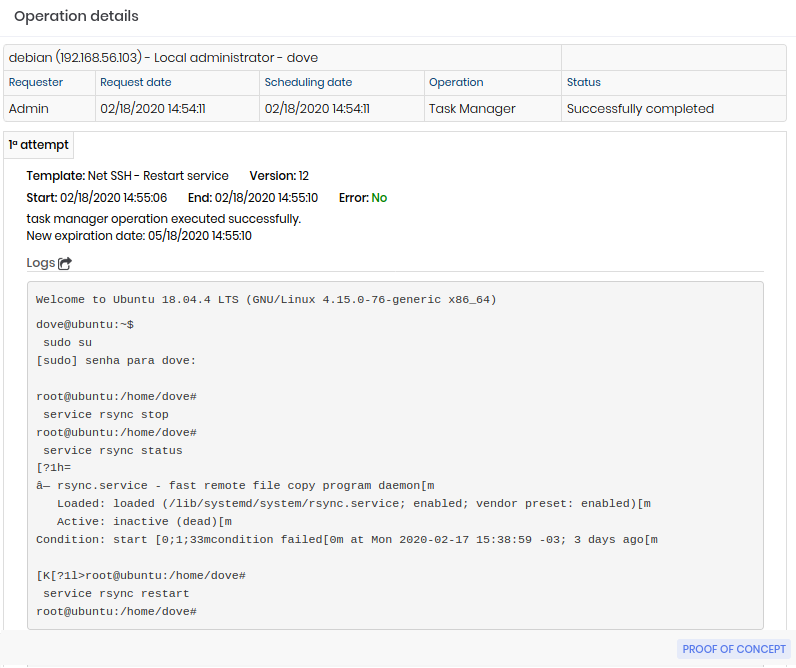
Task operation log
You can also later perform the verification on your own device of the tasks performed. % Redefinindo a pasta atual do capitulo