DevOps Reference Guide
DevOps
Within the DevOps universe flexibility and performance are crucial for applications to have access to all the resources needed to get their jobs done.
Orchestrators and virtualizers rely on technology abstractions so that differentiated ecosystem applications can coexist and share information across core operating system functionality.
Within a modern SDLC, developers have the ability to run their applications using the same variables and resources as a productive environment.
This feature however raises the concern that sensitive information is hardcoded to source codes or configuration files.
Within this scope, senhasegura provides to software manufacturers many ways to request confidential information such as passwords, keys, and other information that must be segregated and managed by a team outside the development team.
The technologies presented here are all developed within the manufacturers customization layer, strictly following their specifications and concerns regarding information security and integrity.
The main channel of this communication is senhasegura WebService A2A . The other plugins, APIs, and requests described in this document are integration facilitators.
Kubernetes and OpenShift
Init container and Sidecar for Kubernetes and Openshift
What is init container?
In a traditional container structure, it is very common for an application to be replicated for use in different parts of the world. As a result, it is necessary that the secrets used by her also be replicated, generating a high risk attack point. Since they are replicas, they all tend to use the same secret to use external applications and a leak of this information would cause damage that cannot be traced.
The senhasegura sidecar comes to mediate this communication and dynamically provision different secrets for each of these replicas and keep all these environments safe and remote. In this way, the leakage of one of these secrets would not have a direct impact on other applications, it would allow quick tracking and an efficient counter attack when updating this secret.
Sidecars and init containers are used to mediate communication between the container and the safe for the search for secrets and storage in a file with its contents on the server Init container is a special type of auxiliary container for applications running inside Kubernetes pods, normally performing bootstrap tasks like application settings and secrets query.
The init container is executed during the creation of a pod, and only allows applications to start after its successful execution
For further information access the official Kubernetes documentation about init containers https://kubernetes.io/docs/concepts/workloads/pods/init-containers/
What is the purpose of the senhasegura init container?
To collect the application's secrets storedge at senhasegura and inject into the application container at the directory /var/run/secrets/senhasegura. The application must be encoded to read the secrets in the directory /var/run/secrets/senhasegura or the access tokens in /var/run/secrets/iso if the sexecution type is iso.
How does it work?
There is four types of execution for the module, which is defined by the
SENHASEGURA_EXECUTION_TYPE environment variable:
iso: Register a new authorization in senhasegura using the WebService A2A endpoint
POST /iso/dapp/application, with the information from/etc/senhasegura/saving authorization data into/etc/run/secrets/isopath.inject_template: Register a new authorization using the WebService A2A endpoint
POST /iso/dapp/application, using the authorization data stored at/etc/senhasegura/with the acquired authorization, request the application secrets and save it at/etc/run/secrets/sechasegura/[app_name].inject: Using the information from
/etc/senhasegura/, request the application secrets and save it at the folder/etc/run/secrets/sechasegura/[app_name]sidecar: Periodically according to the secrets loop, using the information at
/etc/senhasegura/request the application secrets and save it at folder/etc/run/secrets/sechasegura/[app_name]keeping data updated.
How secrets are stored in the directory /var/run/secrets/senhasegura?
All secrets collected by the execution type injectTemplate, inject and sidecar will be saved at /var/run/secrets/senhasegura as plain-text files, following the pattern below.
root@app-nft-6596869788-9mxpf:/var/run/secrets## tree /var/run/secrets/senhasegura/
/var/run/secrets/senhasegura/
`- aws ** <- Application name **
  |- myapp_cred ** <- Identity da secret **
    | - APP_CLOUD ** <- Keys inserted in the secret **
    | - APP_VERSION ** <- Keys inserted in the secret **
    | - AWS_ACCESS_KEY_ID ** <- Keys inserted in the secret **
    | - AWS_ACCESS_KEY_SECRET ** <- Keys inserted in the secret **
    | - CRED_Additional_Information ** <- Keys inserted in the secret **
    | - CRED_Hostname ** <- Keys inserted in the secret **
    | - CRED_Password ** <- Keys inserted in the secret **
    ` - CRED_Username ** <- Keys inserted in the secret **
    ` - PASSWORD ** <- Property of secret if exists **
    ` - HOSTNAME ** <- Property of secret if exists **
    ` - TTL ** <- Property of secret if exists **

1 directory, 8 files
How to configure the init container?
Create the application in senhasegura with authentication method in OAuth2 and link the desired secrets
Create a secret in Kubernetes with the OAuth2 tokens generated by senhasegura for the created application
$ kubectl create secret generic senhasegura-example-app
--from-literal=SENHASEGURA_URL=https://company.security.com/
--from-literal=SENHASEGURA_CLIENT_ID=your_application_oauth_client_id
--from-literal=SENHASEGURA_CLIENT_SECRET=your_application_oauth_client_secret
Add the initContainers session and create a volume of type emptyDir in the deployment declaration. Example:
apiVersion: apps/v1
kind: Deployment
metadata:
  name: senhasegura-example-app
  namespace: senhasegura-example-app
  labels:
    app: senhasegura-example-app
spec:
  replicas: 5
  selector:
    matchLabels:
      app: senhasegura-example-app
  strategy: {}
  template:
    metadata:
      labels:
        app: senhasegura-example-app
    spec:
      volumes:
      - name: senhasegura
        emptyDir: {}

      containers:
      - image: nginx
        name: nginx
        volumeMounts:
        - name: senhasegura
          mountPath: /var/run/secrets/senhasegura/

      initContainers:
      - image: senhasegura/secrets-init-container:latest
        name: senhasegura-secrets-init-container
        command: ["senhasegura-secrets-init-container"]
        volumeMounts:
        - name: senhasegura
          mountPath: /var/run/secrets/senhasegura/
        env:
        - name: SENHASEGURA_URL
          valueFrom:
            secretKeyRef:
              name: senhasegura-example-app
              key: SENHASEGURA_URL
        - name: SENHASEGURA_CLIENT_ID
          valueFrom:
            secretKeyRef:
              name: senhasegura-example-app
              key: SENHASEGURA_CLIENT_ID
        - name: SENHASEGURA_CLIENT_SECRET
          valueFrom:
            secretKeyRef:
              name: senhasegura-example-app
              key: SENHASEGURA_CLIENT_SECRET
Validate that the secrets were created in the
/var/run/secrets/senhasegura/directory
Ansible
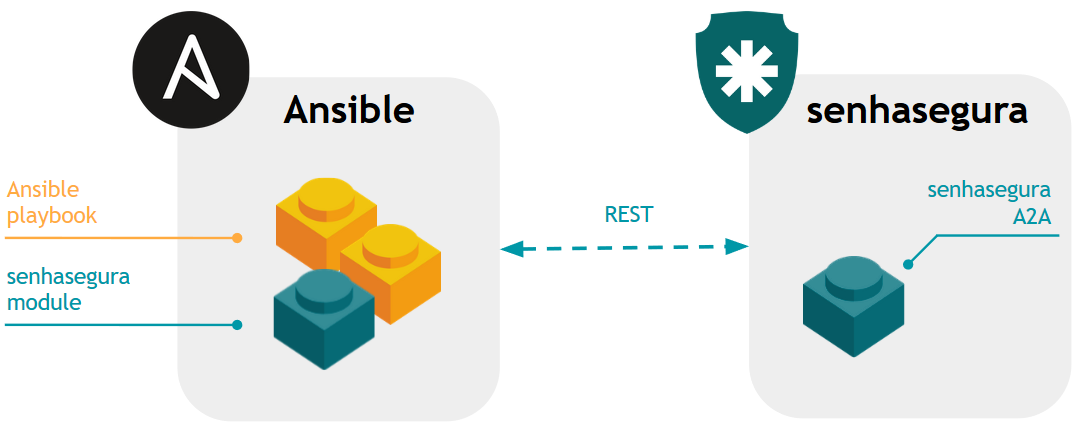
Ansible1 is a provisioning software provided by Red Hat Inc 2.
Its YAML file-based configuration model, filled with server groups and tasks to perform, allows secrets to be integrated through modules. Thus senhasegura has developed a Python module following the manufacturer's specifications so that playbooks can be designed using passwords managed by senhasegura without the need for exposure of their value.
senhasegura Ansible modules instalation
Every Ansible execution using senhasegura Ansible plugins will communicate to senhasegura server using WebService A2A . And it's application must be configured to use OAuth2.0.
First at all you should ask our support team to obtain all senhasegura Ansible plugins source-code.
Then you can follow these steps to install senhasegura plugins into your Ansible server.
In the
ansible.cfgconfiguration file (usually in/etc/ansible/ansible.cfg), define a directory for custom modules.[defaults]
library = /path/to/ansible/custom_modules/Create the directory defined in the configuration file and copy the file
src/senhasegura_credential.pymkdir -p /path/to/ansible/custom_modules/
cp src/senhasegura_credential.py /path/to/ansible/custom_modules/Check if module is loaded using ansible-doc
ansible-doc -t module senhasegura_credential
senhasegura Ansible modules basic usage
After performing the installation steps, you will need to: Export in environment variables the authentication parameters for A2A and define a task set in Playbook that uses the senhasegura module.
Export in environment variables the authentication parameters for A2A
Authentication parameters:
export SENHASEGURA_A2A_URL=https://company.security.com
export SENHASEGURA_A2A_CONSUMER_KEY=valueHere
export SENHASEGURA_A2A_TOKEN=valueHere
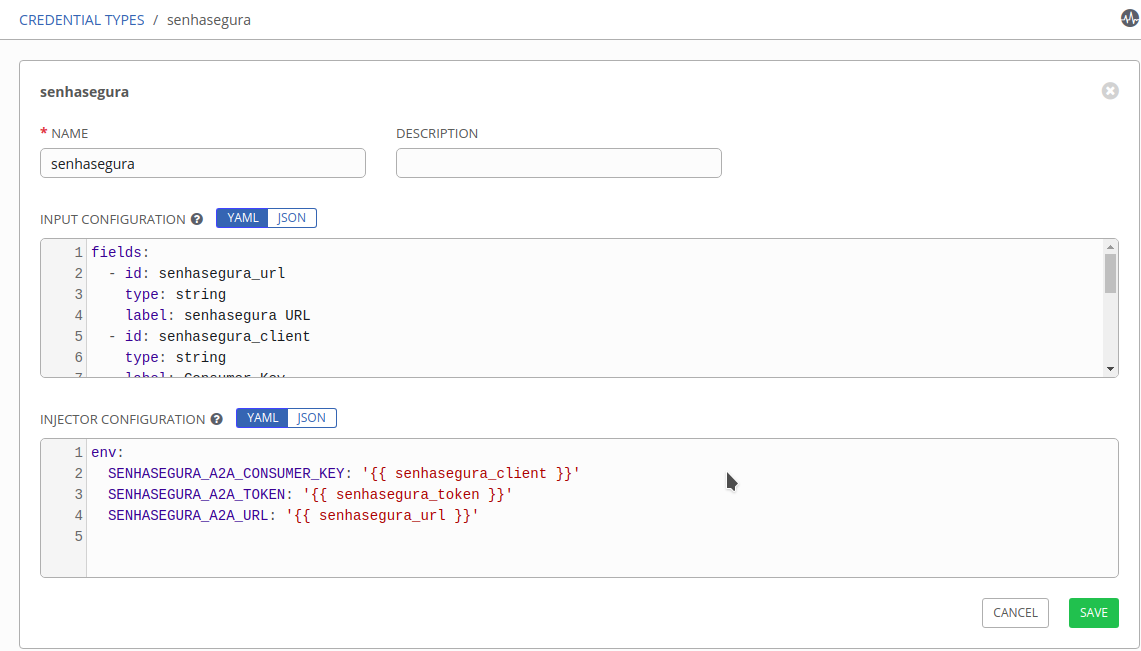
For Ansible Tower or AWX users
Please configure "Custom Credential Type" for senhasegura authentication parameters:
With a user who has administrative privileges, register a new "Custom Credential Type" in Administration ➔ Credential Types
In the input configuration field fill in the values below
---
fields:
  - type: string
    id: senhasegura_url
    label: senhasegura URL
  - type: string
    id: senhasegura_client
    label: Consumer Key
    secret: true
  - type: string
    id: senhasegura_token
    label: Token
    secret: true
required:
  - senhasegura_url
  - senhasegura_client
  - senhasegura_token
In the injector configuration field fill in the values below
---
env:
  SENHASEGURA_A2A_CONSUMER_KEY: '{{ senhasegura_client }}'
  SENHASEGURA_A2A_TOKEN: '{{ senhasegura_token }}'
  SENHASEGURA_A2A_URL: '{{ senhasegura_url }}'
Example:
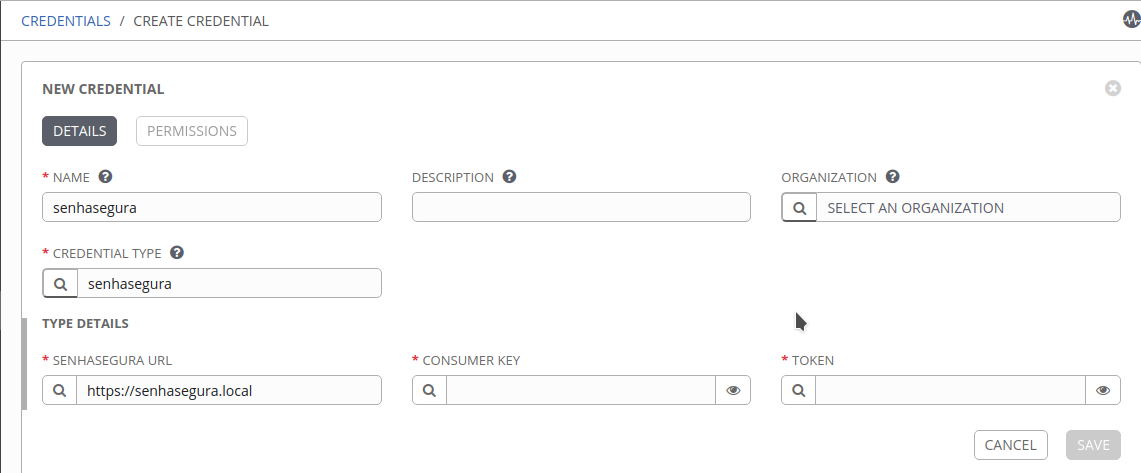
Example With a user who has administrative privileges, register a new credential in Resources ➔ Credentials. Fill in the required values:
Example
senhasegura_credential module
When running a PlayBook Ansible, you need to query a credential registered in the senhasegura to perform tasks such as:
Connect on database with user cbda
Open encrypted file
Execute any task with privilege elevation
Any task that needs a credential
Playbook example
---
### Example: Creating a credential
- hosts: all
  tasks:
    - name: Create credential
      senhasegura_credential:
        system_url: 'https://company.security.com/'
        client_id: 'your_application_oauth_client_id'
        client_secret: 'your_application_oauth_client_secret'
        state: present
        ip: 127.0.0.1
        hostname: my_credential_hostname
        username: my_credential_username
        password: my_credential_password
        tags: ['mytag1', 'mytag2']
        additional_info: 'created by ansible'
      register: cred_created

    - name: "Credential created | Print credential"
      debug:
        var: cred_created
---
### Example: Deleting a credential
- hosts: all
  tasks:
    - name: Delete credential id 9
      senhasegura_credential:
        system_url: 'https://company.security.com/'
        client_id: 'your_application_oauth_client_id'
        client_secret: 'your_application_oauth_client_secret'
        identifier: '9'
        state: absent
      register: cred

    - name: "Credential ID 9 | Print credential"
      debug:
        var: cred
Parameters description
system_url: The senhasegura environment URL used for auth, set up as enviroment variable named
SENHASEGURA_A2A_URLType: String
Required: Only if the enviroment variable is not set
client_id: The A2A
client_idfor user, set up as enviroment variable namedSENHASEGURA_A2A_CLIENT_IDType: String
Required: Only if the enviroment variable is not set
client_secret: The A2A
client_secretfor user, set up as enviroment variable namedSENHASEGURA_A2A_CLIENT_SECRETType: String
Required: Only if the enviroment variable is not set
state: Specifies the state needed for the credential.
presentfor create or update credential,absentfor delete credential.Type: String
Options:
absent,presentRequired: No, default value is
present
id_credential: The ID of credential for management. Required to update and delete. If omitted and the
stateispresent, a new credential will be createdType: int
Required: Only when
stateisabsent
identifier: The secret identifier for management, alias to
credential_id. Required to update and delete. If omitted and thestateispresent, a new credential will be createdType: int
Required: Only when
id_credentialis ommited
hostname: Hostname to set in the credential
Type: String
Required: Only when
stateispresent
ip: IP to set in the credential
Type: String
Required: Only when
stateispresent
credential_type: Specifies the type of credential.
Type: String
Options:
local_user,local_administrator,domain_userRequired: No, default value is
local_user
username: Username to set in the secret if found by
id_credentialor identifier, or will be used to find the credentialType: String
Required: Only when
stateispresent
password: The password to set in the secret. This password must meet the password policy requirements.
Type: String
Required: Only when
stateispresent
domain: The credential domain.
Type: String
Required: No
tags: The credential tags.
Type: list
Required: No
additional_info: The additional information for credential.
Type: String
Required: No
parent_credential: Parent credential id
Type: String
Required: No
senhasegura_device module
When running a PlayBook Ansible, you may need to provisioning new devices inside senhasegura or query for existing devices.
Playbook example
---
### Example: Creating a device
- hosts: all
  tasks:
    - name: Create device
      senhasegura_device:
        system_url: 'https://company.security.com/'
        client_id: 'your_application_oauth_client_id'
        client_secret: 'your_application_oauth_client_secret'
        state: present
        hostname: mydevicehost
        ip: 172.10.20.30
        type: server
        vendor: mydevicevendor
        model: mydevicemodel
        connectivity_protocol: ['SSH','Telnet']
        connectivity_port: [22, 23]
        site: default

      register: device_created

    - name: "Device created | Print device"
      debug:
        var: device_created
---
### Example: Deleting a device
- hosts: all
  tasks:
    - name: Delete device id 9
      senhasegura_device:
        system_url: 'https://company.security.com/'
        client_id: 'your_application_oauth_client_id'
        client_secret: 'your_application_oauth_client_secret'
        identifier: '9'
        state: absent
      register: device

    - name: "Device ID 9 | Print device"
      debug:
        var: device
Parameters description
system_url: The senhasegura environment URL used for auth, set up as enviroment variable named
SENHASEGURA_A2A_URLType: String
Required: Only if the enviroment variable is not set
client_id: The A2A
client_idfor user, set up as enviroment variable namedSENHASEGURA_A2A_CLIENT_IDType: String
Required: Only if the enviroment variable is not set
client_secret: The A2A
client_secretfor user, set up as enviroment variable namedSENHASEGURA_A2A_CLIENT_SECRETType: String
Required: Only if the enviroment variable is not set
state: Specifies the state needed for the device.
presentfor create or update andabsentfor delete.Type: String
Required: None
Options:
absent,present
identifier: Identifier to find device
Type: Integer
Required: Yes
hostname: Hostname to query or set a new device
Type: String
Required: Yes
ip: IP to set a new device
Type: String
Required: Yes
type: Specifies the device type.
Type: String
Required: Only if
stateispresent
vendor: Specifies the device vendor. It will be automatically created if not exists.
Type: String
Required: Only if
stateispresent
model: Specifies the device model. It will be automatically created if not exists.
Type: String
Required: Only if
stateispresent
site: Specifies the device site. It will be automatically created if not exists.
Type: String
Required: Only if
stateispresent
domain: Specifies the device domain.
Type: String
Required: No
connectivity_protocol: The device connectivity protocols.
Type: List
Required: No
Options: HTTP, HTTPS, LDAP, LDAPS, MySQL, Oracle, PostgreSQL, RDP, SQL Server, SSH, TDS Sybase, Telnet, VNC, Windows RM, Windows RPC, X11 Forward
connectivity_port: The connectivity ports on device. Must be a integer list for connectivities protocol sent.
Type: List
Required: No
senhasegura_key module
Using this plugin you can create, change or inativate SSL keys managed by senhasegura .
Playbook example
---
### Example: Creating a key
---
- hosts: all
  tasks:
    - name: Delete key
      senhasegura_key:
        system_url: 'https://company.security.com/'
        client_id: 'your_application_oauth_client_id'
        client_secret: 'your_application_oauth_client_secret'
        id_key: '999'
        state: absent
      register: key

     - name: "Key ID 1 | Print key"
       debug:
         var: key

    - name: Create key
      senhasegura_key:
        system_url: 'https://company.security.com/'
        client_id: 'your_application_oauth_client_id'
        client_secret: 'your_application_oauth_client_secret'
        state: present
        ip: 172.10.20.30
        hostname: mydevicehost
        username: myuser
        password: mypassword
        public_key: |
-----BEGIN CERTIFICATE-----
MIIFazCCA1OgAwIBAgIUB7WzL+hW0LOjErtgfebM5zE8gl0wDQYJKoZIhvcNAQEL
BQAwRTELMAkGA1UEBhMCQVUxEzARBgNVBAgMClNvbWUtU3RhdGUxITAfBgNVB...
        private_key: |
-----BEGIN RSA PRIVATE KEY-----
Proc-Type: 4,ENCRYPTED
DEK-Info: DES-EDE3-CBC,384DE75465B87200
xc7xR0lo1MlgBbZ+8RW/OoMMK5sAs3EaVzahSh5MPfUOMJG9ppVz35iNdnB2bwa6
ksyKfEv2guW3zRb9GVAdFsLoGA4qtOE/FOgeuJKA/RcYSxHnUNmrNzPq38EQl...
        tags: ['mytag01', 'mytag02']
      register: key_created

    - name: "Key created | Print key"
      debug:
        var: key_created
---
### Example: Deleting a key
---
- hosts: all
  tasks:
    - name: Delete key
      senhasegura_key:
        system_url: 'https://company.security.com/'
        client_id: 'your_application_oauth_client_id'
        client_secret: 'your_application_oauth_client_secret'
        id_key: '9999'
        state: absent
      register: key
    - name: "Key ID 9999 | Print key"
      debug:
        var: key
Parameters description
system_url: The senhasegura environment URL used for auth, set up as enviroment variable named
SENHASEGURA_A2A_URLType: String
Required: Only if the enviroment variable is not set
client_id: The A2A
client_idfor user, set up as enviroment variable namedSENHASEGURA_A2A_CLIENT_IDType: String
Required: Only if the enviroment variable is not set
client_secret: The A2A
client_secretfor user, set up as enviroment variable namedSENHASEGURA_A2A_CLIENT_SECRETType: String
Required: Only if the enviroment variable is not set
state: Specifies the state needed for the device.
presentfor create or update andabsentfor delete.Type: String
Required: None
Options:
absent,present
id_key: The key record ID for management. Required to update and delete. If omitted, and the
stateis present, a new key will be created.Type: Integer
Required: Only if
stateisabsent
identifier: The secret identifier for management, alias to
id_key. Required to update and delete operations. If omitted and thestateispresent, a new key will be created.Type: Integer
Required: Only if
id_keyis ommited
hostname: Hostname to set in the device key
Type: String
Required: Only if
stateispresent
ip: Ip to set in the device key
Type: String
Required: Only if
stateispresent
key_type: Specifies the type of key.
Type: String
Required: No, the default value is
local_userOptions: local_user
username: Username to set in the secret if found by
id_keyidentifier, or will be used to find the keyType: String
Required: Only if
stateispresent
password: The password to set in the secret. This password must meet the password policy requirements.
Type: String
Required: Only if
stateispresent
private_key: The SSH private key.
Type: String
Required: No
public_key: The SSH public key.
Type: String
Required: No
tags: The key tags
Type: list
Required: No
senhasegura_query_credential module
Using this module your application can query for registered credentials into senhasegura server.
Playbook example
---
- hosts: all
  tasks:
    - name: Find credential by it's id
      senhasegura_query_credential:
        system_url: 'https://company.security.com/'
        client_id: 'your_application_oauth_client_id'
        client_secret: 'your_application_oauth_client_secret'
        id_credential: '10035'
      register: cred

    - name: "Credential ID 10035 | Print credential"
      debug:
        var: cred

    - name: Fetch credential for 'ansible' user on server 'AIX7.2 ' with IP '150.238.77.93'
      senhasegura_query_credential:
        system_url: 'https://company.security.com/'
        client_id: 'your_application_oauth_client_id'
        client_secret: 'your_application_oauth_client_secret'
        username: ansible
        ip: '150.238.77.93'
        hostname: AIX7.2
      register: cred

    - name: "Print credential"
      debug:
        var: cred
Parameters description
system_url: The senhasegura environment URL used for auth, set up as enviroment variable named
SENHASEGURA_A2A_URLType: String
Required: Only if the enviroment variable is not set
client_id: The A2A
client_idfor user, set up as enviroment variable namedSENHASEGURA_A2A_CLIENT_IDType: String
Required: Only if the enviroment variable is not set
client_secret: The A2A
client_secretfor user, set up as enviroment variable namedSENHASEGURA_A2A_CLIENT_SECRETType: String
Required: Only if the enviroment variable is not set
hostname: The hostname of secret for fetch, only if
id_credentialandidentifieris omittedRequired: No
Type: String
id_credential: The ID of credential for fetch
Required: No
Type: String
identifier: The secret identifier for fetch, only if
id_credentialis omittedRequired: No
Type: String
ip: The IP or DNS of secret for fetch, only if
id_credentialandidentifieris omittedRequired: No
Type: String
username: The username of secret for fetch, only if
id_credentialandidentifieris omittedRequired: No
Type: String
Gitlab CI/CD
GitLab3 CI/CD4 allows variables to be configured at the project layer. Allowing variable values to be determined depending on their scope.
senhasegura can interact directly with the values of these variables at the time the credentials change manually or through automated execution processes.
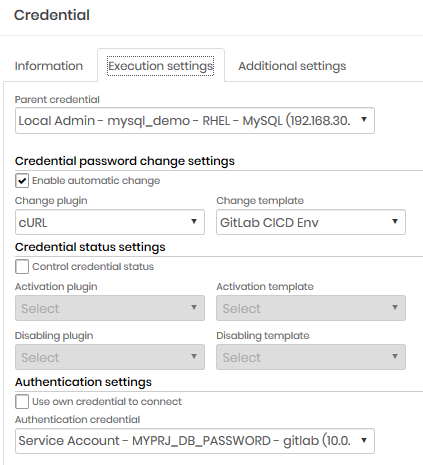
Credentials, such as a database password, can be changed in all projects where this credential is used through GitLab Executor Plugin.
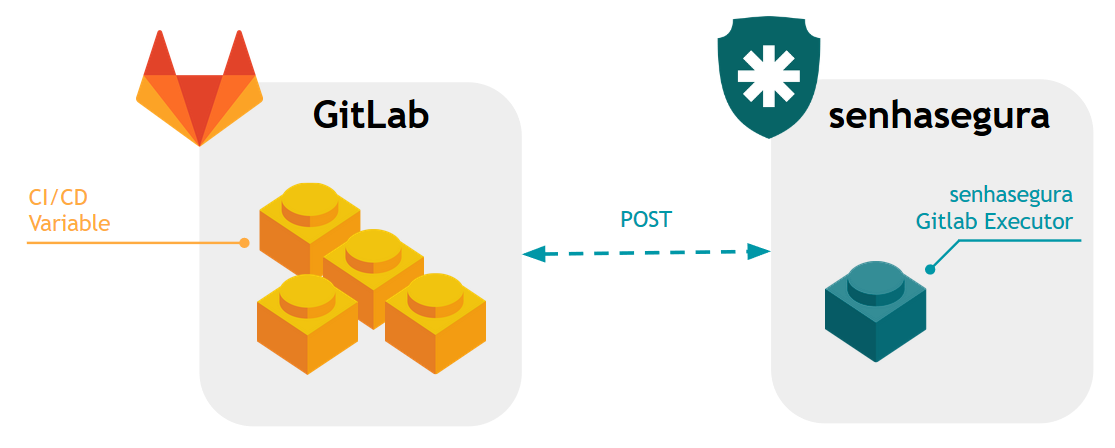
In this case, among the child credentials of this changed parent credential must be the credential for the project variable bearing the updated password.
When triggered the change of the child password, a request will be directed to the GitLab server according to the manufacturer standard, requesting the variable update in the project.

See Operations Administrator's Guide for more information on the Executions module
Once the parent credential is changed, child credentials that match the GitLab performer will make a request as directed by the manufacturer's official documentation5
PRJ_TOKEN: Credential password that stores the project token
GIT: Credential hostname that stores the project token
PRJ_ID: Additional credential information that stores the project token
CHILD_CRED_USER: Child credential username. Is the name of the environment variable.
PARENT_CRED_PASSWORD: Password of parent credential changed
curl --request POST --header 'PRIVATE-TOKEN: \[#PRJ_TOKEN#\]'
'https://\[#GIT#\]/api/v4/projects/\[#PRJ_ID#\]/variables' --form
'key = \[#CHILD_CRED_USER#\]' --form 'value = \[#PARENT_CRED_PASSWORD#\]'
senhasegura Execution Template
set-request-method PUT
set-content-type application/x-www-form-urlencoded
set-request-header PRIVATE-TOKEN [#COE_PASSWORD#]
set-request-content value=[#NEW_PASSWORD#]

request
http://[#IP#]/api/v4/projects/[#ADDITIONAL_INFO#]/variables/[#USERNAME#]

expect [#USERNAME#]
Jenkins CI/CD
The Jenkins CI/CD6 allows environment variables to be set within the execution pipelines. It also allows safe storage of values that can be used within these same pipelines without exposure.
The administrator's challange is ensuring that these same variables are automatically rotated.
Through Jenkins native architecture, senhasegura allows variables to be injected at pipeline runtime from our Jenkins plugin.
Pay attention to Jenkins-CLI security recommendations.
Integration Plugin
The integration plugin of Jenkins is aimed at:
Intercept all environment variables at the moment of their execution by sending them to the senhasegura
Search all the secrets they had in the authorization
Update environment variables
Provide runtime secrets as environment variables
The plugin helps so that the information is not exposed, since it only uses it when it is necessary, and the information will be centralized in a single solution, thus facilitating its management.
To make use of this plugin is necessary that the user:
Get the integration plugin with our support team
Install the integration plugin at Jenkins
Perform the configuration by adding in the section called senhasegura DSM Plugin in one of the levels: Global, Folder or Job
Run the plugin
Variables
After running the plugin access the senhasegura to see all variables sent through the menu: DevSecOps ➔ CI/CD ➔ Variables.
Sensitive variables
senhasegura consider as sensitive variables those that contain confidential information such as passwords and tokens, for example.
It is possible to see the amount of variables sent that were considered by the senhasegura as sensitive through the variable dashboard: DevSecOps ➔ Dashboard ➔ CI/CD variables.
This dashboard also helps you understand what information may be exposed when it should not be.
Secrets
By receiving some variables the senhasegura understands the sensitivity of the information and creates, in an automated way, a Secret for managing these variables.
The secrets can be found in the following report: DevSecOps ➔ Secret Management ➔ Secrets.
In the same way Jenkins will be able to use the secrets managed by the senhasegura . This will require creating an application authorization and linking the secrets that Jenkins may make use of. Please refer to the chapter Secrets of this book to understand how to perform this procedure.
Docker Secrets
Docker7 is a container software that provides operating system abstraction at the kernel layer. Its use, however, does not act as an orchestrator, but is also responsible for providing sensitive information to application containers. Always following the same DevOps principle, these applications abstract the runtime environment so that the same development code can be deployed to a productive container without affecting its behavior.
Because a container's configuration files are open text files, Docker provides a sensitive information management layer called Docker Secrets8.
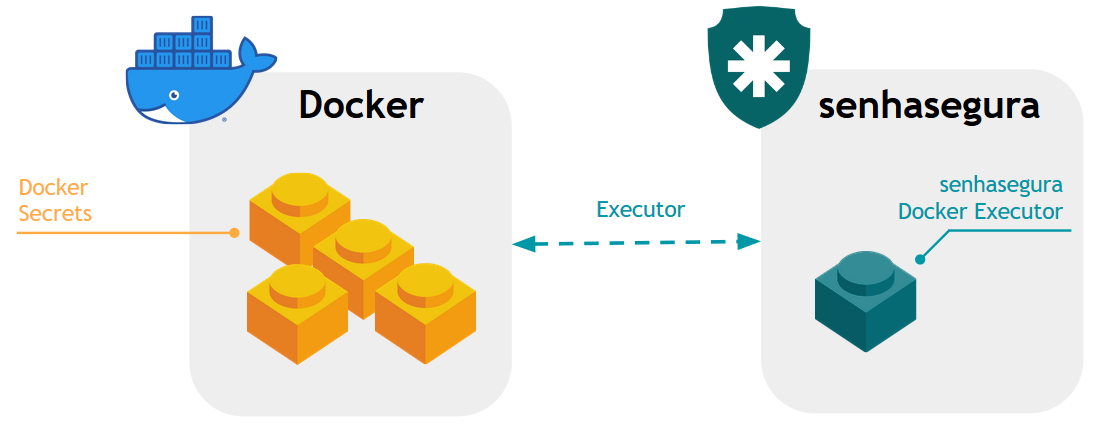
With no need for extra plugins, senhasegura can replicate the changed parent password directly to the Docker server using the manufacturer binary.
Execution Template senhasegura
## general definitions
set-connect-timeout 10
set-read-timeout 5
set-ssh-version 2

## set english language
expect "*$"r
exec "export LC_ALL=C"

## execute as root
expect "*$"
exec "sudo su"
expect "[sudo]*[#AUTH_USER#]*"
exec "[#AUTH_PASSWORD#]"

## remove docker secret
expect "*#"
exec "docker secret rm [#USERNAME#]"

## create new secret
expect "*#"
exec "echo "[#NEW_PASSWORD#]" | docker secret create [#USERNAME#] -"

expect "*#"
exec "exit"

expect "*$"
exec "exit"

end
See the Docker Secrets manual for a better understanding of how you can enhance the senhasegura execution template for your need.
chapterSecret Secrets are a set of sensitive information that is used for digital authentication across DevOps environments. It can include passwords, access keys, tokens or even an array of key/values to be used in privileged accounts, applications and services.
Given the increasing complexity and growth of DevOps culture and tools to support it, the challenge is to centralize, securely store, transmit and audit secrets.
senhasegura Secret Management was conceived/developed/created to overcome these challenges by offering a secure way to manage the entire secret lifecycle.
Create a secret
To manually create a secret, go to the menu DevSecOps ➔ Secret Management ➔ Secrets.
Click the actions button and select New secret option.
On the Main tab, complete the following fields:
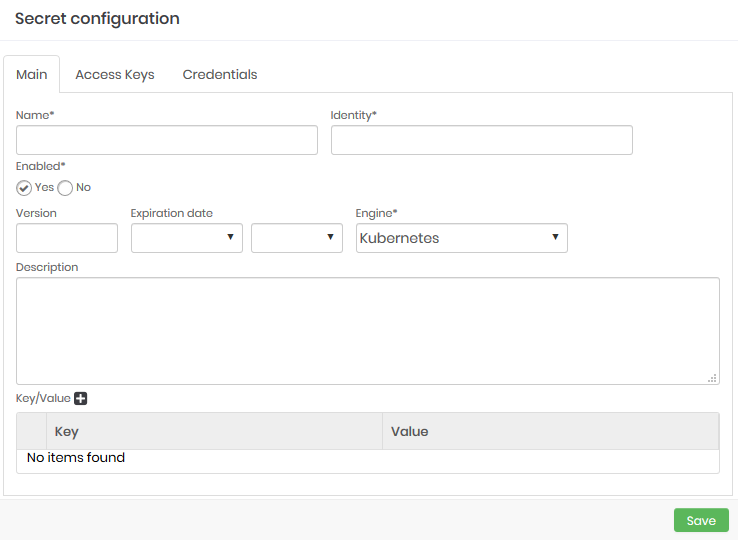
Secret configuration form Name: Secret name;
Identity: Secret identifier;
Enabled: Indicates whether or not the secret is active ;
Version: Secret version;
Expiration date: Date and time for the secret to expire;
Engine: Engine for the secret to being used;
Description: Detailed description for the secret;
Key/Value: An array of key/value entries;
Click the Access Keys tab to add Access Keys to the secret:
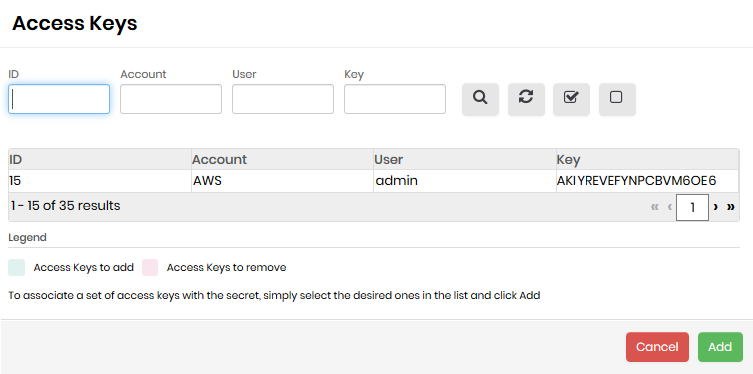
Secret configuration form - Access keys Click on the records to select the desired keys and then click the Add button.
Click the Credentials tab to include credentials to the secret:
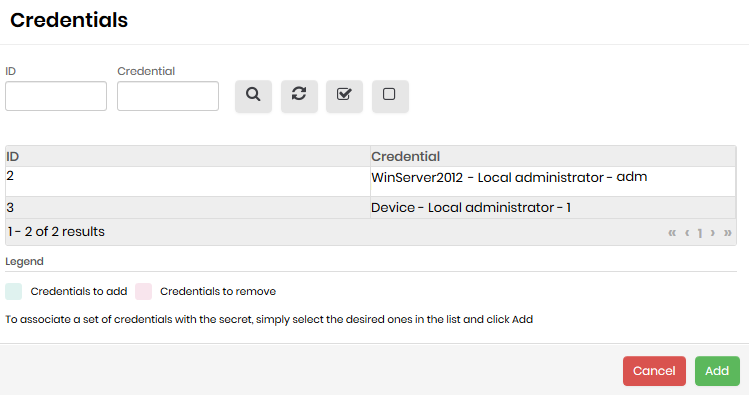
Secret configuration form - Credentials Click on the credential records to select the desired ones and then click the Add button.
Click the Save button to complete the registration
Create an application
For the secrets to be used, they need to be linked to an authorization that is related to the application.
To create a new application, go to DevSecOps ➔ Applications ➔ Applications.
Click the actions button and select New application option
On the Application configuration screen, complete the following fields:
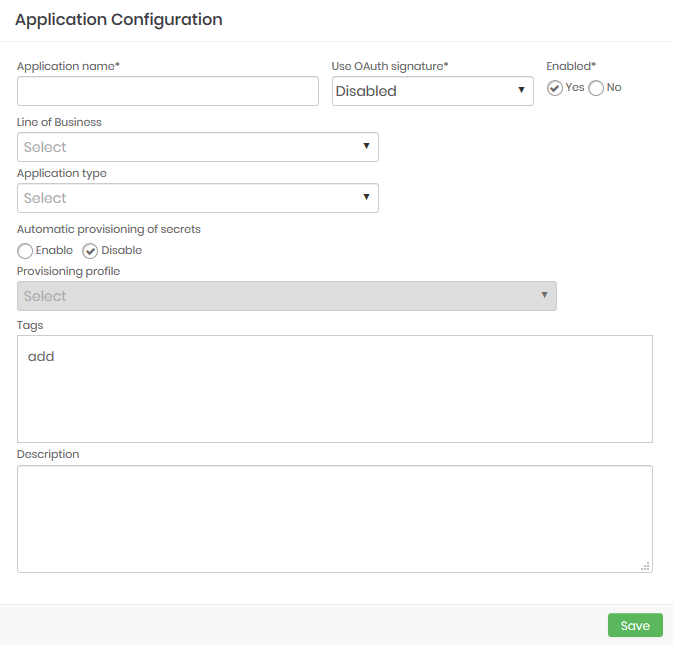
Application configuration form Field Description Application name Name to identify the application Use OAuth signature Option to choose which OAuth signature to be used Enabled Indicates whether or not the application is active Line of Business Application business line Application type Indicates the application category Automatic provisioning of secrets Allows new key pairs to be created automatically when needed Provisioning profile Indicates o profile to be used for o automatic provisioning Tags Tags used to locate a segregate this application Description Detailed description for the application
- Click the Save button to complete the registration
Create an authorization
An authorization is needed to securely identify and authenticate the requester for an application secret and to restrict which secrets are allowed to be requested.
To create a new authorization, follow the menu DevSecOps ➔ Applications ➔ Authorization by application.
An application is required for a new authorization to be created.
Click the New authorization option in the desired application.
On the Security tab, complete the following fields:
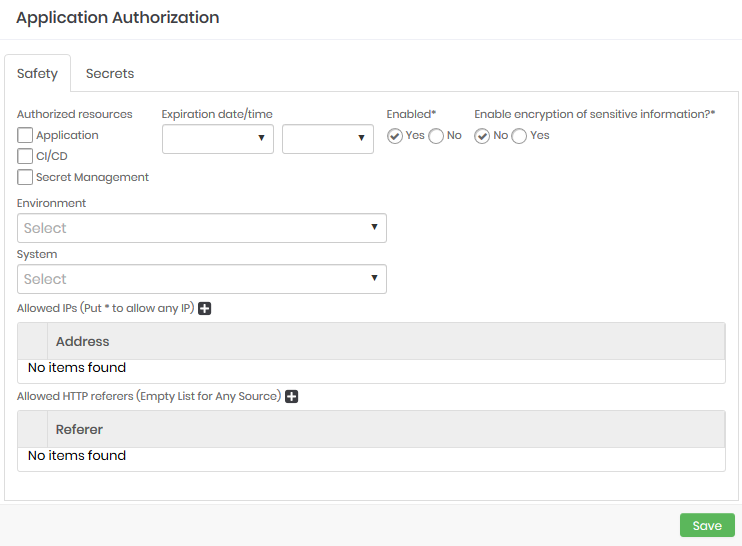
Application authorization security form Field Description Authorized resources List of resources allowed for this authorization Date/Time Expiration Date and time for the authorization to expire Enabled Indicates whether or not the authorization is active Enable encryption of sensitive information Indicates whether sensitive information is to be encrypted or not Allowed IPs List of allowed IPs for this authorization Allowed HTTP referrers List of allowed HTTP referers for this authorization
Click on the Secrets tab to link the secrets to be allowed to this authorization:
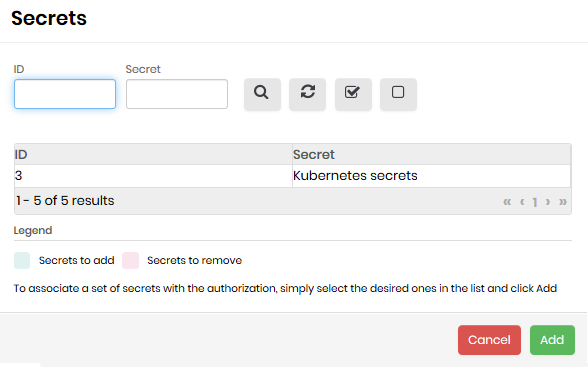
Application authorization secrets form Field Description ID Secret ID Secret Secret name
Click on the desired secrets to select them
Click the Save button to complete the registration
Dashboard
Through the menu: DevSecOps ➔ Dashboard ➔ Secrets you will find data and graphs about the secrets of the system as for example:
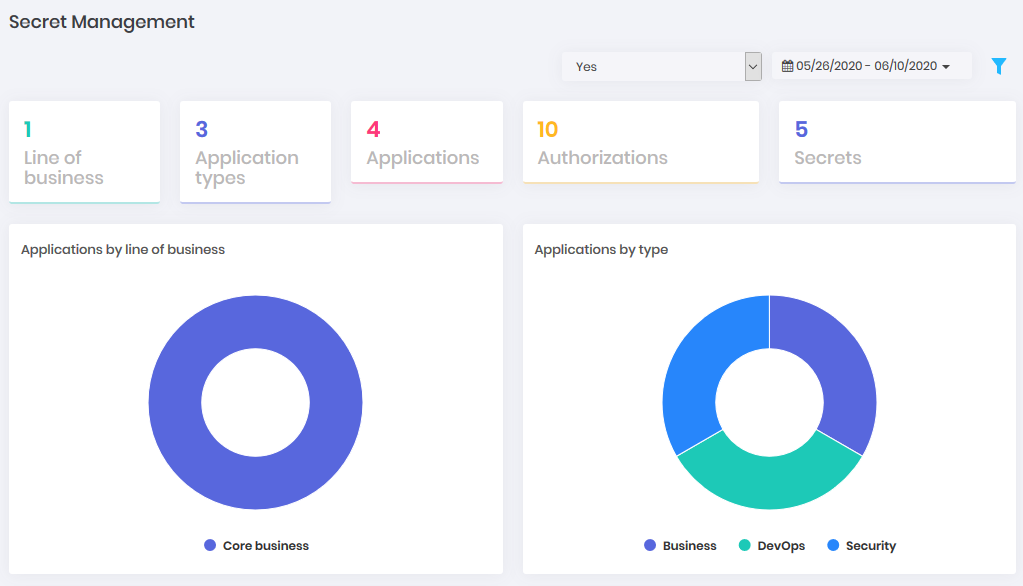
Application by business line
Number of authorizations
Number of secrets consulted per day
Authorizations by environments
Dynamic credentials provisioning
Access the Dynamic provisioning report: PAM ➔ Dynamic provisioning ➔ Profile. Click the report action button Add profile. Then fill out the form:
In the field Identifier enter a term so that this profile is easy to identify in reports.
Indicate whether it is active for use.
Then select the Type of this profile that they can be:
Linux
MySQL
Oracle
SQL Server
Windows
In the field Devices select a device already registered in the senhasegura
Indicate the Template of credential creation that will be used by this profile. Clicking on the add icon next to the field will provide an additional field to insert another credential creation template.
Likewise, select the Credential Removal Template, add icon performs the same action as the previous field providing the option to insert more than one credential removal template that can be used by the profile.
Then enter the Default TTL, that is, the time in seconds that this credential will be valid before being automatically deleted.
After finishing the profile registration go to the menu DevSecOps ➔ Applications ➔Applications and fill in the form:
Insert Application name
Select whether or not your subscription OAuth is enabled, and if this application will be available for the use of the previously created profile.
Then indicate if the application will be automatically provisioned for secrets.
In the Dynamic Cloud Provisioning Profile field select the profile responsible for this action.
Similarly, select the dynamic credential provisioning profile that will be used.
If you want to insert tags for association in the Tags field and in the Description field enter a description for a better understanding of the application.
Finally click on Save