Scheduling report mailing
senhasegura makes it possible to send reports by e-mail and schedule them. In other words, you can schedule the sending of, for example, the remote sessions report to some users. These users will receive the reports, in the format, days and times configured in the schedule, this way, following the example, the users will always be updated on the new remote sessions that were held during the period.
Reports from all modules can be submitted, but only in the format .CSV
To make the appointment follow the instructions:
Access the report you wish to send according to the schedule
Click on the report action button and choose the Schedule report option;
Click the Add new option;
In the displayed form enter the Name of the report, or a term that will be easily associated with the form that will be sent;
On the Details tab in the Format field select the
.CSVoption;In the Reports table you will see which reports will be included in this schedule
Go to the Users tab and add which senhasegura users should receive the report. Remember that these users must have their e-mails registered in the instance;
cautionThe user will only receive reports and data that he can access with his profile and access group.
In the tab Schedule you can define the start and end date of the report delivery schedule;
In the section Sending days check the days of the week when the reports should be sent in the time period you selected earlier;
Finally select the Sending Time and click on Save
At the time indicated in the configuration, users will receive an e-mail with the report attached.
Adding more than one report to a schedule
Each created schedule has characteristics such as: users who will receive the reports, time, days and the period that the sending will take place.
It is common that there is a need to send reports with the same characteristics as an existing schedule.
It allows more than one report to be associated with a schedule, thus optimizing time and avoiding duplicate records.
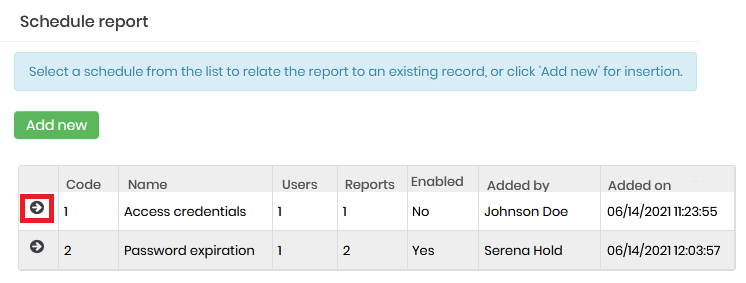
To do this, access any report you want to associate with a schedule, click on the report's action button, and choose the option Schedule Report. A page will be displayed with the list of schedules already registered; click on the button Select corresponding to the scheduled you want to associate the report with.

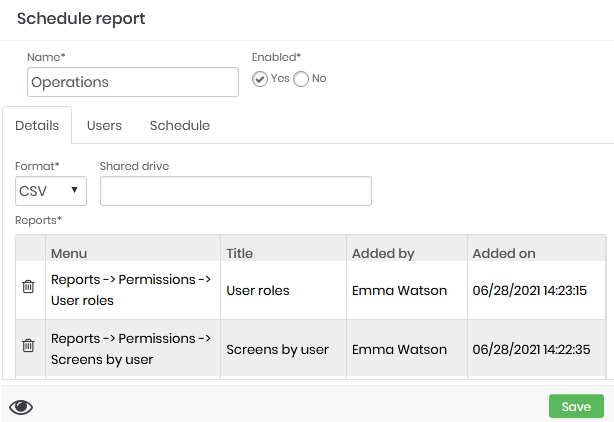
In the form, you will see in the field *Reports** the reports associated with the schedule. Check in the tabs Users, the users who will receive the reports, and in the Schedule tab the period and days of delivery. click the delete button for this report on the Details tab.

If the report can be associated with the schedule, click Save.
Listing the sent scheduling e-mails
To see the report schedule e-mails that have been sent, go to the menu: Settings ➔ Notifications ➔ E-mail ➔ Outbox.
In this report, use the filter to search for the subject Here is your report to list the emails. Check the state field to confirm that the email was sent, also click the Read mail action button to get the details of what was sent.
Disable and enabling schedules
Access the report that lists all the schedules created in the menu: Reports ➔ Schedule reports.
Find the schedule you want to disable, click the related action button and choose the option Disable. This way the reports will no longer be sent.
To enable again use the filter, in the Active field select the No option. Find the schedule you want to activate, click the action button and choose the Enable option.