GitLab CI/CD Integration
GitLab CI/CD is a tool built into GitLab platform for software development through the continuous methodologies:
- Continuous Integration (CI);
- Continuous Delivery (CD);
- Continuous Deployment (CD);
Continuous Integration works by pushing small code chunks to your application's codebase hosted in a Git repository, and to every push, run a pipeline of scripts to build, test, and validate the code changes before merging them into the main branch.
Continuous Delivery and Deployment consist of a step further CI, deploying your application to production at every push to the default branch of the repository.
These methodologies allow you to catch bugs and errors early in the development cycle, ensuring that all the code deployed to production complies with the code standards you established for your app.
senhasegura DSM uses the CLI to integrate with CI/CD pipelines, where it captures all running environment variables at that specific build or deployment, providing a sensible variables discovery, as well as injecting secrets from a secure vault directly into environment variables in a dynamic way.

Deploy DSM CLI on GitLab
To integrate DSM CLI with GitLab, follow these steps:
- Access a project in your GitLab account;
- Add the executable, the config file and optionally the senhasegura-mapping.json file into the project repository;
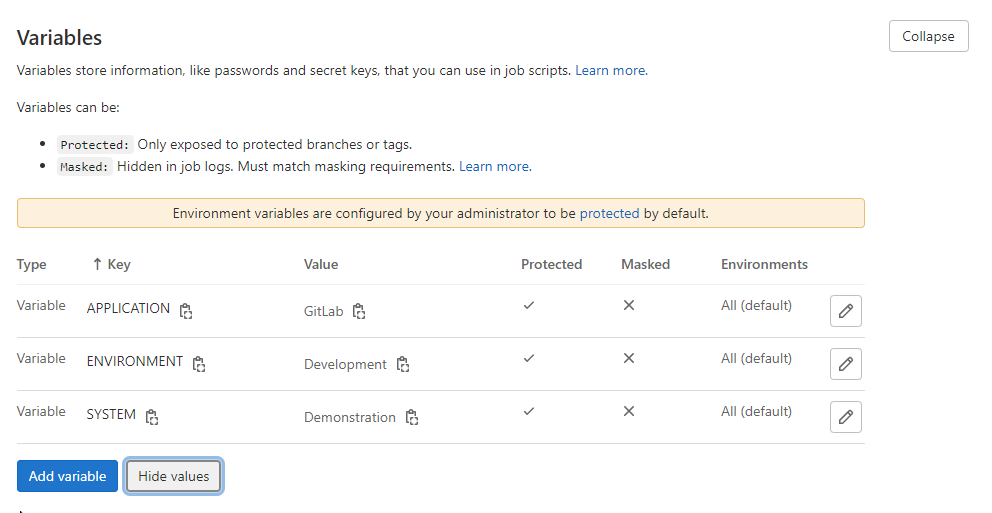
- Access your project CI/CD Variables through Settings ➔ CI/CD ➔ Variables;
- Register the variables necessary for DSM CLI execution as described in the usage guide;
- Edit your .gitlab-ci.yml file in your project folder;
- During the desired job of your pipeline, add the code to execute the DSM CLI and commit the file change;
- Execute the GitLab pipeline to finish;
Example of a .gitlab-ci.yaml file using DSM CLI:
# This file is an example to demonstrate the usage of DSM CLI inside a GitLab pipeline
# Make sure to upload the executable and the configuration files to your project
# For more information on its usage, please visit https://docs.senhasegura.io/

default:
  image: debian

build:
  script:
    - dsm runb \
        --app-name "$APPLICATION" \
        --system "$SYSTEM" \
        --environment "$ENVIRONMENT" \
        --config .config.yml
    - source .runb.vars # After this command the secrets should be available
Make sure you select OAuth 2.0 as Authentication Method on senhasegura DSM since the CLI uses it to fetch secret information.
For more information on how to use DSM CLI, please check the DSM CLI usage guide.
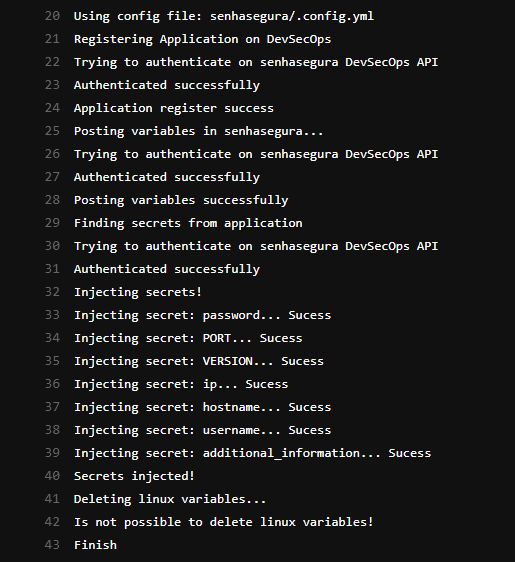
Use DSM CLI to Inject Secrets in Pipelines
After configuring the CLI in the project, follow menu CI/CD ➔ Pipelines to run the pipeline and use the secret data:
- Click on Run Pipeline;
- On the the next step, select the branch and click on Run Pipeline;
- Then click on Status ➔ Job name to display the execution result;