Overview
Webservice Integration
senhasegura integration API enables other applications to create, query, update and remove passwords, keys and other protected information using webservices. The webservice follows a REST architecture and can authenticate with OAuth v1.0 or OAuth v2.0 methods.
Every call made to the service is recorded with the date, time, call source IP, and the calling API client application. Sensitive data, such as password and key values, is hidden from log1 messages.
Each client application's access is controlled, in addition to OAuth v1.0 or OAuth v2.0 authentication, by the request's source IP.
Each client has access only to passwords registered by him or assigned by configuration in the application.
The senhasegura works with two basic types of data that are securely stored: passwords and protected information.
Passwords can be Credentials for accessing Devices such as servers and routers, as well as RSA keys used for SSH access. Passwords are automatically changed by the application according to the configured policies.
Protected Information is any type of information and is not altered by the application. They can be used to store sensitive information such as SSH certificate keys or API keys.
Default Request Usage
Every request into WebService A2A must target requests to the base URI. So, lets understand the URI structure.
https://senhasegura/iso/*MODULE*/*FUNCTION*
MODULE: senhasegura WebService A2A function module
FUNCTION: Module function
From this point ahead, you must understand which authentication method you will use.
Without OAuth Authentication
This method is not recommend by senhasegura . Avoid it if OAuth v2.0 can be used.
Every request into WebService A2A should have the client OAuth Consumer Key and the client OAuth Token. By this way, every request URI looks like the following example.
https://senhasegura/iso/*MODULE*/*FUNCTION*?oauth_consumer_key=*KEY*&
oauth_token=*TOKEN*
MODULE: senhasegura WebService A2A function module
FUNCTION: Module function
KEY: Client OAuth key
TOKEN: Client OAuth token
When using a GET method, do not forget to append oauth_consumer_key and oauth_token before the function extra arguments.
When using POST methods, both parameters must be filled at the URL as a GET method.
Using OAuth v1.0 Authentication
This method is not recommend by senhasegura . Avoid it if OAuth v2.0 can be used.
Using OAuth v1.0, ensure that oauth_signature_method used is HMAC-SHA1 and oauth_version is setted to 1.0.
oauth_timestamp, oauth_nonce and oauth_signature are mandatory.
You can find the full spec about OAuth v1.0 at RFC 58492.
Using OAuth v2.0 Authentication
Using OAuth v2.0, your application must renew the authorization token when its expire. By default, senhasegura will create this token valid for a day.
Using the registered and approved Client Key and Client Secret, request a new token to WebService A2A using the following URI:
POST https://senhasegura/iso/oauth2/token
This request must have the Basic Authorization header. See the section "2.3 Client Authentication" into RFC 67493 for better understand.
Your application will receive a JSON dictionary similar as the following example:
{
    "token_type": "Bearer",
    "expires_in": 3600,
    "access_token": "
        eyJ0eXAiOiJKV1QiL0IjoxNTgwNDM2NTk4LCJuYmYiOjE1ODA0MzY1OTgsImV4cCI
        6MTU4MDQ0MDE5OCwic3ViIjoiTVRNeE1qQWtTRGRPUVRWV1ozcEVSI6Ijg0OWYw
        ZmVhNDI0ZDc5NWUwYTg2MjVlMTdiZWE2YTAyNTQyMzAxNjQzYmRmYTc5ZjYzZDN
        hM2U3ZmI5ZjQzbGCJhjg0OWYwZmVhNDI0ZDc5NWUwYTg2MjVlMTdiZWE2YTAyNT
        QyMzAxNjQzYmRmYTc5ZjYzZDNhM2U3ZmI5ZjQzYmM2MjRhYzg5YmVhMzFhOGQwI
        iwiaWFciOiJSUzI1NiIsImp0ahYzg5YmVhMzFhOGQwIn0.eyJhdWQiOiIzY2E4Y
        Tk4ZDkwNzU0MzgxMjMzNGY3ZjVkYmFmY2E2NTA1ZTMzMTlmYiIsImp0aSI6IYmM
        2MjRTRzB6ZFZONlZXVXhhVWN2Y1RKdFRXNTVhM05sZGtOd1JHeHllbXR5VEV3eE
        5EMD0iLCJzY29wZXMiOltdfQ.efqHZdlij6sQcj_l9RbNNKxDbf81CbIoTFwdIk
        ooT5bK14N5iUazrT8jpB_JsgQdQ8RyD5xF_ReKSj4Al7hp1uRXIiuErlKv1FpxY
        9oNC44kldlumjyevu87GJ0qzem0RYNc3930UbT-XEYqnQijg0se8_GdzdLkxyMn
        0kxApkAkv-to9EUdbbrvvno_pmqiZGyamw6J2BL1aCqwne3S8CCG34TXRyJyqkG
        rPrDO-NPi2fj25PRbX8Ci1iIqXdYvEkefg-g-i0A_Hp9E3s585c5wqxreSBAIwi
        aGtnTkxw0D14JPzqWf48hbvVRPGMj_-KXJTnu-zXkkEPNYs8oWpA"
}
Cache the access_token. It should be used into every next method call. Fill the request header Authorization with the token_type and access_token values. You can check the RFC 6749 section "7.1. Access Token Types" for more details.
It is possible to link an SSL certificate fingerprint to a customer's authorization WebService A2A .
If linked, the senhasegura will validate the CA of the client's SSL certificate with each request, as an additional authentication step.
The use of the certificate does not invalidate or replace validation using OAuth methods.
Providing a new application
For the access to credentials by applications, separately from common users, the senhasegura has the functionality A2A where each application will have its own access group. Also implementing the principle of unique privilege where an application will not have access to the same information as another application.
It is possible to link devices and/or protected information to a WebService A2A authorization.
To perform a provisioning follow the instructions:
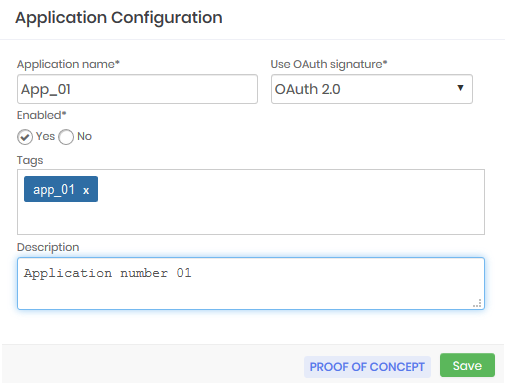
Access the menu A2A ➔ Applications and click on the action button of the report, choose the option New
In the form enter the name of the application that will be provisioned and the type of signature that you will use in the field *Use OAuth signature**
Indicate if this application is Active for use
If you want to insert Tags of identification and a Description about the application.
Click Save.
With the configuration done wait for the screen to be updated or use the update button located on the top bar of the report. When the created application is available in the report click on the respective action button and choose the option Authorizations. In this form you will define which credentials the created application will be allowed to access, fill in the information:
Select the System and the Environment that the application will access
Then indicate the credentials that the application will have access to in the field Access Credential and click on the button Add, perform this process for all the credentials you want to include. You can also select the box Register a new credential in the safe to indicate a credential that is not yet registered in the senhasegura , but for this it will be necessary to select the device, which must already be registered in the system, in which this credential grants access, then indicate the username and password of the credential. Click on the add button, perform this process for all the credentials you want to include. The credentials and respective devices that the application will have access to will be listed in the table below.
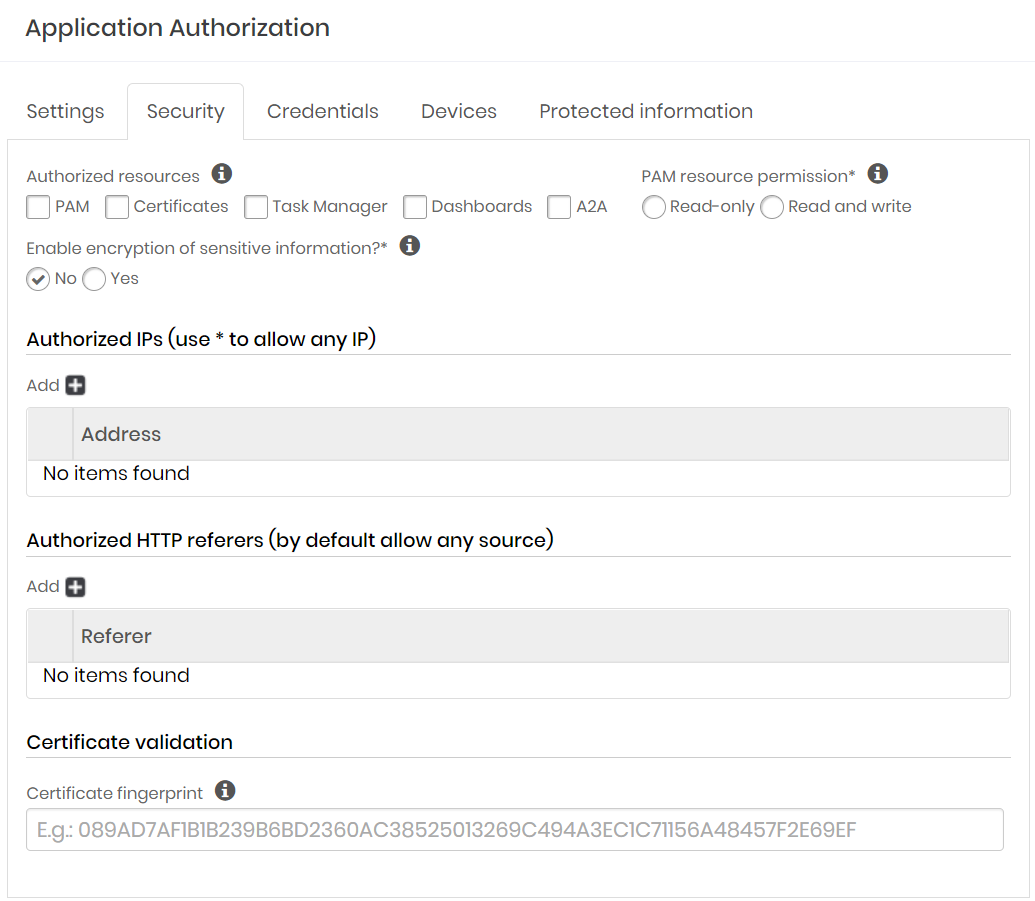
Go to the tab Security
Indicate which resources the application will have access to:
PAM: Provisioning and querying credentials, SSH keys, and other protected information from the PAM module.
Certificate: Requisitions, consultation, signing and other activities of the Certificate Manager module
Task Manager: Creating and changing Task Manager module activities
Dashboards: Knowledge and consumption of the data printed on the dashboards.
A2A: Consultation and registration of A2A applications.
Determine the type of interaction level of client applications with the senhasegura modules in the PAM resource permission field.
cautionThis field is only required if you have selected the PAM module in the Authorized resources
It is important to remember that if the configuration grants read-only permission users will not be able to attempt to make a change, in which case the following error will be displayed:
{
    "response": {
        "status": 400,
        "mensagem": "1039: Without PAM Configuration Access permission",
        "erro": true,
        "message": "1039: Without PAM Configuration Access permission",
        "error": true
    },
    "exception": {
        "code": 1039,
        "message": "1039: Without PAM Configuration Access permission",
        "detail": ""
    }
}
In the *Enable encryption of sensitive information?** field, indicate whether additional encryption will be used to access the application.
Then in the field Allowed IPs you can indicate from which IP's the application can access. To do this click on the button with the add icon and enter the addresses.
In the Referers allowed field you can determine that only referrals with the indicated content will be allowed. To do so, click on the add icon button and enter the allowed contents.
In the field Certificate Validation you can link an SSL certificate fingerprint to authorization.
If linked, the senhasegura will validate the CA of the client's SSL certificate with each certificate authentication process.
cautionUsing the certificate does not replace the validation of the other methods, the certificate will be used in conjunction with OAuth 1 or 2.
This way in addition to authentication with OAuth the user has to send the certificate and key as in the example:
curl --cert /path/to/certificate.crt --key /path/to/certificate.key
--connect-timeout 5 -s --show-error --fail -X POST
-d ${POSTDATA}
"${SENHASEGURA_URL}/iso/oauth2/token"
To finish click Save.
Back to the report click again on the action button of the application and choose the option Authorizations. The newly created authorization will be displayed, click on its respective action button and choose the option View. A screen with the Client ID and Client Secret will be displayed, to view each of the information click on the icon as in the image integracao-0005-enus.

Authorizations for the application
In order see a list of all authorizations per application, go to menu A2A ➔ Authorizations for the application. In this screen besides being able to see the authorization details, it is also possible to edit it and create a new one.
The screen will only show the authorizations for the applications that have already been created and saved successfully.
We recommend the use of this screen in order to see a list of authorizations per application in one place, without the need to enter each application individually to check its authorizations.