JIT Access
The term Just In Time (JIT) is used when an account is created, activated, or has specific permissions added during a period to perform a specific action. After the period, the account is deleted, inactivated, or permissions are removed.
This can happen according to business rules, where the administrator can define it based on a specific date, a period of the day or week, and even based on rules according to user behavior.
The senhasegura allows administrators to define JIT access and restrict who, how often, when and for how long access should occur, with which permissions, on which device and for what reason. All of this relying on multi-level approval workflows and Multi-Factor authentication for login.
It also has a Change Audit module that analyzes what was done versus what was reported before execution to ensure that the temporary privilege was not used for other purposes than what was previously reported.
Currently, there are 6 different ways of using JIT accounts. We will look at them in detail further on.
Configuring an access group
Refer to the related chapter, the JIT account usage you want, and register a dedicated access group according to the account's needs.
To create an access group follow the instructions:
Go through the menu PAM Core ➔ Access ➔ Access groups;
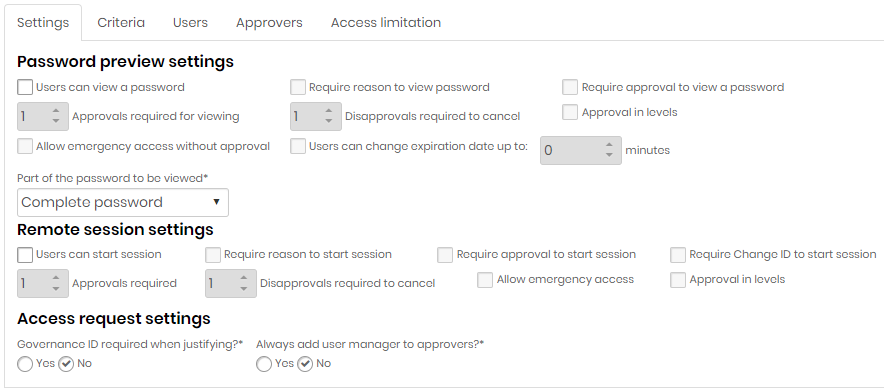
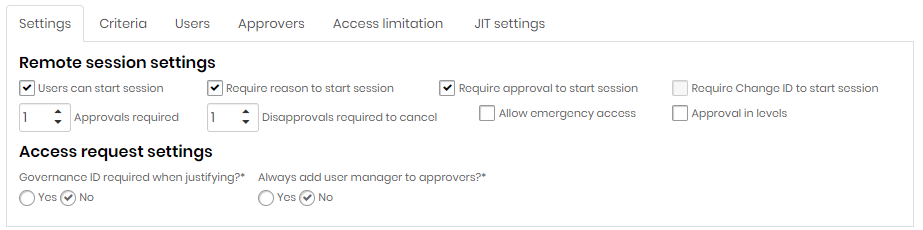
On the Settings tab, define if users can start sessions with approval workflow. In this tab you can define:
If it is necessary to enter a reason for starting the session;
If sessions will have to go through an approval workflow;
If the approval needs to be in levels, considering a defined hierarchy;
If you need the code from a Change configured in the Change Audit module;
If it will allow emergency access, without prior approval;
If the governance code of the company's ITSM tool is required;
Configuring an access group In the Criteria tab, define the criteria for displaying the devices and credentials to the group' s users. Several criteria can be defined, some of them are:
Device Names;
Name of the device products, such as MySQL, Apache, etc;
Credential's usernames;
Device and credential tags;
Device and credential types;
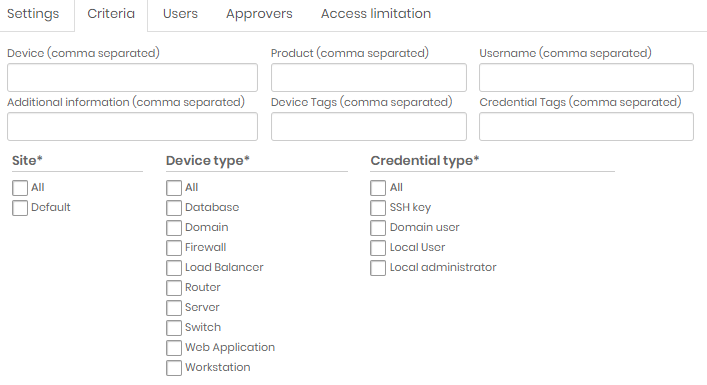
Configuring an access group - Criteria tab Add the users that should be part of the group in the Users tab;
On the Approvers tab, add the approvers and what level of hierarchy each will have during the approval workflow;
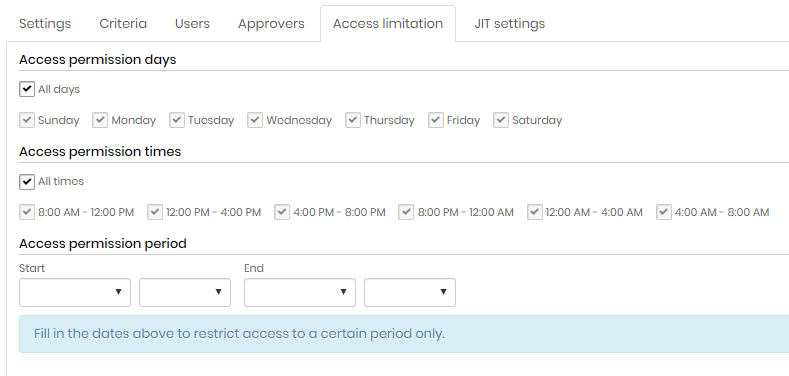
On the Access limitation tab, set the dates, days and times when users can perform JIT access;
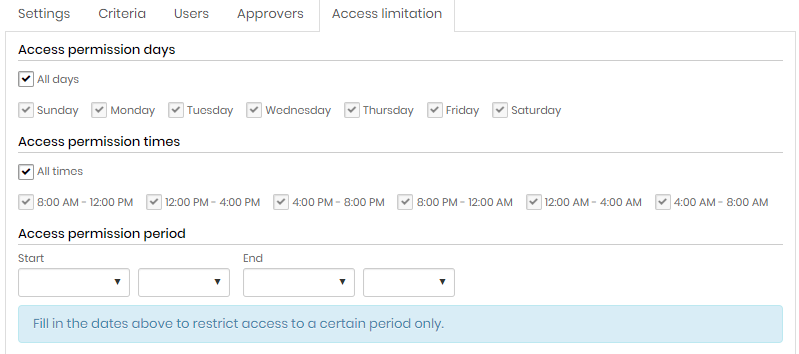
Configuring an access group - Access limitation tab To finish, click the Save button;
Once the Just-in-Time Privilege Elevation has been configured, the user simply follows the PAM Core ➔ Credentials ➔ All menu and starts a session by clicking on the Start a session icon. Before starting the session for the user, the senhasegura will connect to the device, perform the credential privilege change, and then start the requested session. After the end of the session, the senhasegura will reconnect to the device and remove the privileges added to the credential.
The session will be monitored with video recording and all commands will be audited. If the administrator has set up a Change Audit to monitor sessions and the user has done something different than expected, notifications will be sent to the responsible parties.
Privilege elevation JIT
This happens when a user is granted privileges for a set period of time, and after this period these privileges and permissions are removed.
It can happen by adding new permissions for the user or by adding it to the Linux sudoers file, for example.
The just-in-time privilege elevation configuration is performed in the credential registration and the access policies that users must secure are performed in the access groups as instructed below:
Go through the menu PAM Core ➔ Credentials ➔ All;
Create or edit an existing credential;
On the JIT settings tab, in the Authentication settings section, select the credential that will be used to perform the privilege elevation;
Enable the Privilege elevation option;
Select the plugin and template for adding privileges from those available or create a custom one;
Select the plugin and template for removing privileges from those available or create a custom one;
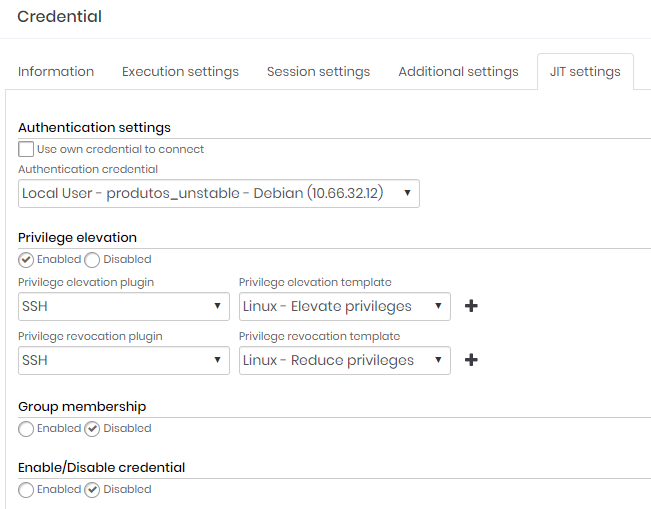
Configuring the credential Then click on the button Save;
JIT account creation and removal
This happens when an account is created on demand with previously defined privileges and for a specific period and is then deleted automatically.
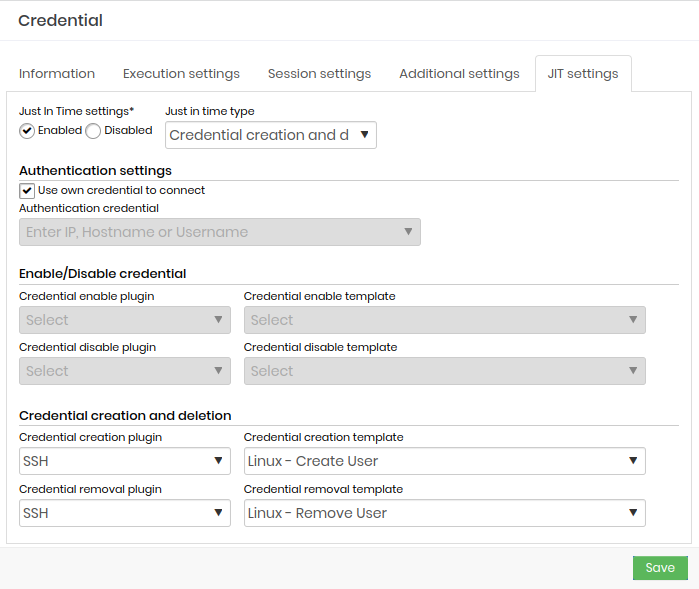
Under PAM Core ➔ Credentials ➔ All add a new credential by clicking New in the action menu:
in the JIT Settings tab configure the following parameters:
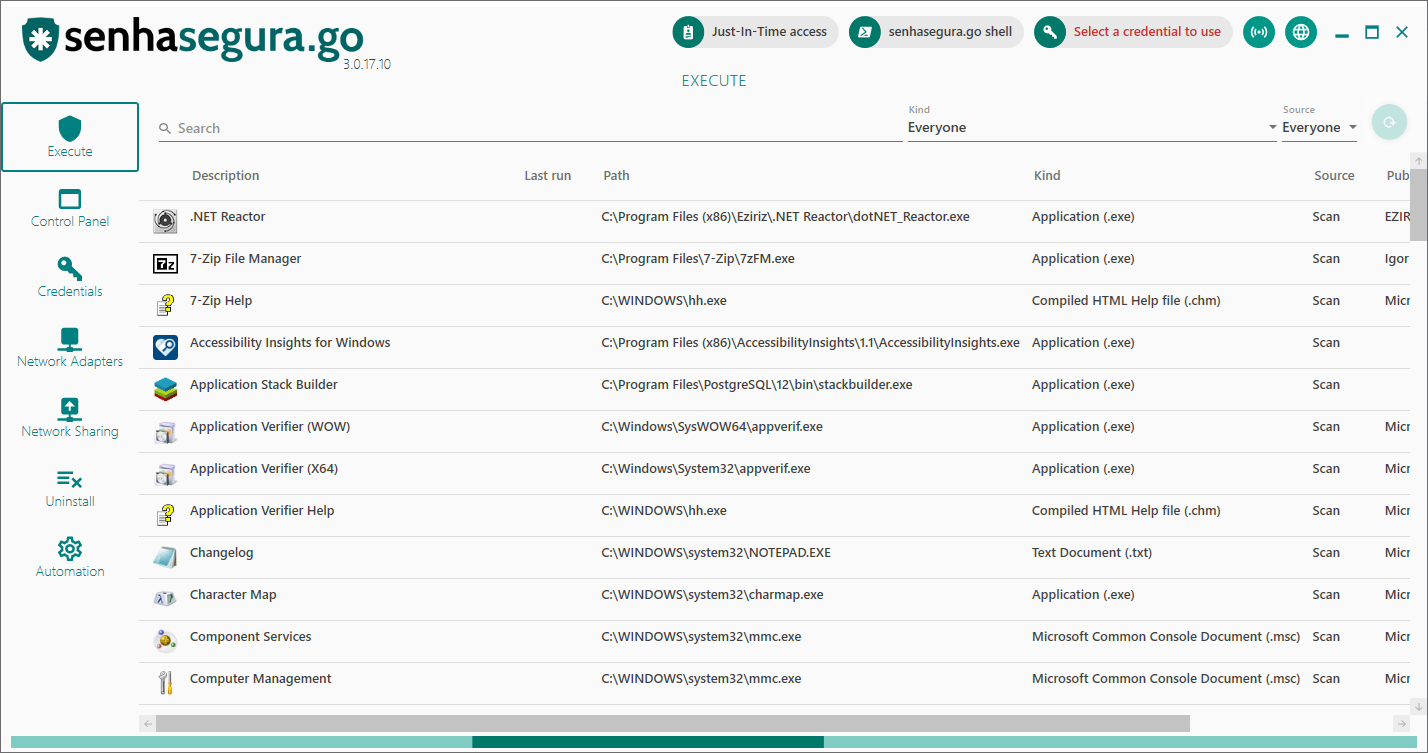
After configuring the JIT access group, search for the device in the global system search, as shown below:
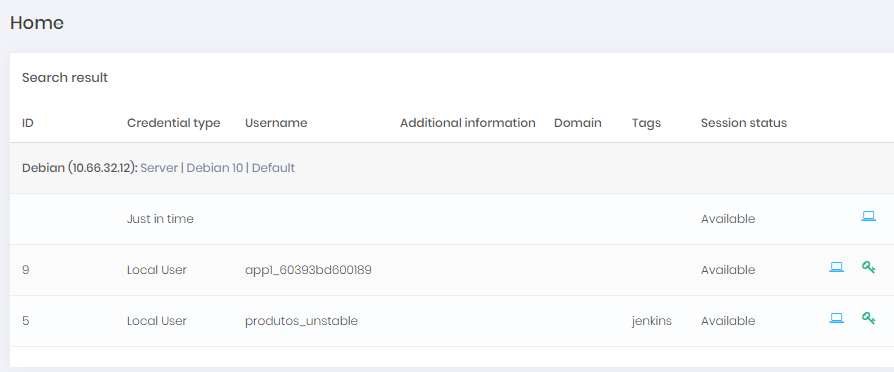
In the Just in time line, click on the Start a session icon, follow the workflow defined in the JIT access group and wait for the session to start.
The provisioned template comes with predefined execution template privileges, which can be modified.
For more information on how to manage, go to Task Manager.
Before the beginning of the session, senhasegura will connect to the device and create a credential with the pre-defined privileges and then start the session with this new credential. After the end of the session, senhasegura will reconnect to the device and remove the added privileges.
JIT certificate creation and removal
This happens when a certificate is created with a defined lifetime and then automatically removed.
Go through the menu Certificate ➔ Dynamic provisioning ➔ Profiles;
Click on the Add profile action;
Select the Request and CA that will generate the certificate;
To finish, click the Save button;
JIT impersonation
It happens when an unprivileged user impersonates an administrative account to perform a specific task and then give that administrative account back.
An example of this is when a script or automation uses Windows' RunAs or Linux's sudo.
The just in time impersonation configuration is done in thesenhasegura.go settings, and the access policies that users must follow are done in the access groups as instructed below:
Step 1
Configuring the senhasegura.go
Go through the menu GO Endpoint Manager ➔ Settings ➔ Parameters ➔ go;
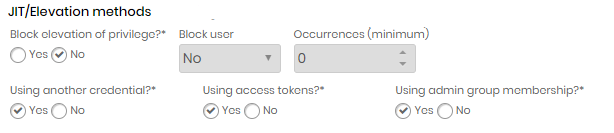
In the JIT/Elevation methods session, disable privilege elevation block;
In the elevation type, choose the Using another credential option;

Configuring the senhasegura.go
Once the access group is configured in the senhasegura backoffice, on your workstation the user simply selects the credential he wants to impersonate in the field Select a credential to use, as shown in the image below:

After this, simply run the desired application and the agent will automatically start the application with the defined credential.
Everything that is done during the application's execution will be monitored by the senhasegura.go and the recording will be sent to the backoffice.
JIT security tokens
This happens when an application or script receives its access token at a specific time so that it can perform its tasks, and then this token is automatically invalidated.
The just in time security tokens configuration is performed in thesenhasegura.go settings and the access policies that the users must secure are performed in the access groups.
Go through the menu GO Endpoint Manager ➔ Settings ➔ Parameters ➔ go;
In the JIT/Elevation methods session, disable privilege elevation block;
In the elevation type, choose the Using access tokens option;

JIT security tokens - Configuring the senhasegura.go
Once the access group is configured in the senhasegura backoffice, in your workstation the user just has to click on the Just-in-time access option and request the use. Follow the workflow, if you have one defined.

After that, simply run the desired application. When you start the application, the session token will automatically be changed to one with the required permission without the user having their permissions changed.
After the execution is finished the token will be changed again.
The user can also click the Just-in-time access button again to update the newly changed session token to his or her own, removing the permissions that were granted to the user.
Everything that is done during the application's execution will be monitored by the senhasegura.go and the recording will be sent to the backoffice.
JIT group membership
This happens when a credential is automatically added to a group and it inherits the group's permissions for a period of time and then is removed.
The senhasegura offers two ways of JIT group membership. One is by using the senhasegura Proxy inside the PAM module and the other is through the agent senhasegura.go installed on the users device.
We will now see how to configure both options.
Go through the menu PAM Core ➔ Credentials ➔ All;
Create or edit an existing credential;
On the JIT settings tab, in the Authentication settings session, select the credential that will be used to perform the privilege elevation;
Enable the option Group membership;
To have a credential automatically activated for a period of time and then inactivated, enable the option Enable/Disable Credential;
Select the plugin and template to add or to remove the credential to a group from those available or create a custom one;
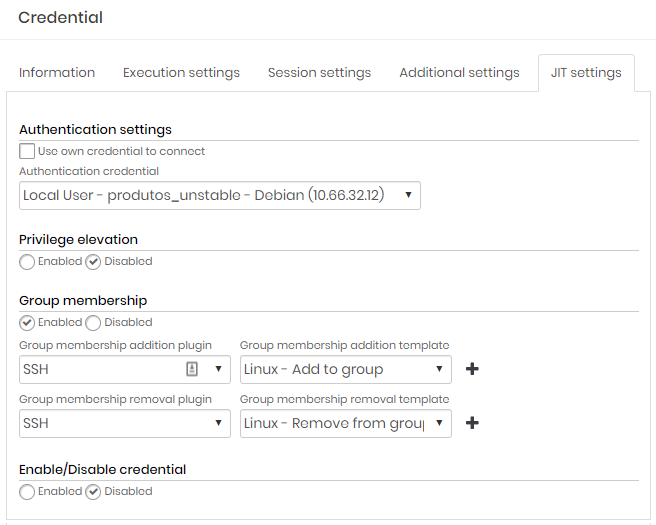
Configuring JIT group membership on PAM - Configuring the credential Then click on the button Save;
Configuring JIT group membership on senhasegura.go
The JIT group membership configuration is performed in thesenhasegura.go settings and the access policies that users must follow are performed in the access groups.
Go through the menu GO Endpoint Manager ➔ Settings ➔ Parameters ➔ go;
In the JIT/Elevation methods session, disable privilege elevation block;
In the elevation type, choose the Using admin group membership option;
Configuring JIT group membership on senhasegura.go - Configuring senhasegura.go
Once the access group is configured in the senhasegura backoffice, in your workstation the user just has to click on the option Just-in-time access and request the use. Follow the workflow, if you have one defined.
When you start the application, the user will automatically be added to an administrative group to run the application.
After running, the user will be removed from the group automatically.
The user can also click the Just-in-time access button again to exit and finish using Just in time.
Everything that is done during the application's execution will be monitored by the senhasegura.go and the recording will be sent to the backoffice.
Access to the JIT Cloud Providers Management Console
senhasegura allows users to log into the JIT management consoles of major cloud providers in a fast and controlled way.
Go to menu Cloud IAM ➔ Cloud IAM ➔ Dynamic provisioning ➔ Profiles;
Create or edit an existing profile;
Select the Account where the user should be created;
Define the Policies this user must have;
Finally, click on Save;
senhasegura enables users to sign into the AWS Management Console using temporary STS credentials. The feature consists of automatically generating a URL with a time-limited session token. After the defined period the token is expired. The session can last from 15 to 12 hours.
Configure a JIT access group
Go to menu Cloud IAM ➔ Access control ➔ JIT access group;
Create or edit an existing JIT access group;
On the Settings tab, define whether users can start sessions with approval workflow. In this tab you can define:
Whether it is necessary to enter a reason for starting the session;
Whether sessions will have to go through an approval workflow;
Whether the approval needs to be in levels, considering a defined hierarchy;
If you need the code from a Change configured in the Change Audit module;
Whether to allow emergency access, without prior approval;
Whether to enter the governance code of the company's ITSM tool;
Configure a JIT access group - Settings limitation tab On the Criteria tab, set the criteria for displaying credentials to the users in the group. Several criteria can be defined, some of them are:
User Types;
User Names and Service Accounts;
User tags and service accounts;
Provider;
Accounts;
Account Tags;
Add the users that should be part of the group in the Users tab;
On the Approvers tab, add the approvers and what level of hierarchy each will have during the approval workflow;
On the Access limitation tab, set the dates, days and times when users can perform JIT access;
Configure a JIT access group - Access limitation tab On the JIT settings tab, in the Cloud Console Management section select which profiles should be used for JIT access. ; For AWS, select the option AWS console JIT access with temporary security credentials (STS)
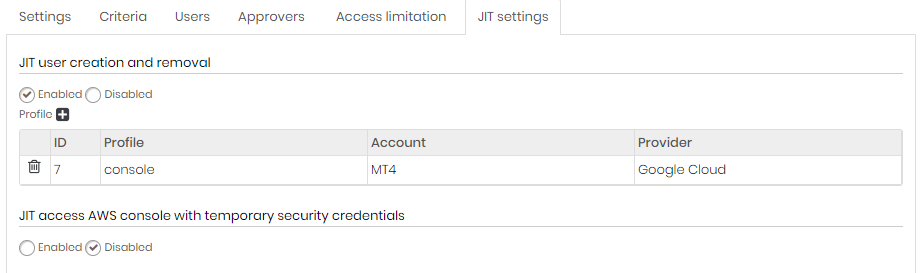
Configure a JIT access group - JIT settings tab Finally, click the Save button;
After setting up the JIT access group, go to the menu Cloud IAM ➔ Settings ➔ Accounts. For AWS go to the menu: Cloud IAM ➔ Cloud IAM ➔ Users or Service accounts
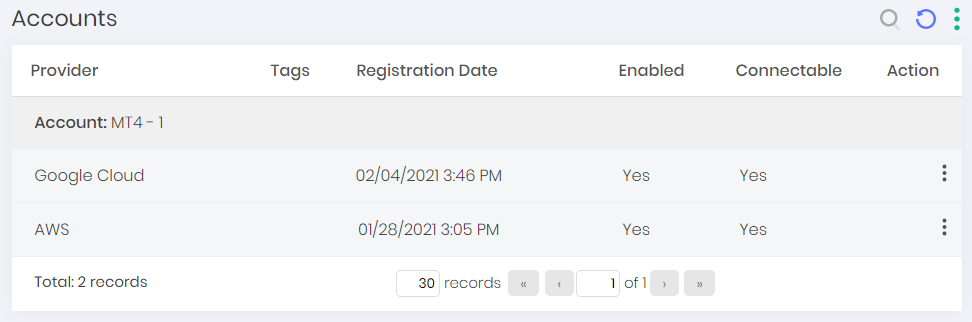
In the row of the service account you want to use, select the action Access console, enter the desired session time and follow the workflow defined in the JIT access group and wait for the session start release.
After approval, senhasegura will create a user on the provider according to the rules defined in the Dynamic Provisioning Profile on the service and will release the login.
Before the session starts, senhasegura will create a temporary credential in the AWS Security Token Service (STS), create a session token for authentication, and log the user in with a runtime generated URL.
This session will be recorded and sent for auditing.
How to configure a user to use JIT
Under Cloud IAM ➔ Settings ➔ JIT Access:
- Click on the stock button and select the New option
- A new window called JIT Settings opens
- Fill in Account* the account you created in How to create a Cloud User
- Under Enabled* is whether this setting is enabled or disabled
- In the Information tab, fill in the Description option to help you define the context for accessing the JIT.
- Fill in the following fields on the AWS tab:
- JIT enabled:* Whether JIT is enabled Yes/No
- Session duration (seconds):* How long the session should last
Define what roles users of this account can assume to perform access using JIT
Roles: Allows the user who does not have permissions for certain actions in AWS, to assume a certain role for a short time, where the assumed role will give its permissions to the user during access.
Under Cloud IAM ➔ Remote Access ➔ AWS configuration and access options:
- JIT access
- Cloud console
- Virtual machines
Access time limitation and approval workflows
All types of Just in Time access go through an approval workflow defined by their respective access groups and can be time-limited both in the senhasegura PAM Core and in senhasegura.go .
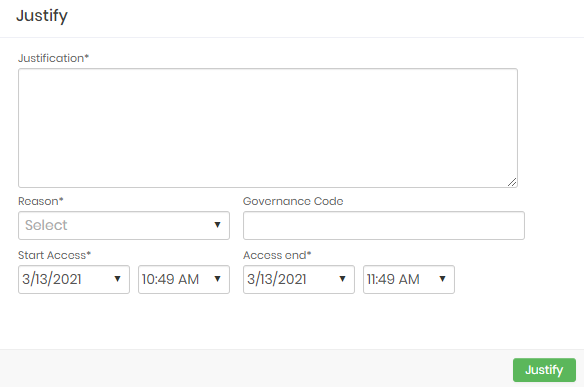
When the user is to start a JIT session, they will have to go through the approval workflow defined by the administrator in the access group. When defined, the user will have to select the reason, enter the justification, and select the time period they want to perform this JIT access. As in the figure jit-43:
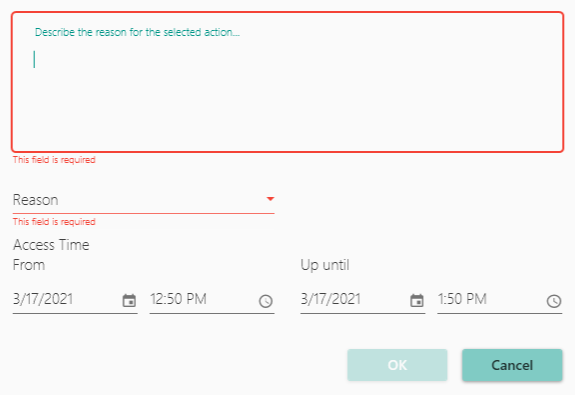
After that, the request is sent to the approvers of the configured access group. The approvers can accept the time suggestion informed by the user or change it, thus limiting the time according to the business rules.
A workflow can have one or more approvers. It is even possible to set up approval levels, where the approval of one is dependent on the approval of another. In this way it is possible to set up approval workflows based on hierarchical levels in the organization.