Password change
Registering a credential
The limit of Credentials to be registered in senhasegura depends on the licensing contracted. Contact the senhasegura Support for more information.
The credential can be registered via the shortcut in the quick actions menu, or through the Credentials report.
To register a credential it is mandatory to fill in the fields Username , Password type and Device . Let's understand each tab of the form and its fields.
Credential general settings
At the information tab we have the following fields:
Username: It is the credential username. Must match the credential on the remote system;
Password type: It is the credential type. You can register new types through the Settings ➔ Credentials ➔ Credential types menu; The Domain user type enables proxy use of the credential on other devices. But it is necessary to inform the domain in the field Domain ;
Domain: Credential domain;
Device: Device that holds the credential;
Additional information: Additional information that complements the use of the credential on the target device. This field is available for use in automated password exchange, RemoteApp macros, and database connections; In the case of database connections, the name of the database must be populated in this field;
Status: Flag whether the credential is active for use or not;
Password: Credential password up to 256 characters; If automated password change is configured, this limit will be reduced to 70 characters to prevent character repetition;
Set current password: Indicative that the user wants to change the value of the password that is already registered in senhasegura . For new registrations, allows the editing of the password;
Show password: Display the password plaintext during editing;
Generate password: Will generate a random password respecting the password strength described in the table below the form;
Tags: Identifiers for credential segregation;
Note that there is a frame named Password policy . We will talk about this. For now, understand that senhasegura calculates the strength of the password from device attributes and the credential being registered. And this password policy determines how the random password will be generated in automated exchanges.
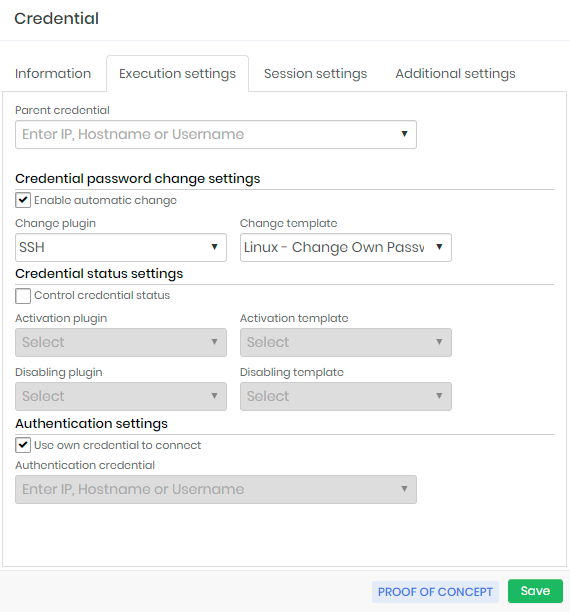
Execution settings
In the Execution settings tab we will configure the credential automated password change procedure. These attributes will be seen in practice ahead when we talk about the automated password change cycle.
Parent credential: Parent credential that initiates the automated password change process of this credential.
It works as a password change chain, where the change of a parent credential initiates the process of all its child credentials.
The existence of a parent credential does not prevent the child credential from being changed manually or automatically;
Credential automatic password change settings
Enable automatic change: Flag to enable automatic credential change;
Change plugin: Plugin connecting and running to the device to perform the change.
This plugin is linked to various connection protocols. There is no validation that the device has its active connectivity;
Change template: Template that will be executed by the executor plugin.
infosenhasegura is installed with more than 250 templates out-of-the-box. And inside senhasegura PAM Solution our clients and partners can be updated with more templates developed by the senhasegura team and partners community.
Credential status settings
Control credential status: Flag if senhasegura should control the status of the credential before and after use by the user;
Activation plugin: Plugin used to connect and perform the credential activation steps on the device;
Activation template: Template that will be used to activate the credential;
Deactivation plugin: Plugin used to connect and perform the credential inactivation steps on the device;
Deactivation template: Template that will be used to inactivate the credential;
Execution authentication settings
Use own credential to connect: Flag whether the credential itself should be used to connect to the device to perform the password change;
Authentication credential: If the credential itself is not used to perform the automated change, you must indicate which credential will be used to connect to the device; You can use a credential to connect to the device and still use your target credential to perform the change. This is possible due to the template system;
As you may have noticed, the Executions module, responsible for automation and template management, was quoted in this tab.
Additional settings
In the Additional settings tab we have the latest credential settings about other features. The most prominent is the Macros/RemoteApp setting.
Identifiers (for web services): Alias to identify the credential when triggered via A2A web services;
User credential owner -: User who owns the credential. When determined, the owner user will always have access to the credential and can make changes to it;
Server path: Path that is used in password exchange templates when the credential is registered into a physical file;
Also in the Additional settings tab, there is the option (not mandatory) to set the criticality of the credential by choosing one of the following options: High, Medium or Low.
Session settings
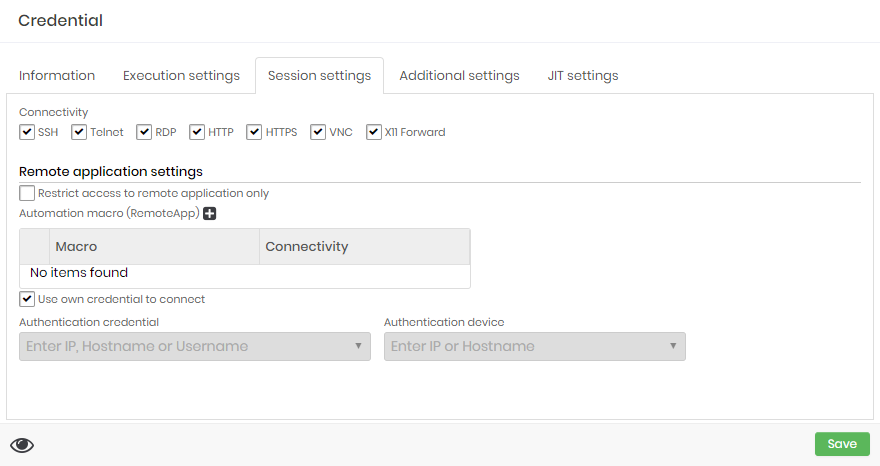
At this tab you can configure the usage of this credential at proxy sessions.
At Connectivity boxes you can select which protocols this credential can be used. The target device also need be configured with one or more selected protocols to enable this credential for proxy usage.
Remote application settings
At the same Session settings you can configure RemoteApp settings for this credential.
Restrict access to remote application only: If active, the credential can only be used for RemoteApp proxy sessions. You cannot use a proxy session that delivers the desktop or terminal of the device. This does not prevent password withdrawal;
Automation macro RemoteApp (grid): You can relate which RemoteApp macros are linked to the credential and available to proxy users;
infoFor a complete list of supported protocols and ports, see: Technical Specification.
Use own credential to connect: Flag the same credential will be used to authenticate to the target device and RemoteApp;
Authentication credential: If the authentication credential on the device is different from the RemoteApp credential, indicate which credential will be used in the authentication step;
Authentication device: The device where the credential will be authenticated and the macro will run. If filled, the original credential device we are registering will be ignored;
Additional fields for multi-factor authentication (grid): Additional fields for authentication on websites. Some sites require a lot of additional information to complete the login steps. You can give an alias to the values to complement the web authentication script;
Remarks: General credential remarks;
You can complete the registration of the credential through the Save button.
Now senhasegura will process the access groups that allow the viewing of the credential and make available to users. Every stage of registration is reported by SIEM. If a manual password change occurs, the child credentials won't be notified.
Requesting change
We will initially request a password change for a credential. To do this, go to the menu Executions ➔ Request password change.
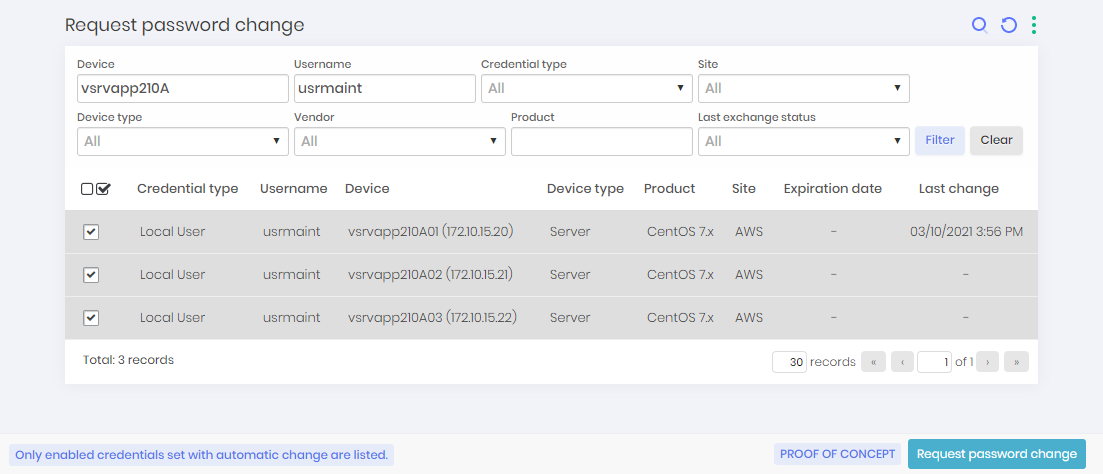
This report will only show credentials that are active and have automated change configured. Select the desired credentials and click on the footer action Request password change. When requesting the change, an asynchronous task will be scheduled. We will now teach you how to monitor the execution.
To perform a bulk change:
Filter the change report with the credentials you want to change;
Select all credentials with the checkbox column action;
Click the Request password change button at the footer bar;
All the selected credentials will be registered to immediately change. When the administrator request manually a password change, all triggers counters will be reseted by the password change.
Following the execution
Go to the menu Executions ➔ List operations to view all registered operations on senhasegura . These operations are performed asynchronously and vary in the following states:
Scheduled: This is the first state. As soon as execution is requested, the asynchronous task waits for the execution time or waits in the queue if it is full. The task in this state is available to cancellation.
Awaiting approval: Some modules require an approval flow in order to run or fail. Only the Certificates and Task Manager modules use this function. The task in this state is subject to cancellation.
Canceled: If it is in the Scheduled or Waiting for approval states, it is possible that the administrator will cancel the operation before it is executed. This operation is then marked in the state Canceled.
Running: These are the operations that are already running at this very moment. No preventive action can be taken.
Successfully performed: These are the operations that have successful in their execution. You will have access to the details of that run.
Error: These are tasks that have not been correctly performed by an impediment. Check through the action Details to understand the reason of the failure. In these cases, we provide an action to restart the process.
Expired: These are the tasks that were in the state Awaiting approval, whose approval period has expired.
Within the actions available for operations you have the following options:
View attempts: For finished operations, through this action you will have access to the logs and details of the operation;
Restart execution: If the operation has finished with an error state, through this action you restart the operation. Use if failure motivators have been mitigated;
Request immediate execution: When many operations are scheduled to run, through this action you will prioritize the selected operation;
Cancel operation: Allows you to cancel running while it is not executed or completed;
The menu Executions ➔ List attempted operations will centralize the result of each attempt of each operation. This report serves as a guide to support the identification of active errors in your park.
Ensuring password validity - Password reconciliation
To ensure that a managed credential is valid on the target system and synchronized with senhasegura , there is a password reconciliation feature to check and reset the credential when an inconsistency is detected.
Once the password change has been configured and the change has been successfully executed, senhasegura will carry out the validation from time to time if this credential is accessible and valid.
This process will identify the credentials that need attention and provide the possibility to reset them automatically or manually.
To enable the reconciliation process, access the menu Settings ➔ Execution processes ➔ Processes.
Find the Password Reconciliation option and in the field Action switch to ON which means that the executing service will be turned on, or active to perform this operation.
Manual reconciliation
For manual reconciliation, the credentials that fail the validity check performed by senhasegura are listed on the Password reconciliation report, where the admin can evaluate the problem and take measures to reset the passwords.
The report can be accessed at Executions ➔ Password reconciliation menu.
Automatic reconciliation
The reconciliation process will attempt to execute a credential rotation for the passwords that fail the validation test in order to reset the credential both on the target device and on senhasegura to keep the synchronized.
At this situation, the target credential should be configured with another credential to connect and execute the password change. You can configure the authentication credential in the Authentication credential under the Execution settings tab. You can see it in details at section execution-auth-settings at page execution-auth-settings.
The reset attempts will be executed as long as the reconciliation service is enabled.
SSH keys change
For SSH Keys, senhasegura can use the same operation workflow described for passwords change. The difference is just the screens and menus used to manage SSH Keys.
As credentials using usernames and passwords, SSH Keys should be related to devices. Access the menu PAM ➔ SSH Keys ➔ SSH Keys to get access to all SSH Keys registered.
To create a new SSH Keys registry, click at the report action button New and fill the following fields:
At the Information tab:
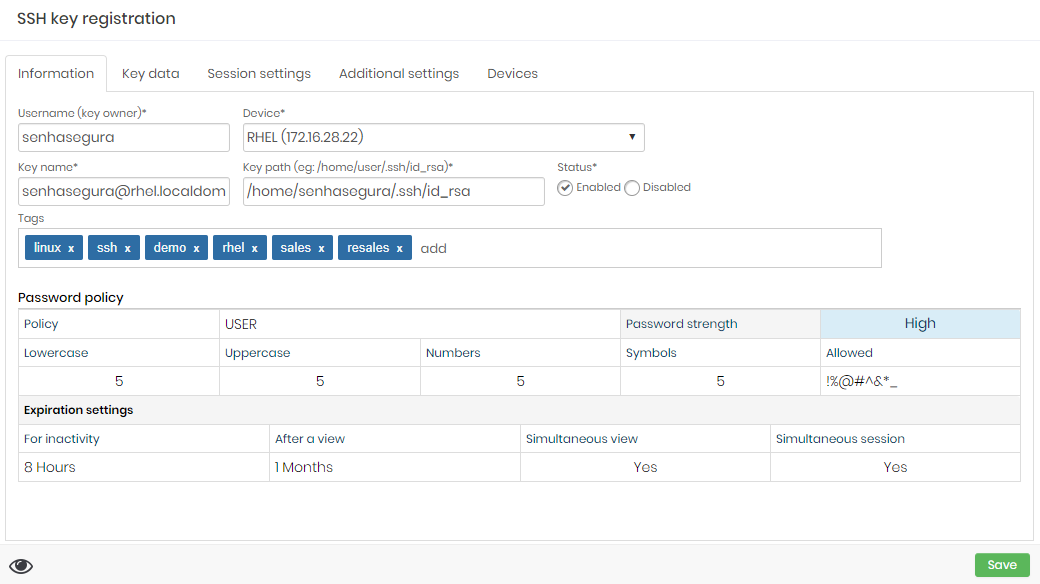
The SSH Key creation form Username (key owner): Operation system user owner of the key;
Device: Device where the SSH Key is installed;
Key name: A alias for internal senhasegura identification;
Key path: The physical location of the key inside the device file system;
Status: Flag if the key is able for use inside senhasegura ;
Tags: User defined tags for data segregation and filters inside senhasegura ;
At the Key data tab:
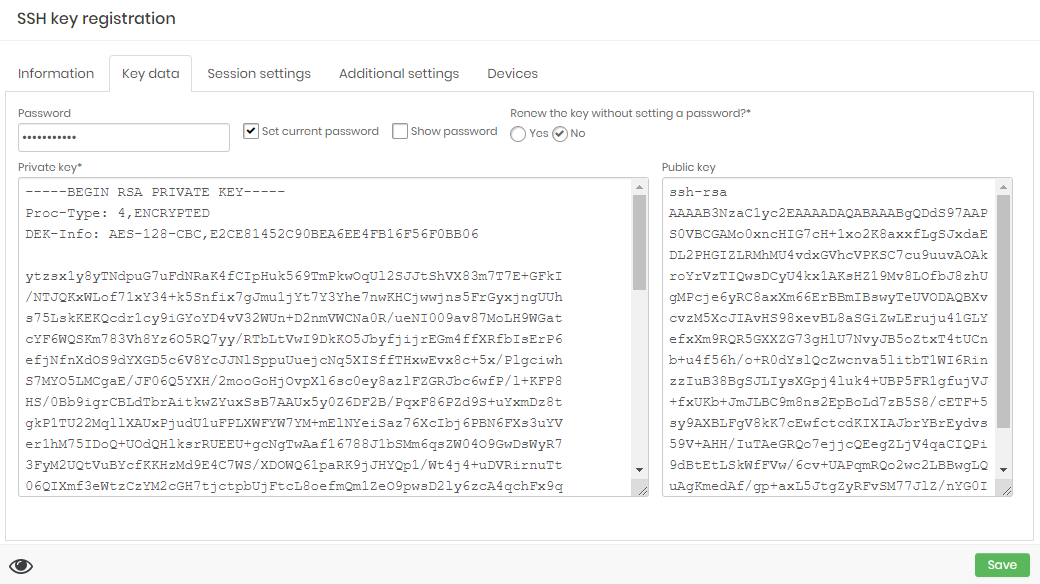
The SSH Key creation form Set current password: Checkbox to define manually the current key password;
Show password: Checkbox to define if the password field will display the plain-text password without mask;
Password: Input the current password;
Private key: Input the plain-text private key value as PEM format;
Public key: Input the plain-text public key value;
At the Addition settings tab:
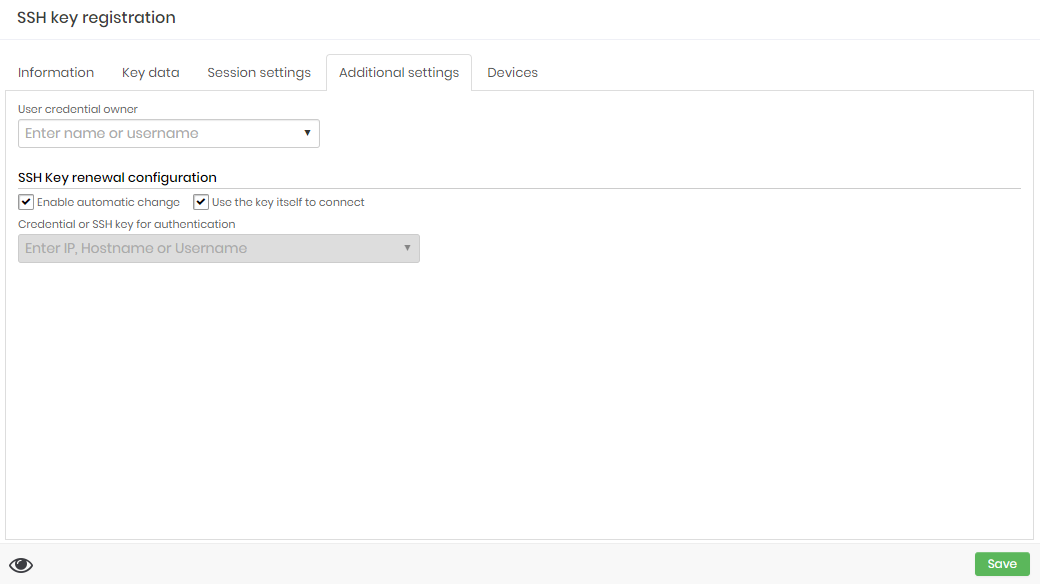
The SSH Key creation form Enable automatic change: Check if you want to senhasegura enable this key to be automatically changed;
Use the key itself to connect: Check if you want to use the key itself to authenticate the target SSH session;
Credential or SSH key for authentication: If you choose to not use the key itself for authenticate, you can choose another credential to execute the change process;
At the Devices tab you can link all devices which this key is published. So senhasegura will replace the key at the owner device and echo the public key into the related devices;
Finished the SSH Key registering, you can execute a change operation request as explained earlier.