Registering Personal Information
In the Information menu, you have access to the personal information report. You will only see your registered information or other users' information that you have access to permission with a direct grant or through an access group.
Through reporting actions or through the quick action shortcut, you can register the new information.
There are four main features that make up protected information:
The information can be composed of file, text and password. All this information will be protected;
The information has a name, a type, an identifier for web services, and may receive a compulsory expiration date;
The information may be linked to a URL and a service, without the use of senhasegura to these attributes. This will be used only for maintainer organization purpose;
The information can be accessed even if inactive. The information status concerns only its use in the business plan;
Let us look at these attributes presented in a completed example.
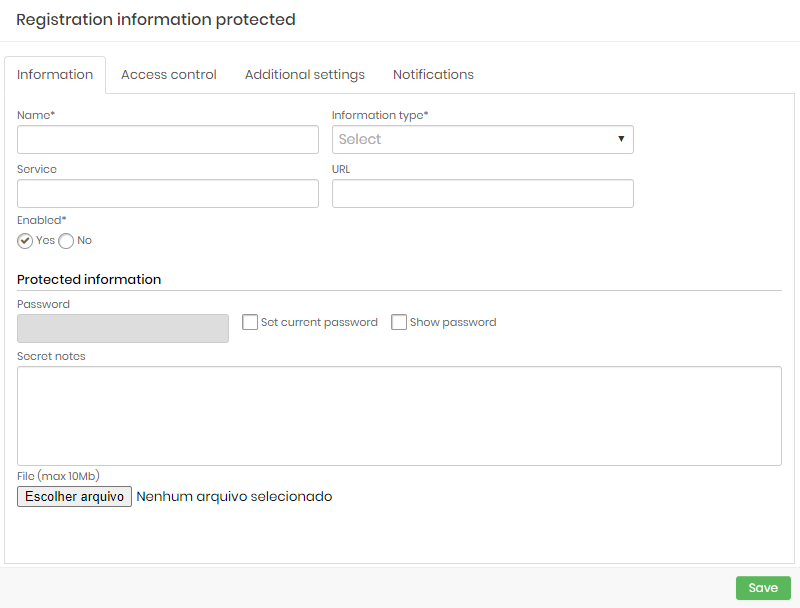
Note that in the Information tab you can fill in the data that will be protected, such as a file, notes and password, and you can also fill in the open attributes of this information, such as name, type, service and URL.
In the Additional settings tab, you can fill out the observations of this custody.
Do not confuse the Note field of this tab with the Secret notes field of the Information tab. The Note field will not be protected!
You can also determine validity for information, an identifier for retrieving information through web service methods and manually indicate the status of this information.
In the Access control tab, you can determine which users will have access to information, for how long and in which context.
When you grant access to an user, the information owner can set up the expiration date and time by filling the Expiration date field. If the access should be permanent, just keep the Expiration date field empty.
Note that in this case, the information owner will have full knowledge of which users will be able to use the secret, instead of information that is shared with access groups, where the group composition is not responsibility of the secret holder.
You can select a predefined Information type if it exists, or if doesn't exist, type a new one to be persisted with the new Personal Information.
You can configure a compulsory expiration date on the Expiration date field at Additional settings tab.
When the information reach the expiration date, all users lose it's access and only the owner can edit ou access the information.
In the Notifications tab you can configure which users should be notified before the protected information expires. You can set up a single rule for all users listed in Access Control, or create special notification rules for users outside of access control.
Registering a personal credential
With the high level of complexity in the standard passwords that some systems have, it is common for users to leave their passwords noted in unsecured places.
The Personal Credentials function aims to provide a "personal vault" for system users to store their personal access credentials to, for example:
Email accounts;
Applications;
File storage services;
And others;
This way users store these credentials where access to them will be exclusively yours, being able to consult them as many times as they think necessary.
In addition, they can generate passwords and share their credentials with other users, without having to send them by email or messaging applications that may not be as secure. Managers can also benefit from this feature when they need to share passwords and generic usernames for their team members.
These personal credentials are unrelated to the credentials associated with devices registered in the vault for password withdrawal and remote sessions.
To insert a personal credential in the senhasegura follow the instructions:
Go to the menu: Information ➔ Personal credentials ➔ Personal credentials;
Click the action button on the report and choose the option New personal credential;
Enter the username of your credential;
If you wish to insert the URL of this credential;
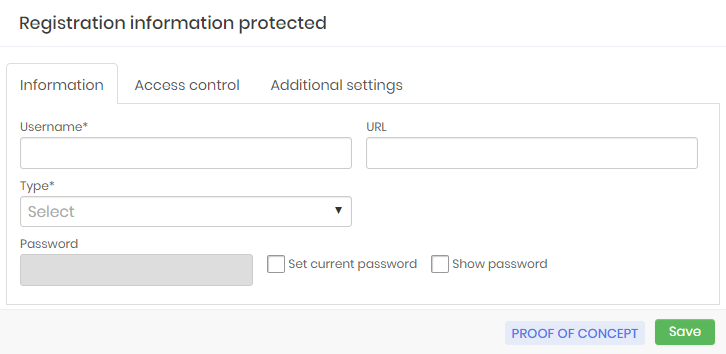
Select in the Type field what the type of this credential is, as shown in the image protec-info-0010-enus;
You can also store the password for this credential.
To do this click on the Set current password option.
Enter the password or click on the Generate password option where the system will create a password for your credential.
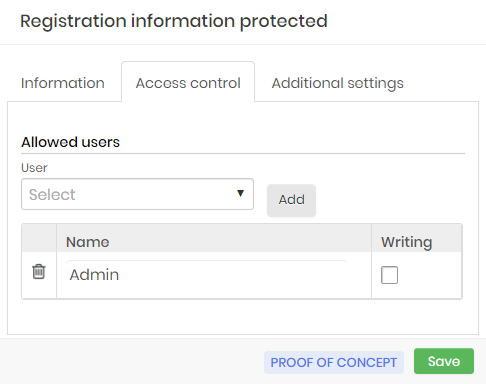
Go to the Access Control tab to add users to whom you wish to share this credential. If the credential should not be shared go to the next step.
In the User field select from the options the user with whom you want to share the information of this credential then click the Add button as shown protec-info-0011-enus.
In the table below a check box will appear in the Write column, select this box if you want the user to make changes in the credential information.
Go to the Additional settings guide as in the picture protec-info-0012-enus;
If this credential has an Expiration Date, type in the field or click to have the calendar displayed;
Click the checkbox in the Notify users with field to receive a notification when the expiration date is near, then select how many days in advance the system should notify the users;
In the Identifier field you can enter a code or name to identify this credential;
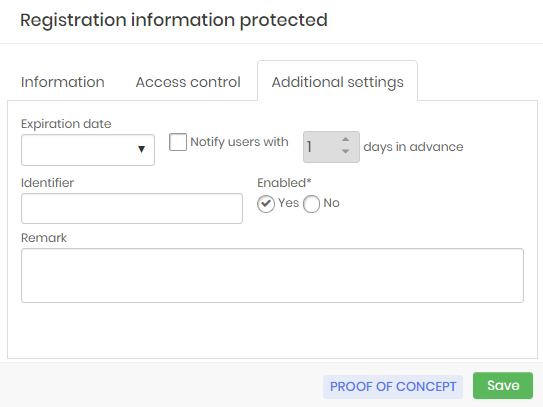
If you wish to enter a Remark with details and other information about the credential;
Finally click on Save;