Configuring Certificate Manager
Administrators, users and deployers who intend to use Certificate Manager must also have a basic knowledge of the subject of digital certificates, as well as nomenclatures and their use in a system.
To introduce how senhasegura deals with certificates for inexperienced users we present the following problem:
You, a system administrator of a large company, would like to have control over how many certificates are published on the network, on which devices, and their validity period.
In addition, you need to apply for new certificates and the renewal of those are close to their period of validity.
The senhasegura provides a complete view of the organization's certificates, performs the request for new certificates and the signature with the certifying authorities. It also sends notifications to those responsible for the certificates when the expiration time is near.
This chapter will focus on the preconfigurations that must be performed before using this module. Follow the instructions in the following sections to get the module ready for use.
Registering environments and systems
If you have not yet registered these two entities it is necessary to do so, because systems and environments are important to categorize and associate a certificate. Follow the instructions to make the registration, if you already have these entities registered go to the next session.
Access: Settings ➔ System parameters ➔ Segregation ➔ Environments.
Use the View actions button in the report and click the New button.
Fill in the required fields and click Save to finish.
Access: Settings ➔ System parameters ➔ Segregation ➔ Systems.
Use the View actions button in the report and click the New button.
Fill in the required fields and click Save to finish.
Registering an organization
The entity organization is necessary to fill out some requests made in this module, so you must register it.
The organization to be registered is the one that will use the certificate that will be requested.
To insert or consult organizations already present in the system, access the menu: Certificates ➔ Settings ➔ Organizations.
Click the report action button
Choose the option New
Fill in the field Organization with the name of the organization to be registered
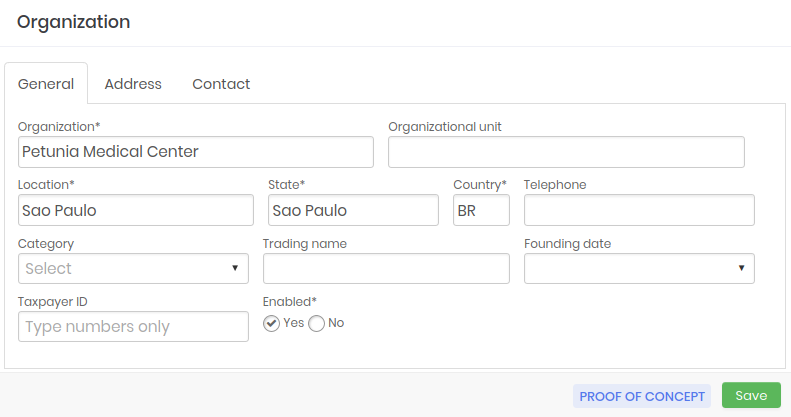
In the organizational unit, fill in the name field for an organizational unit if there is
In the other fields fill in the address data of the organization, as in the figure organizacao-enus
Click Save
Creating an access group
The Certificate Manager module can also be configured with permissions, for certain users to enter justification or wait for approvals of their requests.
Before learning how to request a certificate or other management activities it is pertinent that access groups be created so that permission is already adequate and assigned to users when the module begins to be used by them.
To create an access group, go to the menu Certificaes ➔ Settings ➔ Access group and follow the instructions:
In the report click the View Actions button.
Choose the option New
In the Access group name field, type a name for the group.
Then select the permissions that the group will have as the possibility to download the certificate or key, permission to view the certificate password, permission to publish and sign.
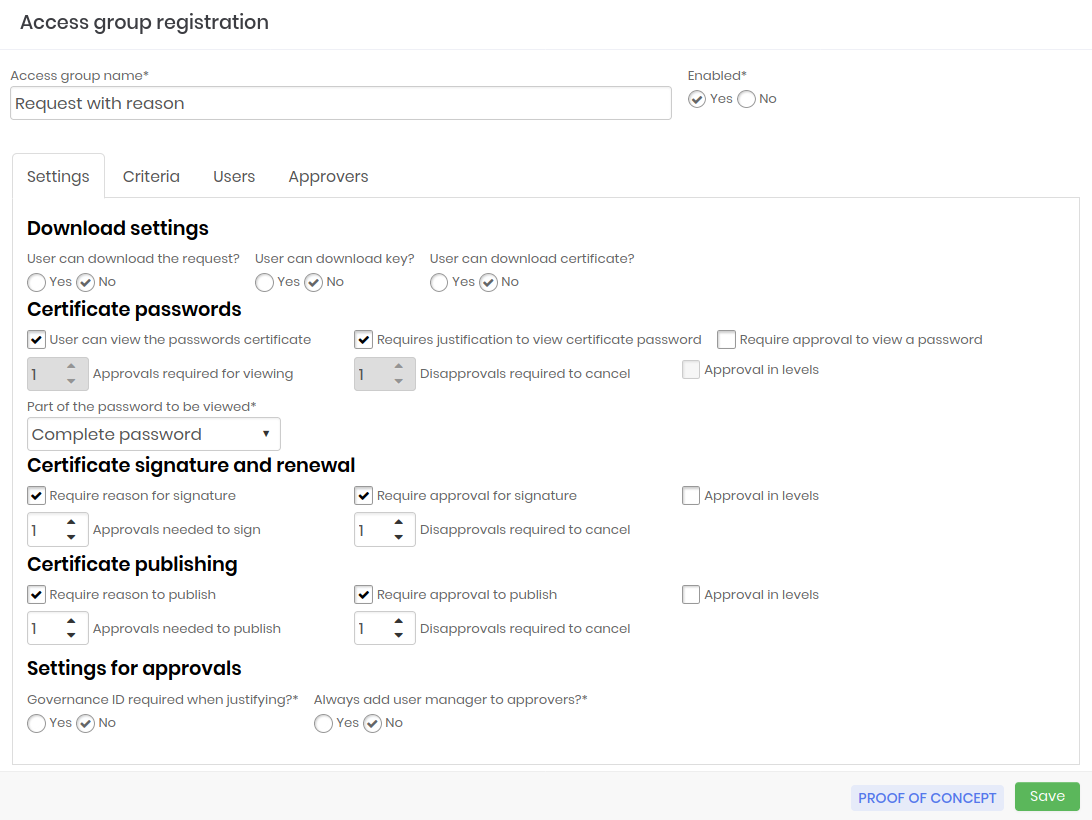
Certificate access group registration form Go to the Criteria tab and select the certifying authorities for which this group may request signatures.
Save the configurations and wait for the page to reload.
Then go to the Users tab and select via the Add button the users that will be part of this group and assume the configured permissions.
infoIf the group doesn't need approval, your group will already be finished.
If you have selected the option that this group should receive an approval to perform some activity, go to the next guide, Approvals..
In addition to the users tab, click Add to select the approving users for this group.
cautionRemember that these approving users will have the "power" to allow or deny the activities of group members to be performed or not, so choose them carefully.
After adding the approvers, if you selected approval in levels1, choose the level of each approver.
Click Save to finish
My requests
Group members who need approval for their activities can monitor the requested approval status via the My Requests menu. Access: Certificates ➔ My requests.
The report displays the requests made by the user and whether they have already been: approved, still pending, rejected, expired or canceled. To learn more about the requests, click the action button on the request.
My approvals
Approved users can view a report on their approvals, access the menu: Certificates ➔ My approvals.
This screen shows the user's approvals as status, applicant, reason and validity. If it is a pending approval, you can also approve or disapprove a request using the Approve or Disapprove buttons, respectively.
To view more information about the approval request:
Click the Request Details button.
On this screen, you can view additional information about the request, such as code, access group and justification, as well as approve or disapprove the pending request, using the Approve or Disapprove buttons, respectively.
Registering a publication profile
The publication profiles are ideal for similar and recurrent types of publications.
Imagine that in your organization there are dozens of devices Apache where the certificates must be published and renewed in your system. A profile configured with the Apache publishing plugin and a list of devices where the profile will have access to publish will make the process much faster and more practical.
To enter or view the publication profiles already present in the passwords, access the menu: Certificates ➔ Settings ➔ Publication profile and follow the instructions:
In the report click the buttonView actions.
Choose the option New
Enter the name of this profile
Select the Plugin that will execute the publication on the server
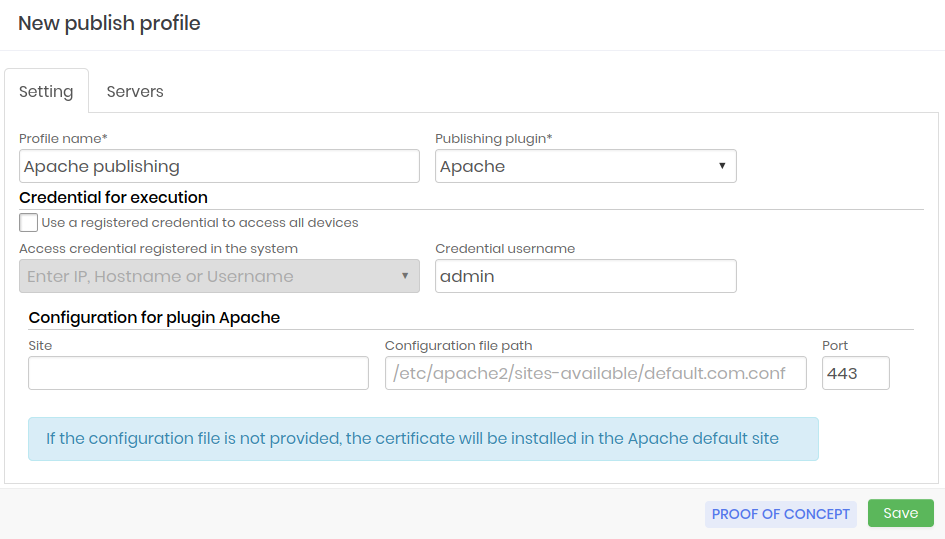
Certificate publication profile form Select a credential already registered in the senhasegura to access the device and perform publication, or deselect the checkbox and enter the credential username.
The plug-in settings will be partially filled according to the settings. Enter all configuration fields present, otherwise the certificate will be installed on the plug-in's standard website.
cautionThe figure perfil-enus shows the form with fields to fill in settings of the Apache plugin. The form will be different according to the choice of the plugin.
Click Save and wait for the reload page.
Go to the Servers tab and click the Add button to enter the servers on which this profile will act.
Select the desired servers and click Add. If you made a mistake, click the Remove button and select the servers you do not want the profile to act on.
Click Save.
Certification Authority
For a certificate to be signed, it is also important to have the desired Certifying Authority, registered in the senhasegura.
- External Authority
- GlobalSign
- Lets Encrypt
- Site Blindado
- DigiCert
- Godaddy
- Microsoft CA
To register a certifying authority access the menu: Certificates, Settings, Authority and follow the instructions:
In the report click the buttonView actions.
Choose the option New
Among the authority options click on the desired one
infoIf the desired authority is not in the list, choose the option External authority and enter a new one.
Enter the Name of this authority
cautionEach certifying authority option a different form will be displayed, as each certifying authority needs different information, such as CA Hostname, username. Enter the required information which is marked with (*).
Click on Save to complete the registration
Therefore the certificate request, signature and publication forms will display the information included in these settings.