senhasegura.go for Linux
Introduction
Linux-based operating systems have a widely known and easily understood permissioning pattern. Its segregation by the entities "owner", "group" and "others", combined with the actions of writing, reading and execution, reduces the possibility of granulation in environments where not even a privileged user could carry out changes that put at risk the functioning of a critical system.
It would be really disastrous if an infrastructure administrator, by chance, modifies a database connection file, under the responsibility of a DBA and widely used by systems hosted on this same server.
Some tools already known in the market deliver better control over the actions that occur in the application layer, file system and even the kernel. But they are too complicated and decentralized.
To increase the governance of these assets, senhasegura.go for Linux , using CaitSith1technology, acts as a PEDM, managing to integrate all Web management facilities with centralized decision making and replicated to the park of devices managed by it. Delivering to the security professional a powerful tool that allows increasing the granulation of actions on Linux devices at the level of Kernel actions.
Goal
In this chapter we will cover the following features of senhasegura.go for Linux
Target device installation: We will teach you how to install the agent on target Linux devices and how to link them to senhasegura
Action control at kernel level: We will show you how to register protection policies and see in practice their effectiveness
Points of attention and troubleshooting: Some important points about this solution and correction procedures in cases of configuration mistakes
Preparing senhasegura to receive the target device
The agent alone will not integrate with senhasegura without first having the necessary information about which device to manage.
Therefore, we will demonstrate how to prepare senhasegura with the necessary information.
Creating access keys to WebService A2A
Previous knowledge of how to create Clients, Tokens and how to configure the desired resources is required. See the Developer Manual or the Tool Administrator Manual for more details.
We recommend that the senhasegura user created to be linked to the WebService A2A configuration does not have Profile or Access group. It will not be used to login the proxy, web, or used to retrieve sensitive information.
From this point I understand that you have already created the user, client and token WebService A2A that senhasegura.go for Linux will use.
In the client resource configuration screen WebService A2A (Settings ➔ Services ➔ API ➔ Tokens), link the resource Linux.Go! to the record created earlier.
If you have a user on the target server that needs to be monitored, you must register this username as a senhasegura user.
Like the service user, this user does not need Access profile and Access group.
If this username is already a senhasegura user, there is no need for modifications. The audit is only done on authorized devices.
You will now need to install the agent. Later we will return to the administration screens to approve detected users and devices.
Agent installation
The senhasegura.go for Linux agent will be made available by the senhasegura Services team. Please contact us via senhasegura PAM Solution for more details.
We recommend that you perform a backup or snapshot of the device that will receive the installation of senhasegura.go for Linux . There are kernels that are customized or that contain unknown drivers that can affect the behavior of this solution.
Dependencies
For our example, we will use the Debian2operating system.
If you want to use senhasegura.go for Linux on another Linux-based operating system, contact us via senhasegura PAM Solution so that we can give you specific instructions for each system.
Make sure your system has installed the following packages: GCC 3, make 4, DKMS 5, linux-headers 6, libjansson4 7, libcurl3 8 and libconfig9 9.
In the case of Debian, run the command below to ensure its installation:
$ sudo apt-get install gcc make dkms
linux-headers-$(uname -r) libjansson4 libcurl3 libconfig9
To perform the installation, the kernel version must be the same version available from linux-headers. Use the following command to check the available packages:
apt list -a linux-headers*
Installation
Once the dependencies are met, run the installer secpack-installer.run.
$ sudo /bin/bash secpack-installer.run
The installation will display several messages informing you of the tasks being performed. These messages will be important if an error occurs. If completed successfully,
the message Installation completed! Will be displayed. Otherwise, contact us with the outputs presented during the installation process in hand so that we can support you.
Once installed, it is necessary to configure it with the connection data WebService A2A created previously.
Edit the file /etc/senhasegura/secpack.conf and fill in the fields below with the requested values.
iso_http_address: URL of the WebService A2A . As usual, it will be the URL you use to access the senhasegura web interface plus the suffix
/iso. example:https://senhasegura.mycompany/iso.iso_oauth_key: Customer identifier WebService A2A created earlier
iso_oauth_token: Client token WebService A2A created earlier
Now we will request registration of this device from senhasegura by executing the
command secpack-register with a privileged user.
$ sudo secpack-register
If you receive the error message Failed to sign workstation. - as shown below - check that the client WebService A2A configuration steps have been correctly performed and that the target device actually has access to senhasegura via HTTPS connection (443). If you have any questions, please contact us via senhasegura PAM Solution to help solve the problem.
root\@debian:/root# secpack-register
senhasegura security pack v1.0.0-1
Failed to sign workstation.
If successful, you will receive the message This device was registered successfully., As in the example below:
root\@debian:/root# secpack-register
senhasegura security pack v1.0.0-1
ERROR: 1002: Registration of pending approval workstation
Adding group gonix \...
This device was registered successfully.
The message ERROR: 1002: Registration of pending approval workstation indicates that this device has not yet been approved by the senhasegura manager to receive lock and audit information. We'll see that in a moment.
Validation
Once installed, the secpack-maestro service must be running. Validate it with the command service secpack-maestro status.
The error message 2037: Incorrectly informed users occurs when no user present on the device correlates with approved users in the senhasegura.go for Linux administrative interface in senhasegura . We will resolve this later.
Only validate that the service is running using the Loaded and Active policies.
Security module
senhasegura has its own security module built inside the senhasegura.go for Linux client. It was developed to simplify the access control using the Access Control List at kernel level.
The main benefits for this security module is that any rules registered in the senhasegura server will be applied to any type of execution:
Shell executions
Software executions
Script executions
Parent and Child process controls
This means that even if the user tries to shell scape, outwit, or abuse privileges, they won't be able to.
The security module allows the system administrator to create policies, scan and control files and folders, set permissions, fully control of permissions, and so on, all based on Access Policies.
Each type of feature, and how to configure, you can find further in this manual.
Creating the first policies
From this point on, the target device is already informing senhasegura which users it has and requesting blocking and auditing policies. We will then approve the device and register our first policy.
If successful, you will receive the message This device was registered successfully., As in the example below:
root\@debian:/root# secpack-register
senhasegura security pack v1.0.0-1
ERROR: 1002: Registration of pending approval workstation
Adding group gonix \...
This device was registered successfully.
The message ERROR: 1002: Registration of pending approval workstation indicates that this device has not yet been approved by the senhasegura manager to receive lock and audit information. We'll see that in a moment.
Authorizing devices
Through the menu go ➔ Workstations you will have a list of devices that are using the senhasegura.go for Linux policies, devices that have been revoked and devices that are pending approval. In our example, our newly installed device is pending. See the image.
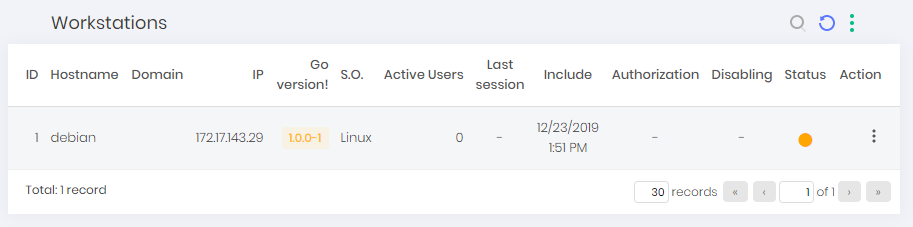
Notice that the column Status has a yellow circle that represents this state of indecision. This circle can vary between green for approved devices and red for revoked devices.
To approve the use, click on the registration action Approve.
Once approved, this workstation will receive the guidelines that we will register below.
Registering kernel-level policies
Kernel-level policies control the Linux Access Control Lists (ACLs). This feature essentially gives the ability to restrict or allow access at the kernel level.
ACLs allow the system administrator to apply a more specific set of permissions to objects, as well as what operations are allowed on which objects.
These rules will also apply to commands executed within scripts. senhasegura.go for Linux has a security module that will enforce policies in any scenario, we make no distinctions between user or script executions.
Warning! Prohibitive policies can cause major damage to the device. This can lead to total blocking of interactivity.
Through the menu go ➔ Linux ➔ Access Policies you can view and manage all registered policies. The policies are segregated at three levels.
General: Policies that apply to all devices where senhasegura.go for Linux is active and approved
Per device: Policies applied to specific devices
By username: Policies that apply only to devices that contain the specific username.
To better understand its use, we will present the following problem.
Within a corporation, the DBA is a highly trusted and hired employee. Support for operating systems is provided by a contractor. \par The contractor has a high-privileged user to perform updates and maintenance on the device. As a result, these outsourced employees end up having access to the Oracle ® onfiguration file at the risk of changing it. The Information Security Manager and the DBA would like to protect the writing in this file centrally without having to create several auxiliary groups server to server, at the risk of losing control of the members of these groups.
In this case, it will be necessary to create a policy on senhasegura.go for Linux stating that only the DBA user has permission to write to the target file. Thus, not even the super user will be able to change its content. Even though he has authority over the file.
Follow the steps below to configure this scenario.
Access the policy report through the menu go ➔ Linux ➔ Access Policies
Click on the report action New Rule to create a global policy
In the form that opens, fill in the fields as follows
Identification name: Name of the policy. Required field. This name must be friendly so that it is easily identifiable. It will not be passed on to the target device. In this example, we will populate it with "Deny TNS changes"
Enable audit: Indicates whether to enable auditing of actions that fall under this directive. The field is mandatory and by default it is active. We will keep it active.
Enabled: State of the policy. Required field. If active, the policy will be considered on the target devices. Otherwise, it will not be applied. We will keep it active.
Guideline: Kernel policy to be monitored. Required field. These actions come from the actions supported by the CaitSith10library. We will use the "Write file" directive. This policy will identify the moment that an attempt to write to a file occurs.
Checker: Target of the policy. Although this field is not mandatory, be very careful not to fill it out. Failure to fill in or fill in this field incorrectly may cause the device to become completely bricked.
In this example, we will fill the variable path with the location of our target file. Example:
path=˝/etc/oracle/tnsnames.ora˝Include general denial rule?: Indicator if the deny all policy should be considered at the time this policy is applied. As it allows actions for specific users, it is interesting that other users have this privilege denied. We will keep it marked in our example. Required field.
Up to this moment, we have registered the characteristics of the policy to be registered. We will now indicate the users who are allowed or prohibited from executing the policy.
Allow or deny: Indicates whether to register a permission or deny policy for the user. In our example we will register a Allow policy for our DBA user
Rule text: Now we will place our username
dbawithin the CaitSith11policy format. Example:task.uid=˝dba˝. This indicates that if the process that fits the policy has the UID of the DBA username, that policy will be accepted.
Save the record and observe the result on the target device!
Warning! The Checker and Rule text fields, although not mandatory, require attention. Empty values or fill in this field incorrectly may lead to brick the device. And their values must be surrounded by double quotes as shown.
Validating the policy on the target device
We will then return to our example by showing:
that the rule was created on the target device;
that the DBA user has permission to write to the file; and
that the super user will not be able to write to the file
Validating the policy
View the /sys/kernel/security/caitsith/policy file to check the default CaitSith12rules applied to the device.
root\@debian:/root# cat /sys/kernel/security/caitsith/policy
POLICY_VERSION = 20120401
stat Policy updated: 9036 (Last: 2019/12/24 00:31:57)
stat Requests denied: 10 (Last: 2019/12/23 18:55:22)
stat Memory used by policy: 4512
stat Memory used by audit: 63808
stat Memory used by query: 0
quota memory audit 16777216
quota memory query 1048576
quota audit \[1\] allowed = 0 denied = 1024 unmatched = 1024

**1**00 acl write path="/etc/oracle/tnsnames.ora"
audit 1
100 allow task.uid = 1002
200 deny
The above output has some statuses that are not important at this point. But notice that the highlighted text presents exactly the rule that we created earlier. senhasegura.go for Linux even translated the dba username to its correct UID, since this will not always be the UID on each device.
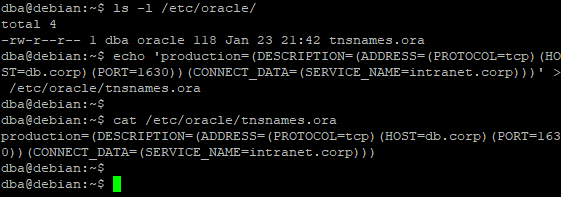
Writing to the file as a dba user
Now we will insert content into the target file as a dba user. According to the applied rule, it must be accepted. Notice that the dba user can write to the file.
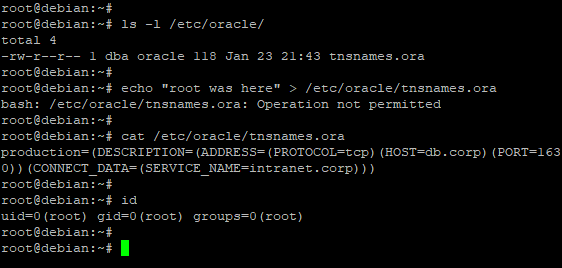
Trying to write to the file as superuser
The super-user will not be able to write to the file, since this user is in the denial rule of the created policy. Even as a super user, the writing attempt fails.
Points of attention and troubleshooting
As stated earlier, policies written without a target user or resource, end up being valid for the entire system, increasing the risk of a total system lock.
The service secpack-maestro will always be running and updating the rules as they are registered in senhasegura . But if there is a need for manual intervention on the device, perform the following procedure:
Using the root user, stop running the service
secpack-maestroservice secpack-maestro stopRun the
caitsith-loadpolicybinary to remove the desired policies. We will remove the previously created policy as an example.echo 'delete 100 acl write path = "/etc/oracle/tnsnames.ora"' \| /usr/sbin/caitsith-loadpolicyValidate that the policy has been removed by re-checking the applied file
cat /sys/kernel/security/caitsith/policyMake changes to senhasegura so that the rule is not applied again
Restart the service
secpack-maestroservice secpack-maestro start
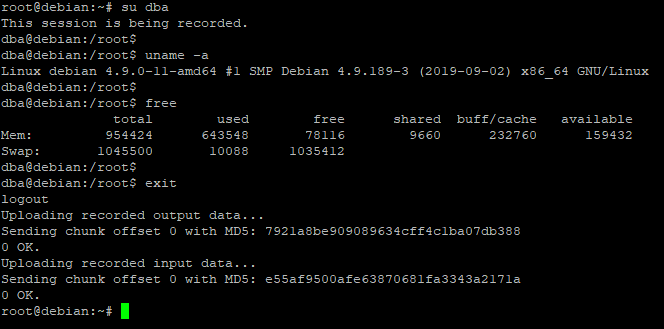
Session recording
The agent senhasegura.go for Linux allows certain users to be monitored via video throughout their session, regardless of the binary they are running. This is possible through the secpack-trec terminal. To activate it, change the target user's default terminal.
According to our example using Debian13, use the vipw command to edit the /etc/passwd file and change the target users' default terminal to /usr/bin/secpack-trec.
As soon as the target user starts their session, they will be notified that their actions are being monitored.
Error messages on login
SIGNUSR: 1013: Local user does not exist on server
This user must have a match with a user with the same username in senhasegura . And this senhasegura user does not need to be linked to Profile or Access Group.
SIGNUSR: 1014: User pending approval location
At this point the equivalence exists but has not yet been approved.
Go to the go ➔ Users report and find the user pending approval. It will be indicated by the orange circle in the column Status. The status can vary between orange for undefined status, green for approved and red for failed.
Click on the registration action Authorize to continue.
Session registration
Once you have correctly linked the user, he will be monitored through a video recording. The user will be notified right after the login of this action, and will notice the sending of evidence at the end.
To watch the video broadcast, go to the session report in the menu PAM ➔ Access Control ➔ Remote Sessions.
Directory and file control
The Directory and file control functionality allows the administrator to register settings that will control the permission of Linux files and directories.
This configuration is done through the web interface of the senhasegura where the permission of files and directories, determined, will be indicated for all users of the indicated workstation. That is:
"If for the Documents" directory of the worktation "01" users will receive only the permission of reading, that is, they will only be able to see and list the files and subdirectories contained inside "Documents" (directory) in the workstation "01"."".
By accessing the menu go ➔ Linux ➔ Access Policies you have access to all registered policies. The policies are segregated into three levels:
General: Policies that apply to all devices where senhasegura.go for Linux is active and approved
Per device: Policies applied to specific devices
By username: Policies that apply only to devices that contain the specific username.
To create a new directory and file control click on the report action New Rule or New rule for workstation;
infoIf you wish, just edit a record already exists to include directory and file control.
In the form that opens, go to the Control directories and files tab;
In the Permissions section select the type of permission that will be allowed to users in the Permission field:
Read: You can only view and list the files and subfiles/subdirectories
Write: You can edit a file or modify the content of a directory
Execution: You can execute a file or access a directory
In the Directory or file field indicate the path complete of the file or directory you want to be controlled.
Click the Add button to include permission for control. If you wish, perform the previous steps to add more files and directories to be controlled.
In the group or user field, insert the name of the domain security group or the username of a local or domain user;
In the Block rules section select the type of permission that will be not allowed to users in the Permission field:
Read: View and list the files and subfiles/subdirectories
Write: Edit a file or modify the contents of a directory
Execution: Execute a file or access a directory
In the Directory or file field indicate the complete path of the file or directory you want to be controlled.
Click the Add button to include permission for control. If you wish, perform the previous steps to add more files and directories to be controlled.
If you have chosen the control option Workstation segregation the form will present a tab called Workstation.
When accessing this tab click the add button and select from the list the workstaions that were part of this configuration and click Add.
To finish click Save
At the end perform a workstation access where the control was configured and try to perform the permissions that were blocked or allowed.
- CaitSith (GNU 2) https://caitsith.osdn.jp/↩
- https://www.debian.org/↩
- https://gcc.gnu.org/↩
- https://www.gnu.org/software/make/↩
- https://github.com/dell/dkms↩
- Find the best reference for your operating system↩
- http://www.digip.org/jansson/↩
- https://curl.haxx.se/libcurl/↩
- http://www.hyperrealm.com/libconfig/libconfig.html↩
- CaitSith (GNU 2) https://caitsith.osdn.jp/↩
- CaitSith (GNU 2) https://caitsith.osdn.jp/↩
- CaitSith (GNU 2) https://caitsith.osdn.jp/↩
- https://www.debian.org/↩