DSM
Introduction
The senhasegura DevOps Secret Management (DSM) allows easy management of applications and secrets in a DevOps environment.
With this module, you can manage the Secrets and Applications life cycle, and how they interact with senhasegura DSM .
The administrator can manage the applications' access through authorizations by defining access policies to senhasegura DSM , in addition to managing the secrets life cycle through automations.
Fully integrated with other senhasegura platform modules, such as Cloud, PAM and Certificate Management, a secret can be composed by Access Keys, Credentials, SSH Keys, Certificates and other generic information through the combination of Keys and Values.
The development team can also easily integrate through APIs and plugins from different containerization platforms, CI/CD, infrastructure and configuration automation, cloud provider services, etc.
Dashboards
The senhasegura DSM module has a dashboard section for data visualization such as: Applications, Secrets, Variables, Deploys and others. To access all graphics and boards, follow through the menu: DSM ➔ Dashboards. Into this section you will find the following dashboards:
Secret Management;
Application;
CI/CD variables;
Secret Management
Into the Secret Management dashboard you can find general information about applications and secrets managed by the senhasegura DSM .
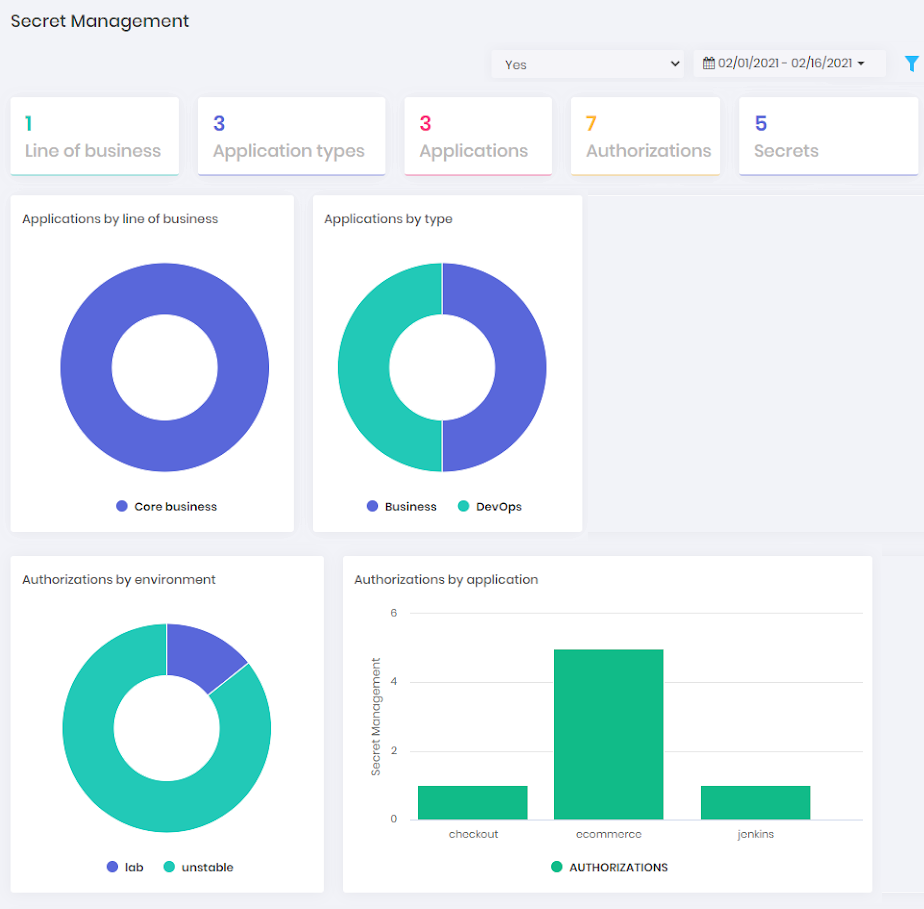
The following information is available:
- Business types numbers;
- Application types numbers;
- Number of applications;
- Number of authorizations;
- Number of secrets;
- Applications pie chart by business type;
- Applications by Type pie chart;
- Authorizations by environment pie chart;
- Authorizations by application pie chart;
- Secret queries by date chart;
Data can be filtered by status and date interval. "Business types numbers" and "Application types numbers" can only be filtered by hour interval.
Application
In the Application dashboard it is possible to find information about a specific application managed by the senhasegura DSM .
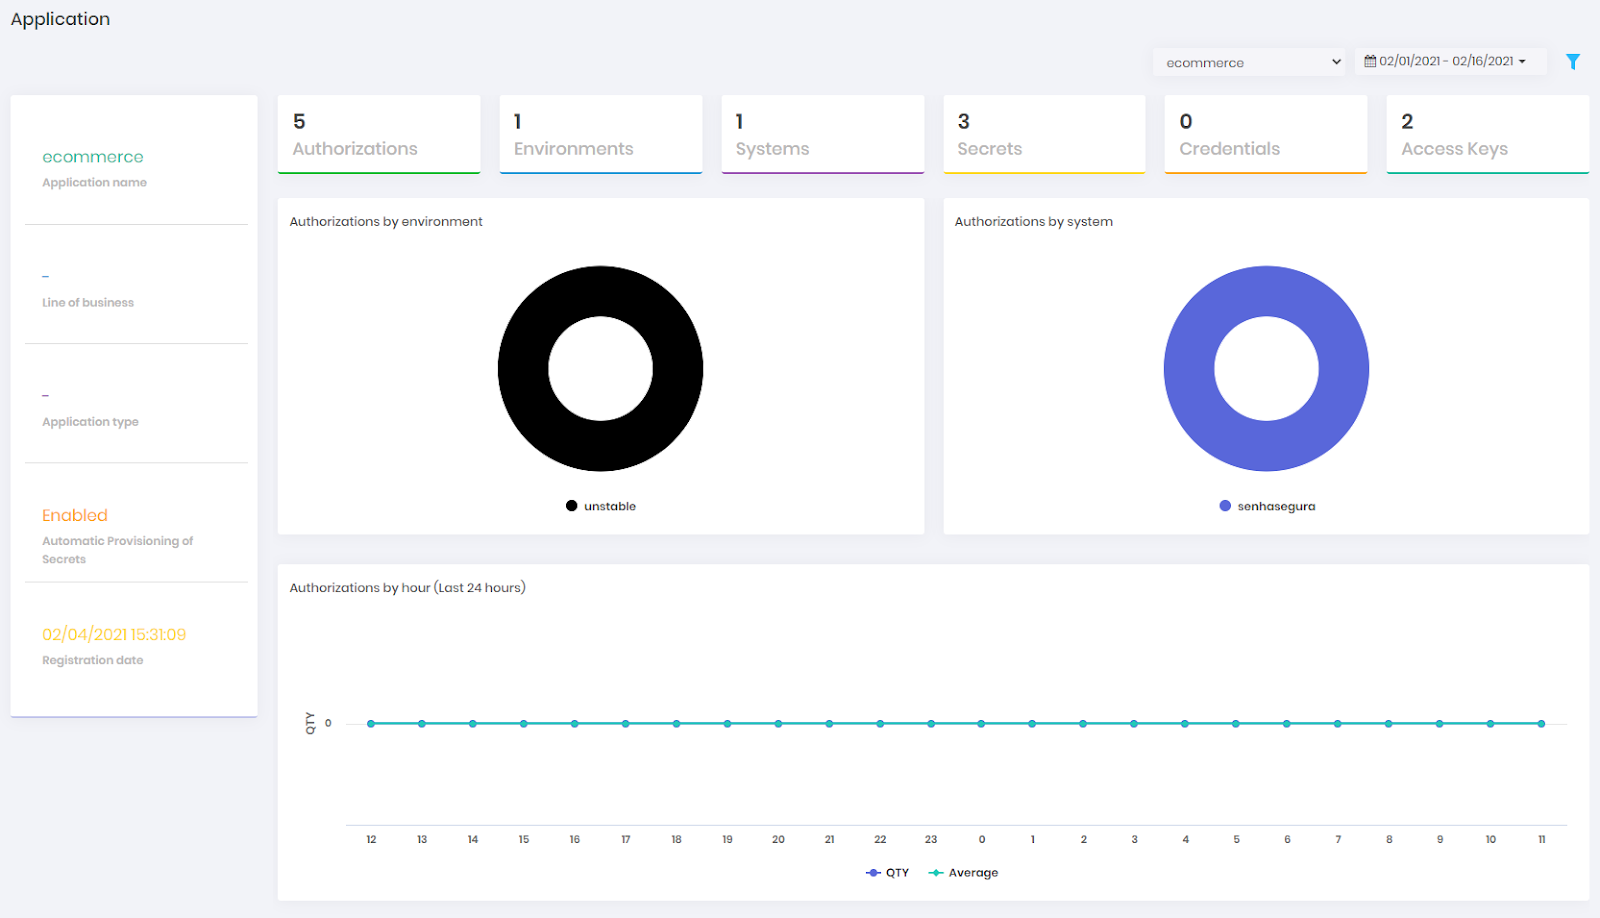
The following information is available:
- Application name;
- Application Business Types;
- Application type;
- Secrets Automatic Provisioning Status;
- Application registering date;
- Number of Active Authorizations;
- Number of Applications Environment;
- Number of Applications Systems;
- Number of Active Secrets;
- Number of Secrets Credentials;
- Number of Secrets Access Keys;
- Environment Authorizations pie chart;
- System Authorizations pie chart;
- Authorizations requested last 24 hours bar chart;
- Secrets requested by date bar chart;
- Secrets requested by week day bar chart;
Data can be filtered by status and date interval. "Business types numbers" and "Application types numbers" can only be filtered by hour interval.
CI/CD variables
At CI/CD variables dashboard you can find information about variables used between application environment.
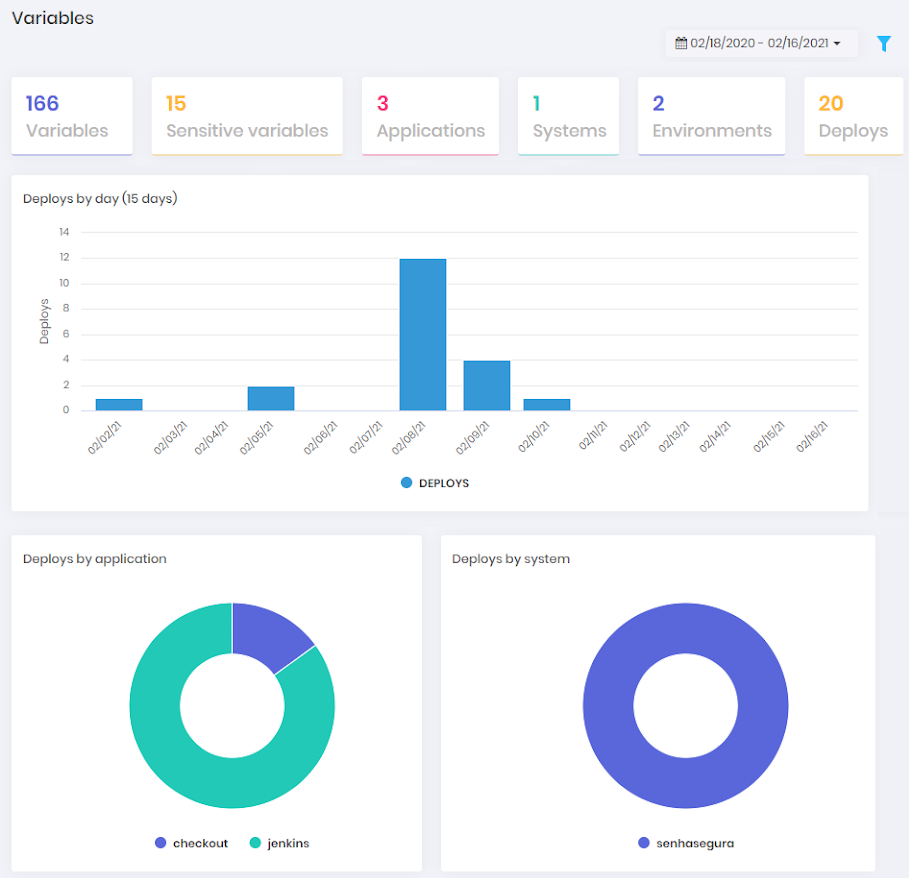
These variables are sent to senhasegura using tools plugins or API calls.
The following information is available:
- Number of variables;
- Number of sensitive variables;
- Number of applications;
- Number of systems;
- Number of environment;
- Number of deploys;
- Last 15 days deploys bar chart;
- Deploys by applications pie chart;
- Deploys by system pie chart;
- Deploys by environment pie chart;
- Deploys by hour bar chart;
- Received variables by date bar chart;
- Applications variables pie chart;
- Sensible variables pie chart;
- System variables pie chart;
- Environment variables pie chart;
Data can be filtered by status and date interval. "Business types numbers" and "Application types numbers" can only be filtered by hour interval.
Sensitive Variables are those that contain the following words: TOKEN, PASSWORD, USER, SECRET_ACCESS_KEY, ACCESS_KEY_ID, USERNAME, SECRET, CLIENT_ID, CLIENT_SECRET
Secrets
A secret is a set of sensitive information, such as credentials, access keys and key and value pair.
The secrets can be queried by applications or scripts through API calls using authorizations with access policies and through automations created directly in the solution, where the secrets will be actively injected, changed and deleted without the need to change the application code.
Register a secret
To register a secret, go to the menu: DSM ➔ Secret Management ➔ Secrets
In the report's action buttons, click New secret;
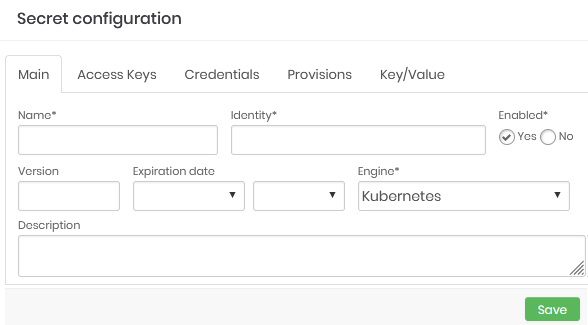
Secret registration form In the Main tab, fill in the following fields:
- Name: Name of the secret for management within senhasegura ;
- Identity: Secret identifier. Using this identifier the applications were able to find the file or variable that will be created;
- Enabled: Flag if this secret is available to be used by the applications;
- Expiration date: Date on which the secret will be automatically inactivated;
- Engine: Engine to be used;
- Description: Secret' usage description aligned with the client's business rule. Will not be used by applications;
In the Access Keys tab, select the access keys that will be part of the secret;
In the Credentials tab, select the credentials that will be part of the secret;
In the Key/Value tab, fill a key and sensitive value pair. The name and value must obey the criteria of the applications and environments where they will be published;
To finish click on Save;
Secrets viewing
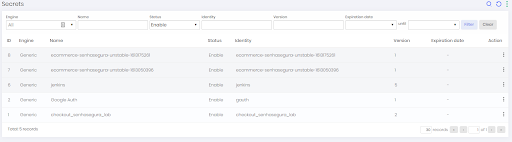
To view the secrets as plain-text follow the menu: DSM ➔ Secret Management ➔ Secrets.
On this screen, you can view the existing secrets along with information such as Engine, identifier, status, version and expiration date.
Viewing versions of a secret
To view the secrets history follow the menu: DSM ➔ Secret Management ➔ Secrets.
- In the action column of the secret row, click on the option Secret versions;
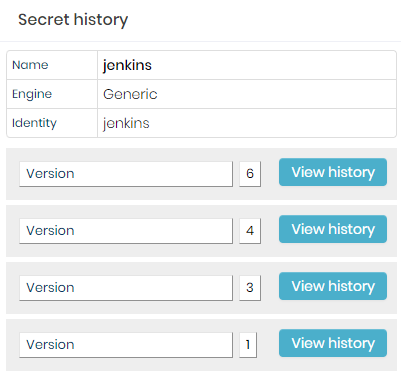
Secret versions - On the screen presented, click on View history button for the version you want to view;
- Finally, click on the View information action to view the information;
Applications
Registering applications allowing to create and manage authorizations, which give access to senhasegura DSM and consume secrets using APIs.
Registering applications
To register a new application follow the menu: DSM ➔ Applications ➔ Applications
Into report actions, click on New;
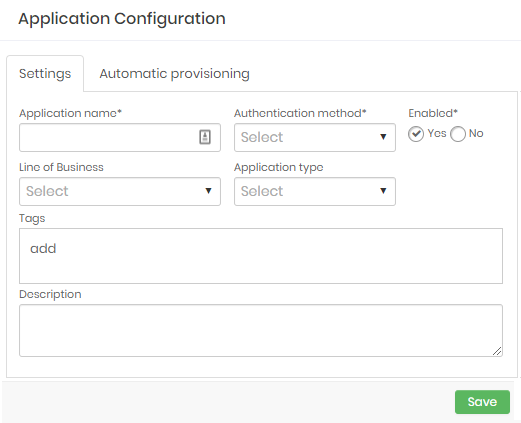
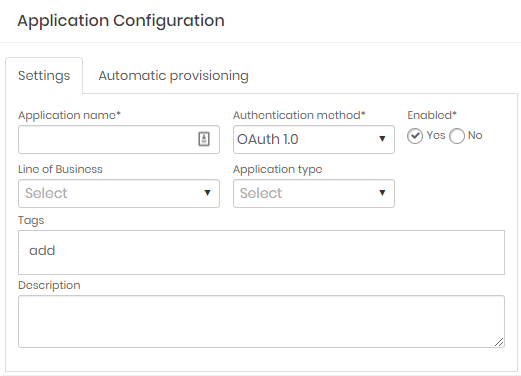
Application configuration form In the Settings tab, fill in the following fields:
- Application name: Application name. It will be used for identification into report, logs and dashboards;
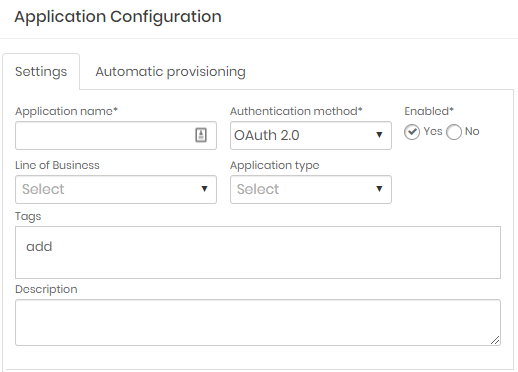
- Authentication method: Authentication Types that will be used. The options are available:
- OAuth 1.0: The client application should first authenticate using OAuth 1.0 over WebService A2A ;
- OAuth 2.0: The client application should first authenticate using OAuth 2.0 over WebService A2A ;
- Enabled: Define whether the application will be active or not;
- Line of Business: Define the business type that the application serves. This property is used only in senhasegura for reports, dashboards and segregations;
- Application type: Application Type. Used only into senhasegura for reports, dashboards and segregations. E.g.: Business, DevOps, Security;
- Tags: Used for filters, dashboards and segregations;
- Description: Add a detailed description for the application;
At Automatic provisioning tab, fill the following fields:
- Cloud dynamic provisioning profile: Select the provisioning profile created at senhasegura DSM ;
- Credential dynamic provisioning profile: Select the provisioning profile created at senhasegura PAM;
To finish click at Save;
Use always modern authentication types that guarantee data integrity. The possibility of authenticating whether through OAuth 1.0 exists due to the impossibility of updating legacy applications. We discourage it use.
Automatic provisioning allows credentials secrets and access keys to be generated and deleted automatically after the creation and inactivation of an authorization. Find out more in the session Secrets Automatic Provisioning into this manual.
View apps
To view the secrets follow the menu: DSM ➔ Applications ➔ Applications.
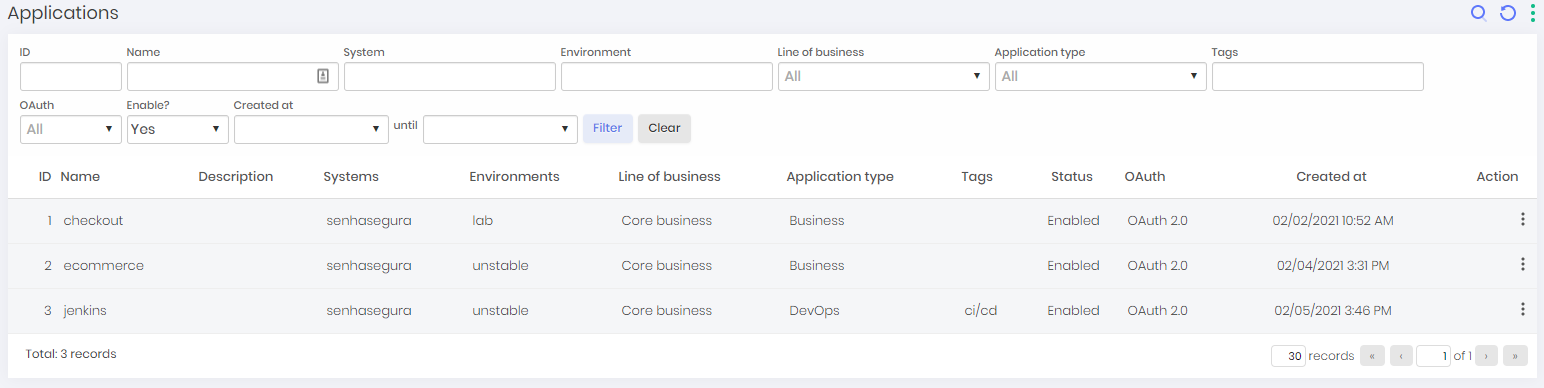
Into this screen, you can view registered applications with extra informations such name, description, systems, environments, business type, application type, tags, status, authentication method and creation date.
View app permissions
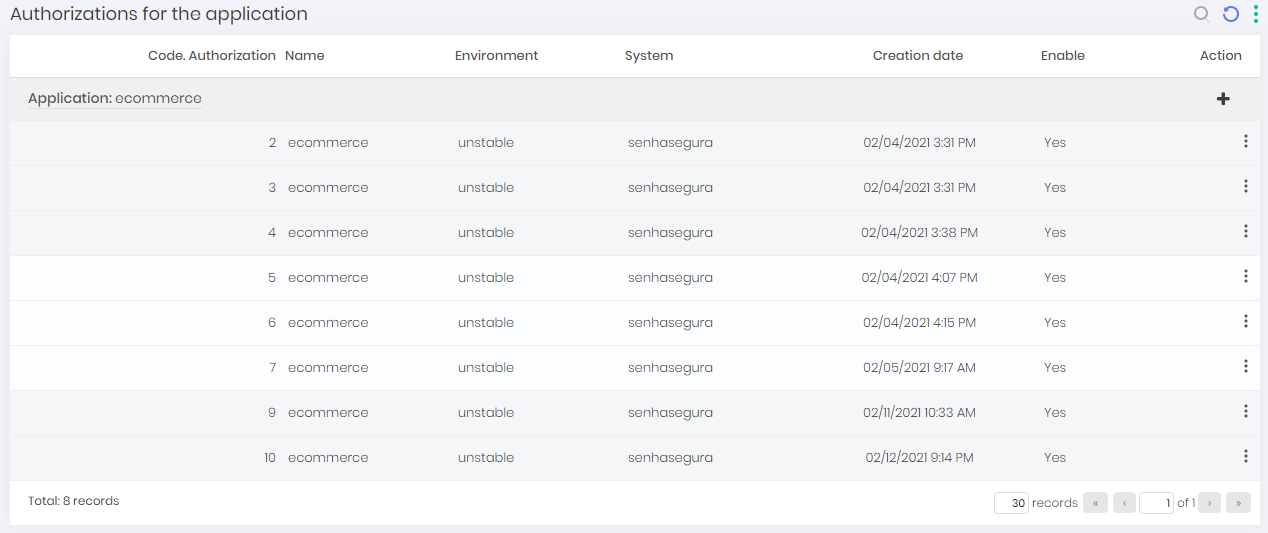
To view an application authorizations, follow the menu: DSM ➔ Applications ➔ Applications.
Into the actions of a application row, click on the Authorizations option. On this screen, you can view the application authorization along with information such as application name, environment, system, creation date and status;
Authenticators
Authenticators are a secure way to broker trust between different applications for the purpose of exchanging secrets and to manage authorizations and related functions. senhasegura provides integration with the most used authenticators as described in the following section.
OAuth 1.0 Authenticator
OAuth 1.0 is an authentication method that consists in using four tokens to identify and authorize an application access.
Use always modern authentication types that guarantee data integrity. The possibility of authenticating whether through OAuth 1.0 exists due to the impossibility of updating legacy applications. We discourage it use.
Configuring OAuth 1.0 Authenticator
To use this authentication method, follow these steps:
Go to DSM ➔ Application ➔ Application;
Edit or create a New application and select OAuth 1.0 authentication method;
When a resource needs to use a secret, it can use its OAuth 1.0 tokens to request the information from senhasegura .
If the data used is valid, senhasegura will leave the application interacting with senhasegura DSM secrets and authorizations.
Checkout our WebService A2A manual for a complete description of senhasegura DSM REST Methods.
OAuth 2.0 Authenticator
OAuth 2.0 is an authentication method that consists in using a client ID and a client secret to request a time limited token and use it to access senhasegura resources.
Configuring OAuth 2.0 Authenticator
To use this authentication method, follow these steps:
Go to DSM ➔ Application ➔ Application;
Edit or create a New application and select OAuth 2.0 authentication method;
When a resource needs to use a secret, it can use its OAuth 2.0 clients to request an time limited token and use it to request the information from senhasegura .
If the token used is valid, senhasegura will leave the application interacting with senhasegura DSM secrets and authorizations.
Checkout our WebService A2A manual for a complete description of senhasegura DSM REST Methods.
Authorizations and policies
management
In the authorizations feature, the administrator can define the access policies to senhasegura DSM . It is also possible to define access policies, such as:
- Which resources can be accessed;
- Authorization expiration date;
- IPs allowed to perform requests;
- Request origin address;
- Environment where the authorization will be used;
- System where the authorization will be used;
- Secrets that can be accessed;
An application can have more than one authorization with different access policies.
Register authorization
To register an authorization follow the menu: DSM ➔ Applications ➔ Authorizations by application
Lookup for the desired application record and click at New authorization button;
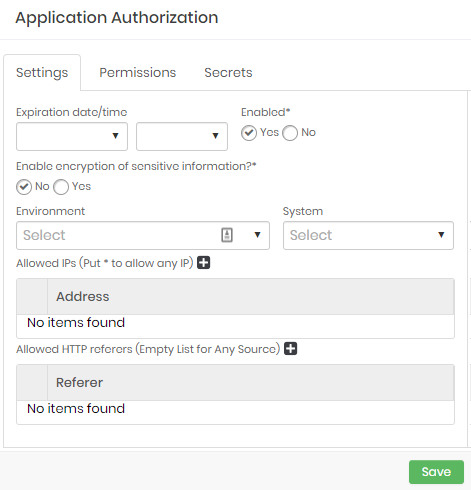
Authorization setup form At tab Settings fill the following fields:
- Expiration date/time: Set a date and time when the authorization will be automatically revoked;
- Enable: Define whether authorization is enabled for use or not;
- Enable encryption of sensitive information: Define whether confidential data should be sent encrypted to the application;
- If enabled, after saving the authorization, export the decryption key at: DSM ➔ Applications ➔ Authorizations by application;
- Search for the desired authorization and click Download public key button;
- Environment: Define the authorization environment. This property will be only used within senhasegura reports, logs and dashboards. Its value will not affect the application use;
- System: Define the authorization system. This property will be only used within senhasegura reports, logs and dashboards. Its value will not affect the application use;
- Allowed IPs: Comma-separated list of IPs that are allowed to use this authorization. Use the wildcard
*to record network intervals. E.g.:192.168.1.*; - Allowed HTTP referers: Application HTTP referers. It will be validated if exists;
At Secrets tab, select which secrets will be related to the authorization;
Click at Save button to finish;
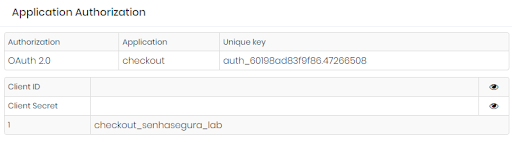
View authorization API clients
To register a secret follow the menu: DSM ➔ Applications ➔ Authorizations by application.
In the authorization record you want to view the clients, click on the action View Authorization.
Click at View information button to view it information.
CI/CD The
CI/CD menu have information such as variables and deploys intercepted by senhasegura DSM through integrations with tools such as GitLab, GitHub, Azure DevOps, Jenkins, among others.
This information is useful for identifying secrets that are being used by applications, but are not being managed by senhasegura DSM .
Variables
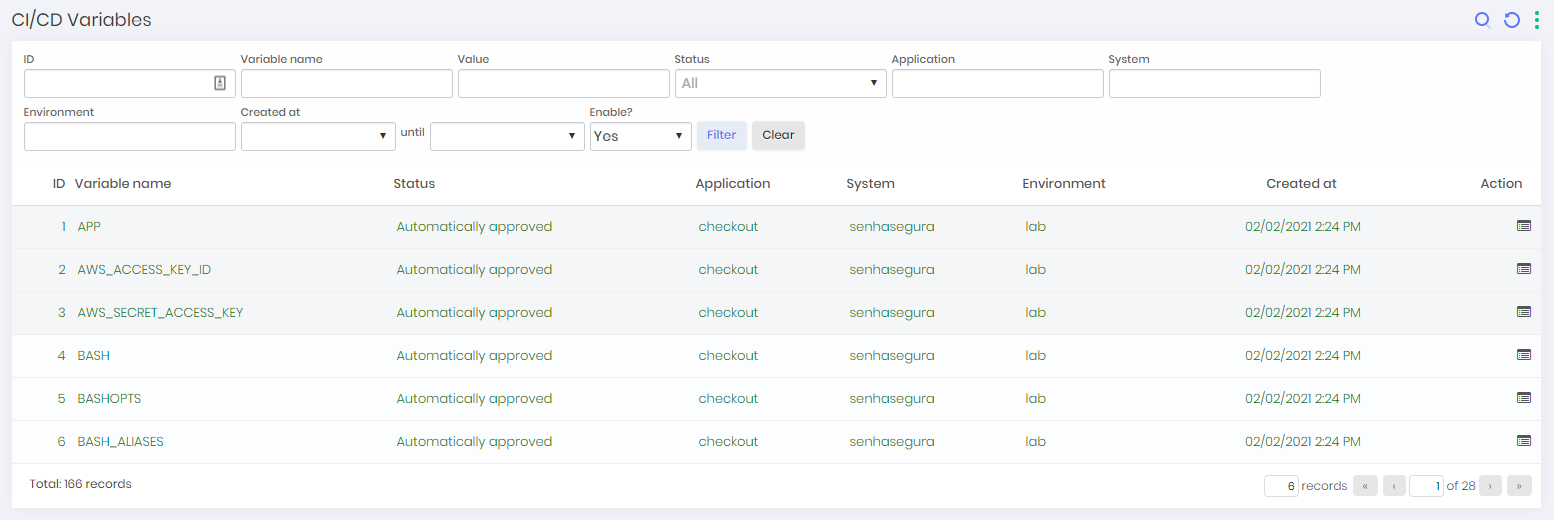
This report shows all variables intercepted by senhasegura DSM through its plugins and integration via API.
These variables may or may not have sensitive information, such as user names, passwords, access keys, SSH keys, among others.In this report you can find the following information:
Variable name;
Approval status;
Application name;
System;
Environment;
Creation date;
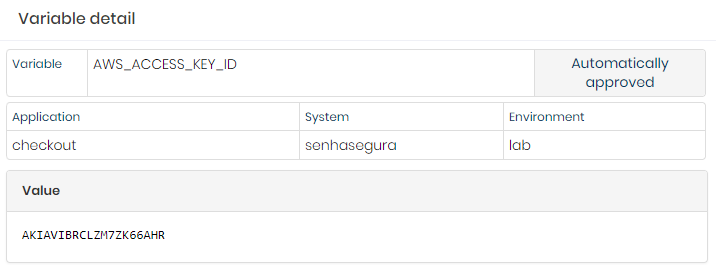
View variable details
To view the details of a variable, follow the menu: DSM ➔ CI/CD ➔ Variables. Click the Variable details button at the desired record.
senhasegura DSM is able to identify some variables as being sensitive, for example, AWS_ACCESS_KEY_ID and AWS_SECRET_ACCESS_KEY and automatically create a secret so that they can be easily managed in the solution.
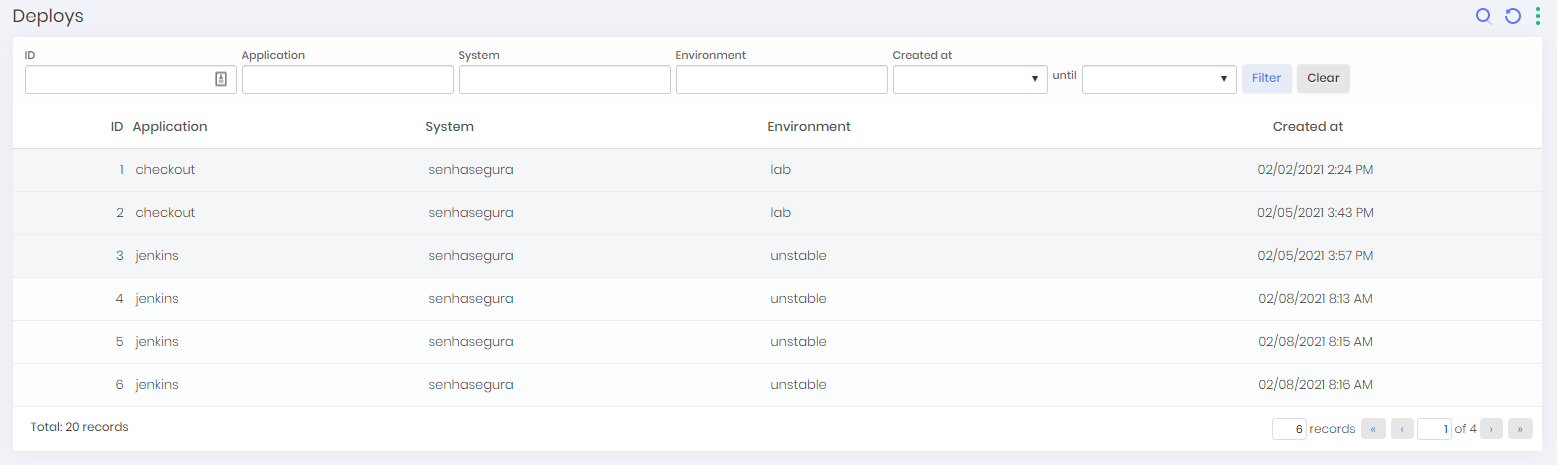
Deploys
This report shows the deploys identified by senhasegura DSM through its plugins and integration via API. In this report you can find the following information:
Application name;
System;
Environment;
Deploy date;
Automations
senhasegura DSM allows creation of automation for secrets life-cycle active management in applications such as, Kubernetes and cloud services such as Google Cloud Manager, Azure Key Vault among others.
Automations are based on triggers, such as creating or updating a secret:
Secret creation;
Secret update;
Secret activation;
Secret inactivation;
Authorization creation;
Authorization update;
Authorization activation;
Authorization inactivation;
The automation module already has several predefined connectors to make easy a resource usage, but new ones can be easily created from templates.
Automations can be used to add, update and delete secrets. But they are not limited to these cases only. For example:
Templates for databases;
Templates to change application or server configuration files;
Templates to run on Kubernetes, OpenShift or other Kubernetes services;
Templates to run into cloud services like Google Secret Manager;
Automations can also run Ansible Playbooks inside Dockers containers to ensure more security and allow greater possibilities for integrations.
Creating an automation
To create an automation, click at the menu: DSM ➔ Automations ➔ Automations
Click the actions button and click at New;
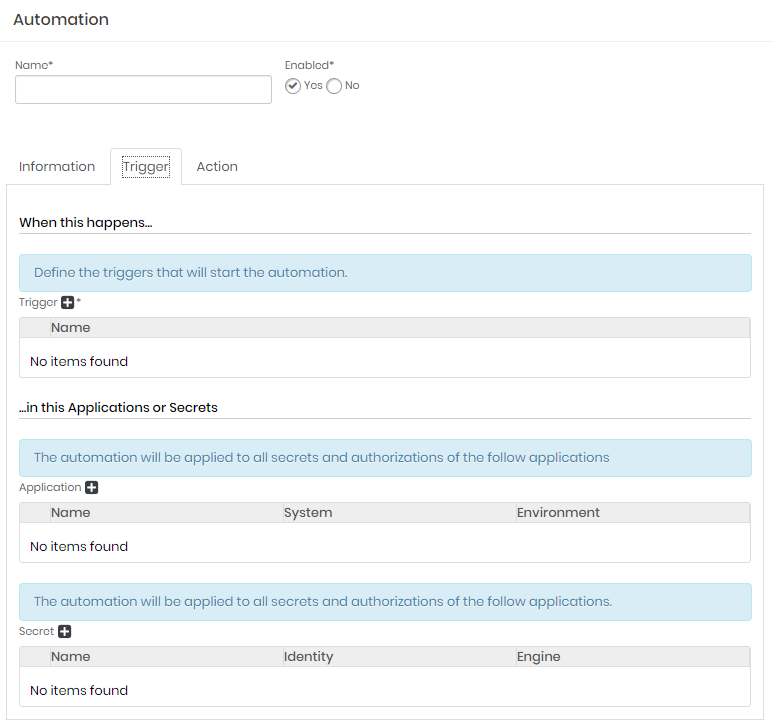
Fill the automation general fields:
Name: It will be the automation name. It will be used internally in the senhasegura for identification on other screens;
Enabled: Indicates whether automation is available for use;
At Information tab, fill the following fields:
Description: A detailed description of this automation;
Tags: Tags to be used as filter or data segregation inside senhasegura ;
At Trigger tab fill the following fields:
Trigger: It's the event triggers who start an automation process. Select one or more items;
Application: Select one or more applications to be triggered by the selected triggers;
Secret: Select one or more secrets to be triggered by the selected triggers;
At Action tab fill the following fields:
Plugin: which protocol or application will execute the select template;
Template: which template will be executed into the target application;
Device: which device will be connected by the plugin to execute the template;
Click at Save button to finish;
It's really easy and fast to create new templates to perform new integrations in others solutions.
Automations details
Click at DSM ➔ Automations ➔ Automations menu to list all automations.
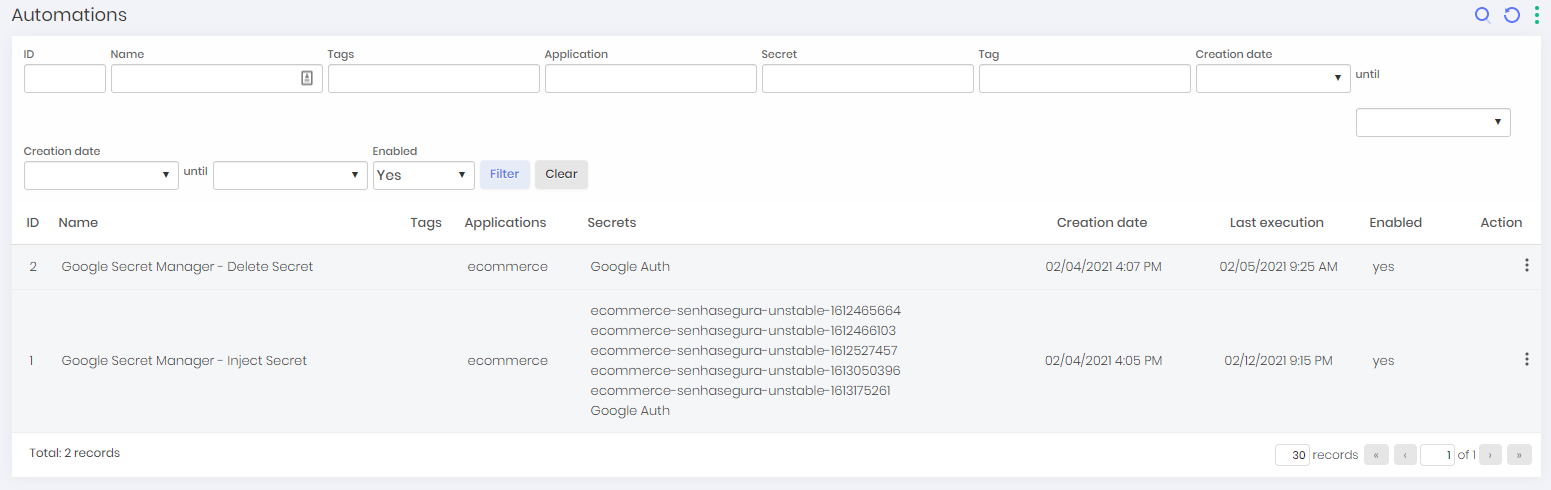
Into this report you can see all automations with its data like name, tags, automations applications, automation secrets, creation date, last execution date and status;
Automation execution details
Click at DSM ➔ Automations ➔ Executions menu to list all automations result. Search for a desired automation execution record and click at its Detail button.
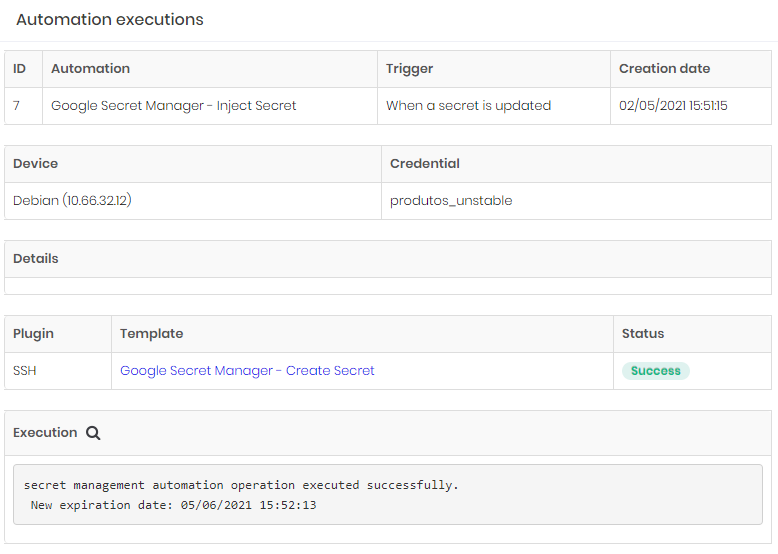
In the Execution section, click on the Execution details button to view the template's execution details.
For security reasons, in the details of the template execution, sensitive information such as passwords and access keys are replaced by a mask.
Inject and change secrets into Azure Key Vault, AWS Secret Manager, Google Secret Manager and Kubernetes
Create an automation as described at section dsm-create-automation of this manual, and in the Action tab, select a template to be executed:
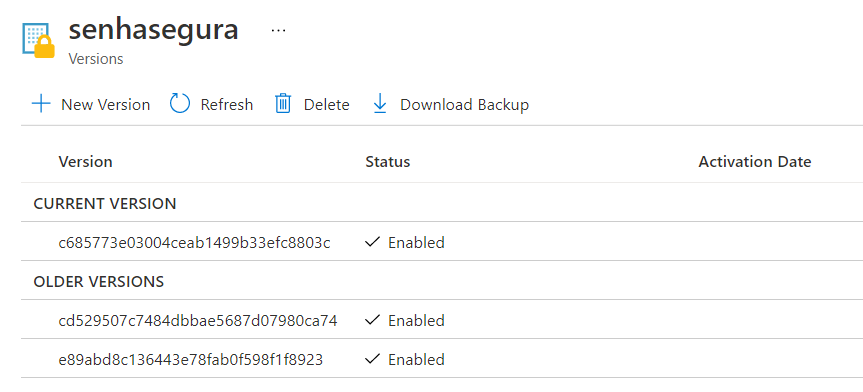
Azure Key Vault
On the Action tab, select the Azure Key Vault - Inject Secret template to inject and rotate secrets.
After execution, access the Azure portal, search for the Key Vaults service, select the vault where the secret was injected. In Settings, click on Secrets and click on the one created by senhasegura to view its details, as in the example below:
AWS Secret Manager
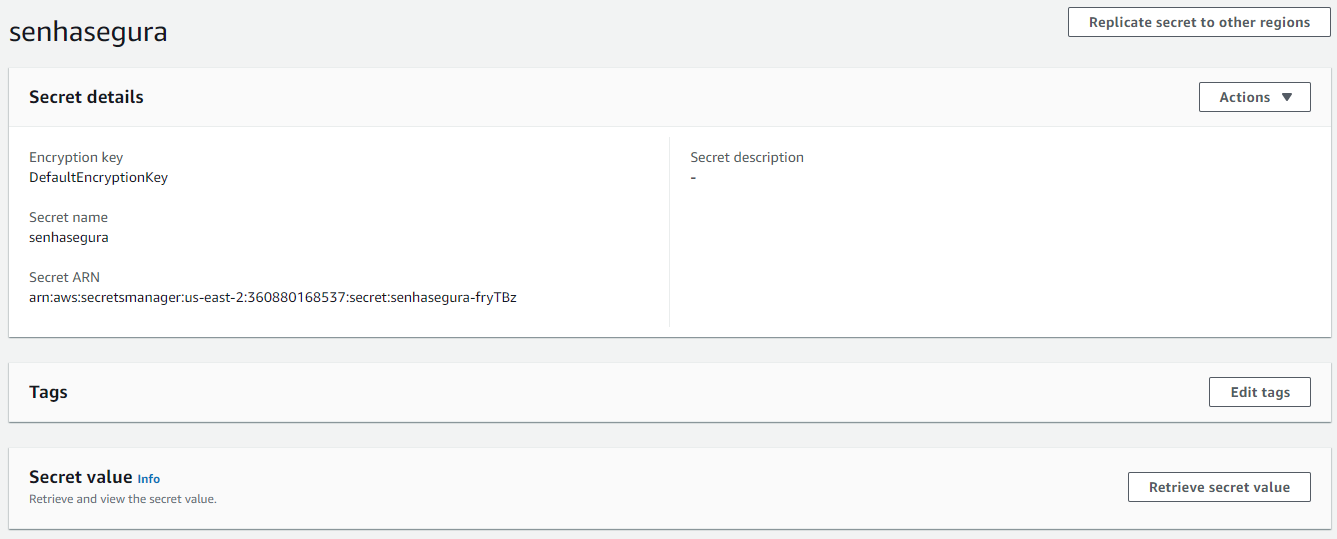
On the Action tab, select the AWS Secret Manager - Inject Secret template to inject and rotate secrets. After running, access the AWS management console, look for the Secret Manager service. In the list of secrets, click on the one created by senhasegura to view its details, as in the example below:
Google Secret Manager
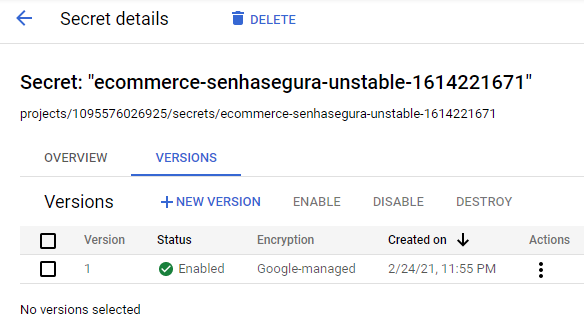
On the Action tab, select the Google Secret Manager - Inject Secret template to inject and rotate secrets. After execution, access the Google Cloud console, select the project in the top selection bar, in the side menu access Security ➔ Secret Manager. In the list of secrets, click on the one created by senhasegura view its details, as in the example below:
Kubernetes
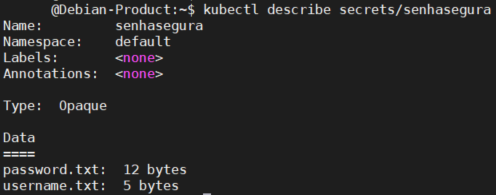
On the Action tab, select the Kubernetes - Inject Secret template to inject and rotate secrets. After execution, access the Kubernetes cluster where the secret was created and view the secret with the command kubectl describe secrets/[secret_name], as in the example below:
Dynamic Just in Time (JIT) secret provisioning
To grant a high security level into elastic cloud Environment, the senhasegura DSM allows JIT automatic secrets provisioning and deprovisioning into cloud providers, environments and systems. This scenario is normally used at ephemeral and dynamics environments, where there is JIT secrets creation.
Configure dynamic access keys provisioning into Cloud Providers
Access keys are credentials used by applications and scripts to access services from cloud providers such as AWS, Azure, Google Cloud and others.
senhasegura DSM allows dynamic provisioning of access keys at major providers such as AWS, Azure and Google Cloud through provisioning profiles.
To create a dynamic provisioning profile, access the menu: Cloud ➔ Cloud IAM ➔ Dynamic provisioning ➔ Profile.
Click at Add profile button at report actions;
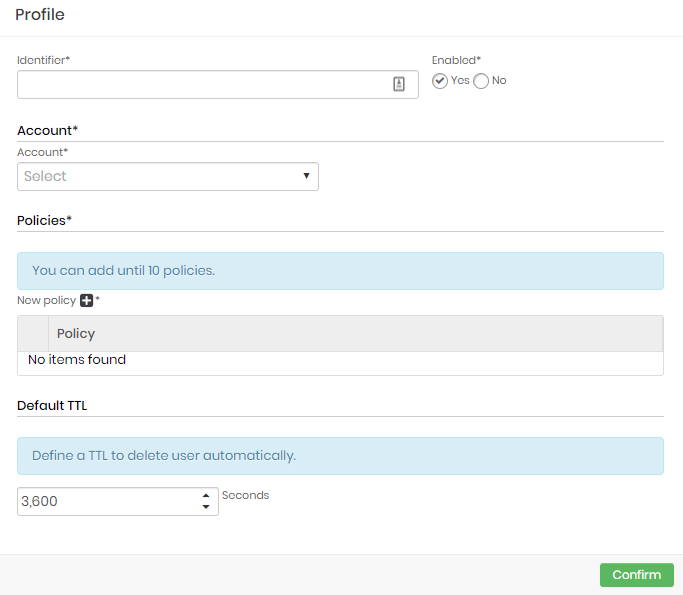
Fill the following fields;
Identifier: Enter an identifier to identify this profile into reports. User names will be composed using this identifier plus a time-based string;
Enabled: Flag if this profile is enabled for use or not;
Account: Set up a provider account where the users and access keys will be created;
Policies: Set up which policies this user will receive when created;
Default TTL: Configure the user life-time. After this time the user will be automatically removed from the cloud provider;
Click at Confirm button to finish;
After creating the dynamic provisioning profile for access keys, relate it to an application into DSM ➔ Applications ➔ Applications menu. Check out the dsm-create-automation section of this manual for more details.
Configure dynamic credential provisioning
senhasegura DSM allows dynamic credentials provisioning into many systems and devices such as databases vendors, such as MySQL, Oracle and SQL server, Linux and Windows servers and other technologies.
Access the Dynamic provisioning report at PAM ➔ Dynamic provisioning ➔ Profile menu.
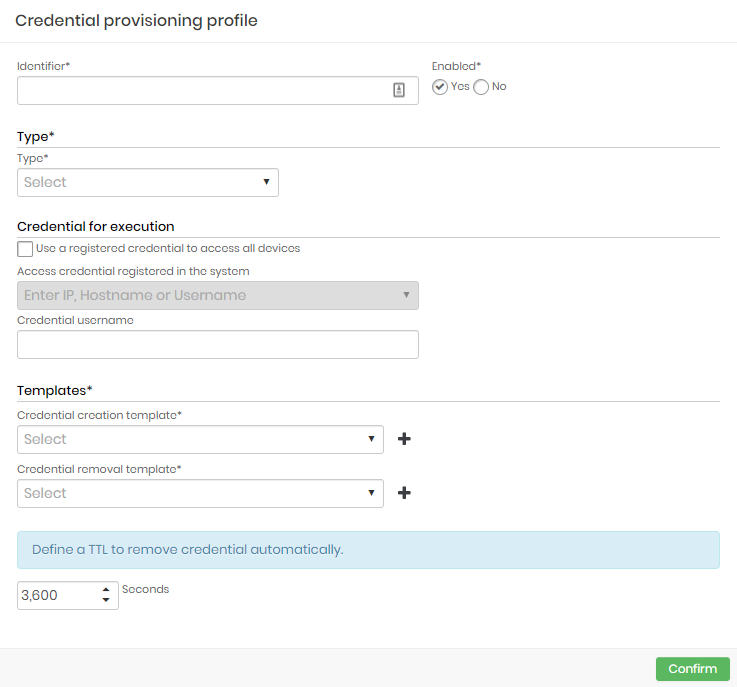
Click at the report action Add profile button;
Fill the following fields:
Identifier: Enter an identifier used to identify this profile into reports;
Enabled: Flag if this profile is enabled for use or not;
Type: Type of profile that represents the target device. There is only predefined options:
Linux;
MySQL;
Oracle;
SQL Server;
Windows;
Credential for execution: Define which credential should be used to connect to the devices where the profile will run;
Templates: These are the templates for the selected Type. It has the execution rules for some actions. Select from the options:
Credential creation;
Exclusion of the credential;
TTL: Define the credential lifetime. After the end of this period, it will be automatically deleted by senhasegura at the destination;
Click at Confirm button to finish;
After creating the dynamic credential provisioning profile, relate it to an application in DSM ➔ Applications ➔ Applications menu, editing an existing one or creating a new one. Visit the dsm-create-automation section of this manual to learn more details.
DevOps artifact discovery
In senhasegura , the security and DevOps teams can count on a powerful discovery tool. It is possible to discover various artifacts of an environment, such as Containers, Roles, Users and Secrets in tools such as Ansible, Jenkins and Kubernetes.
Docker Containers
Docker is a technology that allows developers to package, deliver and run applications in lightweight, self-contained Linux containers.
Configuring Docker Containers discovery
To configure a container discovery, access the Discovery ➔ Settings ➔ Discovery menu.
Click on the action button of the New;
Click on the option Containers;
Fill in the following fields:
Name: Fill in the discovery name for identification in the senhasegura in reports;
Container host: Enter the controller IP or device name. This is the device where the containers are hosted. All registered container hostnames will be listed;
Enabled: Set whether this discovery configuration will be active for use;
At Connection tab, fill the following fields:
- Access credential: Select the credential that will be used for authentication on the host;
At Containers tab, fill the following fields:
- Search only running containers: Define whether to fetch all containers or just those that are currently running;
At Plugins tab, define the plugins and ports that will be used in the discovery process. The plugins have the intelligence to place a connection with the devices and make discoveries. Some of the plugins options for this type of discovery are:
Unix/Linux;
Windows;
At Execution tab, set the discovery frequency:
Keep scan active after import?: Define whether the discovery should continue to run after discovering and importing the containers;
Days allowed for execution: Which days of the week the discovery will be performed;
Periods allowed for execution: Periods of the day when discovery will run with the following time intervals:
8:00 AM - 12:00 PM;
12:00 PM - 4:00 PM;
4:00 PM - 8:00 PM;
8:00 PM - 12:00 AM;
12:00 AM - 4:00 AM;
4:00 AM - 8:00 AM;
Minimum interval between runs: Select the time interval between executions;
Click on the Save button to finish;
View Docker containers info
To view the container information found in Discoveries, go to Discovery ➔ Devops ➔ Containers menu.
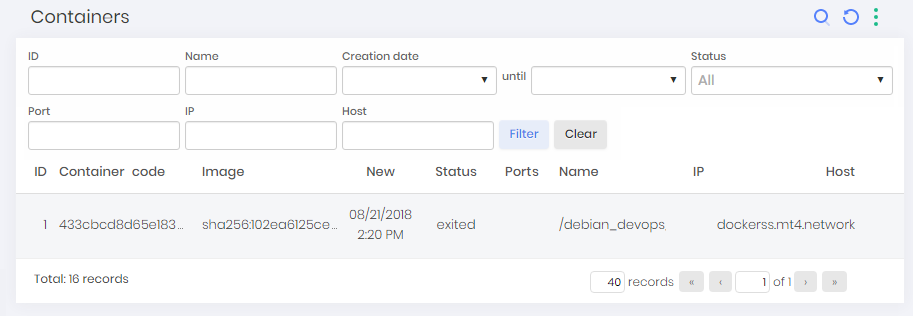
Into this screen, you can view discovered containers data. With information such as code, image, creation, status, IP and host.
Kubernetes and OpenShift
Kubernetes is a container orchestrator that has many ways to share information between your active containers. To abstract the technology on which the target application was built, Kubernetes recommends using system variables and the file system, which can be shared or not, to provide the sensitive data the application needs to perform its tasks.
Configuring Kubernetes and OpenShift secret discovery
To set up a secret discovery in Kubernetes and OpenShift, it is necessary to have a credential registered in the senhasegura PAM with a cluster API access token with permission to list and query secrets. To generate the token, follow the instructions described in the section dsm-token-kubernetes of this manual.
To set up a secret discovery in Kubernetes, access the menu: Discovery ➔ Settings ➔ Discovery.
Click on the New button;
In the window that appears, click on Device option;
In the window that opens, fill in the following fields:
Name: It will be the name of the discovery registered for identification in the senhasegura reports;
Initial IP: Will be the starting IP address of the Kubernetes cluster. Device where the secrets are hosted;
Final IP: Will be the final IP address of the Kubernetes cluster. Device where the secrets are hosted;
Enabled: Indicates whether discovery is active for use or not;
In the tab Searches, check the option Find DevOps artifacts so that the DevOps tab is displayed;
In the tab DevOps, fill in the following fields:
Enable Kubernetes service: Enables the Kubernetes discovery execution;
Search secrets: Enables searching for non-Kubernetes secrets;
Bearer token: Enables the use of a Kubernetes bearer token for authentication and secret query. Select the credential that has the authentication token in Kubernetes;
Access port: Access port to the Kubernetes API. By default, the secure connection port is 6443, however, it can be changed by the administrator;
In the Plugins tab, set up the plugins that will be used in discovery and the ports that will be used. The plugins have the necessary intelligence to make the connection with the devices and make discoveries. Some of the plugins options for this type of discovery are:
Unix/Linux;
Windows;
In the Execution tab, set up the frequency of discovery The options are:
Keep scan active after import?: Defines whether the discovery will continue to run, even after discovering and importing the containers;
Days allowed for execution: Defines the days of the week that the discovery will run on;
Periods allowed for execution: Defines the period of the day when the discovery will run with the following time bands:
8:00 AM - 12:00 PM;
12:00 PM - 4:00 PM;
4:00 PM - 8:00 PM;
8:00 PM - 12:00 AM;
12:00 AM - 4:00 AM;
4:00 AM - 8:00 AM;
Minimum interval between runs: Interval of hours between one execution and another;
Click on the Save button to finish;
Generate bearer token on Kubernetes or OpenShift
Bearer token is a Schema for HTTP authentication. It identifies resources protected by OAuth 2.0. Kubernetes provides some authentication methods and one of them is through tokens. To generate a Bearer token in Kubernetes or OpenShift, follow these steps:
Access the server where Kubernetes or OpenShift is running, via terminal;
Apply the policy to allow access to Kubernetes or OpenShift resources. Below is an example of a policy that allows you to read and list secrets:
kubectl apply -f - <<EOF
---
apiVersion: v1
kind: ServiceAccount
metadata:
  name: senhasegura-discovery
  namespace: kube-system
---
apiVersion: rbac.authorization.k8s.io/v1
kind: ClusterRole
metadata:
  name: senhasegura-discovery
rules:
- apiGroups:
  - ""
  resources:
  - secrets
  verbs:
  - get
  - list
---
kind: ClusterRoleBinding
apiVersion: rbac.authorization.k8s.io/v1
metadata:
  name: senhasegura-discovery
subjects:
- kind: ServiceAccount
  name: senhasegura-discovery
  namespace: kube-system
roleRef:
  kind: ClusterRole
  name: senhasegura-discovery
  apiGroup: rbac.authorization.k8s.io
EOF
After applying the policy, export the Token to a variable in your terminal with the command below:
export K8S_TOKEN=$(kubectl get secrets/$(kubectl get serviceaccount/senhasegura-discovery -n kube-system -o jsonpath='{.secrets[0].name}') -n kube-system -o jsonpath='{.data.token}' | base64 -d)Echo the token in the terminal and copy it:
echo $K8S_TOKENCreate a credential into senhasegura PAM and enter the token in the password field;
Registering the credential
After executing the commands and get the token, it is necessary to associate it with a credential to access the Kubernetes server.
Access the PAM ➔ Credentials ➔ All menu click the report's action button to create a new credential.
Enter the credential username;
Set up the Password type;
Into the field Device select the Kubernetes server;
Click at Set current password and fill the field Password with the generated token;
Click at Save button;
Request Kubernetes or OpenShift secrets
Access the menu Discovery ➔ DevOps ➔ Kubernetes ➔ Secrets. This screen will display the list of Secrets found during the discovery. Click the action button for more information about the Secret.
Ansible
Ansible is an open-source software provisioning, configuration management, and application-deployment tool enabling infrastructure as code. It runs on many Unix-like systems, and can configure both Unix-like systems as well as Microsoft Windows.
Configuring playbook, roles and host discovery on Ansible
To set up an discovery of Ansible playbooks, roles and hosts, access the menu Discovery ➔ Settings ➔ Discovery.
Click the report's action button New;
In the window that appears, click on the option Device;
In the window that opens, fill in the following fields:
Name: It will be the name of the discovery registered for identification in the senhasegura reports;
Initial IP: It will be the starting IP address of the devices where Ansible is running;
Final IP: It will be the final IP address of the devices where Ansible is running;
Enabled: Indicates whether discovery is active or not;
At Searches tab, check the Find DevOps artifacts option. A tab named DevOps will be displayed;
At DevOps tab, fill in the following fields:
Enable Ansible service: Enables the Ansible discovery execution;
Search playbooks: Enables playbooks discovery;
Search roles: Enables roles discovery;
Search hosts: Enable host discovery;
At Plugins tab, define the plugins and ports that will be used in the discovery. The plugins have an intelligence to establish connection with the devices and make discoveries. Some of the plugins options for this type of discovery are:
Unix/Linux;
Windows;
At Execution tab, set the discovery frequency. The options are:
Keep scan active after import?: Defines whether the discovery will continue to run, even after discovering and importing the containers;
Days allowed for execution: Defines the days of the week that the discovery will run on;
Periods allowed for execution: Defines the period of the day when the discovery will run with the following time bands:
8:00 AM - 12:00 PM;
12:00 PM - 4:00 PM;
4:00 PM - 8:00 PM;
8:00 PM - 12:00 AM;
12:00 AM - 4:00 AM;
4:00 AM - 8:00 AM;
Minimum interval between runs: Hour interval between one execution and another;
Click on Save button to finish;
View Ansible playbooks and hosts
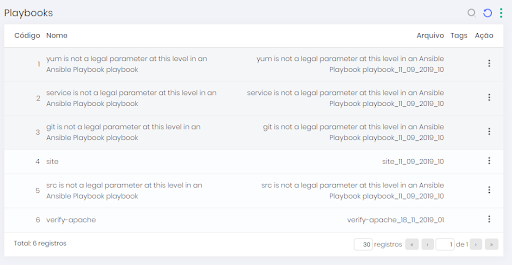
To view information on found playbooks and hosts, go to Discovery ➔ DevOps ➔ Ansible ➔ Playbooks menu.
On this screen, you can view the found playbooks. You can also view the tasks in a playbook by clicking the Tasks button or your hosts by clicking the Hosts button.
View Ansible roles
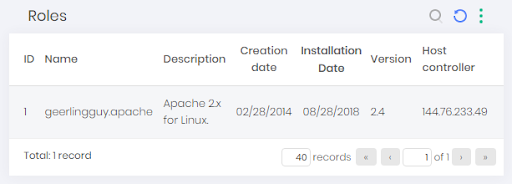
To see information about roles found, go to Discovery ➔ DevOps ➔ Ansible ➔ Roles menu.
Jenkins
Jenkins is a free and open source automation server. It helps automate the parts of software development related to building, testing, and deploying, facilitating continuous integration and continuous delivery. It is a server-based system that runs in servlet containers such as Apache Tomcat.
Configure Jenkins job, node and user discovery
Before starting, there must be a credential registered in the senhasegura PAM with a token to access the Jenkins API. To generate the token, follow the instructions described in the dsm-jenkins-token section of this manual.
To configure a discovery of Jenkins jobs, nodes and users, access the menu: Discovery ➔ Settings ➔ Discovery.
Click the report's action button New;
In the window that appears, click on the option Device;
In the window that opens, fill in the following fields:
Name: It will be the name of the discovery registered for identification in the senhasegura reports;
Initial IP: It will be the starting IP address of the devices where Jenkins is running;
Final IP: It will be the final IP address of the devices where Jenkins is running;
Enabled: Indicates whether discovery is active or not;
At Searches tab, check the Find DevOps artifacts option. A tab named DevOps will be displayed;
At DevOps tab, fill in the following fields:
Enable Jenkins service: Enables the execution of discovery in Jenkins;
Search jobs: Enable job search;
Search nodes: Enables searching for nodes;
Search users: Enables search for users;
Jenkins' access token: Select a credential with the Jenkins access token;
Access port: Jenkins API access port;
At Plugins tab, define the plugins and ports that will be used in the discovery. The plugins have an intelligence to establish connection with the devices and make discoveries. Some of the plugins options for this type of discovery are:
Unix/Linux;
Windows;
At Execution tab, set the discovery frequency. The options are:
Keep scan active after import?: Defines whether the discovery will continue to run, even after discovering and importing the containers;
Days allowed for execution: Defines the days of the week that the discovery will run on;
Periods allowed for execution: Defines the period of the day when the discovery will run with the following time bands:
8:00 AM - 12:00 PM;
12:00 PM - 4:00 PM;
4:00 PM - 8:00 PM;
8:00 PM - 12:00 AM;
12:00 AM - 4:00 AM;
4:00 AM - 8:00 AM;
Minimum interval between runs: Hour interval between one execution and another;
Click on Save button to finish;
Jenkins Token Generation
Tokens allow applications and scripts to interact with Jenkins artifacts through APIs. To generate a token in Jenkins, follow these steps:
Access the Jenkins user interface with the user for whom you want to generate the token;
In the upper right corner, click on the user name and select the Configure option;
In the API Token session, click on the Add new Token button;
Enter a name for this token, for example,
secure-discovery-passwordsand click on Generate;Copy the generated Token value;
Create a credential in the senhasegura PAM module and enter the token in the password field;
Registering the credential
After executing the commands and with the generated token, it is necessary to associate it with an access credential to the Jenkins server.
Access the PAM ➔ Credentials ➔ All menu and click the report's action button to create a new credential.
Enter the credential username;
Set the Password type;
Into the Device field and select the Jenkins server;
Check the Set current password checkbox and insert the generated token into the Password field;
Click at Save button to finish;
View Jenkins jobs
To see information about jobs found, go to: Discovery ➔ DevOps ➔ Jenkins ➔ Jobs;

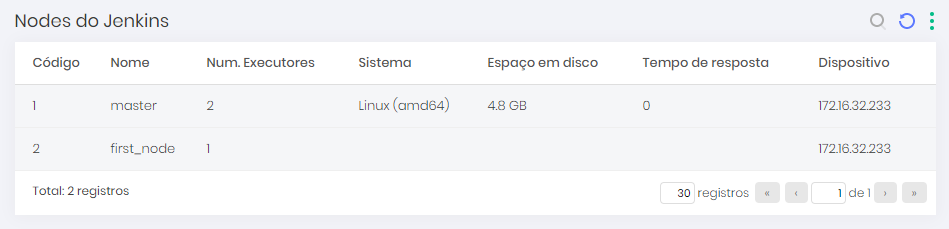
View Jenkins nodes
To see information about nodes found, go to: Discovery ➔ DevOps ➔ Jenkins ➔ Nodes;
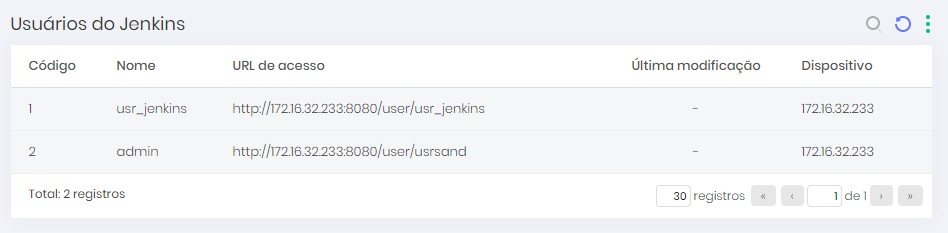
View Jenkins users
To see information about users found, go to: Discovery ➔ DevOps ➔ Jenkins ➔ Users;
Plugins
As a complete DevOps solution, senhasegura DSM has a respected library of plug-ins to help developers and the security team achieve the highest security with the least possible effort.
senhasegura DSM has several plugins and integrations, some of which are:
Kubernetes and OpenShift;
GitLab;
GitHub;
Jenkins;
Azure DevOps;
and others;
Ask the support team for the complete list and the user manual for each of the available plugins.
Kubernetes and OpenShift
Kubernetes is a container orchestrator that has several ways of sharing information between its active containers. To abstract the technology on which the target application was built, Kubernetes recommends the use of system variables and the file system, which can be shared or not, to provide the sensitive data that the application needs to perform its tasks.
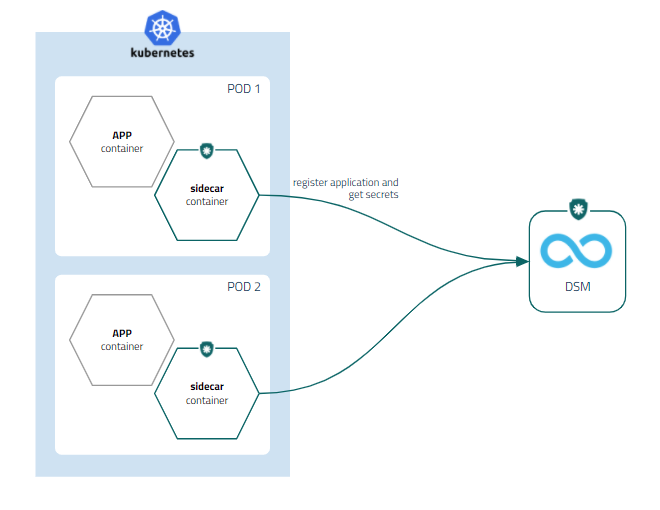
senhasegura Sidecar
Using a sidecar container model, Kubernetes provides more comprehensive resource sharing within a Pod. This sharing not only allows information isolation only for containers residing in the Pod, but gives you more possibilities for development, customization and integration.
This is possible due to Kubernetes' own architecture that allows sidecar to query the identity of the requester directly to the Orchestrator, taking into account their Namespace, Deploy, Pod and Container. Preventing the application from attempting to mask its identity and ensuring that only credentials belonging to this identifier block are made available to the requester.
senhasegura DSM uses this Kubernetes feature to deliver a container that hosts a simplified senhasegura DSM WebService client application. This application normalizes access to senhasegura and allows existing applications not to be redone to access shared information.
Dynamic Kubernetes secrets injection with senhasegura Sidecar
With the senhasegura Sidecar plugin it is possible for an application inside a container to consume secrets managed by senhasegura DSM without the need to develop direct integration.
senhasegura Sidecar will fetch the secret during the creation of a new Application Pod and will update it whenever its TTL expires.
To configure the senhasegura Sidecar plugin it is necessary to have Client ID and Client Secret for authentication via API. To generate the access keys, follow the steps described in the sections dsm-register-auth and dsm-view-auth sections.
To configure the senhasegura Sidecar , follow the steps below:
Create a Kubernetes secret with the following content and authentication information into senhasegura DSM ;
apiVersion: v1
kind: Secret
metadata:
    name: senhasegura-authentication-parameters
stringData:
    SENHASEGURA_CLIENT_ID: <senhasegura Client ID>
    SENHASEGURA_CLIENT_SECRET: <senhasegura Client Secret>
    SENHASEGURA_URL: <senhasegura IP or host>
    SENHASEGURA_APPLICATION_NAME: <application name>
    SENHASEGURA_APPLICATION_ENVIRONMENT: <application environment>
Update the deployment file adding the senhasegura Sidecar configurations or create a new configuration for a new application, as you can see bellow:
apiVersion: apps/v1
kind: Deployment
metadata:
  name: <application name>
  labels:
    app: <application name>
spec:
  replicas: 1
  selector:
    matchLabels:
      app: <application name>
  template:
    metadata:
      labels:
        app: <application name>
    spec:
      volumes:
      - name: senhasegura-secrets
        emptyDir: {}
      - name: senhasegura-authentication-parameters
        secret:
          secretName: senhasegura-authentication-parameters

      imagePullSecrets:
        - name: registry-mt4

      containers:
      - image: busybox
        name: busybox
        command: ['sh', '-c', 'echo Container 1 is Running ; sleep 3600']

        volumeMounts:
        - name: senhasegura-secrets
          mountPath: /var/run/secrets/senhasegura/
      initContainers:
      - image: <senhasegura Sidecar binary address>
        name: senhasegura-secrets-provider

        volumeMounts:
        - name: senhasegura-secrets
          mountPath: /var/run/secrets/senhasegura/
          readOnly: false

        - name: senhasegura-authentication-parameters
          mountPath: /etc/senhasegura
          readOnly: true

        env:
          - name: SENHASEGURA_EXECUTION_TYPE
            value: sidecar
```
Building container image;
cd src
docker build . --tag senhasegura/sidecar:<version >
Send container image for your docker registry or import manually on nodes;
Once configured, just execute the application deploy and validate the deploy:
kubectl get pods

NAME                                READY   STATUS   RESTARTS   AGE
demo-application-57f8b89bdf-22csj   2/2     Running  0          27m
The secrets will be placed at the shared directory on the Pod where the application and the senhasegura Sidecar is running. This directory is /var/run/secrets/senhasegura/<application_name>.
Dynamic injection of senhasegura authorization in Kubernetes with senhasegura Sidecar
With the senhasegura Sidecar plugin is possible that an application running inside a container query access authorizations to senhasegura DSM without development of any additional tool.
The senhasegura Sidecar will provide an authorization and receive the API keys so that the application can query the secrets managed by senhasegura DSM .
To configure the senhasegura Sidecar , follow the steps below:
Register an application in senhasegura DSM with the OAuth 2.0 authentication method. To do this, follow the steps described in the dsm-register-app section of this manual;
Register an authorization and write down the Client ID and Client Secret data. Follow the instructions described in the dsm-register-auth and dsm-view-auth sections of this manual;
Create a Kubernetes secret with the following content and the senhasegura DSM authentication information:
apiVersion: v1
kind: Secret
metadata:
  name: senhasegura-authentication-parameters
stringData:
  SENHASEGURA_CLIENT_ID: <senhasegura Client ID>
  SENHASEGURA_CLIENT_SECRET: <senhasegura Client Secret>
  SENHASEGURA_URL: <senhasegura IP or host>
  SENHASEGURA_APPLICATION_NAME: <application name>
  SENHASEGURA_APPLICATION_ENVIRONMENT: <application environment>
Update your deployment configuration file adding the senhasegura initContainer settings, or create a new one as the example bellow:
apiVersion: apps/v1
kind: Deployment
metadata:
  name: <application name>
  labels:
    app: <application name>
spec:
  replicas: 1
  selector:
    matchLabels:
      app: <application name>
  template:
    metadata:
      labels:
        app: <application name>
    spec:
      volumes:
      - name: senhasegura-secrets
        emptyDir: {}
      - name: senhasegura-authentication-parameters
        secret:
          secretName: senhasegura-authentication-parameters

      imagePullSecrets:
        - name: registry-mt4

      containers:
      - image: busybox
        name: busybox
        command: ['sh', '-c', 'echo Container 1 is Running ; sleep 3600']

        volumeMounts:
        - name: senhasegura-secrets
          mountPath: /var/run/secrets/senhasegura/
      initContainers:
      - image: <senhasegura Sidecar binary address>
        name: senhasegura-secrets-provider

        volumeMounts:
        - name: senhasegura-secrets
          mountPath: /var/run/secrets/senhasegura/
          readOnly: false

        - name: senhasegura-authentication-parameters
          mountPath: /etc/senhasegura
          readOnly: true

        env:
          - name: SENHASEGURA_EXECUTION_TYPE
            value: iso
```
Building container image:
cd src
docker build . --tag senhasegura/sidecar:<version>
Send container image for your docker registry or import manually on nodes;
After configured you can execute the application deploy;
Validating the deploy:
kubectl get pods

NAME                                READY   STATUS   RESTARTS   AGE
demo-application-57f8b89bdf-22csj   2/2     Running  0          27m
The authorizations will be added to the Pod shared directory, where the application and the senhasegura Sidecar is running.
The directory path is:
/var/run/secrets/senhasegura/<application_name>.
Jenkins
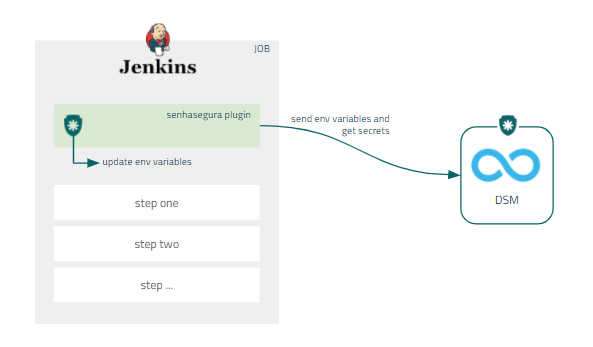
The Jenkins allows environment variables to be set within the execution of jobs. It also allows safe storage of values that can be used within these same pipelines without exposure. The administrator's challenge is ensuring that these same variables are automatically rotated.
Through Jenkins' native architecture, senhasegura enables variables to be set at pipeline runtime through our Jenkins plugin.
In addition, to ensure better governance for administrators, all variables that are available in the Job environment will be sent to senhasegura DSM .
Installing Jenkins plugin
To install the senhasegura Jenkins plugin, using the .hpi plugin file, follow the steps bellow:
Access your Jenkins account;
On the home page, click on the Manage Jenkins option on the side menu;
Click on the option Manage Plugins;
On the Advanced tab, select the plugin file on your computer;
Click the Upload button;
To finish the installation, restart Jenkins;
Secret injection in Jenkins pipelines
To configure the senhasegura Jenkins plugin you need to have a Client ID and Client Secret for authentication via API. To generate the access keys, follow the steps described dsm-register-auth and dsm-view-auth sections of this manual.
To configure the plugin, follow these steps:
Access your Jenkins account;
Create an Job or select an existing one;
In the side menu, click on the option Configure;
Scroll down to the Build Environment session and activate the use of the senhasegura DSM Plugin;
In the senhasegura URL field, enter the senhasegura instance IP or hostname;
Click on Add button to create a new credential;
At the opened window, select the senhasegura Auth Credential option into Kind field;
Fill the fields Client ID, Client Secret and Description and click at Add button;
Finally, in the senhasegura Auth Credential field, select a credential to be injected;
GitLab CI/CD
GitLab CI/CD is a tool built into GitLab platform for software development through the continuous methodologies:
Continuous Integration (CI);
Continuous Delivery (CD);
Continuous Deployment (CD);
Continuous Integration works by pushing small code chunks to your application's codebase hosted in a Git repository, and to every push, run a pipeline of scripts to build, test, and validate the code changes before merging them into the main branch.
Continuous Delivery and Deployment consist of a step further CI, deploying your application to production at every push to the default branch of the repository.
These methodologies allow you to catch bugs and errors early in the development cycle, ensuring that all the code deployed to production complies with the code standards you established for your app.

Installing GitLab plugin
Ask our support team for to receive the senhasegura GitLab plugin download link.
To install the senhasegura GitLab plugin, follow these steps:
Access a project in your GitLab account;
Add the binary and
senhasegura-mapping.jsonfile into the project repository;infoThe
senhasegura-mapping.jsonfile can be used to report the senhasegura DSM which variables should be faced as secret.Edit the
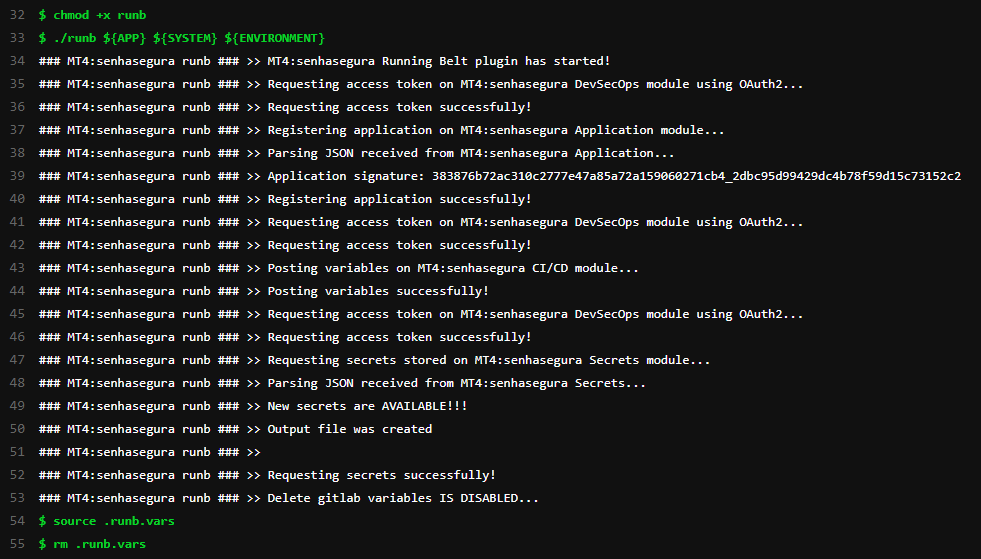
.gitlab-ci.ymlfile in your project folder;At the
before_scriptsection, add the following code:chmod +x senhasegura`\newline` ./senhasegura ${APP} ${SYSTEM} ${ENVIRONMENT}`\newline` source .runb.vars`\newline` rm .runb.varsSave the config file;
Access the senhasegura menu Settings ➔ CI/CD ➔ Variables;
Register the variables APP, ENVIRONMENT e SYSTEM;
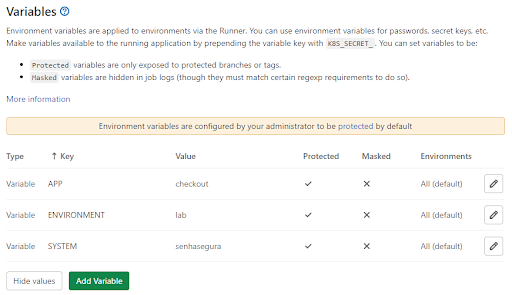
GitLab variables infoThe variables
APP,ENVIRONMENTandSYSTEMwill be used to identify and report to senhasegura DSM , what is the application and in which environment and system it will be running.Execute the GitLab pipeline to finish;
Secret injection in GitLab pipelines
After installing the plugin in the project, follow the steps to inject the secrets into your pipeline:
Access the senhasegura menu CI/CD ➔ Pipelines;
Click at Run Pipeline button;
Into the next step, click at Run Pipeline;
Then click at Deploy button to display the execution result;
GitHub
GitHub is a platform for hosting source code and versioned files using Git.It allows programmers, utilities or any registered user on the platform to contribute on private or Open Source projects from anywhere in the world.
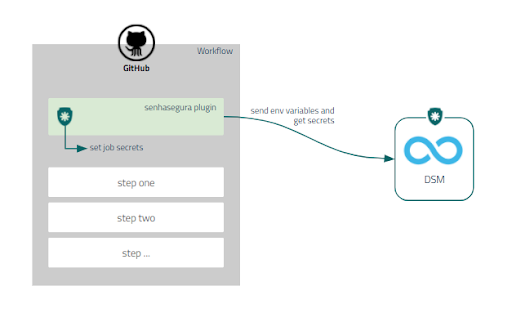
Through GitHub Actions it is possible to automate, customize and execute software development workflows directly in the repository.
With the senhasegura GitHub, it is possible to intercept all the environment variables and inject the secrets directly into the pipelines during the automation execution step without the need to expose the secrets.
Installing GitHub plugin
To install the senhasegura GitHub plugin you need a Client ID and a Client Secret for API authentication. To create an access key, follow the steps described dsm-register-auth and dsm-view-auth sections of this manual.
Access a project in your GitHub account;
Add the binary and the
senhasegura-mapping.jsonfile into the project repository;infoThe
senhasegura-mapping.jsoncan be used to report the senhasegura DSM which variable should be registered as secrets.Edit the
cicd.ymlconfig file, located at<project_name>/.github/workflows/into your project directory;At section jobs ➔ build ➔ steps, add the following source code:
- name: senhasegura
  env:
    APP: ${{ secrets.APP }}
    SYSTEM: ${{ secrets.SYSTEM }}
    ENVIRONMENT: ${{ secrets.ENVIRONMENT }}
    SENHASEGURA_URL: ${{ secrets.SENHASEGURA_URL }}
    SENHASEGURA_CLIENT_ID: ${{ secrets.SENHASEGURA_CLIENT_ID }}
    SENHASEGURA_CLIENT_SECRET: ${{ secrets.SENHASEGURA_CLIENT_SECRET }}
  run: |
    chmod +x senhasegura
    ./senhasegura $APP $SYSTEM $ENVIRONMENT
    source .runb.vars
    rm .runb.vars
Save the file;
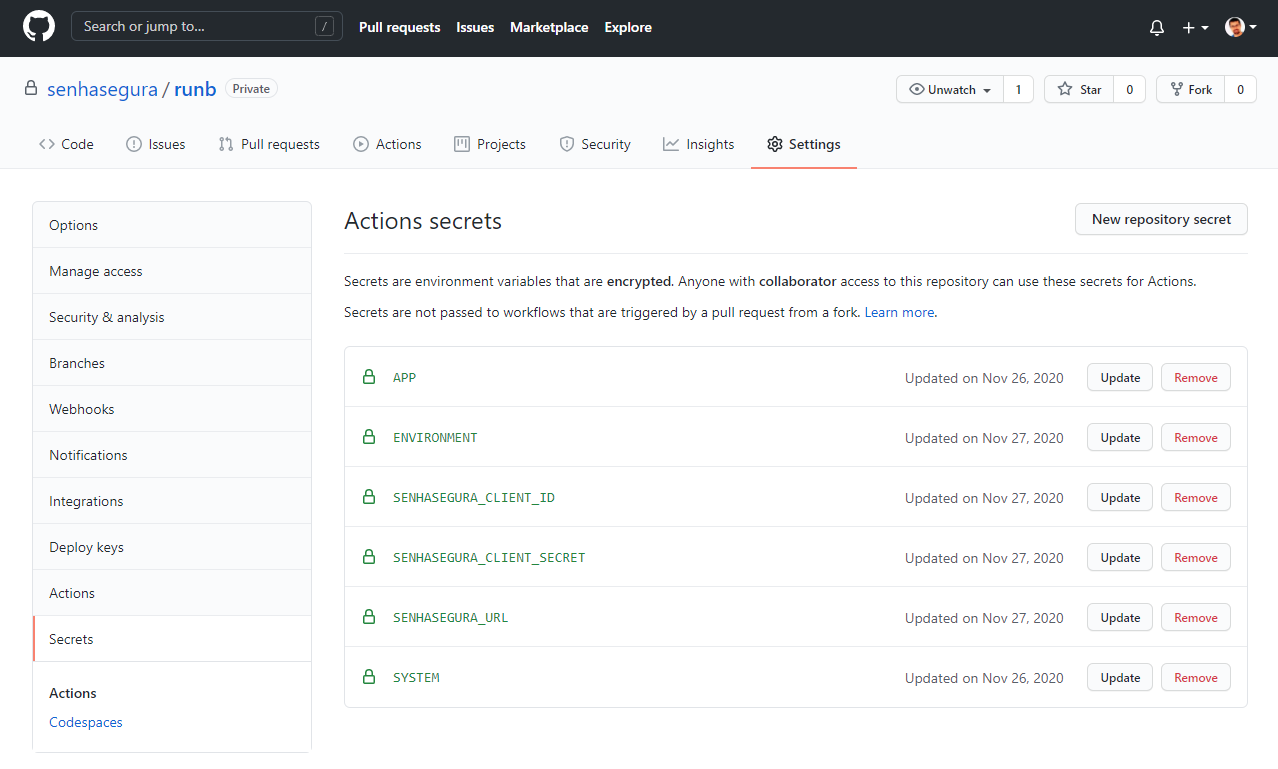
Access the senhasegura Settings ➔ Secrets menu;
Register the following variables: APP, ENVIRONMENT, SYSTEM, SENHASEGURA_URL, SENHASEGURA_CLIENT_ID and SENHASEGURA_CLIENT_SECRET;
At the end, execute the GitHub workflow;
The variables APP, ENVIRONMENT and SYSTEM are used into senhasegura DSM to identify which application is running and which is its environment and system.
GitHub pipeline' secrets injection
After installing the plugin into a project, follow the steps bellow to inject secrets into pipeline:
Click the Actions menu;
Select the desired workflow;
Click at Run workflow section and into Run workflow button;
When the workflow finish its running, click at Build button to display the result;
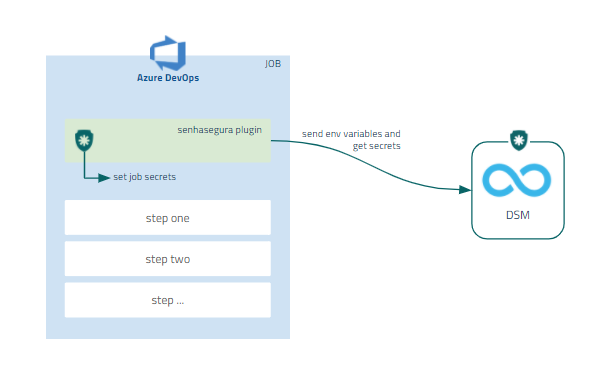
Microsoft®Azure DevOps
Microsoft®Azure Pipelines automatically builds and tests code projects to make them available to others. It works with just about any language or project type. Microsoft®Azure Pipelines combines continuous integration (CI) and continuous delivery (CD) to constantly and consistently test and build your code and ship it to any target.
With the senhasegura Azure DevOps Plugin plugin, it is possible to inject secrets in real time during the execution of a pipeline without the need to expose sensitive information.
In addition, the plugin will intercept all variables in the pipeline so that administrators can identify if there is sensitive information not managed by the solution. It also register all secrets as environment variables transparently for developers.
Installing Microsoft®Azure DevOps plugin
To install the senhasegura Azure DevOps Plugin plugin, follow these steps:
Login into a project in your Microsoft®Azure DevOps account;
Add the binary and the
senhasegura-mapping.jsonfile to the project repository;infoThe
senhasegura-mapping.jsonfile could be used to report senhasegura DSM which variables should be faced as secrets.Edit the
azure-pipelines.ymlfile, located at your project folder;Into the steps section, input the code below as an example:
- task: Bash@3
  displayName: 'senhasegura Plugin'
  inputs:
    targetType: filePath
    filePath: ./senhasegura
    arguments: '${APP} ${SYSTEM} ${ENVIRONMENT}'
  env:
    APP: <app_name>
    SYSTEM: <app_system>
    ENVIRONMENT: <app_environment>
Save it;
infoThe variables
APP,ENVIRONMENTandSYSTEMwill be used to identify and report to senhasegura DSM , what is the application and in which environment and system it will be running.Execute the pipeline;
Secrets injection into Microsoft®Azure DevOps pipelines
After installing the plugin in the target project, follow the steps to inject the secrets into your pipeline:
Follow the menu Pipelines ➔ Pipelines;
Select the pipeline and click Run Pipeline;
In the next step, click Run;
Click on the Job name to display the result;
Ansible
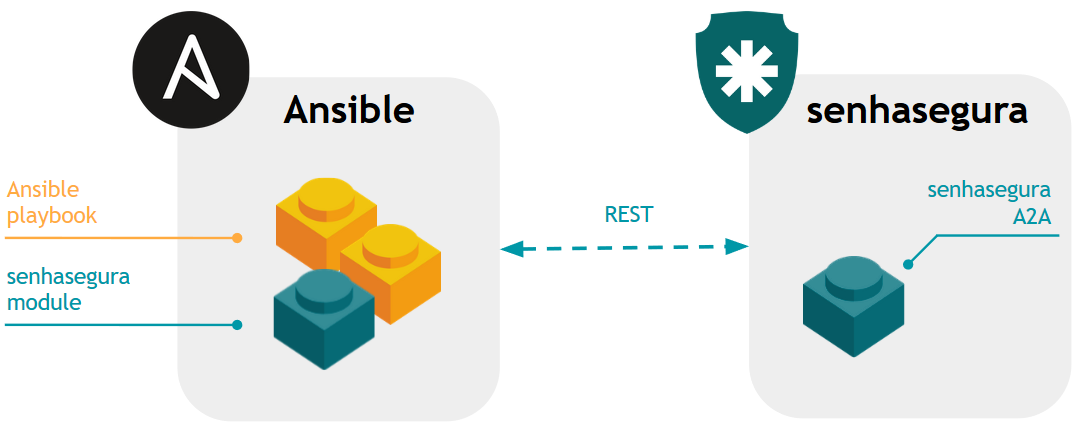
Ansible1 is a provisioning software provided by Red Hat Inc 2.
Its YAML file-based configuration model, filled with server groups and tasks to perform, allows secrets to be integrated through modules. Thus senhasegura has developed a Python module following the manufacturer's specifications so that playbooks can be designed using passwords managed by senhasegura without the need for exposure of their value.
Passwords module integration example
---
- hosts: mygroup
  tasks:
    - name: Request senhasegura credential
      senhasegura:
        api_url: "https://my.senhasegura.com.br/iso"
        consumer_key: "5cb2990b2259e068653d9ba00cbc99ca2b2361f5f"
        consumer_secret: "6c4e73f496ee2857f4692727d837d8aa"
        token: "5cd8074565bf0058653de9e6df650080cab63a279"
        token_secret: "bde3ad3a798c9aacc541e43b7a6f5e35"
        username: "ansibleapi"
        ip: "10.0.20.20"
        hostname: "cisco-asav"
      register: result

    - debug: var=sscred

    - name: Using the returned password
      shell: echo {{ sscred | hash('md5')}}
Command line module usage
ansible mygroup --module-name senhasegura -u root --ask-pass
Use of the module through playbook
ansible-playbook myplaybook.yml -u root --ask-pass
senhasegura_device module
The purpose of this module is to perform device-related tasks, for example:
Registering devices;
Inactivating a device;
Update a device;
Installation
In the
ansible.cfgconfiguration file (usually in /etc/ansible/ansible.cfg), set the directory to custom modules;[defaults]
library = /path/to/ansible/custom_modules/Create the directory for custom modules and copy the file
senhasegura_device.py;mkdir -p /path/to/ansible/custom_modules/
cp src/senhasegura_device.py /path/to/ansible/custom_moduleCheck if the module was recognized by the ansible with the command below;
ansible-doc -t module senhasegura_device
Use
After performing the module installation procedures, it will be necessary:
Export the authentication parameters in the senhasegura in environment variables;
Create the task in PlayBook that uses the
senhasegura_devicemodule;
Export the authentication parameters in the senhasegura in environment variables
Variables:
export SENHASEGURA_A2A_URL=https://senhasegura.mycorp.com
export SENHASEGURA_A2A_CONSUMER_KEY=valueHere
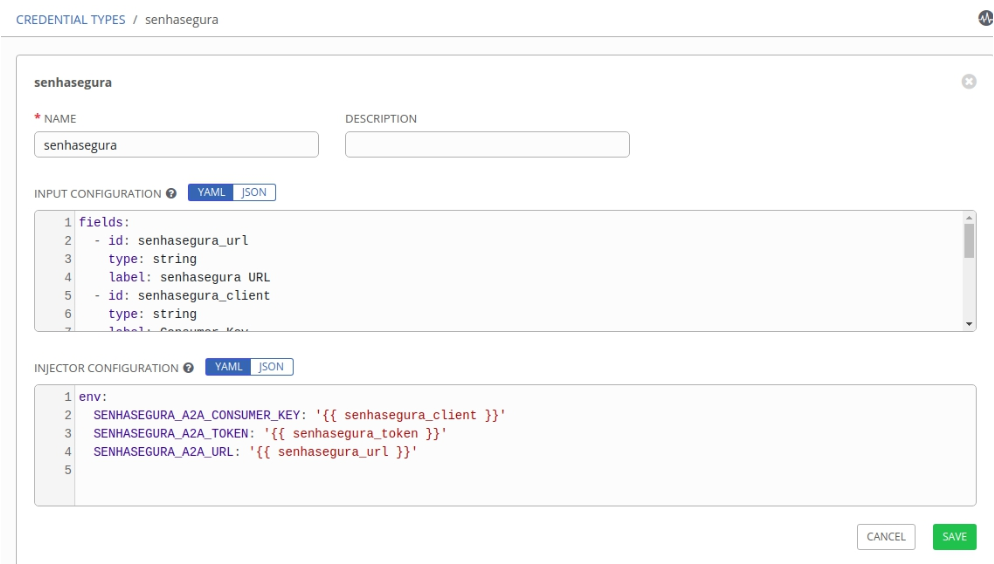
export SENHASEGURA_A2A_TOKEN=valueHereFor Ansible Tower or AWX users we recommend using a Custom Credential Type to set the authentication parameters in the passwords, as described below:
With a user who has administrative privileges, register a new Custom Credential Type in Administration ➔ Credential Types;
In the input configuration field fill in the values below;
---
fields:
    - type: string
        id: senhasegura_url
        label: senhasegura URL
    - type: string
        id: senhasegura_client
        label: Consumer Key
        secret: true
    - type: string
        id: senhasegura_token
        label: Token
        secret: true
        required:
        - senhasegura_url
        - senhasegura_client
        - senhasegura_token
In the injector configuration field fill in the values below;
---
env:
    SENHASEGURA_A2A_CONSUMER_KEY: '{{ senhasegura_client }}'
    SENHASEGURA_A2A_TOKEN: '{{ senhasegura_token }}'
    SENHASEGURA_A2A_URL: '{{ senhasegura_url }}'
Example:
Example of the use of variables Register a "senhasegura" type credential.
With a user who has administrative privileges, register a new credential in Resources ➔ Credentials;
Fill in the required values;
Create the task in PlayBook that uses the senhasegura_device module
Example:
---
- hosts: 127.0.0.1
    tasks:
        - name: "senhasegura | Create device w2012-server"
            senhasegura_device:
            state: present
            ip: "10.0.0.30"
            name: "w2012-server"
            tenant: "MT4"
            type: "Server"
            vendor: "Microsoft"
            site: "Europe-001"
            connectivity_protocol: "RDP"
            tags: ["db", "team_dev"]
        - name: "senhasegura | Disable device 'Firewall_003'"
            senhasegura_device:
            state: absent
            ip: "192.168.41.3"
            name: "Firewall_003"
            tenant: "MT4"
        - name: "senhasegura | Update device 'LB_BSD'"
            senhasegura_device:
            state: present
            ip: "172.16.0.90"
            name: "LB_BSD"
            tenant: "MT4"
            type: "Server"
            vendor: "OpenBSD"
            site: "DC003"
            connectivity_protocol: "SSH"
            connectivity_port: "2222"
Parameters supported by the module
| Parameter | Required | Options | Note |
|---|---|---|---|
| state | Yes | present, absent | Specifies the desired device status |
| ip | Yes | Necessary to be previously registered | |
| name | Yes | Necessary to be previously registered | |
| tenant | Yes | ||
| type | Just when the state == present | Cluster, Database, Domain, Firewall, Load Balancer, Router, Server, Switch, Web Application, Workstation | |
| vendor | Just when the state == present | ||
| site | Just when the state == present | ||
| connectivity_protocol | Just when the state == present | HTTP, HTTPS, LDAP, LDAPS, MySQL, Oracle, PostgreSQL, RDP, SQL Server, SSH, TDS Sybase, Telnet, VNC, Windows RM, Windows RPC, X11 Forward | |
| connectivity_port | No | ||
| tags | No |
senhasegura_credential module
The purpose of this module is to perform tasks in the senhasegura related to credentials, such as:
Register a credential;
Inactivating a credential;
Update a credential;
Installation
In the
ansible.cfgconfiguration file (usually in/etc/ansible/ansible.cfg), set the directory to custom modules;[defaults]
library = /path/to/ansible/custom_modules/Create the directory for custom modules and copy the file
senhasegura_credential.pymkdir -p /path/to/ansible/custom_modules/
cp src/senhasegura_credential.py /path/to/ansible/custom_modules/Check if the module was recognized by the ansible with the command below
ansible-doc -t module senhasegura_credential
Use
After performing the module installation procedures, it will be necessary:
Export the authentication parameters in the senhasegura in environment variables;
Create the task in PlayBook that uses the senhasegura_credential module;
Export the authentication parameters in the senhasegura in environment variables
Variables
export SENHASEGURA_A2A_URL=https://senhasegura.mycompany.com
export SENHASEGURA_A2A_CONSUMER_KEY=valueHere
export SENHASEGURA_A2A_TOKEN=valueHere
For Ansible Tower or AWX users we recommend using a Custom Credential Type to set the authentication parameters in the passwords, as described below:
With a user who has administrative privileges, register a new Custom Credential Type in Administration ➔ Credential Types;
In the input configuration field fill in the values below;
---
fields:
    - type: string
        id: senhasegura_url
        label: senhasegura URL
    - type: string
        id: senhasegura_client
        label: Consumer Key
        secret: true
    - type: string
        id: senhasegura_token
        label: Token
        secret: true
        required:
            - senhasegura_url
            - senhasegura_client
            - senhasegura_token
In the injector configuration field fill in the values below;
---
env:
    SENHASEGURA_A2A_CONSUMER_KEY: '{{ senhasegura_client }}'
    SENHASEGURA_A2A_TOKEN: '{{ senhasegura_token }}'
    SENHASEGURA_A2A_URL: '{{ senhasegura_url }}'
Example;
Example of the use of variables Register a "senhasegura" type credential.
With a user who has administrative privileges, register a new credential in Resources ➔ Credentials
Fill in the required values;
Create the task in PlayBook that uses the senhasegura_credential module
Read the
PlayBook_example.yaml file
Parameters supported by the module
| Parameter | Required | Options | Note |
|---|---|---|---|
| state | Yes | Present, absent | Specifies the desired device status |
| device_ip | Yes | Necessary to be previously registered | |
| device_hostname | Yes | Necessary to be previously registered | |
| usernmae | Yes | ||
| password | No | ||
| credential_type | Yes | ||
| tenant | Yes | ||
| domain | When credential_type is Domain User | ||
| tags | No |
senhasegura_query_credential module
This module propose is consulting a credential registered in the senhasegura , when running a PlayBook Ansible, to perform tasks such as:
Connect on a database with user ansible;
Open encrypted file;
Execute any task with privilege elevation;
Any task that needs a credential;
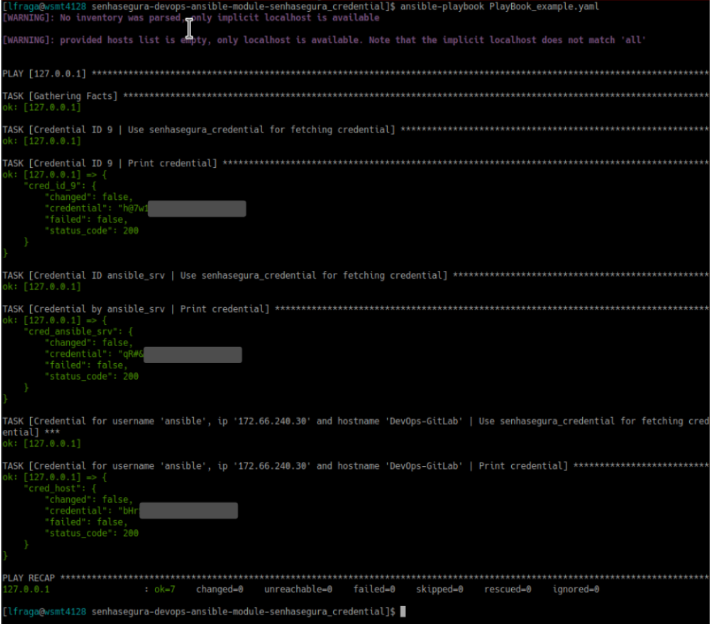
Execution example
---
- hosts: 127.0.0.1
    tasks:
        - name: "Credential ID 9 | Use senhasegura_query_credential for query credential"
            senhasegura_query_credential:
                identificator: "9"
                register: cred_id_9
        - name: "Credential ID 9 | Print credential"
            debug:
                var: cred_id_9
        - name: "Credential ID ansible_srv | Use senhasegura_query_credential for query credential"
            senhasegura_query_credential:
                identificator: "ansible_srv"
                register: cred_ansible_srv
        - name: "Credential by ansible_srv | Print credential"
            debug:
                var: cred_ansible_srv
        - name: "Credential for username 'ansible', ip '172.66.240.30' and hostname 'DevOps-GitLab' | Use senhasegura_query_credential for query credential"
            senhasegura_query_credential:
                username: ansible
                ip: 172.66.240.30
                hostname: DevOps-GitLab
                register: cred_host
        - name: "Credential for username 'ansible', ip '172.66.240.30' and hostname 'DevOps-GitLab' | Print credential"
            debug:
                var: cred_host
Installation
In the
ansible.cfgconfiguration file (usually in/etc/ansible/ansible.cfg), set the directory to custom modules:[defaults]
library = /path/to/ansible/custom_modules/Create the directory for custom modules and copy the file
src/senhasegura_query_credential.py:mkdir -p /path/to/ansible/custom_modules/
cp src/senhasegura_query_credential.py /path/to/ansible/custom_modules/Check if the module was recognized by the ansible with the command below
ansible-doc -t module senhasegura_query_credential
senhasegura dynamic inventory plugin
This plugin get credentials registered in the senhasegura with WebService A2A to authenticate to remote devices and run Ansible PlayBooks to:
Support individual credentials or usernames for each host;
Support only authentication using password, not SSH keys (yet);
Execution example
ansible-playbook --inventory senhasegura.yaml Example_playbook.yaml
Use
After performing the module installation procedures, it will be necessary:
Define WebService A2A parameters:
You can use environment variables (recommended);
Or you can set the parameter
a2a_configin the inventory file;
Populate the inventory file with the desired devices;
Run PlayBook;
Export in environment variables the authentication parameters for WebService A2A
Variables
$ export SENHASEGURA_A2A_URL=https://senhasegura.mycompany.com
$ export SENHASEGURA_A2A_CONSUMER_KEY=valueHere
$ export SENHASEGURA_A2A_TOKEN=valueHere
Populate the inventory file with the desired devices:
plugin: senhasegura
    username: dev ## Global username for all hosts
hosts:
    - hostname: DevOps-GitLab
        ip: 172.66.240.30
        username: ansible ## Override global username for this host
    - hostname: DevOps-Ansible
        ip: 172.66.240.20
    - hostname: DevOps-Kubernetes-001
        ip: 172.66.240.41
        username: root ## Override global username for this host
Running example PlayBook:
$ ansible-playbook --inventory senhasegura.yaml Example_playbook.yamlSetting the WebService A2A authentication parameters within inventory file.
You can define authentication parameters on WebService A2A within inventory file, but we recommend that you use environment variables for :
$ head -n 2 senhasegura.yaml
plugin: senhasegura
a2a_config: /path/to/a2a_parameters

$ cat /path/to/a2a_parameters
api_url: https://my.senhasegura.com.br
consumer_key: valueHere
token: valueHere
Chef is a solution for configuration automation widely used by the market. Its use is made from Cookbooks which contain the commands that need to be executed. The integration of senhasegura with Chef allows users to use the secrets managed by senhasegura DSM in Chef recipes without the need to expose them.
This integration works with Chef from version 15 and on all platforms.
Configuring Chef cookbook
To configure the senhasegura DSM cookbook in Chef, it is necessary to have Client ID and Client Secret for authentication via API. To generate the access keys, follow the steps described in the sections Register Authorization and View authorization API clients.
With the data and the Chef Cookbook in hand, follow these steps:
Upload senhasegura DSM cookbook to your Chef server;
Create a data bag with senhasegura authentication data, as the example below:
{
    "addr": "<senhasegura-url>",
    "client-id": "<senhasegura-client-id>",
    "client-secret": "<senhasegura-client-secret>"
}
Injection of secrets into Chef cookbooks
After configuring the cookbook, just insert this cookbook as a dependency on yours and consult the secrets as shown below:
dsm_secret "dsm-secret" do
  addr            dsm_auth["addr"]
  client-id       dsm_auth["client-id"]
  client-secret   dsm_auth["client-secret"]
end
After that, just run the chef-client for your cookbook to run already looking for the secret in the senhasegura DSM without it being exposed or saved in codes.
It is also possible to insert the value of the secret in a file by following this example:
file "/tmp/secret.txt" do
  sensitive true
  content lazy { node.run_state["dsm-secret"]["data"] }
  only_if { node.run_state.key?("dsm-secret") }
end
senhasegura-credential module for Puppet
This module offers a secure way for Puppet to fetch secrets from senhasegura .
Installation
Download senhasegura-credential module and install with the command below:
\## puppet module install /path/to/puppet-senhasegura-X.Y.Z.tar.gz --ignore-dependencies
Usage
The senhasegura::credential function can be called to fetch secrets from senhasegura to be used by Puppet.
By providing a credential-identifier, senhasegura::credential uses the node's identity to return the needed value.
$senhaseguracredential = senhasegura::credential(’credential-identifier’)
To inform which secrets should be retrieved, a Hiera attribute file can be defined as shown below:
file { '/opt/my_application/credential.yaml':
    content => $credential,
    ensure  => file,
    mode    => '0600',
}
The secrets values are returned in a Sensitive data type. This is necessary to avoid secrets to be mishandled.
For the secret to being used, it is required to use the unwrap function. Then the result should be wrapped in a Sensitive value.
$credential = Sensitive(”password: $senhaseguracredential.unwrap”))
Full example
class { senhasegura:
    senhasegura_endpoint => 'senhasegura.corp',
    client_id            => Sensitive('OAuth2 info'),
    client_secret        => Sensitive('OAuth2 info'),
    tenant               => 'MT4',
}

$senhaseguracredential = senhasegura::credential('credential-identifier')

$credential = Sensitive("password: ${senhaseguracredential.unwrap}")

file { '/opt/my_application/credential.yaml':
    content => $credential,
    ensure  => file,
    mode    => '0600',
}
Terraform is an infrastructure provisioning tool that allows creation, management and maintenance of resources like Virtual Machines, Containers, network switches and more.
senhasegura Provider for Terraform offers a simple way to manage secrets used to provision infrastructure resources.
The resources senhasegura Provider offers are:
senhasegura_getcredential: Query a credential;
senhasegura_credential: Create, Update or Disable a credential;
Installation
Make a directory for Terraform plugins at /.terraform.d/plugins and copy
senhasegura-provider folder.
$ mkdir -p ~/.terraform.d/plugins/
$ mv ../terraform-provider-senhasegura ~/.terraform.d/plug-ins
Usage
Create senhasegura Provider with authentication parameters
provider "senhasegura" {
    senhasegura_url = "https://senhasegura.corp"
    senhasegura_consumer_key = ""
    senhasegura_token = ""
}
Get credential with ID db_001
data "senhasegura_getcredential" "my_credential" {
    identifier = "db_001"
    tenant = "MT4"
}
Print credential
output "my_credential_out" {
    value = "${data.senhasegura_getcredential.my_credential.value}"
}
Local user credential example
resource "senhasegura_credential" "my_new_credential" {
    username = "foo"
    password = "mySuperSecretPassword"
    tenant = "MT4"
    type = "Local user"
    tags = ["foo", "bar"]

    device {
        ip = "10.0.0.10"
        hostname = "linux_10"
    }
}
Domain credential example
resource "senhasegura_credential" "my_new_domain_credential" {
    username = "bar"
    password = "myNewSuperSecretPassword"
    tenant = "MT4"
    type = "Domain user"
    domain = "corporate"

    device {
        ip = "10.0.0.20"
        hostname = "windows_20"
    }
}
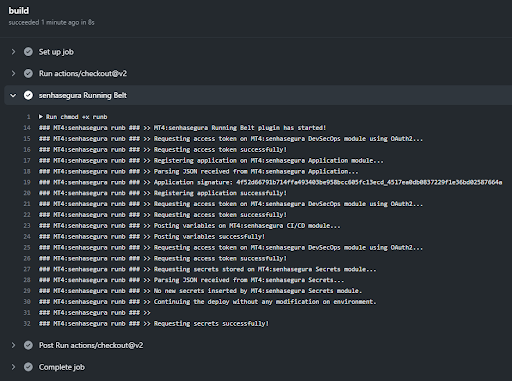
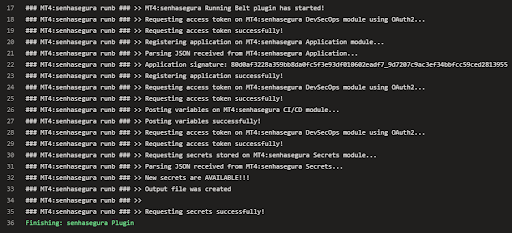
senhasegura Running Belt
senhasegura Running Belt is an agnostic plugin for intercepting environment variables and secret injection.
Using this plugin, DevOps teams have an easy visibility of applications and secrets. Providing into a secure way, secrets for applications, pipelines and environments.
Installing senhasegura Running Belt plugin
As a GO Lang binary, its installation is quite simple. Just add it into a directory of your environment or CI/CD tool and run it providing 3 attributes:
APP: the name of your application;
SYSTEM: the system where the application is installed;
ENVIRONMENT: the environment where the application is running;
Inject of secrets into environment variables using senhasegura Running Belt
When executing the plugin providing the three information APP, SYSTEM and ENVIRONMENT the plugin will collect all the environment variables and send them to senhasegura DSM . Then, it will query all the application secrets registered in senhasegura DSM and update the environment variables with the new values.
This way, developers will not have to worry about injecting secrets during pipelines, for example. They can be managed directly via API or under the senhasegura DSM interface by any developer or security team member.