Deployment and Management
Introduction
This book will explain simply the use of the senhasegura from its installation to the use of basic functions.
Who is this cookbook for?
The senhasegura Getting Started Cookbook was written to set deployers, users, and system administrators who require a first experience when using some features of the senhasegura .
Symbols used in this cookbook
This book uses the following symbols to highlight information that should be taken into account for the best use of senhasegura :
Info - useful information that can make the use of the solution more dynamic
Caution - actions and items that cannot be ignored
commands: data that must be entered in the same way as described in this book- URLs: paths to access web pages.
<KEYS>: keyboard paths that will be used to perform actions.
Deployment
How to get the OVA
To start using the solution it is necessary to purchase the virtual machine to perform the installation and other activities. The OVA of the senhasegura can be found in our support portal:
- Access the support portal through the URL: https://support.senhasegura.comand insert the access credentials granted by the deployment team.
- When accessing the portal follow the following path: Solution ➔ senhasegura Artifacts ➔ senhasegura Images;
- A list of available machines will be displayed, click on the desired machine and download.
Configuring Network Interfaces
From version 3.2 or above, senhasegura provides the user mt4adm as the maintenance and configuration user of the operating system that hosts the senhasegura .
To standardize and ensure the operation of all systems that make up the solution, we provide a command line Orbit client to handle the tasks already accessible through the Orbit Web interface. In this cookbook we will only explain how to configure the network interface through the command line, but you can find more details of the command line Orbit in its dedicated manual.
To configure the network interface, perform the following steps:
Login locally.
cautionFor senhasegura OVAs version 3.10 and above, you should login using the following user:
user:
mt4admpassword:
mt4adm
For older versions, contact our Support team.
After the first successful access the immediate change of password of the default user will be requested
Check that the instance contains the binary
orbitwith a simple version check test;$ sudo orbit versionIf the binary is not installed, please contact our support so that we can assist you in updating the instance;
If the binary is installed correctly, let's configure the network interface;
Execute the command
$ sudo orbit networkand answer the questions related to the primary network interface configurationeth0;Execute the command
$ sudo orbit hostnameto change the default hostname of this instance of the senhasegura . You should change its name to create a valid application activation code;At the end, you should receive a success message according to the example;
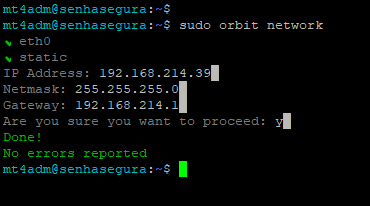
Network configuration example Now that the network interface is properly configured, let's configure the NTP server to correct the server time;
$ sudo orbit ntp --servers=SERVER1,SERVER2 --listen-interface=eth0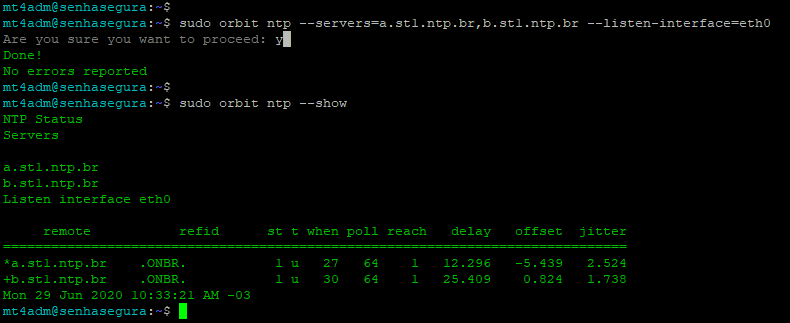
Example of NTP configuration
Updating senhasegura platform
Please keep all your senhasegura instances updated with the lasted stable version published into our official mirrors. Stay familiarized with our published changelogs, where you can find bugfixes, new features, and security, and usability improvements.
Online update
Update the platform using our official mirror so that this instance receives the most up-to-date version of senhasegura ;
cautionIf you are configuring an instance that is part of a cluster, ensure that all instances are properly updated in the same version before starting the cluster.
The sequence of commands below will update the package list, update the Orbit binary and update the platform. A long log output will be displayed and this process may take a few minutes.
$ sudo apt-get update

$ sudo apt-get install orbit-cli

$ sudo orbit upgrade
You will need to restart the instance to ensure that all services use this configured interface.
$ sudo orbit shutdown --rebootWait for the instance to finish the reboot and the system will be available to be accessed by the web interface.
Offline update
To perform the update offline, if the safe does not have Internet access, perform the following steps:
In another station, download the update package:
wget
https://repo:HpRh0BVMNVAq\@repo.senhasegura.com/buster-se-update.sh
Upload the downloaded file to the senhasegura server (e.g. via scp):
scp buster-se-update.sh mt4adm\@10.0.0.1:/home/mt4admPerform the package installation:
sudo bash buster-se-update.sh
In this step, remember to make the confirmations when they are requested in the terminal.
Affinity Portal
This chapter follows the steps for the successful activation of the application, as well as an explanation of the use of the Affinity portal for partners and specialized users.
It is important to note that this step focuses on activating the license to use the application and not the activation of the application itself, i.e. it confirms that the activation requestor has the right to use the application as well as deliver the services according to what was contracted.
To activate the senhasegura license, follow these steps:
In your Web browser enter the host IP senhasegura configured in the previous step to access the activation screen of your instance.
An activation code will be displayed as in the figure ativacao-0001. Copy this code.
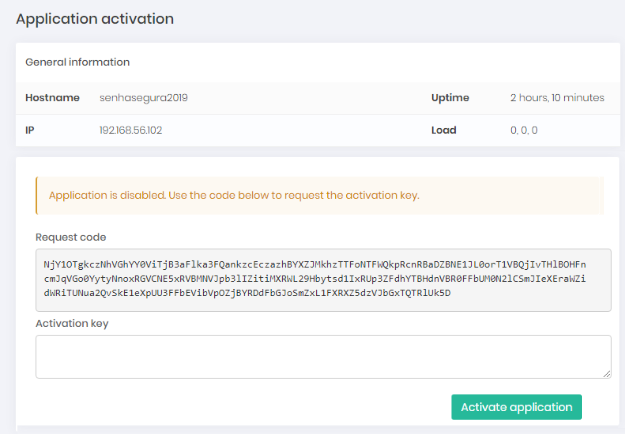
Instance activation code In another window of your browser, access the senhasegura activation portal, Affinity1 and use your username and password to authenticate yourself.
infoIf this is your first access to Affinity Portal, you will need to change your password before access can be granted. Check the criteria for creating the password
Once authenticated access the menu: Activation ➔ Activation ➔ Activation license
In this first step select for which resale this license is destined and click the arrow button to continue.
Then choose the type of license that will be used, which can be:
POC: Used in presentations and proofs of concept. It should preferably have a short expiration time and fewer devices and users.
Production: Used in real customer productive environments. Its term and quantities are adequate to the client's reality.
And click the arrow button to continue.
cautionThe licensing of the senhasegura depends on the contract signed between the client and MT4 Technology, this license will directly influence the number of users and devices that can be inserted in the application.
infoIt is also possible to request new license types. Please contact the support team for more details.
In the next step define the license details in the fields:
Account: Select the organization to which the license will be destined
Start of term: The date on which the terms of this license begin to be valid. The date set in this field is the calculation parameter for the Expiration days field
Expiration days: Period of validity of the license.
Block senhasegura after license expiration: Check this option if you want the senhasegura to be blocked after the license expires. If this option is not selected, the senhasegura will display only a renewal alert.
cautionFor licenses of the type POC it is not possible to interact with this option, since this type of license already performs the automatic blocking
.
Paste the activation code into the Request code genered by Orbit field
Select the senhasegura modules that will be available in this instance.
Click on Generate Activation Key. The result will be the issuance of a license key. Besides the key you can see a detailed summary of the license with information such as: who made the request, start date of validity of the license, the expiration date calculated, if it has the automatic block set, the modules of the instance among other details.
Copy the license code issued in the Activation code field and paste it in the activation screen of your instance.
After entering the key click on the Activate application button.
cautionAfter entering the activation key it is necessary to click the Activate application button only once, if by accident you click the button without having a valid license filled, the application will be inactivated and you will need to perform the process again.
From this moment on the senhasegura will be active and the chosen modules will be available for the instance.
After the license activation it will be possible to make the application activation.
After performing the application activation, explained in the following section, you can access the menu: Orbit ➔ Application ➔ Licenses and check license details, such as: name of the instance client, calculation of expiration date, licenses assigned to this instance, modules granted and other details.
Activation of the senhasegura application
This section will describe how to make the activation of the application, this will make the senhasegura ready for us to perform the first activities in the system.
To activate the application access the IP or host URL again through your web browser and follow these steps:
On the login screen, enter the default administrator user credentials.
infoFor senhasegura 3.10 and above, the login information is:
user:
adminpassword:
5enh@5eGuR@!
For previous versions of senhasegura , you should contact the support team to require the admin password.
After the first successful access you will be asked to immediately change the password of the default user.
Once successfully authenticated and the password change is done, the Orbit options panel and the Wizard settings screen will be displayed.
Wizard
In a new instance of senhasegura , right after activation through license, you will be presented with the first step of the Orbit Wizard. If for any reason you wish to review the Orbit Wizard procedures, a button on the main panel can be used to restart your steps.
First step
In this first step you can define: Hostname, Application URL, Application title, Default language, Timezone, NTP settings e DNS Settings.
When you change the Hostname, the server will be restarted.
When changing the NTP server, the NTP service will be restarted and users will be logged off.
When changing the DNS server, make sure that the senhasegura will have access to the other network elements already configured.
Second step
In the second step you can configure Backup. If you want the backup to be exported to a remote disk partition, you can configure it through CIFS, NFS or direct sending using RSYNC. The partition type is specified later in the section "Managing disks and partitions".
There is no need to install third-party software to manage the backup. And this attitude should be discouraged, as the platform is homologated with restricted third-party software.
If the client has a backup agent, we indicate that this agent is installed on the server that contains the remote folder that will receive the backup copy.
If the system loses access to the remote backup directory a notification via email and SIEM will be sent.
Third step
In this third and last step you can add the instance to an existing cluster.
The senhasegura cluster is restricted to the database. However, you can configure that the files generated by the instance are also replicated to other members.
If you have chosen to configure the cluster, the database service will be restarted.
The steps of this third step of the Wizard can be summarized as follows:
If you want to activate the cluster, select yes in enable high availability and/or Contingency environment
By default, the senhasegura will only replicate the database layer between the instances. If you also want to replicate the video files, select yes in enabling replication of session files
In the members of the section members of the High Availability or Contingency environment, indicate the IP of the cluster members.
cautionThe order of these members should be the same among all members
If cluster members are in different datacenters, select yes from the the members are in different datacenters field; Configure latency between clusters within field options Latency between nodes. Also, set the instance indicator in the Network segment field if you have more than one instance of senhasegura in the same datacenter.
Click Finish for Orbit to apply cluster settings
You will be directed to the replication status screen to check the results.
When you finish the third step, wait for the instance to normalize and you will be ready to activate the application and use all functionalities!
Activate the application
After passing through the Wizard steps follow the instructions:
Then Click on the button Settings.
You can also access the settings screen via the side menu by clicking on Settings ➔ Application
In the application settings screen (ativacao-0006-enus) select the option Enable application.
On this screen you can also change the title and URL of the application, as well as email for notifications. These and other application settings items will be dealt with in future chapters.
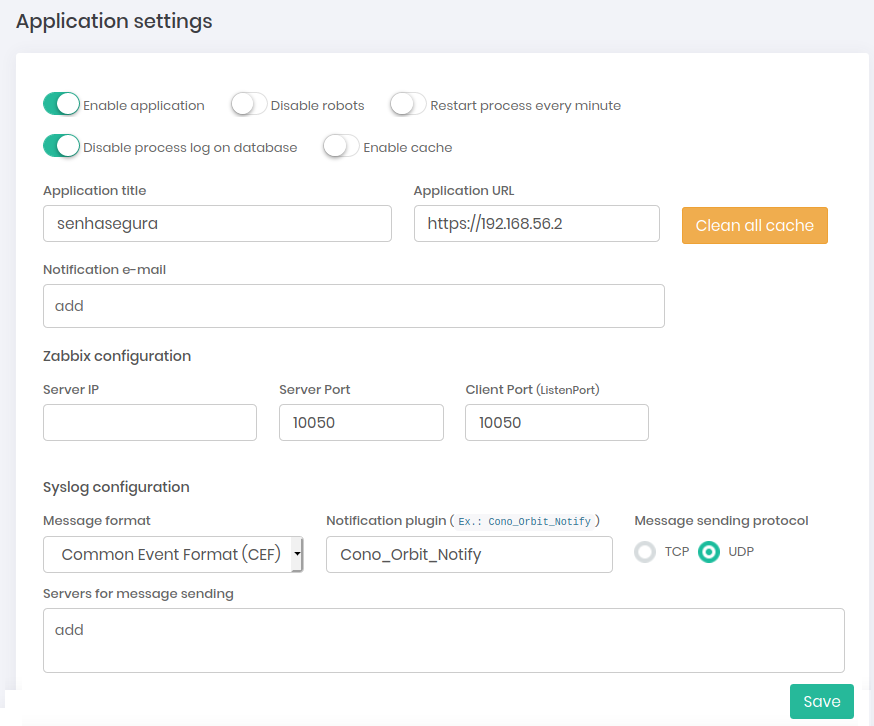
Application settings screen Click on Save.
From this moment the application is ready to start the first configurations and activities. Logout and access the solution again so that the other modules can be loaded.
Creating a new administrator user
After activating the application it is important to create another administrator user, this will prevent that the access to the application is interrupted in the hypothesis that some problem occurs that leads the user already configured to be blocked or his password is lost.
To create a second administrator user you can follow one of the paths below:
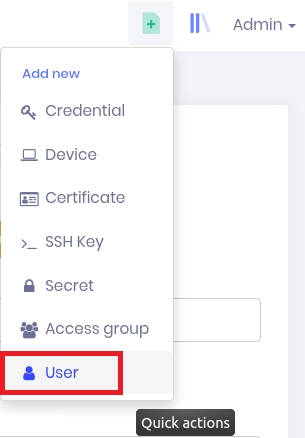
Through the quick actions button
In the top corner of the application click the Quick Actions button and select the User option as in the image segundoadmin-0004-enus.
Through the side menu
In the side menu (segundoadmin-0001-enus) click on the shield icon and follow the path Settings ➔ System users ➔ Users.
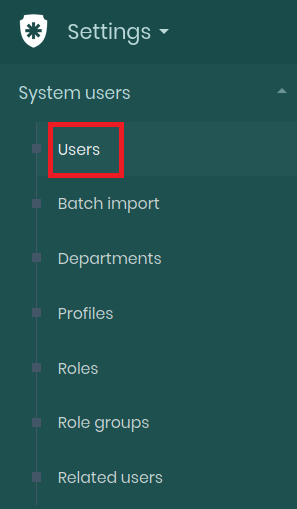
Click the Show actions button in the report and then click the New option.
New user
Both paths led to the system's user creation form, it is important to fill in the fields carefully as this information will not only be used for system access, but will also be present in some module reports that may influence audit activities. To fill out the form:
General Tab
In the field Name fill in the name of the new user who will use this user to access the system.
In the field Email enter the email to contact this user, if desired since this field is not required.
cautionThe e-mail must be filled in if you want the system to create a password and send it automatically to the user. No administrator knowledge of the password is required.
Then enter in the Username field the login name of this user.
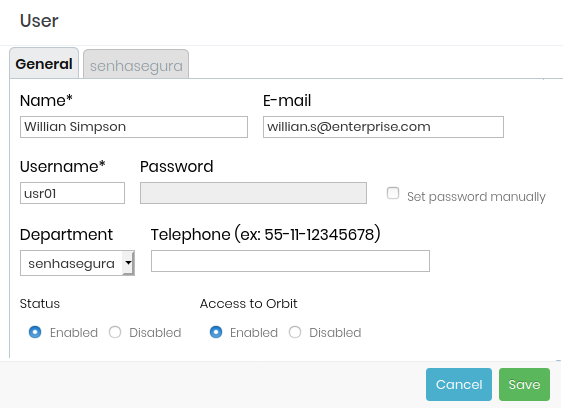
User registration form Click the Set Password Manually checkbox next to the Password field and register a password for this user.
The password to be registered must follow a policy that requires that the password has:
at least 10 characters
at least one lower case letter
at least one capital letter
at least one symbol
Numbers that are not in numerical sequence
If you choose not to register your password, do not click the checkbox.
cautionIf a password is not registered, the user will receive a password generated by the system in his e-mail.
If the e-mail has not been filled in the user will not receive the password thus making access to the application impossible.
In the field Department select the department of the employee, if desired since this field is not mandatory.
Likewise, enter the phone number for contacting the employee in the phone field, this is not a required field either.
Select the options in relation to the Orbit.
Status: if you want the user to be active for use select the option Enabled, if you do not select the option Disabled.
Access to Orbit: if you want this user to be able to access and configure Orbit select the option Enabled, if you don't want to select the option Disabled
cautionThis decision is very important due to the criticality that Orbit represents for the application, so select only those users who actually should have access to this module
After entering the desired information go to the next tab:
senhasegura Tab
In this tab will be presented the profiles and access groups that this user can be part of.
In other books, and in the manual it will be better explained what they are and how to create and edit profiles and access groups, for now what you should keep in mind is that these profiles define the levels and amounts of permissions you will receive.
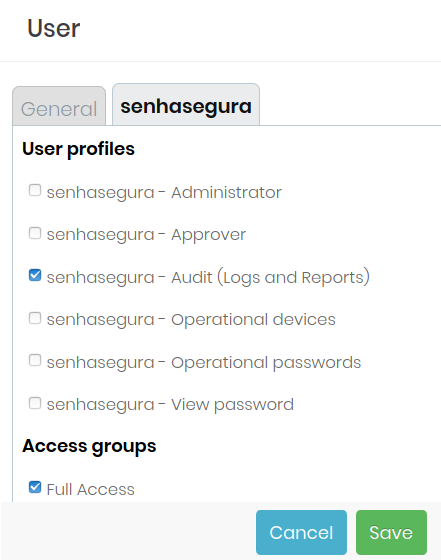
Likewise, access groups define various access permissions that users may receive in relation to different modules of the senhasegura .
The senhasegura has some profiles and access groups registered by default, understand that the profile Administrator is the one with the highest number of permissions, as well as the group Full Access that grants full access to the credentials registered.
So be very careful when selecting these options for any user, make sure that only those who need these privileges have these options set
Select the profiles and access groups you wish to assign to the user and click the Save button.
This way it will be possible to use this user to perform some activities in the application, for this it will be necessary to perform a login with your credentials.
First Log In
The first log in of a user in the senhasegura results in the definition of a new password, since for security reasons the password should be known only by the employee.
In the first log in the user will go through the following steps:
In the login screen enter the credentials defined in the previous registration and click on Login.
Remember to use safe means to pass these credentials on to the user who will use them effectively.
A screen will appear requiring a new password to be set by the user.
Enter the current password, the same one used to login as shown in the image primeiroacesso-0002
Then enter the new password following the password policy described in the box.
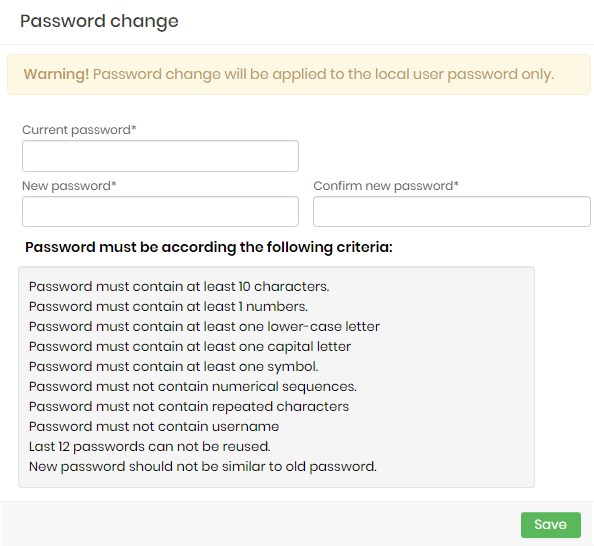
Password change screen Enter the confirmation of the new password
Click the Save button
If the current password entered is correct and the new password follows the standards required by the policy the change will be saved and the user will be redirected to the application.
EULA
If the user who is logging in for the first time has the profile of Administrator and has access to the module Orbit Web he will be automatically redirected to the acceptance screen of the EULA senhasegura .
The screen will display the text of the EULA which are the terms and conditions governing the use of passwords, and it is necessary that at least one of Administrator users with access to the Orbit Web module perform the acceptance of the terms in order to be granted access to the rest of the solution.
After reading the text fill in the fields:
This acceptance will only be made by administrator users who have access to the module Orbit. It must be done again every time the EULA text is updated.
Name: Full name of the user is doing the acceptance;
Email: Email address of the user who is carrying out the acceptance;
Company: Name of the organization that the user who is accepted works for;
Job title: Name of the position that the user who is doing the acceptance, occupies in the organization filled in the previous field.
To see which versions of the EULA have been accepted and which users have carried out the acceptances access the menu: Settings ➔ EULA ➔ Versions.
In this report you will be able to consult when each version was accepted, besides the information entered by the user during the acceptance, it is also possible to consult the IP that he used when he accepted the EULA.
The report action button allows you to see the text of the EULA that was accepted.
Devices, Credentials and their actions
Registering the First Device
Now that the additional settings have been made it will be possible to start using the senhasegura to manage access to devices and credentials.
Devices: are all the items that will be accessed through the passwords such as servers, workstations and others.
To register a device you can follow one of the paths below:
Through the quick actions button
In the top corner of the application click the Quick Actions button and select the Device option.
Through the side menu
In the side menu click on the shield icon and follow the path Devices ➔ Devices. Click the button in the report and then click the New option.
Device registration
Both ways led to the form to register devices in the senhasegura , it is important to fill out the fields carefully as this information will enable access to the devices through the application. To fill out the form follow the instructions:
Tab: Information
Fill in the IP of the device that will be registered.
Fill in the Internal Name.
Insert the device's site.
Select the options: Type, Manufacturer and Model. The senhasegura has pre-registered options to be selected.
infoIf your desired option is not on the list just type in the term, these fields allow the immediate registration in the system of unregistered items, like the figure primeirodispo-0002-enus displays.
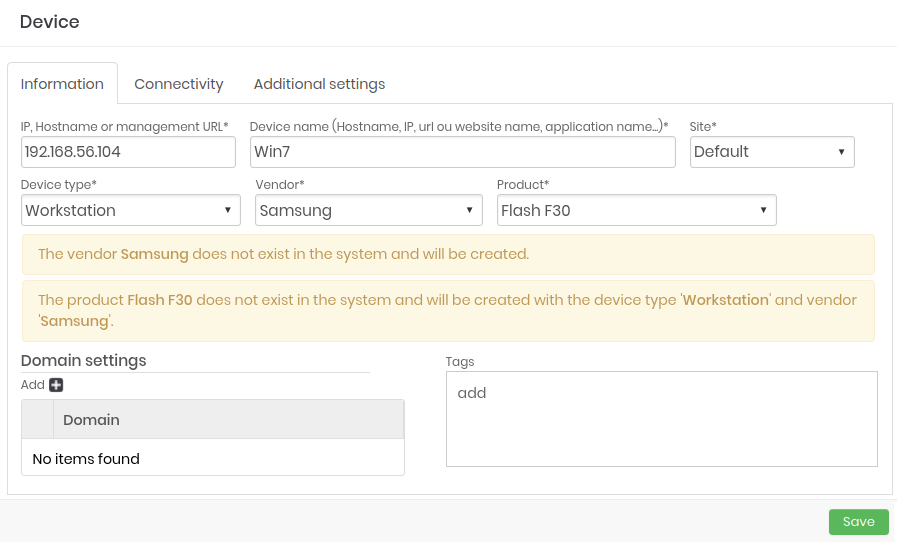
Immediate registration of typed items In the section of Domain settings it will be possible to add the domain to which the device is linked through the Add button.
Tags can also be inserted for the device. This option is not mandatory, but can help in future configurations to create relationships with other devices and modules, we will address the subject of tags in other books and in the manual.
Go to the next tab.
Tab: Connectivity
Select from the list the protocol you want to add to this device.
Enter the number of the port that will be used.
Click Add. At this point the protocol will be set for this device, if you want to add other protocols in the same way.
Test the added connections by clicking the Test button.
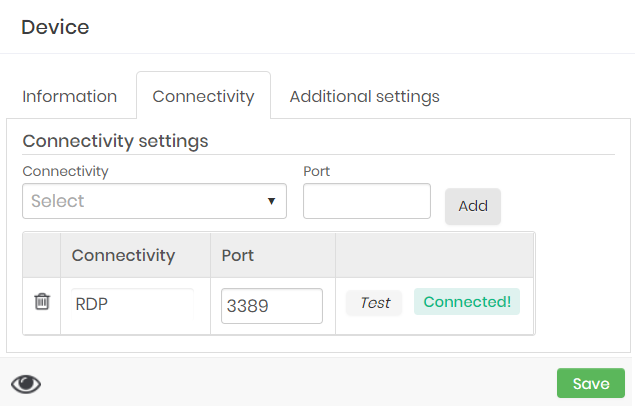
Test connectivity with the device Please note that the connection to the chosen protocol was successfully made through the status flag next to the button.
Click on Save.
After you finish the settings and click the save button the device will be included in the report.
It is not necessary to fill in the tab Additional Settings at the moment, but if you wish to do so, consult the Operations Administrator's Manual.
Adding First Credential
In this section we will present the steps necessary to insert a credential to be managed by the senhasegura
After inserting a device in the senhasegura , access to it through the solution cannot be made before the access credential to it is inserted in the system.
The vault can also protect these credentials from being accessed and used by users who do not have privileges.
To insert a credential follow the instructions:
Through the quick actions button
In the top corner of the application click the Quick Actions button and select the Credential option.
Through the side menu
On the side menu click on the shield icon and follow the path PAM ➔ Credentials ➔ All. Click the Show actions button on the report and then click the New option.
Credential registration
Both ways led to the form to insert credentials in the senhasegura it is important to fill the fields carefully as this information will enable access to the devices using these credentials or using them in other ways. To fill out the form follow the instructions:
Tab: Information
Fill in the username used to access the machine. According to the picture primeiracrede-0001-enus
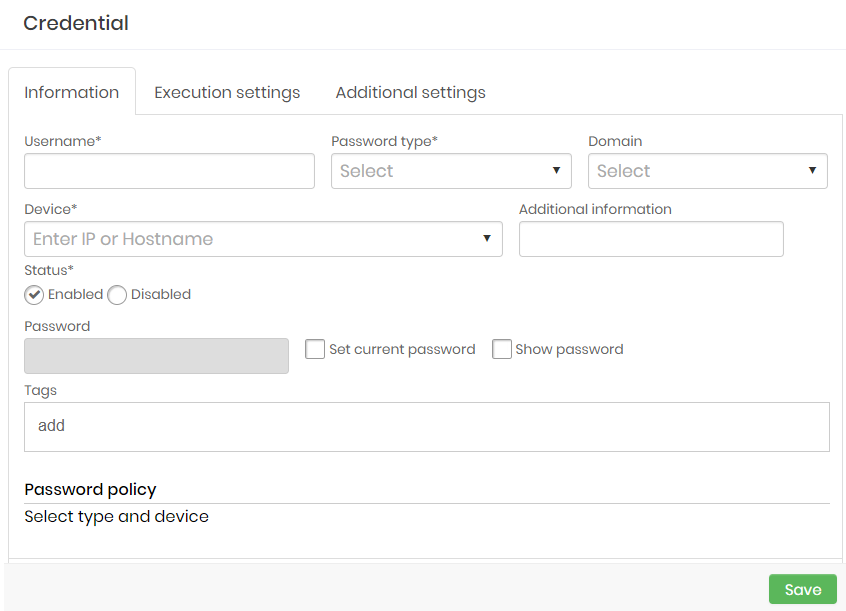
Credential registration form Choose the Password type that this credential uses.
Local administrator: The credential has a password that belongs to a local administrator.
A local administrator is a user account that only has administrative access in one device.
Local user: The credential has a password of a local regular user.
A local user is a user account used to authenticate just in one device but without any administrator privileges.
Domain user: The credential has a password of a user belonging to the domain.
A domain user is a user account used to authenticate in different devices of the same domain. When the password from this type of account is changed the setting is replicated in all the domain's devices.
Choose or fill in the IP or hostname of the device to which this credential will grant access.
In some systems the login can be done using only the username for authentication because of that the field password is not required.
cautionIf the password is not filled in it will not be possible to perform a Password view or Start a session in a system that requires the filling of a password for authentication.
However if you wish to fill in the password follow the instructions: Select the Set current password box and enter the password that this credential uses to access the device.
Click on Show password if you want to check the characters you have typed.
infoYou can also generate a password if the credential does not already have one. The system will create a password following the appropriate password policy for the previously selected password type.
You can also enter the password later by editing the credential.
Click Save to finish.
From now on the credential can be managed and protected by the vault.
To understand how to fill in the other tabs of the credential registration form please refer to the Operation Administrator Manual.
Performing a session and a password view
Now that the senhasegura already manages and stores the device's credential, it is possible to allow users to view the credential's password or start a session.
Start a session
Now that you have registered a credential of the device it is already possible to perform the first session, to do so follow the instructions:
Access the credentials report along the way: PAM ➔ Credentials ➔ All
Choose the credential you wish to use to conduct the session:
You can use the filter at the top of the report and find the credential through yours: Code, Device, Type, Site, Domain and other items.
When you find the desired credential click on the Start Session button for it.
The session will begin immediately.
Performing a password view
It is also possible to perform a first password view, to do so follow the instructions:
Access the credentials report along the way: PAM ➔ Credentials ➔ All
Choose the credential you want to view the password:
You can use the filter at the top of the report and find the credential through yours: Code, Device, Type, Site, Domain and other items.
When you find the desired credential click on the View password button for it. The options to view the password will be displayed:
View Password: This mode allows the password to be viewed completely by increasing or decreasing its level of clearness.
Copy Password: This mode copies the password to your clipboard without you needing to view or be aware of its content
Spell password: This mode displays the password character by character.
After choosing a mode the password can already be viewed. Remember that the mode display has a set time, if you do not choose the mode in time will need to click again on the button View password and choose the credential and click the button View password again.
Password withdrawals and sessions can also be used to test the effectiveness of a password change, which we will learn in the following section.
Performing a password change
In this section you can understand how to execute a password change for a credential.
As previously mentioned, the credentials are very important since they make it possible to use the devices managed by the senhasegura . Therefore many of them need to be changed in some situations, but changing each one manually takes a lot of time.
senhasegura provides a function for automatic exchange of passwords through the solution, to request a password exchange you must first configure the exchange in the credential, follow the instructions:
Enabling password change on credential
Access the credentials report along the way: PAM ➔ Credentials ➔ All.
Choose the credential you wish to use to conduct the session:
You can use the filter at the top of the report and find the credential through yours: Code, Device, Type, Site, Domain and other items.
When you find the desired credential click on the More Actions button for this one.
Then click on the Edit option.
Go to the Execution Settings guide.
Select the checkbox Enable automatic change as in the figure trocasenha-0001-enus.
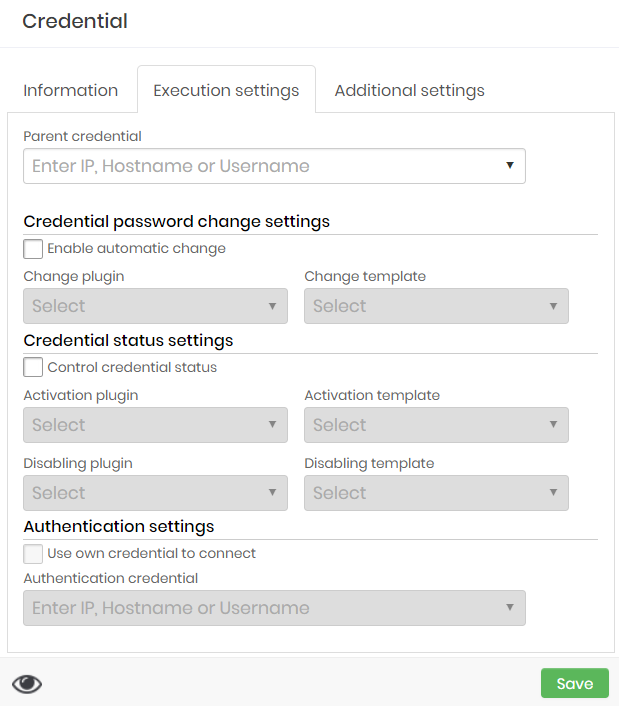
Edit the run settings tab to enable automatic password exchange Then the Plugin that will be used to execute the exchange.
Choose which Template2 will also be used.
Parent credential
If you wish to use a Parent Credential to perform the exchange select from the options the credential you wish to use as a parent to perform the exchange on child credential.
Parent credentials and child credentials are credentials that, for some reason, need to have the same password.
They can be related to each other, that is, they are the same credential used for different services.
They are not related, that is, they are different credentials, but with the same password.
When you change the password of the parent credential automatically, the child credentials will have their passwords changed to the same value as the parent credential.
infoChanging the password for the parent credential will trigger the child credentials changing process. Each child credential can have different executors and templates. In other words, senhasegura will apply the parent password to the child credentials respecting which plugin and template each child credential uses.
You can even keep your child credentials without a plugin and template. In this case, senhasegura will only update the credential password value in senhasegura without starting a remote exchange process.
When using the exchange schema with parent and child credentials, the parent credential will always be the first to be recycled and persisted in senhasegura .
cautionRemember to adjust the number of asynchronous executors for password change operations to the number of credentials managed by senhasegura .
Authentication settings
To execute the change you need to use an authentication credential to perform the procedures that can be:
Use own credential to connect: Select this box if you want the exchange to be executed by the very credential that will take over the exchange.
Authentication Credential: Select a different credential that you want to use to execute and perform the password change.
This means that another credential registered in the senhasegura will authenticate itself on the device to perform the change of the credential you want to change the password.
After entering the desired settings click on Save.
This way the credential will already be available in the exchange request report to be selected.
Requesting a password exchange
For the exchange to be executed, you must follow the instructions:
Access execution reports: Executions ➔ Request password change.
Pick the credential you want the password changed:
You can use the filter at the top of the report and find the credential through yours: Code, Device, Type, Site, Domain and other items.
When you find the credential click on the corresponding checkbox, as in the figure trocasenha-0002-enus.
Click on the Request password change button.
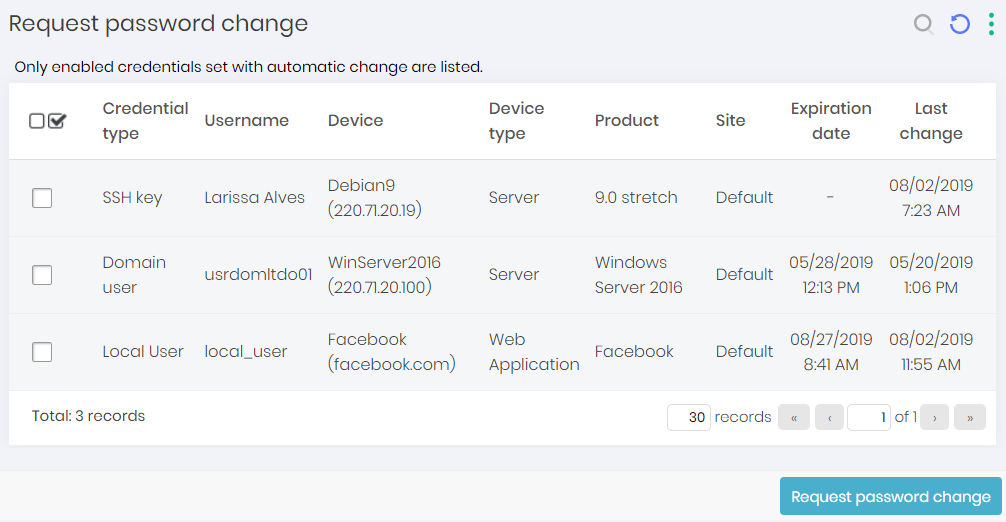
Example of credential selection for exchange
Checking the change
To verify that the exchange has been successfully performed, follow the instructions:
After verifying the request follow it to the operations report through the menu: Executions ➔ List operations. If the listed operation is in color:
Green: the change was successfully performed
Red: some error occurred and the change was not performed
Click the View attempts button if you want to understand how the process was executed.
infoTo validate the effectiveness of the execution perform a password view and see if there was in fact a swap.
Notifiers
The purpose of the Notifications module is to manage notifications sent through senhasegura . Some actions performed on senhasegura can be configured to send notifications to chosen users to reporting about a change or an alert.
These notifications can be an error, certificate expiration or an access request. Administrators can know what is happening on the system and be aware of any suspicious behavior or error occurred.
The senhasegura allows the notifications to be sent through email, SMS or screen, it can be organized by type and you can also choose which users will receive that type of notification.
Registering notifications
To register a new notification type, follow these steps:
Access the menu: Settings ➔ Notifications ➔ Settings
Click on the New notification register action button, and fill in the following fields:
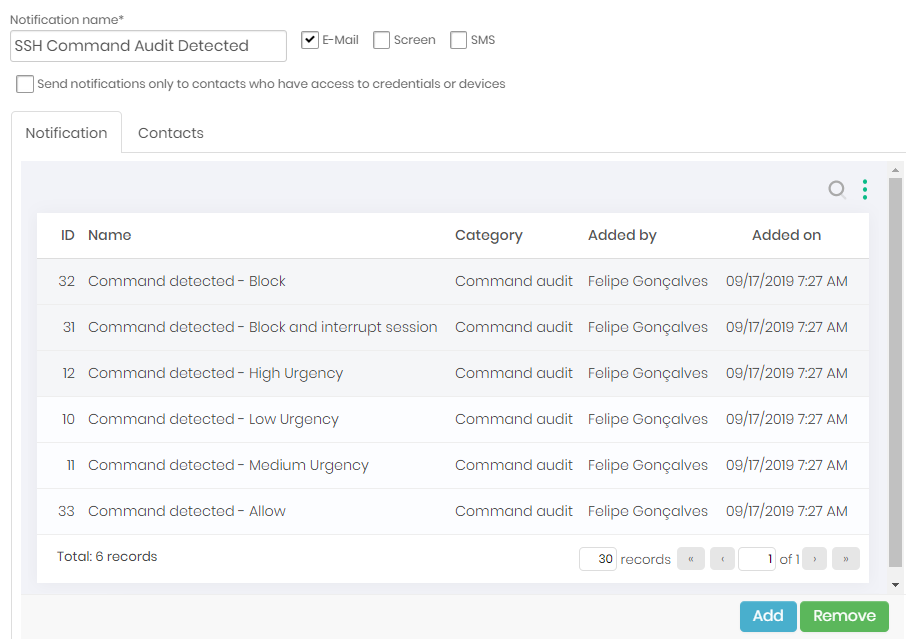
Field Description Notification name Name that will identify the notification. Ex: SSH Command Audit Detected Email If this option is selected, notifications will be sent via email Screen If this option is selected, notifications will be will be displayed on the user’s desktop screen like a pop-up SMS If this option is selected, notifications will be sent via SMS Send notifications only to contacts who have access to credentials or devices If this option is selected, the notifications are sent only to contacts who have access to credentials or devices infoThe following sections of this chapter will teach you how to configure the three types of notification.
On the Notification tab, click on the Add button to include a notification type
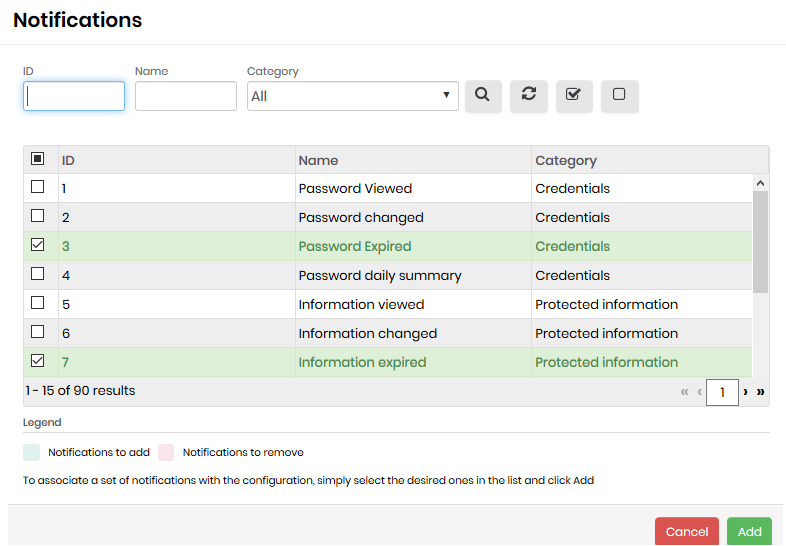
List of notification types Select the notification types to be added
Click on the Add selected button
Notification configured with types of alert On the Contacts tab, click on the Add button to include the contacts that will receive the registered alerts
Select the contacts to be added
Click on the Add selected button
Click on the Save button to complete the registration.
Sent notification list
To list sent notifications, follow this step, access the menu: Settings ➔ Notifications ➔ List sent.

On this screen, you can view the list of sent notifications along with a series of information, such as sending date, notification method, message content and number of notified users.
In addition, you can perform some operations such as approving or disapproving access and viewing the notification details.
Texts
You can also modify all text templates used by senhasegura into its notifications. To view notification texts, follow these steps:
Access the menu: Settings ➔ Notifications ➔ Texts
On this screen, you can set up the notification texts sent by email to approvers and requesters, as well as automatic notifications from senhasegura . To modify a text:
Click on the Edit text button from the text to be modified.
Modify the desired data
Click on the Save button to complete the changes.
Configuring an E-mail account
Setting an E-mail Account on senhasegura will allow the application to send notifications about a password change, before a Certificate expiration or even suspect access, for example.
It's important to include valid email addresses because some access requests will be notified to the approvers through email, and likewise the requesters will receive the request disapproval or approval reply.
Setting up an SMTP account
Through the Settings ➔ Notifications ➔ E-Mail ➔ SMTP configuration menu you have access to all registered accounts on the platform.
Like all system entities, accounts can be active or inactive. But in the case of SMTP accounts there must be a standard account. This default account will be the account that platform will use.
Access the new account registration through the New report action, and fill the blanks.
Account Name: Account name for internal identification and distinction from other registered accounts;
Enabled: Flag it if this account is active for use on the platform;
Sender email: The email account that will be used to perform the sending;
Reply email: The email account that will receive the reply from the recipient;
Reply email (return path): Return email for error cases;
Confirmation email: Email for reading confirmation;
Default Account: Flag whether this account will be the platform's default sending account;
Send read receipt: Flag whether to forward the read confirmation request;
Force settings use: Flag whether the email accounts set to Reply , Return-Path, and Confirmation must be maintained or can be changed by the module that performs the submission;
Enable footnote: Flag it if the automatic footer should be added in the email body;
SMTP server settings:
SMTP Host: Serveraddress that hosts the SMTP service;
Port: SMTP service port;
Use a safe connection: Flag i if the sender should be done by protocols with encryption;
Secure connection type: Type of cryptography. TLS or SSL;
Use authentication: Flag whether the server requires authentication or not;
Ignore certification error: Ignore SMTP server certificate errors;
Credential for authentication: The credential to be used for authentication on the SMTP server;
When you save the registration the account will be available for submission testing and also for platform use.
Perform the submission test using the Send test mail record action. Fill in the recipient, subject, and email body fields and click Send . The email is immediately sent.
Emails forwarded by the platform can be seen in the report accessible in Notifications ➔ Email ➔ Outbox.
Setting up a POP3/IMAP account
Through the Settings ➔ Notifications ➔ E-Mail ➔ IMAP Configuration / POP3 menu. In this report, you have access to all inbox accounts that senhasegura will interact with. Through the New report action you can register new accounts.
Account name: Name of the sign-in account for the identification of the record on the platform;
Keep copy on server: Flag whether the received email should have a copy in the POP3/IMAP server inbox;
Automatic check: Flag whether the platform should read inbox messages automatically;
Enabled: Flag whether the account is active for use on the platform;
Server configuration:
Address: Server address that hosts the POP3/IMAP service;
Protocol: Inbox read protocol. POP3 or IMAP;
Skip certificate: Flag whether inbox server certificate errors should be ignored;
Credential for authentication: The credential that will be used for authentication;
Port: The port on which the service is running on the target server;
Use safe connection: Flag it if communication with the service should be done using encryption;
Secure connection type: Type of cryptographic algorithm.
Then Save the registration.
Screen notifications
The senhasegura screen notifications allow the administrator to create notifications that will be displayed on the user desktop like a pop-up.
Besides the previous notifications that had pre-configured messages and types, screen notifications can be elaborated by the administrator.
It's possible to create a personalized text, choose the display time and the user that will be notified.
Registering screen notifications
To register a new screen notification type, follow these steps:
Access the menu: Settings ➔ Notifications ➔ Screen notifications ➔ New notification
Enter a title for the notification identification on the platform
Type the message you want to be displayed in the text of the notification
Determine the duration time, in milliseconds, in which the notification will be displayed
Select the system users who will have the notification displayed on their screens
Click on Save
Screen notifications list
To list the screen notifications, follow these steps, access the menu: Settings ➔ Notifications ➔ Screen notifications ➔ List notifications.
On this screen, you can view the list of sent screen notifications along with the text of the notification, such as the author and date of display.
The senhasegura provide details about the screen notifications that can be used on an audit process such the time the notification was displayed for each user and the time each user closed the pop-up; this becomes evidence that the user was indeed notified by something and helps with the nonrepudiation of the information.
Click on the View notification by user register action button to see all the details.
Parameters
It's possible to adjust default settings of the screen notifications through the menu: Settings ➔ Notifications ➔ Screen notifications ➔ Parameters. On this screen will be possible to configure the display time, the maximum number of screen notifications and more.
Integration with SMS service
senhasegura has an integration with Zenvia3 SMS service.
To be able to use this feature it is necessary to have an account Zenvia.
To configure this feature access: Settings ➔ System parameters ➔ System parameters and click on the tab Notifications, as in the picture notificacoes-0005-enus.
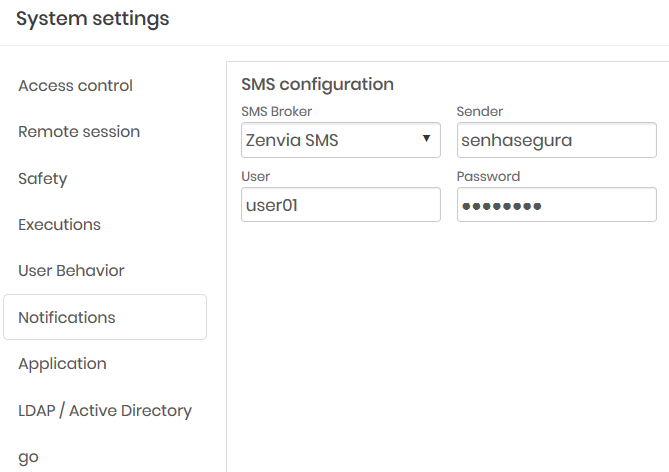
In the field SMS Broker select the service Zenvia
Then enter the name that will appear in the message in the Sender field
In the field User enter the username of the user Zenvia who will be responsible for notifications
Enter the password of this user in the field Password and finally click Save.
With this setting you will need to adjust an SMS notification for this:
Create a new notification by logging in: Settings ➔ Notifications ➔ Settings
Enter a name for the notification and select the option SMS as in the figure notificacoes-0006-enus
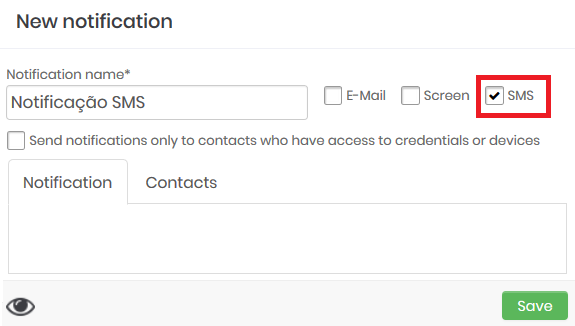
SMS notification register Click the Save button and wait for the window to reload. If it closes, go back to the notification registration report and click the action button Edit of the newly created notification.
Select the type of Notification that will be sent by SMS. The types of notifications that can be sent by SMS are:
Access behaviour
Workstation alerts
Expiration of certificates
About remote sessions
Password operations
Password backup
Audit of commands
Equipment connectivity
About protected information
Operations with credentials
Monitoring
Then in the tab Contacts add the users who should receive these notifications by SMS
cautionUsers selected to receive this type of notification must have their mobile phone numbers registered in the senhasegura .
Click on Save to finish.
Conclusion
By completing this book you will have acquired the knowledge to perform the basic activities of the system and move on to more complex ones.
If you wish to continue learning how to use the system in the best possible way, please ask our support team for our available documentation according to your profile and needs:
Manuals
Technical Specification
User Manual
Tool Administrator Manual
Operation Administrator Manual
Auditor Manual
Developer Manual
Guides
- Monitoring Guide
Cookbooks
- Getting Started Cookbook
- https://affinity.senhasegura.io
For more information on password exchange templates see the "Password Change Cookbook"↩